Info Favorites Register Log in
myArmoury.com Discussion Forums

Forum index Memberlist Usergroups Spotlight Topics Search


myArmoury.com is now completely member-supported. Please contribute to our efforts with a donation. Your donations will go towards updating our site, modernizing it, and keeping it viable long-term.
Last 10 Donors: Anonymous, Daniel Sullivan, Chad Arnow, Jonathan Dean, M. Oroszlany, Sam Arwas, Barry C. Hutchins, Dan Kary, Oskar Gessler, Dave Tonge (View All Donors)

Forum Index > Historical Arms Talk > My latest project: heater shield Reply to topic
This is a standard topic  
Author Message
Eric Allen


Location: Texas
Joined: 04 Feb 2006

Posts: 208

PostPosted: Wed 13 Sep, 2006 7:08 pm    Post subject: My latest project: heater shield         Reply with quote

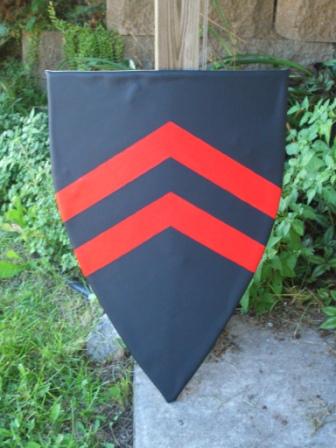
Now that my wife and I have moved into a larger apartment (with a garage I can turn into a workshop!), I took the opportunity to get to work on some of the projects I've wanted to do for a while now. This is the first project of mine, a "heater" shield.

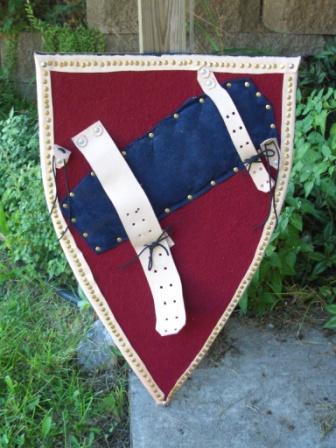
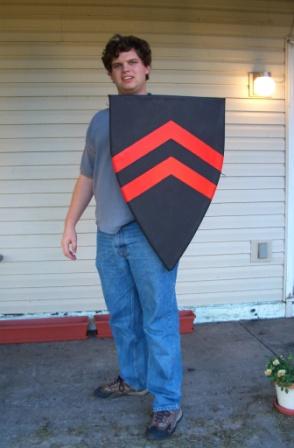
Its made of birch plywood 1/2" thick with a slight curve applied (I was shooting for more curvature, but hey), backed with wool felt and faced with 6-7 oz leather. The arm pad is seuede with cotton batting underneath (I was hoping for wool, but cotton is cheap). Final dimensions are approximately 20.5 x 29.5 inches.
As you can see, I did make some modern allowances, such as the use of modern upholstery tacks to help attach the leather to the back (I originally had fewer, strategically placed tacks, my wife "filled it in" because she thought it looked nicer that way).
The face was designed by me and painted by my wife.

Still some adjstments to be made. The main enarm needs to be trimmed shorter, and I need to add the guige (the attaching points are on there, as you can see). Other than that, I'm pretty happy with it.

My next project is to make a kite shield Happy


 Attachment: 56.38 KB
heater_face_resized.JPG
face of the shield

 Attachment: 62.66 KB
heater_back_resized.JPG
back of the shield

 Attachment: 49.67 KB
heater_scale_resized.JPG
just for scale
View user's profile Send private message
Patrick Kelly


Location: Wichita, Kansas
Joined: 17 Aug 2003
Reading list: 42 books

Spotlight topics: 2
Posts: 5,739

PostPosted: Wed 13 Sep, 2006 8:00 pm    Post subject:         Reply with quote

Very nice first project! Is this for use in some kind of re-enactment activity or a "just becuase I want it" kind of thing?
View user's profile Send private message AIM Address
Eric Allen


Location: Texas
Joined: 04 Feb 2006

Posts: 208

PostPosted: Wed 13 Sep, 2006 8:49 pm    Post subject:         Reply with quote

Partly "just because I want it," partially for lugging around ren-faires.
Mostly so I have something of proper size an weight for when I get around to flourishing and working at the pell when I get the inkeling to take a break from longsword to do sword-and-shield.
View user's profile Send private message
Al Muckart


Location: NZ
Joined: 27 Dec 2005

Posts: 309

PostPosted: Thu 14 Sep, 2006 12:42 am    Post subject:         Reply with quote

Nice work!

Out of curiosity did you base the lace-on attachments for the straps on a particular historical example? I ask because one of these is fairly high on my project list and I don't know a great deal about the details of the strapping.

Thanks for sharing.

--
Al.
http://wherearetheelves.net
View user's profile Send private message Visit poster's website
Greg Griggs


Location: Houston, TX
Joined: 31 Aug 2005

Spotlight topics: 1
Posts: 214

PostPosted: Thu 14 Sep, 2006 6:09 am    Post subject:         Reply with quote

Nice job. Looks great. That birch isn't the easiest to bend is it, eh? Adjustments, never ending aren't they.......
Not one shred of evidence supports the notion that life is serious.
View user's profile Send private message
Ken Rankin


Location: North Carolina
Joined: 12 Mar 2006

Posts: 69

PostPosted: Thu 14 Sep, 2006 7:25 am    Post subject:         Reply with quote

Hi!

The shield looks great! How did you curve your wood? In my shield I had a small press that I used (but plywood bends easier) and I used 2 pieces of plywood instead of a single piece. Love to hear the mechanics of the construction!

Ken
View user's profile Send private message Yahoo Messenger
Eric Allen


Location: Texas
Joined: 04 Feb 2006

Posts: 208

PostPosted: Thu 14 Sep, 2006 9:31 am    Post subject:         Reply with quote

Ken Rankin wrote:
Hi!

The shield looks great! How did you curve your wood? In my shield I had a small press that I used (but plywood bends easier) and I used 2 pieces of plywood instead of a single piece. Love to hear the mechanics of the construction!

Ken


I used two 1/4" birch plywood sheets, slathered ample amounts of wood glue between them, and lashed them to a tree with truck tie-downs Wink

Honestly, the adjustable enarms via lacing, I "borrowed" that idea from looking at the shields offered by The Mercenary's Tailor. I played wround with a few different methods of attaching them to the shield itself--carriage bolts, screws, nails--I ultimately wanted to try rivets, but the closest store that sells half-way decent rivets is in Des Moines. On this one, I ultimately ended up with these things I found at Lowes. I think they're called "screw posts" or something like that. Its a post, threaded internally, and it has a short screw that fits in it. I used them even though they're not in the least bit hisotrical because they sort of look like rivets, but you only need a screwdriver, and they were readilly available.
View user's profile Send private message
Greyson Brown


Location: Windsor, Colorado
Joined: 22 Nov 2004
Reading list: 15 books

Posts: 813

PostPosted: Thu 14 Sep, 2006 10:51 am    Post subject:         Reply with quote

Eric Allen wrote:
On this one, I ultimately ended up with these things I found at Lowes. I think they're called "screw posts" or something like that. Its a post, threaded internally, and it has a short screw that fits in it. I used them even though they're not in the least bit hisotrical because they sort of look[/] like rivets, but you only need a screwdriver, and they were readilly available.


I think those are also called Chicago Rivets. I have used them from time to time, and my father has used them on several things. I do find that they can come loose on some projects, but a shield does not flex much, so it probably won't be an issue.

-Grey

"So long as I can keep the path of honor I am well content."
-Sir Arthur Conan Doyle, The White Company
View user's profile Send private message
Ken Rankin


Location: North Carolina
Joined: 12 Mar 2006

Posts: 69

PostPosted: Thu 14 Sep, 2006 12:45 pm    Post subject:         Reply with quote

Eric Allen wrote:
[ On this one, I ultimately ended up with these things I found at Lowes. I think they're called "screw posts" or something like that. Its a post, threaded internally, and it has a short screw that fits in it. I used them even though they're not in the least bit hisotrical because they sort of look[/] like rivets, but you only need a screwdriver, and they were readilly available.


Have you thought about using carriage bolts and acorn nuts? Also, you can get copper rivets at stores like Tractor Supply, which I don't know if you have in your area, it's a feed type store that carries alot of supplies for horses and the like. Also, I found some really cool brass tacks at Lowe's as well and used them on mine.

Ken

Here's a pic of my fantasy shield:
View user's profile Send private message Yahoo Messenger
Eric Allen


Location: Texas
Joined: 04 Feb 2006

Posts: 208

PostPosted: Thu 14 Sep, 2006 1:15 pm    Post subject:         Reply with quote

I've used carriage bolts in the past. I did like the fact that if you don't peen them, the enarms are removable/replacable (I used this feature when the cheap cruddy straps on of the padded sparring shields I made a couple yars ago broke. Simply uncrewed the nuts and replaced the strap). They don't really have that "look" I'm going for, though. I keep them in mind as a sort of "if all else fails" contingency.

Hmm, I'll have to check out one of the local farm supply stores for rivets. I'm in the middle of Corn Country, there's plenty of them around here. Thanks for the tip, Ken. If I can find good ones, I may use rivets for the upcoming kite shield. Leather stores like Tandy Leather also sell rivets and tools to set them.

Oh, and here's a general tip: if using nails to secure the straps, make sure the nails are of a relatively soft metal. I tried roofing nails at one point. Yeah, that was a mild disaster.
View user's profile Send private message
Chuck Russell


Location: WV
Joined: 17 Aug 2004
Reading list: 46 books

Posts: 936

PostPosted: Thu 14 Sep, 2006 5:21 pm    Post subject:         Reply with quote

good job
View user's profile Send private message Yahoo Messenger MSN Messenger
Allan Senefelder
Industry Professional


Location: Upstate NY
Joined: 18 Oct 2003

Posts: 1,563

PostPosted: Thu 14 Sep, 2006 6:33 pm    Post subject:         Reply with quote

Isn't there a thread around here somewhere in which Chuck mentioned a source for clinch nails for making shields?
View user's profile Send private message Visit poster's website


Display posts from previous:   
Forum Index > Historical Arms Talk > My latest project: heater shield
Page 1 of 1 Reply to topic
All times are GMT - 8 Hours

View previous topic :: View next topic
Jump to:  
You cannot post new topics in this forum
You cannot reply to topics in this forum
You cannot edit your posts in this forum
You cannot delete your posts in this forum
You cannot vote in polls in this forum
You cannot attach files in this forum
You can download files in this forum


All contents © Copyright 2003-2024 myArmoury.com — All rights reserved
Discussion forums powered by phpBB © The phpBB Group
Switch to the Basic Low-bandwidth Version of the forum