| Author |
Message |
|
Jonathan Hodge
Location: East Tennessee Joined: 18 Sep 2015
Posts: 132
|
 Posted: Tue 05 Apr, 2016 11:47 am Post subject: Pollaxe stop-guard Posted: Tue 05 Apr, 2016 11:47 am Post subject: Pollaxe stop-guard |
 |
|
|
Needing some advice about how to craft a stop guard for my pollaxe project. What gauge sheet metal is typically used, and how would one typically dish the guard and roll the edge?
|
|
  |
 |
Sean Flynt

|
 Posted: Tue 05 Apr, 2016 12:38 pm Post subject: Posted: Tue 05 Apr, 2016 12:38 pm Post subject: |
 |
|
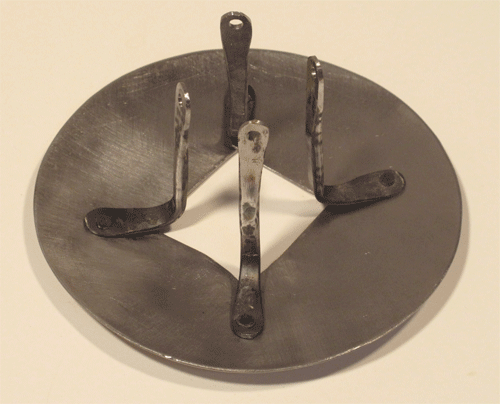
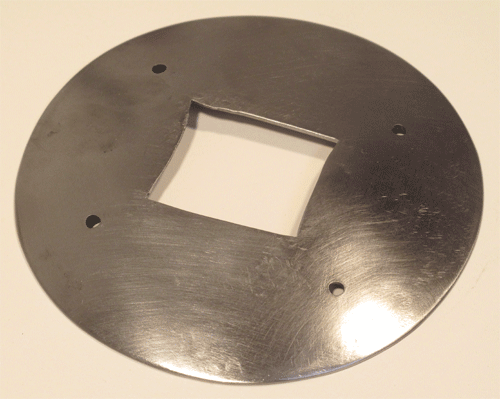
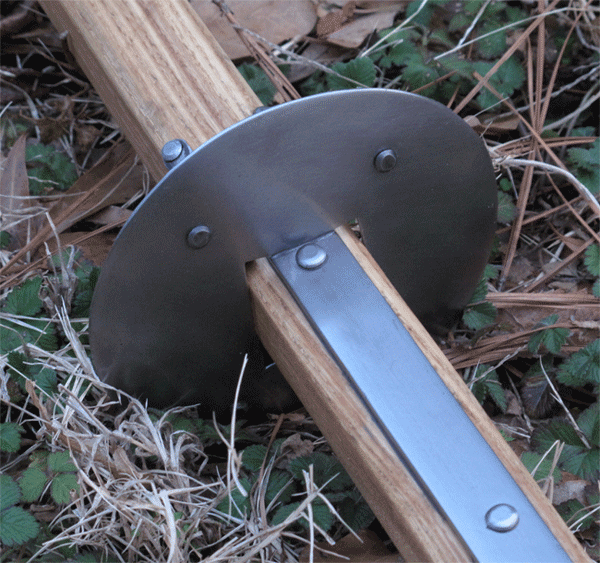
I cut a rondel out of 16 ga. mild steel, marked the center with a punch and marked off a square the same shape as the haft. Then I just held it at a slight angle on my little anvil and went around it in courses with the hammer, working in toward the center as a spiral but stopping at the marked square. In other words, it's a shallow dome with a flat top. No heat. I was striking just above the point of the steel's contact with the anvil. I was using the rounded-over "flat" face of an ancient small ball peen hammer. That left very few marks and required no planishing. If you want/need to planish, get a cheap hand weight with rounded ends, strip off the rubber covering and clamp vertically in a bench vise. Rest the plate on that as you smooth it with the polished flat of the peening hammer.
I just lightly sanded the top side and underneath. I screwed up the opening. Measure twice, cut once, right? I didn't want to start over so I gambled and heated the sides of the opening I cut too deep and spread those inward with my hammer and anvil. Worked perfectly. I didn't inlet the langets, so my original plan was to to cut a channel for the langets in the rondel. But this is what I ended with due to the measuring error and it's perfectly sound.
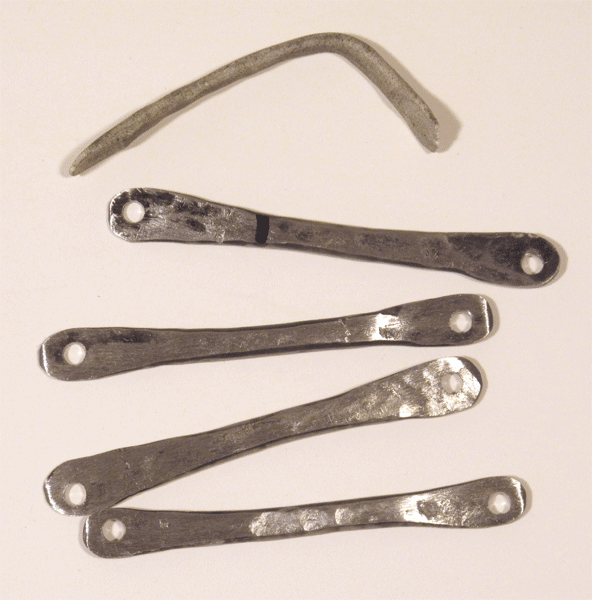
I used some cheap steel rod for the rondel supports. I modeled them in Sculpey first. Yes, that pitiful gray object at the top of the image below used to be beautiful white Sculpey. That worked perfectly. I cut the rod, heated the sections to orange and shaped them hot. Then I just drilled and riveted them to the rondel. I attached them to the haft using modified nails but didn't think that was secure enough so I added JB Weld to the nail holes. I left the supports rough but I sanded them lightly just so they weren't black from the hot work.
 Attachment: 106.02 KB Attachment: 106.02 KB

 Attachment: 178.59 KB Attachment: 178.59 KB

 Attachment: 103.2 KB Attachment: 103.2 KB

 Attachment: 209.5 KB Attachment: 209.5 KB

-Sean
Author of the Little Hammer novel
https://www.amazon.com/Little-Hammer-Sean-Flynt/dp/B08XN7HZ82/ref=sr_1_1?dchild=1&keywords=little+hammer+book&qid=1627482034&sr=8-1
Last edited by Sean Flynt on Tue 05 Apr, 2016 12:54 pm; edited 2 times in total
|
|
   |
 |
|
Jonathan Hodge
Location: East Tennessee Joined: 18 Sep 2015
Posts: 132
|
 Posted: Tue 05 Apr, 2016 12:47 pm Post subject: Posted: Tue 05 Apr, 2016 12:47 pm Post subject: |
 |
|
Thank you Sean! I assumed I would have to use a ball pein hammer to dish my shape, but had yet to figure out how I would planish it without more expensive equipment. Excellent suggestion. I've got some old leather scraps laying around that I could use to line the underneath as you've noted. I'm still a little confused about the attachment with modified nails. I'll see if I can do some searching and dredge up the thread you've mentioned.
Last edited by Jonathan Hodge on Tue 05 Apr, 2016 1:04 pm; edited 1 time in total
|
|
  |
 |
Sean Flynt

|
|
   |
 |
|
Jonathan Hodge
Location: East Tennessee Joined: 18 Sep 2015
Posts: 132
|
 Posted: Tue 05 Apr, 2016 1:03 pm Post subject: Posted: Tue 05 Apr, 2016 1:03 pm Post subject: |
 |
|
|
Thanks for that. Next question set: any trusted source for that mild steel stock, and if it's what I think it is, it may be shareable without heat? And any tips for cutting a clean circle out of that 16 gauge plate?
|
|
  |
 |
Sean Flynt

|
|
   |
 |
|
Jonathan Hodge
Location: East Tennessee Joined: 18 Sep 2015
Posts: 132
|
 Posted: Tue 05 Apr, 2016 4:38 pm Post subject: Posted: Tue 05 Apr, 2016 4:38 pm Post subject: |
 |
|
|
As usual, you've provided great knowledge and resource. Thanks so much!
|
|
  |
 |
|
|

