Needing some advice about how to craft a stop guard for my pollaxe project. What gauge sheet metal is typically used, and how would one typically dish the guard and roll the edge?
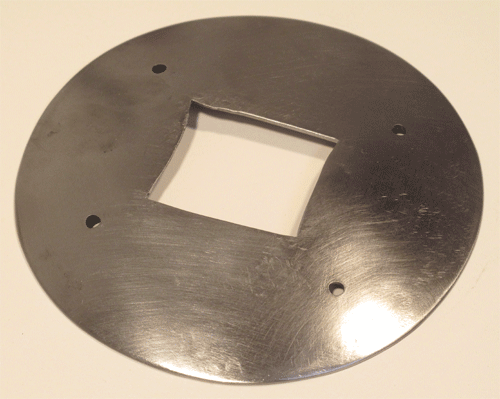
I cut a rondel out of 16 ga. mild steel, marked the center with a punch and marked off a square the same shape as the haft. Then I just held it at a slight angle on my little anvil and went around it in courses with the hammer, working in toward the center as a spiral but stopping at the marked square. In other words, it's a shallow dome with a flat top. No heat. I was striking just above the point of the steel's contact with the anvil. I was using the rounded-over "flat" face of an ancient small ball peen hammer. That left very few marks and required no planishing. If you want/need to planish, get a cheap hand weight with rounded ends, strip off the rubber covering and clamp vertically in a bench vise. Rest the plate on that as you smooth it with the polished flat of the peening hammer.
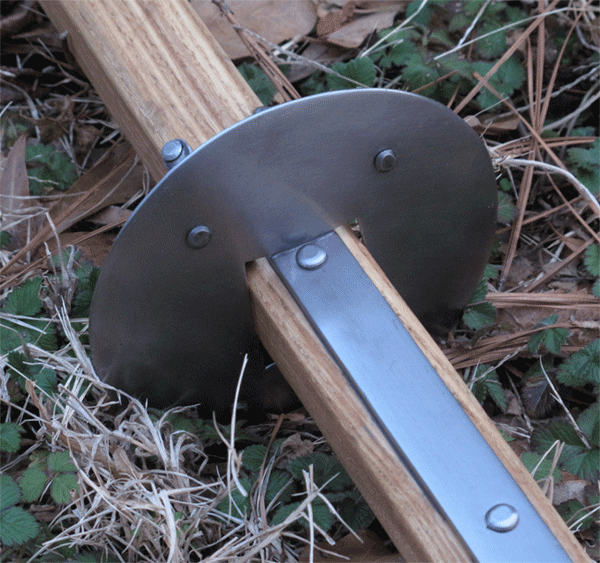
I just lightly sanded the top side and underneath. I screwed up the opening. Measure twice, cut once, right? I didn't want to start over so I gambled and heated the sides of the opening I cut too deep and spread those inward with my hammer and anvil. Worked perfectly. I didn't inlet the langets, so my original plan was to to cut a channel for the langets in the rondel. But this is what I ended with due to the measuring error and it's perfectly sound.
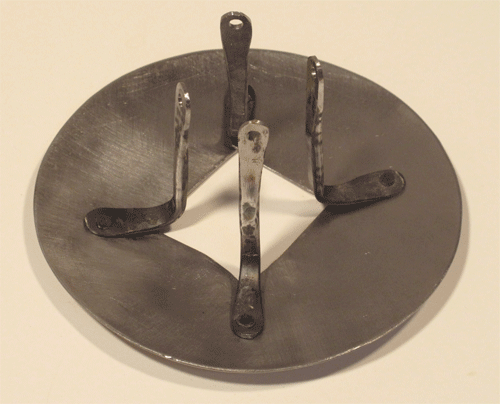
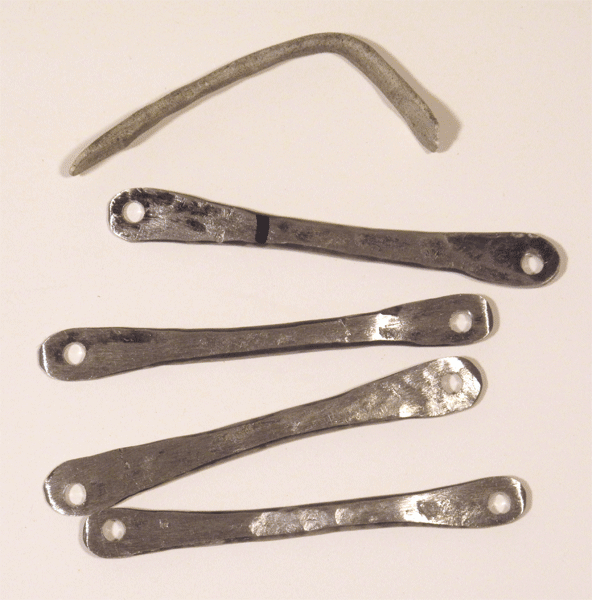
I used some cheap steel rod for the rondel supports. I modeled them in Sculpey first. Yes, that pitiful gray object at the top of the image below used to be beautiful white Sculpey. That worked perfectly. I cut the rod, heated the sections to orange and shaped them hot. Then I just drilled and riveted them to the rondel. I attached them to the haft using modified nails but didn't think that was secure enough so I added JB Weld to the nail holes. I left the supports rough but I sanded them lightly just so they weren't black from the hot work.
 Attachment: 106.02 KB

 Attachment: 178.59 KB

 Attachment: 103.2 KB

 Attachment: 209.5 KB

I just lightly sanded the top side and underneath. I screwed up the opening. Measure twice, cut once, right? I didn't want to start over so I gambled and heated the sides of the opening I cut too deep and spread those inward with my hammer and anvil. Worked perfectly. I didn't inlet the langets, so my original plan was to to cut a channel for the langets in the rondel. But this is what I ended with due to the measuring error and it's perfectly sound.
I used some cheap steel rod for the rondel supports. I modeled them in Sculpey first. Yes, that pitiful gray object at the top of the image below used to be beautiful white Sculpey. That worked perfectly. I cut the rod, heated the sections to orange and shaped them hot. Then I just drilled and riveted them to the rondel. I attached them to the haft using modified nails but didn't think that was secure enough so I added JB Weld to the nail holes. I left the supports rough but I sanded them lightly just so they weren't black from the hot work.


Last edited by Sean Flynt on Tue 05 Apr, 2016 12:54 pm; edited 2 times in total
Thank you Sean! I assumed I would have to use a ball pein hammer to dish my shape, but had yet to figure out how I would planish it without more expensive equipment. Excellent suggestion. I've got some old leather scraps laying around that I could use to line the underneath as you've noted. I'm still a little confused about the attachment with modified nails. I'll see if I can do some searching and dredge up the thread you've mentioned.
Last edited by Jonathan Hodge on Tue 05 Apr, 2016 1:04 pm; edited 1 time in total
Edited to show some details. I see that I actually just used some mild steel rod for the supports.
Thanks for that. Next question set: any trusted source for that mild steel stock, and if it's what I think it is, it may be shareable without heat? And any tips for cutting a clean circle out of that 16 gauge plate?
i get all that sort of thing from Lowes. you might be able to flatten the rod cold as long as you don't have to keep hitting it. otherwise, get a MAPP gas torch kit if you don't already have propane. i use propane, but it can be tedious getting stuff hot enough to become plastic. look for a cheap throatless shear. it will let you do this sort of light work with ease. just draw the shape and cut away! here's what i use: http://m.harborfreight.com/throatless-shear-3...20provided
As usual, you've provided great knowledge and resource. Thanks so much!
Page 1 of 1
You cannot post new topics in this forumYou cannot reply to topics in this forum
You cannot edit your posts in this forum
You cannot delete your posts in this forum
You cannot vote in polls in this forum
You cannot attach files in this forum
You can download files in this forum
All contents © Copyright 2003-2006 myArmoury.com — All rights reserved
Discussion forums powered by phpBB © The phpBB Group
Switch to the Full-featured Version of the forum
Discussion forums powered by phpBB © The phpBB Group
Switch to the Full-featured Version of the forum