| Author |
Message |
|
Radovan Geist
|
 Posted: Mon 03 Feb, 2014 11:01 pm Post subject: DIY: swordbreaker paryying dagger Posted: Mon 03 Feb, 2014 11:01 pm Post subject: DIY: swordbreaker paryying dagger |
 |
|
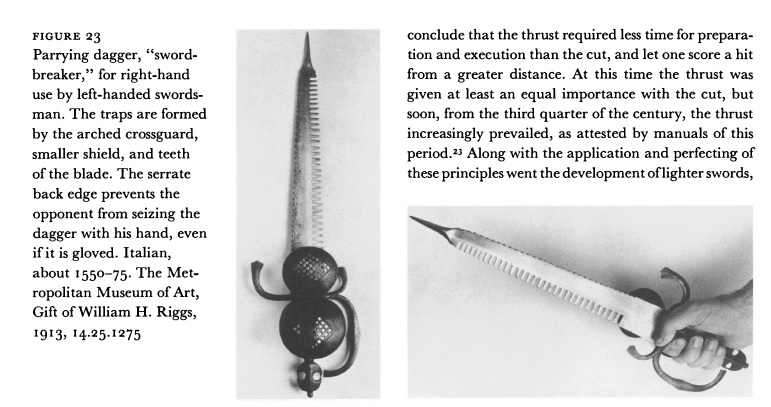
Yesterday I´ve finally received my bunch of blades from heat-treat, so the fun begins. One of the first project I´ll work on is a parrying dagger / sword breaker, inspired by a piece in the NY Metropolitan Museum.
I´ve found the picture from Leonid Tarassuk´s "Some Notes on Parrying Daggers and Poniards" and I was really intrigued by it´s complexity - it seems that the makers did everything possible (with given level of technology) to make this dagger an efficient blade-catcher. It has the downward curved crossguard, downward turned shell-guard, and the teeth on the true edge. With another shell-guard and the arched crossguard to protect the hand, and the serrate false edge, and the reinforced point it is an interesting beast (and a challenge to make:))
First picture shows the original. I wanted to make an exact copy, but could not find many more details. So in the end I had to go with an "inspired" piece, and maybe, some time later when I manage to get more info, I will make another, more accurate one.
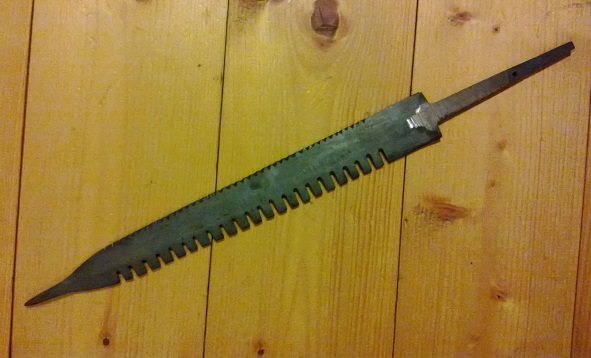
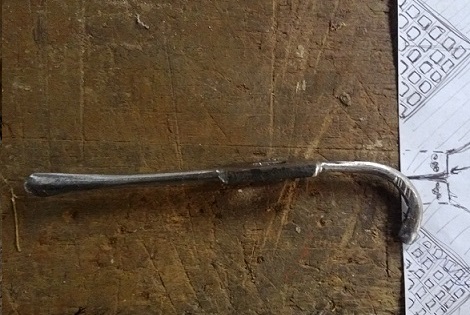
It has all started with cutting the blade some two months back. It´s 40 cm long and 3.5 cm wide at the crossguard. It´s 5 mm thick, thinning down to 2.5 mm close to the reinforced point, which is 5 mm thick again. The true edge has a row of teeth, 14 - 10 mm deep and 3 mm wide; serrate false edge was hand-filed. Blade has a lenticular cross-section, but it´s not made sharp on any of the sides (serrate edge is 3-2 mm thick to allow file-work, true edge is 1 mm thick as I intend to use this for fencing trainings).
All work was done with an angle grinder, hand-files, small belt grinder (only for removing scratches from grinding ) and sand-paper. Finished piece was sent to a professional company for heat treatment, and then came the difficult part - I had to wait two long months:)
Blades arrived yesterday, so I took a quick picture - that´s No. 2. Now the fun begins:)
 Attachment: 106.44 KB Attachment: 106.44 KB
Attachment: 89.43 KB
|
|
  |
 |
|
Radovan Geist
|
| Posted: Sun 09 Feb, 2014 11:27 pm Post subject: |
|
|
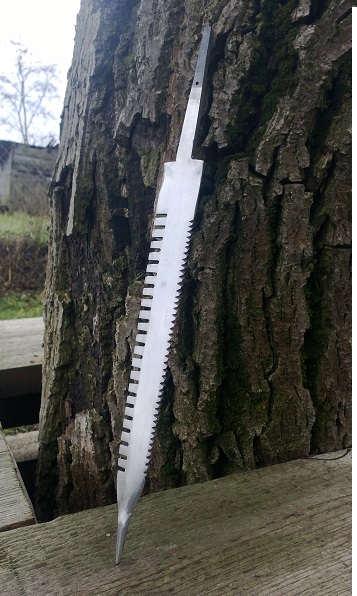
I was working on on another projects, so I have only managed polishing the blade. First, I had to remove hammer marks (as the blade had to be straighten after normalizing), which I did with the belt grinder, working super-slow and cooling the blade regularly.
Then I have polished it by hand with sand-paper, ending with a very fine grit. I´d say that so far it´s coming quite nice. Next step - the crossguard.
Attachment: 117.48 KB
|
|
|
|
|
|
Radovan Geist
|
| Posted: Mon 10 Feb, 2014 11:42 pm Post subject: |
|
|
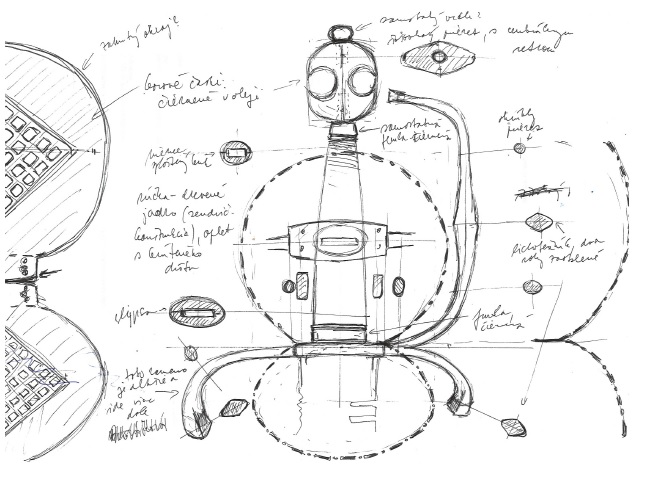
I usually don´t have much time to spend in the workshop during the work-week, so I´ve only made a simple concept drawing in 1:1 scale, which will help me to keep overall proportions on the crossguard and the handle. Of course, it´s only done by hand, so excuse its too many imperfections 
Here it goes, I would welcome any suggestions or advises.
Attachment: 99.55 KB
|
|
|
|
|
P. Frank

|
| Posted: Mon 10 Feb, 2014 11:52 pm Post subject: |
|
|
I cannot quite put my finger on it, but I find this piece intriguing somehow. Would hate to have to face it
Can't wait to see how yours turns out.
|
|
|
|
|
Kai Lawson

|
| Posted: Tue 11 Feb, 2014 7:34 am Post subject: |
|
|
Look at that sweet little pommel on the original! It's got medial ridges, cutouts and circular shaping--like a set of pincers glued together. The whole piece has an air of the fantastic about it, with a prickly blade and a beefy hilt. I'm diggin' this. Good choice!
"And they crossed swords."
--William Goldman, alias S. Morgenstern
|
|
|
|
|
|
Radovan Geist
|
| Posted: Sun 23 Feb, 2014 11:59 pm Post subject: |
|
|
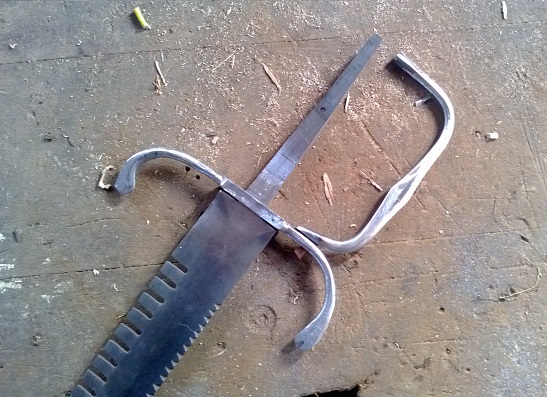
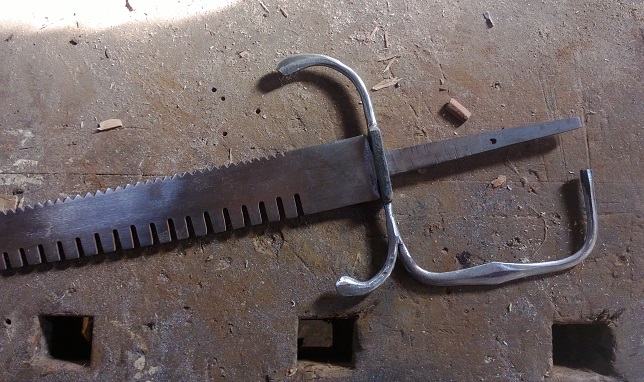
There has been some progress on this one too, so here it goes:
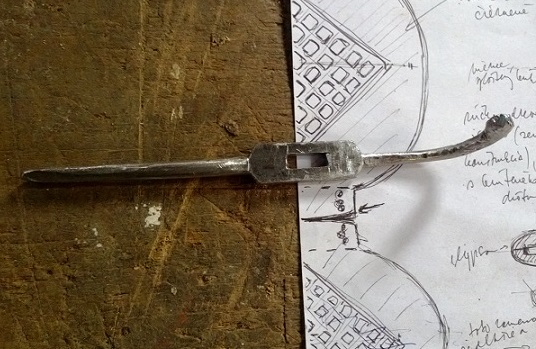
1. I have cut a crossguard from a piece of mild steel and shaped it roughly with an angle grinder. A tang hole has been drilled and shaped by hand with files. Pic.1&2 show it with one side already bent.
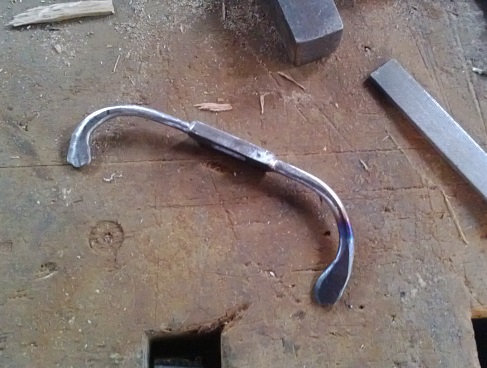
2. I needed to flatten the terminals, so they were heated with a gas torch, hammered and shaped with the angle grinder and files. Pic 3 shows it with one side already shaped, the other half-finished. On pic 4 it´s nearly finished & fitted to the blade.
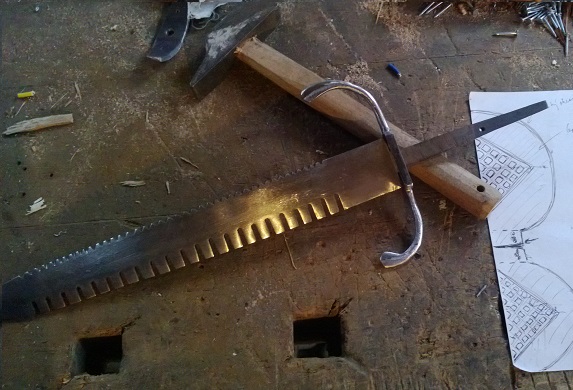
3. Next came the loop-guard. It was cut from the mild-steel, shaped and bent to fit the cross-guard (pic 5 shows the planned final setting). (EDIT - I have just realised that I have confused the sides when making this picture - the loop-guard will be attached to the shorter side of the cross-guard, of course! )
4. Then it was welded to the cross-guard. This part was much painstaking, as I can only use electrical welding and I´m really not good at it, so I had to re-work it several times (pic. 6)
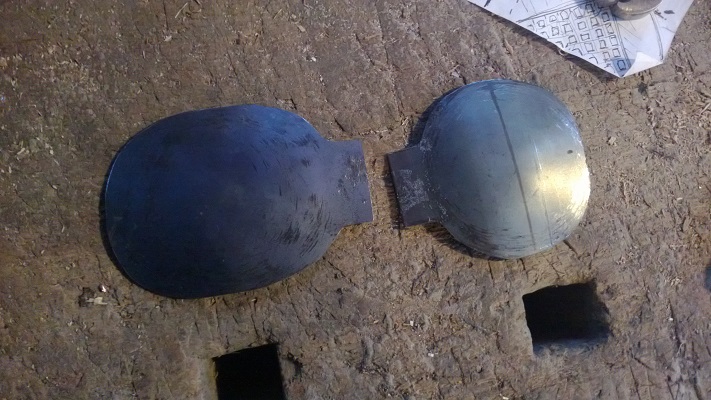
This is where I got stuck for now, as I don´t have a good sheet of steel for shell-guards. It needs to be at least 2 mm thick (or even 3 mm) as it would have to withstand sword hits without any additional support.
Attachment: 85.43 KB
Attachment: 104.44 KB
Attachment: 88.92 KB
Attachment: 110.89 KB
Attachment: 128.76 KB
Attachment: 140.64 KB
|
|
|
|
|
|
D. S. Smith
Location: Central CA Joined: 02 Oct 2011
Posts: 236
|
| Posted: Mon 24 Feb, 2014 12:19 am Post subject: |
|
|
|
Very cool project, I can't wait to see how it turns out. I agree with Kai, even the original in the photo looks straight out of a Hollywood steampunk type movie.
|
|
|
|
|
|
Radovan Geist
|
| Posted: Mon 03 Mar, 2014 11:06 pm Post subject: |
|
|
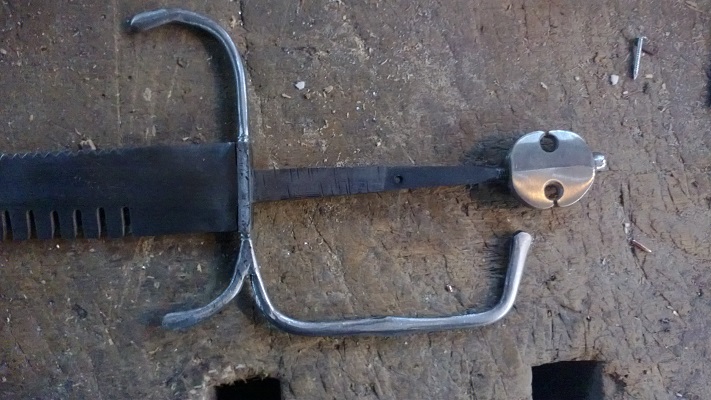
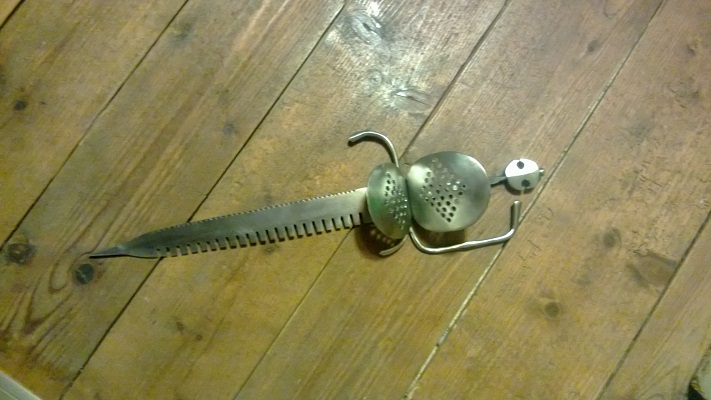
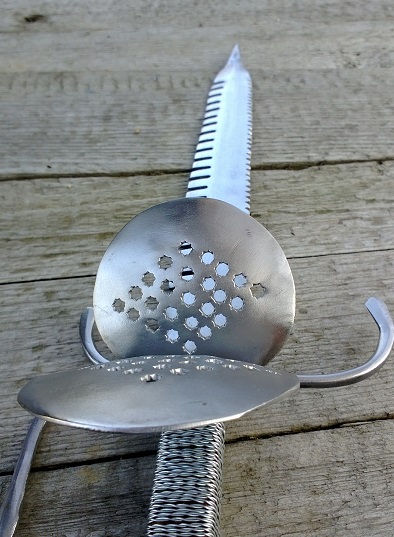
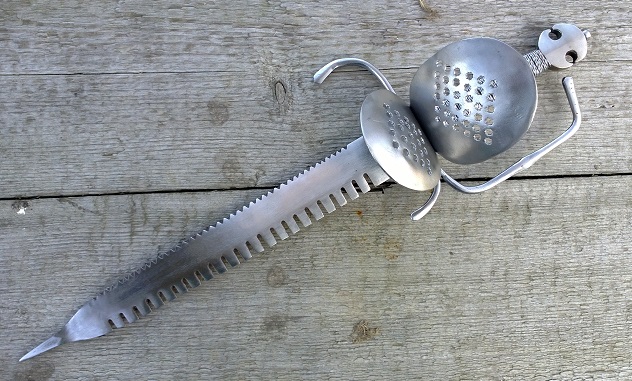
let me share some new updates. the project is nearing its completion, so here it goes:
- I have cut a pommel from a piece of mild steel, drilling a tang-hole and two decorative holes. Then I have shaped it with angle grinder, files and sanding paper to a kind of flat hexagonal cross-section with central ridge. Unfortunately I did not have a camera with me, so I can only show a nearly-finished piece (picture 1)
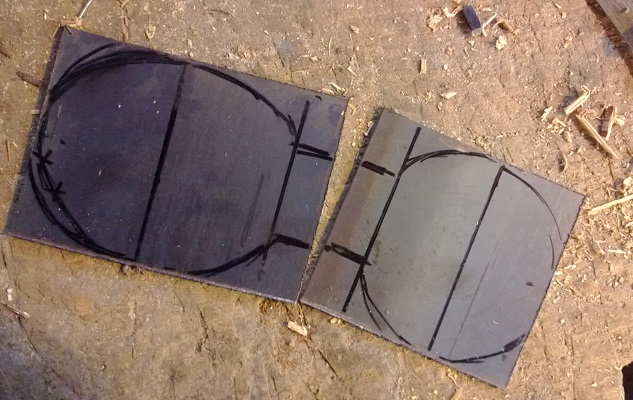
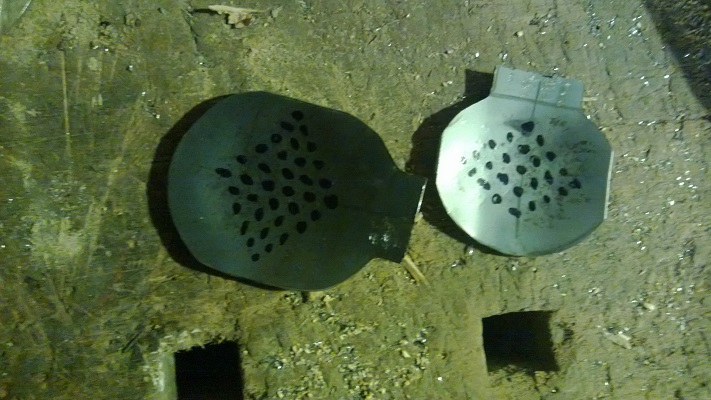
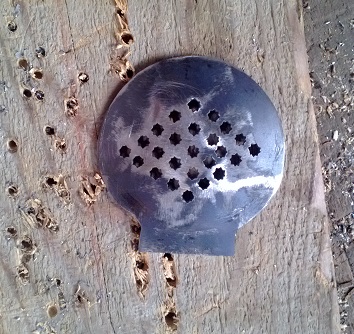
- next 4 pictures show the work on plates. they we cut from 2mm steel plate ( had to buy a piece of 1x2 meters, so there is plenty of it left for other projects:)) , shaped and dished. Then I´ve drilled holes (I shall really get a stand drill machine otherwise I could never achieve an even alignment with this number of holes....) and shaped each one with a file. Originally I was planning for square shapes, but at the last moment I´ve changed my mind and made them into small stars. No specific reason, I just like it that way.
- after that it was all cleaned and polished, plates were riveted together and riveted to the crossguard. So the only thing missing is the handle. I will probably make it with a wire-grip to fit the dagger to one of my end 16th cent. side-swords. the last pictures shows it after provisional assembly. It was taken indoors, in poor light and just with my cellphone camera, so it´s quite crappy...
Originally I was planning to blacken these parts in oil, as is probably on the original. But I have to think it over - it would fit better to that side-sword without blackening. Well, I have at least one week to decide before I get to my workshop again, so we will see...
Attachment: 135.61 KB
Attachment: 130.22 KB
Attachment: 141.51 KB
Attachment: 133.76 KB
Attachment: 88.08 KB
Attachment: 111.61 KB
|
|
|
|
|
|
Isaac H.
|
| Posted: Tue 04 Mar, 2014 10:39 pm Post subject: |
|
|
One of the most unique DIY I've seen in a long while. And very well executed. How'd you go about dishing the shell guards?
Wounds of flesh a surgeons skill may heal...
But wounded honor is only cured with steel.
We who are strong ought to bear with the failings of the weak and not to please ourselves.
Each of us should please his neighbor for his good ,to build him up.
Romans 15:1-2
|
|
 |
|
|
Radovan Geist
|
| Posted: Tue 04 Mar, 2014 10:47 pm Post subject: |
|
|
thank you, Isaac:)
I have dished them with a hammer with rounded surface, first over an iron ring (in fact - a piece of a thick iron tubing with a diameter of some 12-13 cm) and then on wooden surface (a plank of some soft wood), to remove hammer marks as much as possible. Still, there were some hammer marks left, so I have evened the surface with a sanding paper.
|
|
|
|
|
|
Radovan Geist
|
| Posted: Sun 09 Mar, 2014 11:20 pm Post subject: |
|
|
So, this project is closing to its end. Parrying dagger is practically finished, I only need to make the scabbard. It was an interesting (and sometimes frustrating:)) experience - first time working on a complex hilt like this. I will definitely need to improve my welding technique - so let´s go to youtube hunting for some "how to" videos:)
To wrap up: there is one thing I would have done differently next time (crossguard and loopguard should be probably bit beefier), there is one thing I will probably still re-don (twisted wire-grip, adding turk-head ferule), and there is one thing I still need to finish (scabbard). But all in all I like it and I can´t wait for fun of trying to fence with this.
All comments and suggestions are of course welcome.
Attachment: 129.4 KB
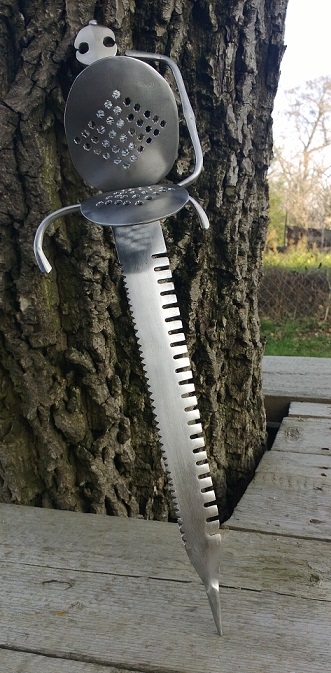
Attachment: 106.38 KB
Attachment: 145.72 KB
|
|
|
|
|
|
Mark Moore
|
| Posted: Mon 10 Mar, 2014 7:36 am Post subject: |
|
|
I have only two words.........WELL DONE!........  ..........McM ..........McM
''Life is like a box of chocolates...'' --- F. Gump
|
|
|
|
|
|
Radovan Geist
|
| Posted: Sun 27 Jul, 2014 10:01 pm Post subject: |
|
|
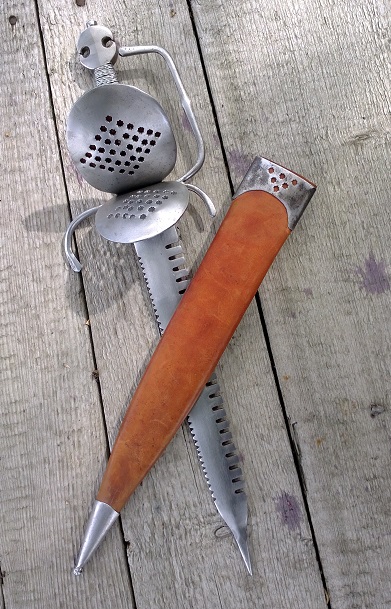
Thank you, Mark:) Finally, this beauty got it´s scabbard. Its made from two layers of leather, with steel fittings. Piercings in the upper plate replicate the design of the shells of the dagger. On the other side (not shown on the pictures), the upper plate has a hook for a belt.
Attachment: 158.37 KB

Attachment: 144.78 KB
|
|
|
|
|
|
Matias Tonazzi
Location: Buenos Aires Joined: 13 Jul 2014
Posts: 9
|
| Posted: Mon 28 Jul, 2014 3:07 am Post subject: |
|
|
Lovely, and I also notice how much your fencing opponents must hate facing a left handed fencer 
|
|
|
|
|
|
Radovan Geist
|
| Posted: Mon 28 Jul, 2014 9:43 pm Post subject: |
|
|
Hi Matias, thank you. It is probably some misunderstanding - the original dagger was made for a left-handed fencer (so the dagger was for a right hand), but I have altered it, as I´m right-handed.
Otherwise, you are right - people hate fencing with me, when I wield this dagger in my left hand... Of course, I´m just kidding. I´m not allowed to use it at fencing tournaments. It´s only used in re-enactment and stage fights. And I can confirm, it really catches the opponent´s blade nicely.
|
|
|
|
|
|
|

