| Author |
Message |
|
Michael Pikula
Industry Professional
|
 Posted: Thu 21 Apr, 2011 1:30 pm Post subject: Simple Sheath how to Posted: Thu 21 Apr, 2011 1:30 pm Post subject: Simple Sheath how to |
 |
|
I've made a few of these simple sheaths for medieval style knives and I thought I would share my process in case someone would like to make a similar one for a knife in their collection.
First off I start with some 2.5oz veg. tanned leather, I cut the piece about twice as long as the blade, and about 2.5 times as wide. This piece of leather is soaked in isopropyl alcohol and working by hand to break up the grain and make it soft, imagine you are rinsing a rag that you are using to clean the floor to get a general idea.
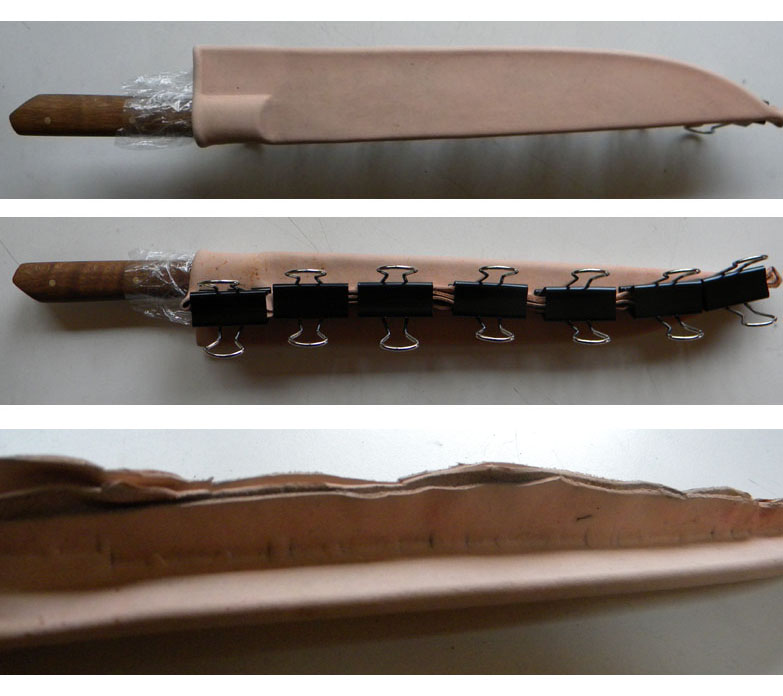
Once the leather starts feeling soft I let the alcohol evaporate off and then soak the leather in warm water for about 10 minutes. Then I remove, and squeeze the extra water off, and glue the inside with leather cement, and fold in half so that the fold is at the throat of the sheath. Folding the leather in two with the leather cement makes it "two ply" and it helps make the leather stiff and rigged with little effort. I wrap the leather around the knife, and with clip the ends with black binder clips along where the seem will be. (See photo 1) At this point you want to leave a little extra width at the throat so that when the leather shrinks a little the blade isn't cutting the leather every time to take the blade in and out. With a bone knife you can press the outline of the grip, and once the glue cures (about 5-10 minutes) the form won't change or move on you so you can take a break.
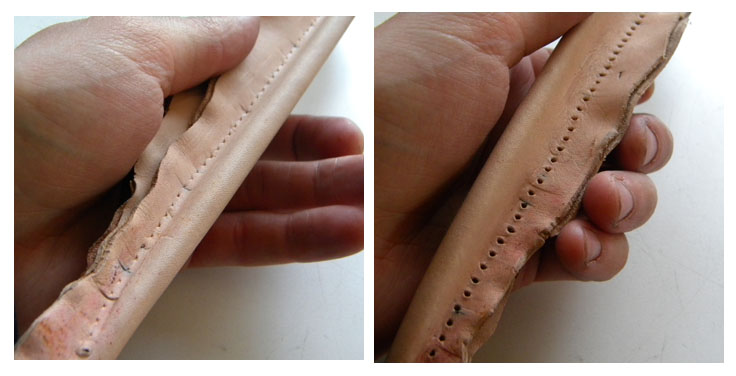
When the leather is dry you can remove the binder clips and remove the blade. I roll a spiked wheel on the seem to mark where the holes will be stitched, and then press a needle/awl through the holes in order to make stitching easier. (See photo 2) Then starting at the tip I go up to the throat, then back down and tie off the thread. Sometime with misaligned holes the sheath can twist a little, just put the knife back in, spray the outside with water and everything should come back to being straight and pretty 
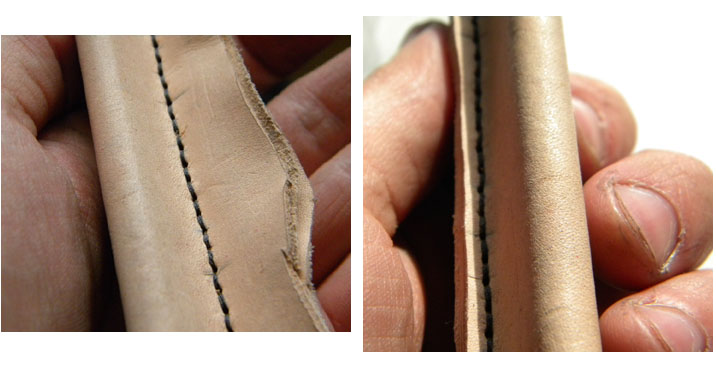
Now the nerve wrecking part! carefully trim the excess leather off the spine, making sure you don't trim too much, and be sure that both sides are as even as you can get them. (See photo 3) Now you can dye the inside of the throat, insert the knife, and dye the outside as well. Make sure to get the dye as even as you can, work quick, stop when you think its close, and let it dry. If you put too much dye on you can go over the surface with a damp cotton rag soaked in acetone and pull some color out and blend.
While the dye is drying fashion two rings that will hold a belt loop, then make a belt loop. For the loop I cut a strip of leather, I shave the ends down and fold it over so that once again the leather is "two ply" with the shaved ends overlapping by about a centimeter and glue the touching surfaces of the loop. You now have a ring of leather, and two metal rings to attach to the sheath.
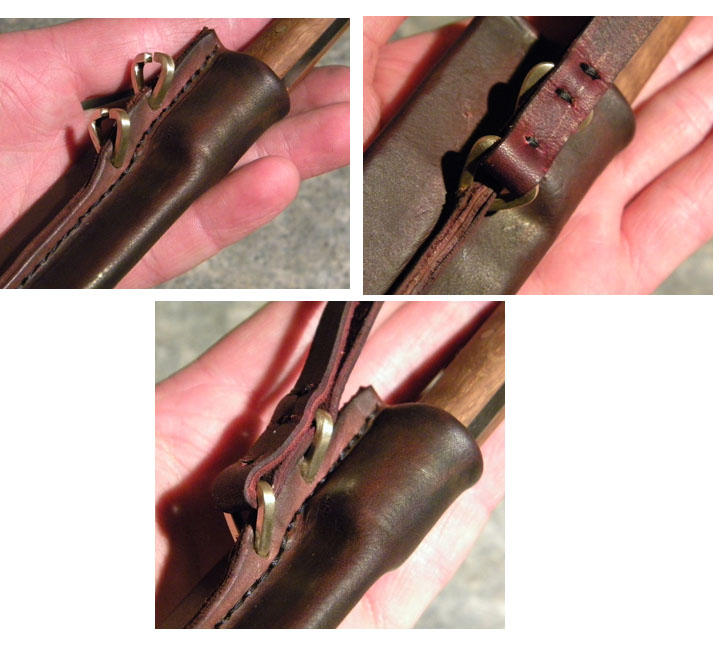
With an awl punch two holes in the spine, and insert the rings. Feed the loop into the bottom ring, and then stitch the loop to close it over the ring. Line up where the second ring will rest, and stitch the bottom, then insert the ring, and stitch the top. (See photo 4) Now squeeze the rings closed, work some leather lotion into the surfaces, and make sure to get a good coat on the spine and holes for the belt loop.
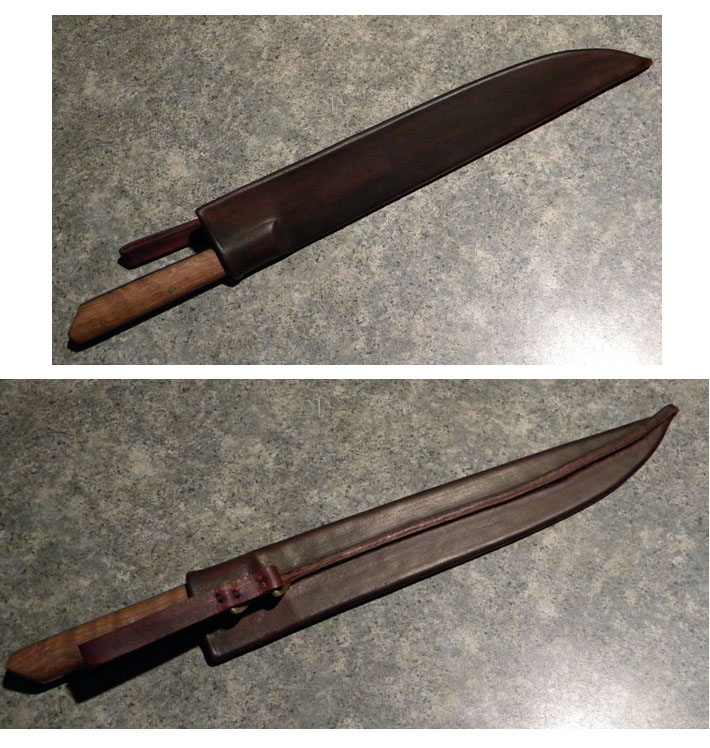
Now clean off the knife and you are done! (See photo 5)
Some pointers:
Paint the surface of the blade with clear nail polish, this will drastically help keeping the blade from pitting and getting mucked up from the moisture. Also wrap in clear plastic wrap as a second barrier, plus it keeps dye off the handle material.
Be sure to let all the alcohol evaporate off the leather prior to gluing otherwise the glue won't be as effective, or just won't hold.
 Attachment: 83.97 KB Attachment: 83.97 KB
Attachment: 57.29 KB
Attachment: 60.73 KB
Attachment: 96.35 KB
Attachment: 149.49 KB
|
|
   |
 |
Scott Roush
Industry Professional

|
| Posted: Thu 21 Apr, 2011 1:48 pm Post subject: |
|
|
yep.. the center seam is my favorite construction style to make now. And those look awesome. I really like your loop system.
http://www.bigrockforge.com
|
|
|
|
|
|
Carl W.
|
| Posted: Fri 22 Apr, 2011 9:34 am Post subject: |
|
|
Hi Michael,
Thank you very much for this. I've often wondered how you made the 2 sheaths of yours that I've got - so thin yet stiff, & both tough & precise. I see no hint of knives cutting sheaths either, amazing (to me) given so snug.
Dumb questions:
- what % alcohol do you use?
- what leather cement? tend toward use a lot or sparingly?
- how do you trim the seam - if its already stiff can't lay it flat for a sharp knife? scissors?
Thanks again. - Carl
|
|
|
|
|
Scott Roush
Industry Professional
|
| Posted: Sat 23 Apr, 2011 3:53 am Post subject: |
|
|
Michael...
What do you mean by 'gluing the inside with rubber cement'? Are you coating the entire inside with it to form a layer of sorts?
edit... nevermind... I see now. Interesting.... thanks for posting this. My scabbards will improve.
http://www.bigrockforge.com
|
|
|
|
|
Mark Routledge
Industry Professional

|
| Posted: Sat 23 Apr, 2011 5:34 am Post subject: |
|
|
Nice bit of work there. Do you ever line them with wood as well ? I tend to use that method on smaller knives sometimes, stops any danger of cutting through the sheath.
Trick is to get them nice and thin though or they look all clumsy and wrong.
Yours is elegant and very nicely done.
|
|
|
|
|
|
Michael Pikula
Industry Professional
|
| Posted: Sat 23 Apr, 2011 1:49 pm Post subject: |
|
|
| Carl W. wrote: |
- what % alcohol do you use?
- what leather cement? tend toward use a lot or sparingly?
- how do you trim the seam - if its already stiff can't lay it flat for a sharp knife? scissors?
|
Hey Carl,
I have used 91%, the strongest stuff most pharmacies have. I believe that the weaker stuff works as well, but the stronger the better.
I use Fiebing's leather cement. I usually apply enough so that I don't have a lot of run off since it creates a mess, and when glue gets on a un-dyed surface it tends to absorb the dye differently. Normally you can try to work it out with either acetone, or alcohol, but I don't like to do that after it is already glued since it lessens the bond of the glue. Ideally you want enough glue to get the leather set around the form, and if the area that will become the seam doesn't get glued in every spot that is okay since you can touch up some areas after the leather is dry, and prior to stitching. Also the glue is not super paramount on the sheath itself since after the seem is stitched it isn't going anywhere, if you don't use enough it will just make the steps after a little tougher to go about.
*For the first couple times it wouldn't hurt to just wet the leather, and form it around the knife and clamp the seam, then remove the clips and you will have a rough idea of the surfaces that need to be glued. Once you do it several times you will develop a system and better idea of how each step relates.
For trimming the seam I use a leather cutting knife, the key is it needs to be very very sharp. I use a slicing motion, and starting at the throat I work my way down. I found the key is to have the blade cut the leather, keeping the flat of the blade as a guide, and once you cut/slice one area or section you stop only to reposition the blade for the next slice. Anytime to have to go back and correct an area it is increasingly difficult to make it blend with the rest of the cut.
I know that there are other ways of going about the process, this is just what I found gets me the best results with my tooling and skill set. If anyone else makes sheaths and cares to give some input or thoughts they are of course very welcome. I don't want this thread to be just about me, just one persons perspective and trying to share the knowledge.
Hey Scott,
Just a slight correction, I don't use rubber cement, I stick with leather cement.
Hey Mark,
When I first was making sheaths, or when I make them for larger blades like seaxes I do use wood. Briefly, I cut out the profile of the blade in some thin plywood (the stock I have now is about 2.6mm) and then glue the plywood to the leather and use clips along the edge to be stitched. With this process I've found that you need to sand some of the wood that is at the throat, and shave the leather, so that the wood/leather seam inside isn't exposed and the tip is guided into the right home
I haven't had any problems with the knives cutting through the sheaths as of yet. I feel that if the blade is guided from the spine and with a little attention it shouldn't be a problem, although time will be the judge of that. There are ideas that I have as to how the problem could be resolved, but as far as I know sheaths for these kinds of knives didn't have some kind of reinforcement for the edge. Although someone with more historical knowledge will have to chime in on this.
|
|
|
|
|
Nathan Robinson
myArmoury Admin


|
| Posted: Sat 23 Apr, 2011 2:02 pm Post subject: |
|
|
Hi Michael-
Great work. I'm thrilled you're sharing this with us.
I'm curious why you use the isopropyl alcohol. This is only something I've done when I wanted to wet-form the leather with a reduced dry time compared to water. Since you're going to water after that, this seems superfluous. In my experience, alcohol dries out the leather and then requires more care be taken during finishing. Have you tried just warm water and skipping the alcohol altogether?
.:. Visit my Collection Gallery :: View my Reading List :: View my Wish List :: See Pages I Like :: Find me on Facebook .:.
|
|
 |
|
|
Michael Pikula
Industry Professional
|
| Posted: Sat 23 Apr, 2011 4:58 pm Post subject: |
|
|
Hi Nathan,
I'm happy to share what I know
I started using isopropyl alcohol as a tip from another maker when I was having trouble breaking in my leather and making it soft and accept the dye in a more consistent manner. I found that by working the alcohol into the leather it helps break up the grain and make the leather more soft and pliable then when I use just water. Of course this could also just be a reflection of the leather that I am using and other hides may come softer and this step might not be needed. (I am using 2oz. vegetable tanned tooling leather from Tandy)
If the hide is super stiff, I have found that running the back of the leather over a piece of steel, polished, with a sharp 90 degree edge helps jump start the process.
The reason why I soak the leather in water after the alcohol is because the glue doesn't hold or take a bond when soaked in the alcohol and I need it to be soft to form it around the blade.
The dye that I use is oil based, and after it dries I apply leather lotion several times, allowing the lotion to sit on the surface for a few minutes and work it into the surface with a soft cotton rag. This result in a nice pliable finish and helps improve the color and luster.
|
|
|
|
|
Nathan Robinson
myArmoury Admin
|
| Posted: Sat 23 Apr, 2011 5:22 pm Post subject: |
|
|
| Michael Pikula wrote: | | I started using isopropyl alcohol as a tip from another maker when I was having trouble breaking in my leather and making it soft and accept the dye in a more consistent manner. I found that by working the alcohol into the leather it helps break up the grain and make the leather more soft and pliable then when I use just water. |
Hey, that makes sense... with the stuff that I used to make, I didn't mind the inconsistencies that the grain and fiber variation would create. If I were to want to do more high-end, polished work, I could easily see this being a major frustration. There's a product that Tandy once sold that does essentially the same thing: breaks up and softens the fibers for accepting dye more consistently. I don't remember the name, as it's been over 10 years for me, but I'd wager ir's probably isopropyl alcohol.
One thing I'd always do is moisturize the leather before dying with Lexol. After a good soak, the dye would be much more even than it would be if applied to just dry leather.
Thank you!
.:. Visit my Collection Gallery :: View my Reading List :: View my Wish List :: See Pages I Like :: Find me on Facebook .:.
|
|
|
|
|
|
Michael Pikula
Industry Professional
|
| Posted: Sat 23 Apr, 2011 8:04 pm Post subject: |
|
|
Thanks for the tip on Lexol, I will pick some up and give it a try when I order some dye in the next couple of weeks.
Part of the intrigue of this art and sharing with the community is you always learn something new, and the more you learn the more you realize how much more you have yet to discover.
|
|
|
|
|
Ben Potter
Industry Professional

|
| Posted: Mon 25 Apr, 2011 8:32 am Post subject: |
|
|
Beautiful work Michael.
I'll have to try the alcohol I have always just used water. Thanks for sharing.
Ben Potter Bladesmith
It's not that I would trade my lot
For any other man's,
Nor that I will be ashamed
Of my work torn hands-
For I have chosen the path I tread
Knowing it would be steep,
And I will take the joys thereof
And the consequences reap.
|
|
|
|
|
|
Jim Mearkle
|
| Posted: Mon 25 Apr, 2011 6:40 pm Post subject: |
|
|
I suggest adding a "help and how to" forum for posts like this, or at least making them sticky.
Jim
|
|
|
|
|
|
Aleksei Sosnovski
|
| Posted: Mon 25 Apr, 2011 10:06 pm Post subject: |
|
|
| Jim Mearkle wrote: | | I suggest adding a "help and how to" forum for posts like this, or at least making them sticky. |
I join to this. For people like myself these posts ore one of very fiew available "teachers" and save a lot of time and effort. While learning from own mistakes always works, I think that most people prefer to learn from others.
|
|
|
|
|
Jean Thibodeau

|
| Posted: Tue 26 Apr, 2011 6:34 am Post subject: |
|
|
Well this one is on it's way to me and it's really interesting seeing how the scabbard is put together.
I already have couple of Michael's By-Knives and their scabbards and they look really good up close also.
You can easily give up your freedom. You have to fight hard to get it back!
|
|
|
|
|
Scott Hrouda

|
| Posted: Tue 26 Apr, 2011 9:21 am Post subject: |
|
|
Michael,
Thank you for sharing the information and photographs. I've had scabbard making described to me before, but now it makes sense!
I have yet to make a scabbard for the seax purchased from you last year.  Would you recommend using the same process only marrying the leather on the "blade edge" vs. on a "flat side". Would you sew the seam before wrapping it in stamped brass or just rivet the brass pieces in place? Would you recommend using the same process only marrying the leather on the "blade edge" vs. on a "flat side". Would you sew the seam before wrapping it in stamped brass or just rivet the brass pieces in place?
...and that, my liege, is how we know the Earth to be banana shaped. - Sir Bedevere
|
|
|
|
|
|
Michael Pikula
Industry Professional
|
| Posted: Tue 26 Apr, 2011 10:40 am Post subject: |
|
|
| Scott Hrouda wrote: | Michael,
Thank you for sharing the information and photographs. I've had scabbard making described to me before, but now it makes sense!
I have yet to make a scabbard for the seax purchased from you last year. Would you recommend using the same process only marrying the leather on the "blade edge" vs. on a "flat side". Would you sew the seam before wrapping it in stamped brass or just rivet the brass pieces in place? |
Hi Scott,
For seaxes yes, I would marry the leather on the "edge" side. I was under the impression that there should be some kind of a sewn seam to hold everything together but the brass rivets do a really good job of structurally holding the sheath together. I would recommend using either glue, or some kind of other adhesive where the two sides meet to make it harder for water to get in if the blade was worn on a rainy day, this can be added once the leather has been dyed and is dry. Also some care has to be taken when using the black binder clips since they leave a distinct texture, I like to cut out a piece of thin wood to use as a "buffer" so that the texture stays nice and smooth. I suppose that the brass clips can be put in place when the leather is wet, but I like to wait until it is dry since the leather won't change much and is much closer to it's final shape, which is easier to work with and fit the clips.
I will be making a leather sheath for a larger seax in the next month or two so I'll add some pictures and comments on the process. I know it is getting away from simple, as in the title, but I think it would make a nice addition to the process.
By the way, if you haven't already seen the pics in this thread, http://www.myArmoury.com/talk/viewtopic.php?t...highlight= it might help visualize my ramblings
|
|
|
|
|
Scott Hrouda
|
| Posted: Tue 26 Apr, 2011 12:39 pm Post subject: |
|
|
I believe a little seax sheath tutorial would be very well received!
Thank you for pointing out the thread and the pictures therein. They helped confirm the "pictures in my head".
I hope that I didn't take this thread too far off course by asking about seax sheaths as the process seems so similar, only the placement of the seam differs.
Thanks again,
Scott
...and that, my liege, is how we know the Earth to be banana shaped. - Sir Bedevere
|
|
|
|
|
|
|
You cannot post new topics in this forum
You cannot reply to topics in this forum
You cannot edit your posts in this forum
You cannot delete your posts in this forum
You cannot vote in polls in this forum
You cannot attach files in this forum
You can download files in this forum
|
All contents © Copyright 2003-2026 myArmoury.com — All rights reserved
Discussion forums powered by phpBB © The phpBB Group
Switch to the Basic Low-bandwidth Version of the forum
|

