Info Favorites Register Log in
myArmoury.com Discussion Forums

Forum index Memberlist Usergroups Spotlight Topics Search
Forum Index > Off-topic Talk > 13th century surcoat projectDIY Project Reply to topic
This is a standard topic Go to page 1, 2  Next 
Author Message
Sander Marechal


Location: The Netherlands
Joined: 04 Dec 2009
Reading list: 17 books

Spotlight topics: 1
Posts: 671

PostPosted: Sat 24 Jul, 2010 5:22 pm    Post subject: 13th century surcoat project         Reply with quote

Alongside fabricating shields on my new shield press, I have been learning how to operate a sewing machine so I could make my own Hospitaller surcoat. My design is very basic. It's two squares (64x123cm) sewn together to make the body, with triangular gores sewn in on the lower half. I'm pretty pleased with it so far, considering this is just my second sewing project (the first one being the traditional marble bag).

I am probably going to trim the bottom a bit to just below my knees (or simply use wide hems). I also still need to put splits in the front and back so I can ride a horse. But I have a question about the shoulders. Because the body is a basic tube, the shoulders are quite wide. You can see that on the left shoulder in the attached picture. I am contemplating making then narrower. The right shoulder in the picture had some of the fabric folded back, making it narrower (although it bunches up when folding, especially in the arm pit).

What do you think is best? The wider shoulder or the narrower shoulder? This is supposed to be 1250-ish.

Thanks in advance (and apologies for my ugly smirk in the picture :p )


 Attachment: 81.01 KB
surcoat-0002.jpeg

View user's profile Send private message Send e-mail Visit poster's website
Michael Ekelmann


Location: Seattle Metro Area, USA
Joined: 01 Nov 2006
Likes: 1 page

Posts: 92

PostPosted: Sat 24 Jul, 2010 7:14 pm    Post subject:         Reply with quote

I think the narrower shoulder looks more in line with images from the Maciejowski bible, so that would put it at around 1250.
“Men prefer to fight with swords, so they can see each other's eyes!" Sean Connery as Mulay Hamid El Raisuli in The Wind and the Lion
View user's profile Send private message
Chuck Russell


Location: WV
Joined: 17 Aug 2004
Reading list: 46 books

Posts: 936

PostPosted: Sat 24 Jul, 2010 10:00 pm    Post subject:         Reply with quote

i am currently making the same. you want the shoulders to be free and clear of movement. take your finger and place it on the top of your shoulder. now move your arm around you should find where the top of the ball is. i would not make the shoulder any wider than that point. also remember to allow under arm movement. you see this in the Mac Bible where the slit gaps open a little bit. you could even taper the hole too so it doesn't look like a tube on the body. great start though! can't wait to see it finished
View user's profile Send private message Yahoo Messenger MSN Messenger
Mihai Ionita


Location: Romania
Joined: 17 Dec 2008

Posts: 49

PostPosted: Sun 25 Jul, 2010 12:36 am    Post subject:         Reply with quote

Your cat seems to be watching you intently. By its gaze, it seems to approve what it sees.

I also concur with the chaps. Narrower is somewhat better than wide (and more functional, I would assume).
View user's profile Send private message Send e-mail
Thomas R.


Location: Germany
Joined: 10 May 2010
Likes: 4 pages
Reading list: 17 books

Posts: 396

PostPosted: Sun 25 Jul, 2010 1:57 am    Post subject:         Reply with quote

Hey Sander, good work.

You are doing a really inspiring work there. But I would advise narrower arm and big arm holes. Ahm... like slits going down from armpit to mid-waist, so you will have a maximum of movement allowed. I planning on doing a second surcot as well for my 1250 kit.

Thomas

http://maerenundlobebaeren.tumblr.com/
View user's profile Send private message Visit poster's website
Sander Marechal


Location: The Netherlands
Joined: 04 Dec 2009
Reading list: 17 books

Spotlight topics: 1
Posts: 671

PostPosted: Sun 25 Jul, 2010 3:44 am    Post subject:         Reply with quote

Thanks for your advice everyone. The arm holes are already quite big but it's hard to see in the picture. They end about 15cm below the armpit of my gambeson (which is already much wider than my actual arm at that point). The arm hole is 70cm around.

I will be making the shoulders narrower.

Some more advice if you please: Does anyone know how to properly hem the round neckline? I have found a couple of articles online that try to explain this, but most are short on detail and usually deal with stretchy fabrics like T-shirt material. Linen has a lot less stretch. I'm having trouble wrapping my head around it (no pun intended).
View user's profile Send private message Send e-mail Visit poster's website
Thomas R.


Location: Germany
Joined: 10 May 2010
Likes: 4 pages
Reading list: 17 books

Posts: 396

PostPosted: Sun 25 Jul, 2010 3:53 am    Post subject:         Reply with quote

Hi Sander,

as you stated earlier, that you can read german, I have posted you a link to excellent instructions. Its for a keyhole neckline and I used it for my under garment, but you can apply it to any regular neckline with minimal alterations.

http://www.isarviking.de/kleidung/tunika/tunika.htm

Sorry@all english readers, it's too much text to translate.

Thomas

http://maerenundlobebaeren.tumblr.com/
View user's profile Send private message Visit poster's website
Eric Allen


Location: Texas
Joined: 04 Feb 2006

Posts: 208

PostPosted: Sun 25 Jul, 2010 9:12 am    Post subject:         Reply with quote

Sander Marechal wrote:

Some more advice if you please: Does anyone know how to properly hem the round neckline? I have found a couple of articles online that try to explain this, but most are short on detail and usually deal with stretchy fabrics like T-shirt material. Linen has a lot less stretch. I'm having trouble wrapping my head around it (no pun intended).


Do it like a regular hem, just take it very slow. It is a little easier to do by hand, since you'll likely have little fabric to work with and have only a little seam allowance, but you can do it on a machine if you take it slow.[/i]
View user's profile Send private message
Sander Marechal


Location: The Netherlands
Joined: 04 Dec 2009
Reading list: 17 books

Spotlight topics: 1
Posts: 671

PostPosted: Sun 25 Jul, 2010 11:19 am    Post subject:         Reply with quote

Thank you both. I'll post more picture when I am further along!
View user's profile Send private message Send e-mail Visit poster's website
Johan S. Moen


Location: Kristiansand, Norway
Joined: 26 Jan 2004

Posts: 259

PostPosted: Wed 28 Jul, 2010 1:51 am    Post subject:         Reply with quote

Sander Marechal wrote:

Some more advice if you please: Does anyone know how to properly hem the round neckline? I have found a couple of articles online that try to explain this, but most are short on detail and usually deal with stretchy fabrics like T-shirt material. Linen has a lot less stretch. I'm having trouble wrapping my head around it (no pun intended).


If rolling the edge proves to be too much of a problem, you can always stitch a piece of linen tape to it. Take the tape(simply cut out a strip about 2 cm wide and as long as the circumference of the neckline, plus a few centimeters), pin it on all the way round on the outside of the garment, sew a seam along the edge of the neckhole, and then fold/roll the tape to the inside and stitch it down. I'd definately do this by hand though, unless you're really good with a sewing machine.

Johan Schubert Moen
View user's profile Send private message
Sander Marechal


Location: The Netherlands
Joined: 04 Dec 2009
Reading list: 17 books

Spotlight topics: 1
Posts: 671

PostPosted: Wed 28 Jul, 2010 2:40 am    Post subject:         Reply with quote

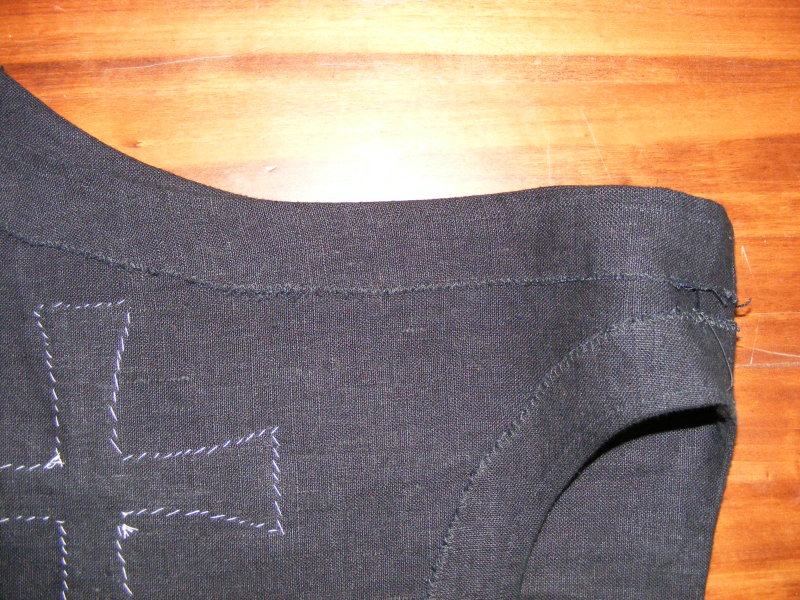
Thanks Johan, but the neckline is already done. I did it by cutting out a shaped facing sewn to the outside. Then I pressed the seam allowance, understitched it to the facing, pressed the facing to the back and secured it with blind stitches all around. I finished the arm holes and the splits in the front and back in the same way.

It took some time to figure out how to do it, but with the German tutorial that Thomas posted and this tutorial I managed to figure it out. Mine is a little simpler than these examples because my neckhole is round, not keyhole shaped.

It's a lot of work but almost all of it can be done on the sewing machine. The only thing I do by hand is securing the facing to the back with blind stitches. But this goes quite fast as the stitches are wide apart.

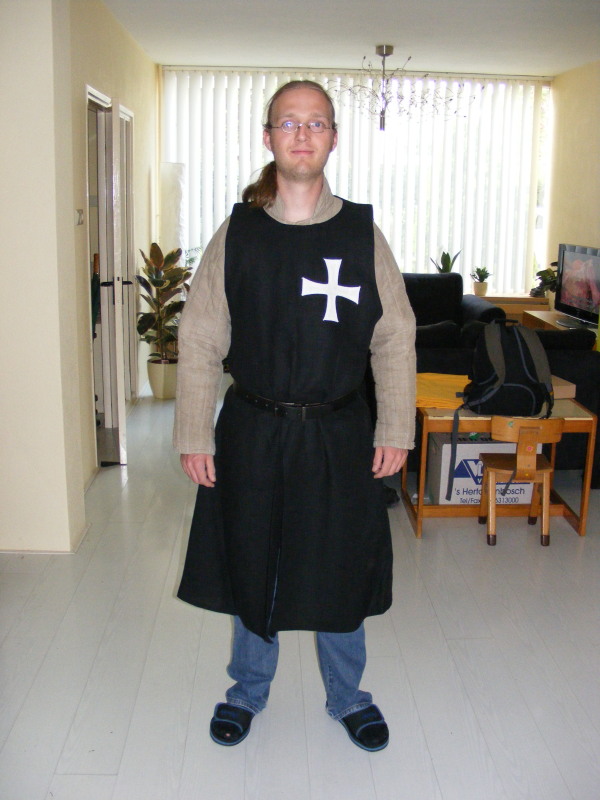
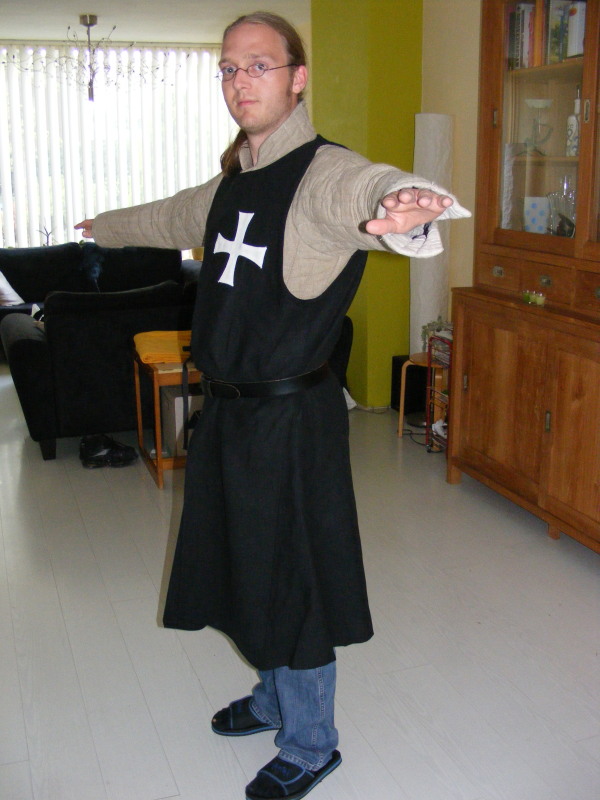
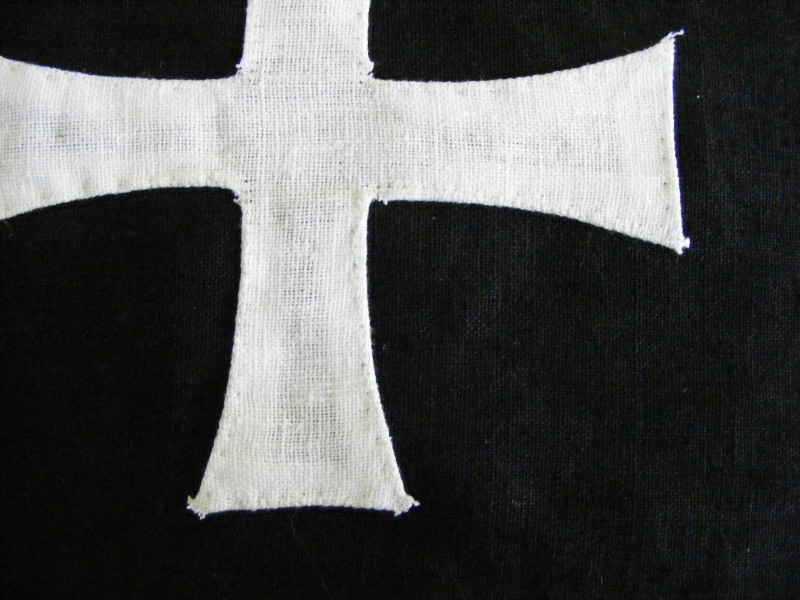
All that remains is securing the facing of the front and back split, hemming the lower edge and sewing a cross on the left of my chest. With a little luck I will be done either tonight or tomorrow night.

All-in-all it has been much more work than I estimated. I think I have easily sunk 30 hours into it when I'm finished. But, it's finished to a much higher standard than I though I would be able to when I started this. Also, it's been slow going because this is my first real sewing project (aside from a marble bag) so I had to do a lot of research on the internet on how to sew and operate my machine.

Pics to follow when it's finished!
View user's profile Send private message Send e-mail Visit poster's website
Sander Marechal


Location: The Netherlands
Joined: 04 Dec 2009
Reading list: 17 books

Spotlight topics: 1
Posts: 671

PostPosted: Fri 30 Jul, 2010 10:59 am    Post subject:         Reply with quote

Yesterday evening I finished my surcoat as planned. Here are some pictures. The third picture show a detail of the cross. I have folded under the edges and pressed them. Then I blind-stitched it to the front. The fourth picture shows a detail of the inside finishing. All the edges are finished with facings, pressed, understitched, pressed again and then blind stitched. You can't see anything on the front. It's mostly made on a sewing machine but the blind stitches and the hemming was done by hand.


 Attachment: 112.12 KB
surcoat-0005.jpeg
Front view. The cross looks off, but it's really straight.

 Attachment: 113.62 KB
surcoat-0007.jpeg
Side view, showing the size of the arm holes.

 Attachment: 124.79 KB
surcoat-0009.jpeg
Detail of the cross.

 Attachment: 167.17 KB
surcoat-0010.jpeg
Detail of the inside finishing.
View user's profile Send private message Send e-mail Visit poster's website
Shae Bishop


Location: Louisville KY
Joined: 08 Jan 2006
Likes: 9 pages
Reading list: 9 books

Posts: 79

PostPosted: Fri 30 Jul, 2010 12:04 pm    Post subject:         Reply with quote

Looks great Sander. I'm glad you narrowed the shoulders, looks right to me. It's really cool to see people's historical sewing projects. I'm working on sewing some much later period stuff right now, but I would really like to start working on a fourteenth century soft kit in the future. I have wondered before how many people have made their own surcoats.
View user's profile Send private message
Thomas R.


Location: Germany
Joined: 10 May 2010
Likes: 4 pages
Reading list: 17 books

Posts: 396

PostPosted: Fri 30 Jul, 2010 12:57 pm    Post subject:         Reply with quote

Looks like you really spent a couple of hours on this! The cross looks indeed a bit off. How comes?

Thomas

PS: You've lost your cool beard during the sewing... Razz

http://maerenundlobebaeren.tumblr.com/
View user's profile Send private message Visit poster's website
T. Hamilton


Location: United States
Joined: 30 Dec 2009

Posts: 85

PostPosted: Fri 30 Jul, 2010 2:24 pm    Post subject:         Reply with quote

Nice work, Sander! Thanks for the shots of the inside and close up of the cross. I like your gambeson, did you make that as well?
"What we do in life echoes in eternity."
View user's profile Send private message Visit poster's website
Chuck Russell


Location: WV
Joined: 17 Aug 2004
Reading list: 46 books

Posts: 936

PostPosted: Fri 30 Jul, 2010 2:29 pm    Post subject:         Reply with quote

looks great. really like the arm openings now

the cross should not be centered if that's what you meant Thomas, it should be more over the heart.
View user's profile Send private message Yahoo Messenger MSN Messenger
Thomas R.


Location: Germany
Joined: 10 May 2010
Likes: 4 pages
Reading list: 17 books

Posts: 396

PostPosted: Fri 30 Jul, 2010 2:41 pm    Post subject:         Reply with quote

Chuck Russell wrote:
looks great. really like the arm openings now

the cross should not be centered if that's what you meant Thomas, it should be more over the heart.


Well, it looks like it's right arm is a bit curving down, compared to the left... but maybe it's just the fabric hanging in an awkward angle...

http://maerenundlobebaeren.tumblr.com/
View user's profile Send private message Visit poster's website
Sander Marechal


Location: The Netherlands
Joined: 04 Dec 2009
Reading list: 17 books

Spotlight topics: 1
Posts: 671

PostPosted: Fri 30 Jul, 2010 3:25 pm    Post subject:         Reply with quote

Thanks for the compliments everyone.

Thomas R. wrote:
Well, it looks like it's right arm is a bit curving down, compared to the left... but maybe it's just the fabric hanging in an awkward angle...


Yes, the fabric is hanging down. The cross is exactly straight when you lay the surcoat flat. The right side of my surcoat wasn't properly folded down under my belt when these pictures were taken. You can also see that because the bottom of the armhole is sticking out a bit on the right but is flush with my gambeson on the left.

T. Hamilton wrote:
I like your gambeson, did you make that as well?


No, the gambeson was made by Matuls. The gambeson is actually very wrong. It's a 14th/15th century short gambeson that opens to the front. I knew it was wrong when I ordered it though. I don't have a lot of money so I want my kit to be as multi-period as possible. The Netherlands has a lot of 14th/15th century reenactment so I opted to get the wrong gambeson and hide the wrong bits under a surcoat for my mid-13th century Hospitallers kit. That way I can use the gambeson without the surcoat at other events. Judging from your comment, I think it succeeded Laughing Out Loud When money permits I will get the proper long gambeson that has no front opening.

Shae Bishop wrote:
It's really cool to see people's historical sewing projects.


I have a bunch more projects planned. I still need braies and hosen. Also, I offered my girlfriend to sew a gown and undergown for her birthday. The gown is going to be one of those 13th century gowns with partially attached hanging sleeves. See the image below. The final upcoming project is a medieval-esque tarp/day-shade. Our reenactment group doesn't have the money yet for a period pavilion tent so we're making something simple and cheap that does not look too out of place. Not historically accurate, probably, but most of the general audience can't tell. I'll be sure to make more topics about these projects as they progress.

Picture of a gown with partially attached sleeves:
View user's profile Send private message Send e-mail Visit poster's website
Jared Smith


Location: Tennessee
Joined: 10 Feb 2005
Likes: 1 page

Spotlight topics: 3
Posts: 1,532

PostPosted: Fri 30 Jul, 2010 4:30 pm    Post subject: Re: 13th century surcoat project         Reply with quote

Sander Marechal wrote:
This is supposed to be 1250-ish.


What you have looks good and undoubtedly continued to be used through the 13th century.

This time frame is roughly credible for two styles of "over coat" for which the exact time line of transition is not well known. The full surcoat was actually very much so sleeveless (like a "tank top" tee shirt, with minimal upper body coverage. No extant examples of the style you have made survive, while several as I attempt to describe do.) Some minimal upper body examples are shown here. http://www.virtue.to/articles/extant.html

I am wondering if you considered the open sided "tabart" (11th century French for poor man's style overcoat) or "tabard" style. You can see the "3 musketeer" tabard style on priestly subjects in illuminated manuscripts back to early 12th century, identified with one of the kings (Alfred?) as early as 1115, and probably find academic discussion of how ornamented tabards and plain surcoats seem to have swapped social classes around this time. The tabbard was certainly common by 14th century (the assumed name in Chaucer's prologue to the collection that became known as Canterbury Tales.) An example from early 13th century (the closes the period had to a documentary about the crusade of that time) in actual combat shows what I consider to be a tabard, actually suited for mounted use and hotter environment as the hospitalers required.

http://prodigi.bl.uk/illcat/record.asp?MSID=8...;NStart=12

folio 109


 Attachment: 95.26 KB
tabard.GIF


Absence of evidence is not necessarily evidence of absence!
View user's profile Send private message
Sander Marechal


Location: The Netherlands
Joined: 04 Dec 2009
Reading list: 17 books

Spotlight topics: 1
Posts: 671

PostPosted: Sat 31 Jul, 2010 1:23 am    Post subject: Re: 13th century surcoat project         Reply with quote

Jared Smith wrote:

I am wondering if you considered the open sided "tabart" (11th century French for poor man's style overcoat) or "tabard" style. An example from early 13th century (the closes the period had to a documentary about the crusade of that time) in actual combat shows what I consider to be a tabard, actually suited for mounted use and hotter environment as the hospitalers required.


Are you sure that shows an open-sided tabbard? The style of drawing in that illimunation looks very much like the Maciejowski bible. Images of mounted knights in the bible look very much like that illumination, but whenever the bible shows dismounted knights, you can see clearly that the split is in the front. Perhaps it's an artifact of the lack of proper perspective in extant drawings?

Anyway, I haven't looked much at tabbards because, according to several books about the Hospitallers, the papal decree from 1248 specifically allowed them to wear surcoats instead of their regular uniform into battle (which we assume is an ankle-length mantle). I haven't read anything about tabbards. But that said, I haven't been able to find the original papal bull to see if the words in it could also be translated as e.g. a tabbard instead of a surcoat.
View user's profile Send private message Send e-mail Visit poster's website


Display posts from previous:   
Forum Index > Off-topic Talk > 13th century surcoat projectDIY Project
Page 1 of 2 Reply to topic
Go to page 1, 2  Next All times are GMT - 8 Hours

View previous topic :: View next topic
Jump to:  
You cannot post new topics in this forum
You cannot reply to topics in this forum
You cannot edit your posts in this forum
You cannot delete your posts in this forum
You cannot vote in polls in this forum
You cannot attach files in this forum
You can download files in this forum


All contents © Copyright 2003-2024 myArmoury.com — All rights reserved
Discussion forums powered by phpBB © The phpBB Group
Switch to the Basic Low-bandwidth Version of the forum