Author |
Message |
Sander Marechal
|
Posted: Sun 20 Jun, 2010 12:45 pm Post subject: My new shieldpress and my first shield |
|
|
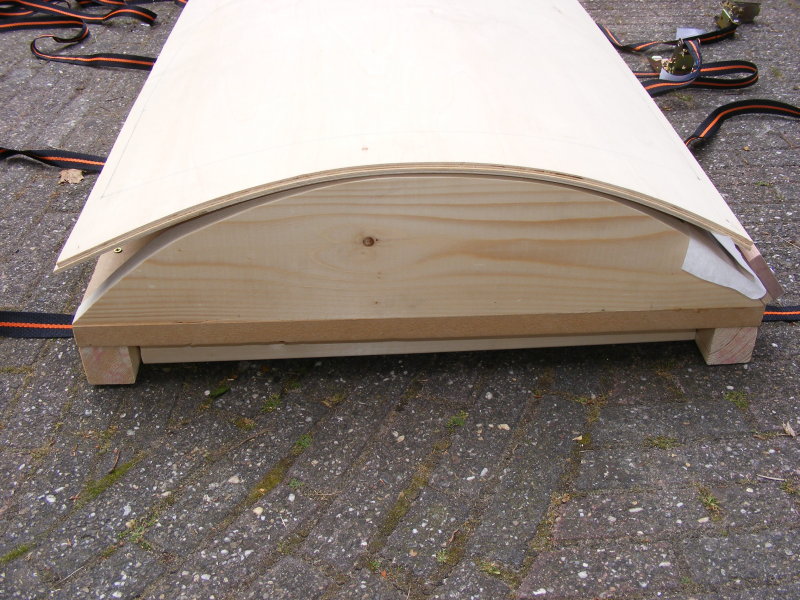
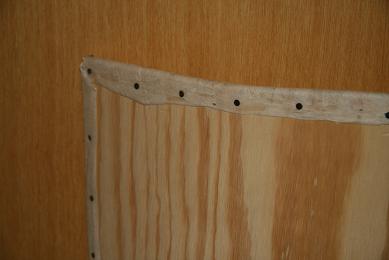
Yesterday me and a friend built a shield press based on the design by Ye Olde Gaffer. It took us about five hours to build, including shopping for materials. The total cost, including straps and material for two shields was about US$ 100. Immediately after we loaded it up with the first shield blank. It's quite a scary thing when loaded. Not just because it looks like a coffin, but there is a lot of tension on the straps.
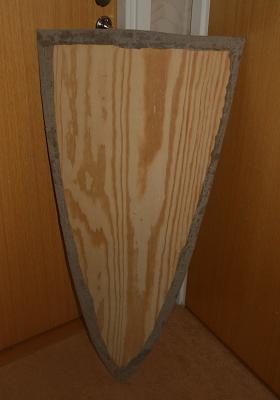
I left it to dry for 24 hours and today I took it out and cut out the shield. As you can see in the third photo the shield did spring back a bit, but overall I am still happy with the results. But if you have any tips on how to make a blank that doesn't spring back so much then I would love to hear it!
The shield itself is made from two layers of birch plywood, 4 millimeter thick. The glue I used is Bison wood glue, unthinned and applied liberally with a brush. The blanks are 61x122 centimeter (the standard plywood size here in The Netherlands). The shield itself came out at 57x100 centimeter (I'll post the exact design in my other thread).
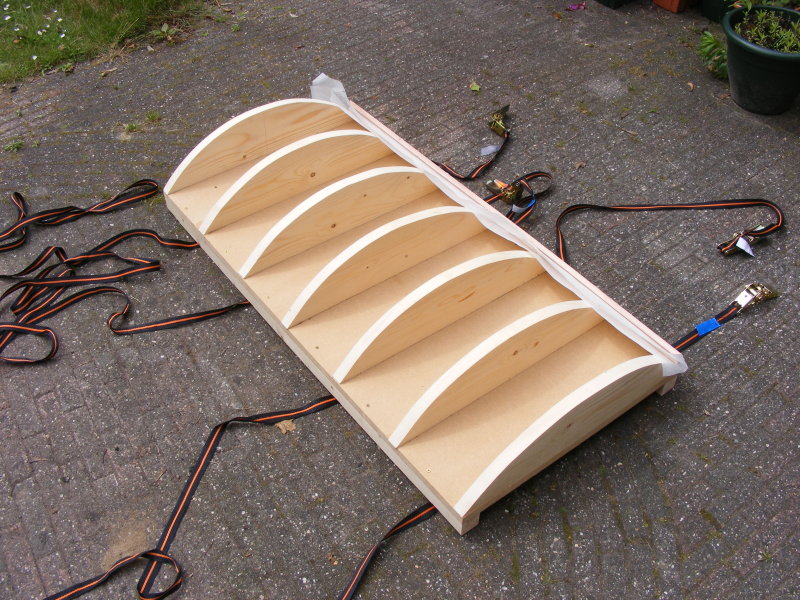
Attachment: 165.76 KB
The shield press. I put some oven paper in the slot to prevent gluing the shield blank to the press.
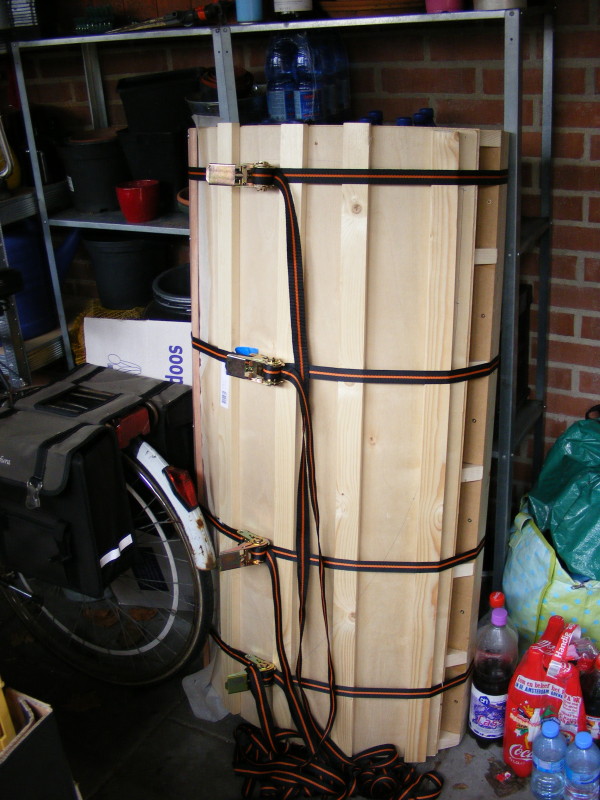
Attachment: 138.92 KB
The press loaded, waiting to dry.
Attachment: 136.64 KB
The shield after drying 24 hours. Notice how it springs back a bit.
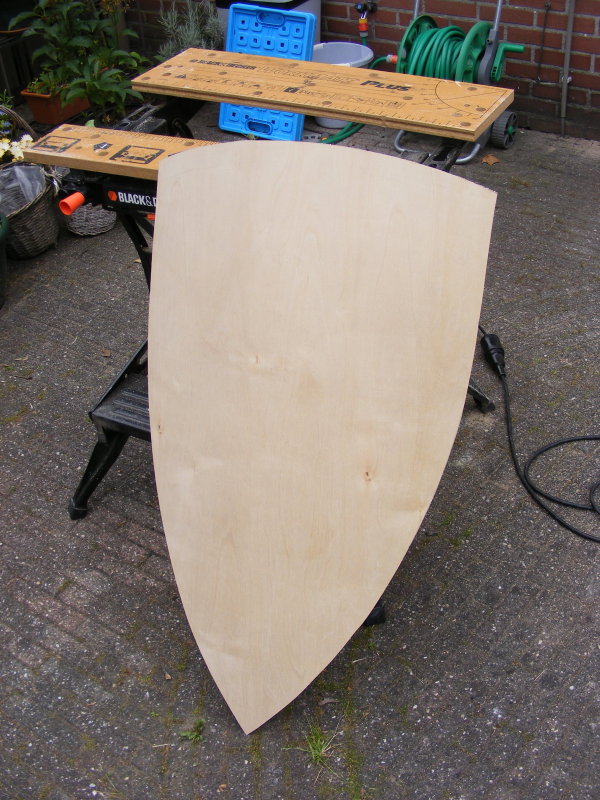
Attachment: 133.33 KB
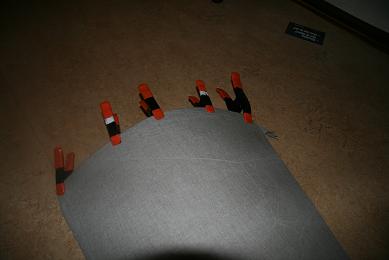
The shield after cutting it out.
|
|
|
|
Luke Zechman
Location: Lock Haven Pennsylvania Joined: 18 Jan 2009
Posts: 278
|
Posted: Sun 20 Jun, 2010 1:45 pm Post subject: |
|
|
Sander,
Nice shield press/ former! I think making a shield would be a fun project, and the end result would be nice to addition to a homes decor. I think the best part would be painting the front with a cool design. I do not know much about shields. Do you intend to cover this with many layers of fabric? What do you intend to paint onto the shield?
As I looked through the pictures I noticed the small modular work bench made by Black and Decker if I recall correctly. I have contemplated getting that work bench due to my limited space, and was wondering if you liked it as a tool.
|
|
|
|
Sander Marechal
|
Posted: Sun 20 Jun, 2010 2:14 pm Post subject: |
|
|
Luke Zechman wrote: | Do you intend to cover this with many layers of fabric? What do you intend to paint onto the shield? |
Yes, I'm going to cover it front and back with several layers of canvas. I don't think I will be painting this one. I'm probably going to put some make-shift strapping on it and bring it to my WMA practice. There I can do some (destructive?) testing to make sure that 8mm is strong enough for my purpose.
After that I will make more shields. I'm going to paint them as Hospitaller shields (red and white) for my reenactment group and one with my family heraldy on it.
Quote: | As I looked through the pictures I noticed the small modular work bench made by Black and Decker if I recall correctly. I have contemplated getting that work bench due to my limited space, and was wondering if you liked it as a tool. |
Yes, absolutely. I use it often to clamp stuff I am working on. The entire top is split down the middle and can close and clamp like a really big vice. I use that feature a lot, even though I have a real workbench as well in my shed. It's not a complete replacement for a sturdy workbench but it works well enough.
|
|
|
|
Jared Smith
|
Posted: Sun 20 Jun, 2010 5:04 pm Post subject: |
|
|
Sander Marechal wrote: |
Yes, I'm going to cover it front and back with several layers of canvas. I don't think I will be painting this one. I'm probably going to put some make-shift strapping on it and bring it to my WMA practice. There I can do some (destructive?) testing to make sure that 8mm is strong enough for my purpose. |
If you do not have a "hot pot" for hide glue, you might want to check and see if you can get some fiberglass cloth (0.5 oz per square yard weight or similar) and 30 or 45 minute setup time epoxy more cheaply for the lamination. This has tremendous strength to weight benefits. (increases of 4:1 compared to un-laminated.) It is not unreasonably to compare to traditional hide glue canvas laminates, just more readily obtainable from current day hardware stores.
Absence of evidence is not necessarily evidence of absence!
|
|
|
|
T. Hamilton
Location: United States Joined: 30 Dec 2009
Posts: 85
|
Posted: Sun 20 Jun, 2010 9:37 pm Post subject: |
|
|
Nice job, Sander! I recently made one using Gaffer's shield press, and you're right, all that tension is a bit unnerving as you're ratcheting down those straps! I used Titebond II glue and left mine in the press a few days. I ended up with a little less spring back that way, so you might give that a shot. I faced mine with heavy duck canvas, then spread a second layer of glue over that. Paint and three layers of polyurethane hardened it up even more. Are you going to edge it before you take it to practice?
"What we do in life echoes in eternity."
|
|
|
|
Sander Marechal
|
Posted: Mon 21 Jun, 2010 12:26 am Post subject: |
|
|
Jared Smith wrote: | You might want to check and see if you can get some fiberglass cloth (0.5 oz per square yard weight or similar) and 30 or 45 minute setup time epoxy more cheaply for the lamination. |
Thanks. I'll see if I can find some around here. I really like the weight of the 8mm shield so I hope I can get them strong enough. It's quite a bit lighter than some of the viking shields that people in our WMA group made. Some are so heavy that they tire out your arm after just 5 minutes of intense fighting.
T. Hamilton wrote: | Are you going to edge it before you take it to practice? |
I haven't decided yet. We use steel wasters so I'm sure a rawhide edge will make it more durable. But on the other hand I do like the look of an unedged shield, and from what I read that became popular in the 13th century. Perhaps I should just make two shields, one edged and one unedged, and see how they hold up under abuse.
|
|
|
|
Sam Gordon Campbell
Location: Australia. Joined: 16 Nov 2008
Posts: 678
|
Posted: Mon 21 Jun, 2010 1:10 am Post subject: |
|
|
Man, I've gotta make me one of these shield press', maybe with a slightly steeper curve.
With regards to edging and looks, what I did with one of mine (it was 5 or 6mm thick) was do all the enarmes and strapping and padding, then I put some cheap bright green el-crappy leather around the edge (have yet to try with either decent veg tanned leather or hardened rawhide) that cost me about a $1, then I simply put two layers of linen over the thing (didn't have canvas, though that would be better) and did the whole 'add more glue' thing then primer coat, then design. I must try that hardening agent everyone keeps mentioning, but I hate the 'gloss' finish I've seen similar things give.
I think that the fact that these are going to be used and probably destroyed in anything from training to fighting, to use sweet historically accurate things to make it with would be a tad annoying. Spend weeks making something, then it get trashed, no thanks
Member of Australia's Stoccata School of Defence since 2008.
Host of Crash Course HEMA.
Founder of The Van Dieman's Land Stage Gladiators.
|
|
|
|
Sander Marechal
|
Posted: Mon 21 Jun, 2010 1:46 am Post subject: |
|
|
Hmm, so in your shield, the edging goes under the canvas facing? Do you have any pictures? I'd like to see how that looks.
|
|
|
|
Sam Gordon Campbell
Location: Australia. Joined: 16 Nov 2008
Posts: 678
|
|
|
|
Bjorn Hagstrom
|
Posted: Mon 21 Jun, 2010 4:29 am Post subject: |
|
|
Sander Marechal wrote: | Hmm, so in your shield, the edging goes under the canvas facing? Do you have any pictures? I'd like to see how that looks. |
I have a couple of shields in progress, one with rawhide edge, and one with edge of layered linen, all onder the topmost linen layer (I use two layers to the face and one to the back) I have added some images. I now have to hide-glue/gesso the front and find some period red pigment to paint it with, since I lean towards the red/white design for the hospitaller shield. I do plan on making my own linseedoil based paint for this.
btw Sander, it seems we are reenacting the very same thing =)
I'll soon post some images of my efforts so far...had some pictures taken this weekend when trying on my gear on horseback for the first time!
Attachment: 20.79 KB
Attachment: 21.14 KB
Attachment: 19.51 KB
There is nothing quite as sad as a one man conga-line...
|
|
|
|
Sander Marechal
|
Posted: Mon 21 Jun, 2010 5:21 am Post subject: |
|
|
That looks quite good. Thanks for the video and the images.
Quote: | btw Sander, it seems we are reenacting the very same thing =) |
It appears so, yes Please let me know about your red pigments when you find them. I probably won't be mixing my own paint like you are going to do, but I am very interested in which colours were available back then.
|
|
|
|
Sam Gordon Campbell
Location: Australia. Joined: 16 Nov 2008
Posts: 678
|
Posted: Mon 21 Jun, 2010 6:00 am Post subject: |
|
|
Bjorn Hagstrom wrote: |
I have a couple of shields in progress, one with rawhide edge, and one with edge of layered linen, all onder the topmost linen layer (I use two layers to the face and one to the back) |
How does the layered linen hold up?
It never occured to me to use the offcuts and such to reinforce the edge, that'd be so much cheaper and easier.
Member of Australia's Stoccata School of Defence since 2008.
Host of Crash Course HEMA.
Founder of The Van Dieman's Land Stage Gladiators.
|
|
|
|
Bjorn Hagstrom
|
Posted: Mon 21 Jun, 2010 6:34 am Post subject: |
|
|
Sam Gordon Campbell wrote: |
How does the layered linen hold up?
It never occured to me to use the offcuts and such to reinforce the edge, that'd be so much cheaper and easier. |
A bit early to tell, really. I have just made one shield with i think six layers of linen to the edge, but have not used it yet, but when I do, I will let you all know.
There is nothing quite as sad as a one man conga-line...
|
|
|
|
Ed McV
Location: Ontario,Canada Joined: 06 Mar 2006
Posts: 27
|
Posted: Mon 21 Jun, 2010 11:37 am Post subject: |
|
|
To avoid excessive springback you might try and steam the shield blank first. It takes extra work but it may solve your problem.
|
|
|
|
Ron Reuter
Location: Southern Indiana Joined: 04 Oct 2007
Posts: 56
|
Posted: Mon 21 Jun, 2010 11:40 am Post subject: Re: My new shieldpress and my first shield |
|
|
Sander Marechal wrote: |
I left it to dry for 24 hours and today I took it out and cut out the shield. As you can see in the third photo the shield did spring back a bit, but overall I am still happy with the results. But if you have any tips on how to make a blank that doesn't spring back so much then I would love to hear it!
|
Sander, nice job! Looks much more profesional then the one on my web page, but I had to adjust mine a few times to get what I wanted.
I have found that the Birch plywood springs back much more then using fir or pine plywood (the type shown in Bjorn's picture above). I do like the birch because it is lighter than the pine plywood, but it is much harder to strap down, more apt to split a bit, and, of course spring back.
Ron
|
|
|
|
Felix R.
|
Posted: Mon 21 Jun, 2010 12:04 pm Post subject: |
|
|
I made my shield without a shield press. Without a press you can get as deep a curvature as you like.
|
|
|
|
Paul Hansen
|
Posted: Mon 21 Jun, 2010 1:00 pm Post subject: |
|
|
Nice press Sander! I made my kite shield by tying it around two poles, but it turned out a bit crooked. Not too bad for training, but not really nice either.
Bjorn Hagstrom wrote: | I now have to hide-glue/gesso the front and find some period red pigment to paint it with, since I lean towards the red/white design for the hospitaller shield. I do plan on making my own linseedoil based paint for this. |
Here's a supplier of a lot of old-fashioned painting materials (pigments, oils, glues etc.):
http://www.verfmolendekat.com/en/home.html
Not everything they sell belongs to the middle ages, but some of it does.
They do have a lot of variety in colours and materials.
They have quite a few distributors in the Netherlands, so if you are able it might be worthwhile to check it out. See the Dutch-language page for details. They also have an English language webshop.
|
|
|
|
Sander Marechal
|
Posted: Mon 21 Jun, 2010 1:43 pm Post subject: Re: My new shieldpress and my first shield |
|
|
Thanks for the compliments and tips!
Ron Reuter wrote: | I have found that the Birch plywood springs back much more then using fir or pine plywood. |
Any idea if a shield made out of fir or pine is as strong as one made from birch? When I was in the hardware store I mainly chose the birch plywood because it had nice, even layers. The fir plywood and a very thick and light coloured inner layer and two very thin outer layers. Almost as if it was veneer instead of plywood.
Great resource, thanks!
|
|
|
|
Randall Moffett
|
Posted: Mon 21 Jun, 2010 2:27 pm Post subject: |
|
|
I really wish I had a shield press. I have attempted to make one but the press cracked and was basically worthless. I have not tried to make one since but I really would like to as I am trying to get some shields together for some friends.
Felix,
How did you make your shield. If you do not want to take this post over shoot me a PM. I tried using a log and it worked just barely. Still thinking over ways to do this.
RPM
|
|
|
|
T. Hamilton
Location: United States Joined: 30 Dec 2009
Posts: 85
|
Posted: Mon 21 Jun, 2010 3:01 pm Post subject: |
|
|
Randall Moffett wrote: | I really wish I had a shield press. I have attempted to make one but the press cracked and was basically worthless. I have not tried to make one since... |
I can't say enough good things about Gaffer's press. Don't worry about it breaking. This thing is SOLID.
"What we do in life echoes in eternity."
|
|
|
|
|