| Author |
Message |
|
Peter Johnsson
Industry Professional
|
 Posted: Wed 25 Feb, 2009 7:02 am Post subject: Posted: Wed 25 Feb, 2009 7:02 am Post subject: |
 |
|
Mikko, this is very interesting work you do!
Thanks for posting pictures and telling us about the process.
I am eager to learn more!
|
|
   |
 |
|
Jeff Pringle
Industry Professional
Location: Oakland, CA Joined: 19 Nov 2005
Posts: 145
|
| Posted: Wed 25 Feb, 2009 7:24 am Post subject: |
|
|
Great stuff Mikko!

Yes, let us not forget the apprentices, and feel sorry for the ones whose letters shifted as the smith’s hammer descended – although, chances are it was the apprentice with the hammer and the smith managing placement, that is more the natural order in the smithy.
I am going to propose that the letters must have been done as a group, in one or a few heats, and not individually or in small groups, just to stir up the cauldron of ideas & hopefully foster further experimentation. If Mikko and I are the only ones trying the techniques out, it may take us a while to sift through the options to find the most likely answers….
The letters were done as a group for following reasons:
-Smiths in general like to maximize work done per heat, and placing letters by ones and twos while the sword is hot wastes several letters worth of heat to either side of the placed letter(s).
-Heating high carbon steel is risky to the material, so bladesmiths would be minimizing the heats as well, especially late in the process.
-Labor was cheap, charcoal and steel expensive, so the labor of cold inlaying the sig so it could be welded in one heat is probably more than balanced out by the fuel saved.
-One would expect the artifacts with inscriptions to be strongly showing uneven amounts of inlay preserved within a single inscription, if the letters were installed in individual operations, but most of the inlays seem to be either there or gone – though if one follows up a lower-temp setting operation with a welding heat to secure everything that would take care of that issue.
These are just my impressions, of course, I don’t have much to back them up, in terms of archaeo-sociology… it just seems like the wrong kind of inefficiency to me. It also seems that the old inscriptions seem a little too tidy to have been done that way, though well-trained apprentices would certainly make the job easier...
I really like the idea of using higher-carbon material for the inlay. It would make for an easier welding operation too, since high carbon is stickier at lower temperatures, and it would explain those swords where the inlay is more corroded than the surrounding blade. I know one Ulfberht was analyzed and found to have an iron (“nearly carbon free” or “Inläggningarna är nästan helt kolfria” in Swedish) inlay, but I have not seen any reports on the later swords’ inlay material. There’s a nice photo of the metal deformation under the inlay in that Fornvännen article.
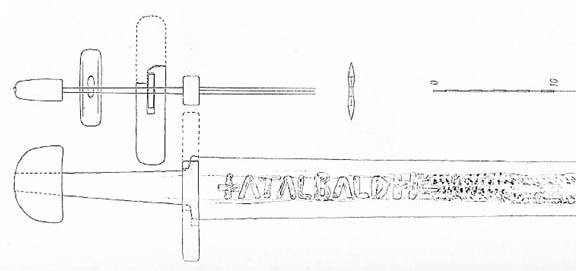
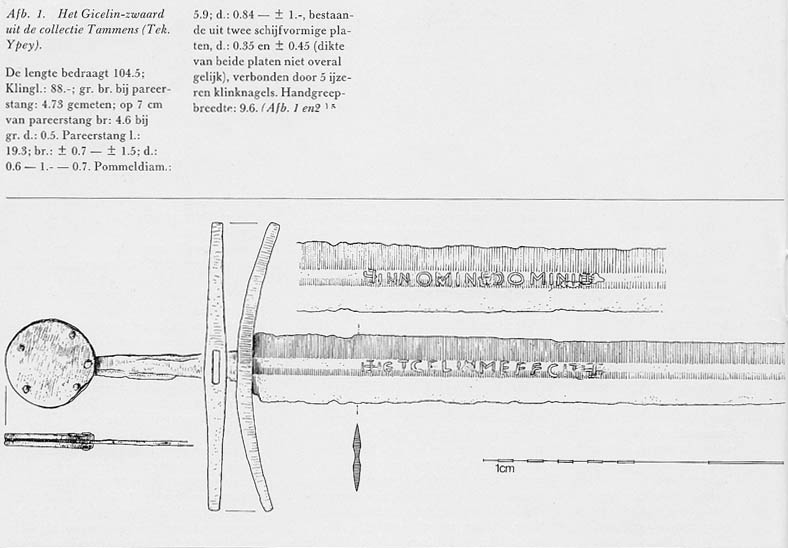
Pattern-welded swords with inlaid inscriptions are mentioned in a couple reports, Lech Marek in “Early Medieval Swords from Central and Eastern Europe” reproduces a drawing of one from Polcyn, and Ypey’s drawing of Atalbaldii’s sword is attached…that is a sword with a six-bar pattern-welded core and Ulf-style sig. Also, a Gicelin drawing of Ypey’s and photos of an inlay I did last year via the “cold inlay then weld” method.
Look, an internet post with bibliography! 
Ypey, J
Vroeg-middeleeuvse wapens uit Nederlandse verzamelingen
ROB 12/13 (1962/63)
Een Gicelin-zwaard in Nederland.
Antiek 6; pp. 521-527 1972.
Polcyn M. 1991, Znaleziska roślinne w podwodnej warstwie kulturowej w obrębie reliktów wczesnośredniowiecznego mostu poznańskiego w jeziorze Lednica, [w:] Wstęp do paleoekologii Lednickiego Parku Krajobrazowego, Poznań.
Törnblom, M
Metallografisk analys av inläggningar i vikingatida svärdsklinga,
inv. nr SHM 907 Go, Hogrän sn, Ålands
Fornvännen 76 1981
 Attachment: 17.41 KB Attachment: 17.41 KB
Attachment: 56.83 KB
Attachment: 23.21 KB
Attachment: 23.51 KB
|
|
|
|
|
|
Mikko Moilanen
Location: Turku, Finland Joined: 23 Aug 2008
Posts: 14
|
| Posted: Wed 25 Feb, 2009 12:31 pm Post subject: |
|
|
I feel that you are right with the minimizing of the number of heats, Jeff. I faced the very same problem during my experiments: it was hard to make the inlays sink deep enough so that they would not suffer from multiple heats. Especially when executing inlays on both sides of the blade, the problem became very clear. I am sure that the swordsmiths of the Viking Age have strived to minimize the number of heats.
The best I have done (without cold inlaying) is to sink two or three letters with one heat. I bet several hands would make possible to inlay even more letters with one heat. I have also noticed that when hammering inlays cold into a hot blade, it is possible to sink the inlay all the way into the blade. For example a pattern-welded rod of a diameter of 3 mm would end up being about 2.5 mm deep, flattening only little. Now when inlays are in this depth, there still remains ca. 1,5 mm deep inlay in the finished blade, even though letters were hammered two at one heat, and welded only after that.
If looking for optional methods producing a neater inscription, cold inlaying before welding would be ideal. Now when looking at the (so far very little) studied inlaid sword blades, grooves could have been struck too, besides carved. The bent material of the blade under the inlay would support struck grooves, but in my opinion some blacksmiths surely carved the grooves since the technique seems to work well. I have also experimented cold inlaid inscriptions in struck grooves, and they ended up looking very neat after welding. I took only four heats to weld all inlays into their places.
I agree also that cold inlaid inscriptions should have a quite uniform look, even when corroded. I have based my assumptions about the outlook of the inlays in the Finnish find material. In Finland, the majority of so far observed inlaid blades have obscure symbolical motives and misspelled inscriptions. In all these blades the inlaid letters differ from each other to some degree. For example, the width of the inlaid rod varies; it can vary between three and six millimetres in one blade. Second, the patterns are varied too, even though the part of the inlays is quite evenly corroded. I think these could be due to inlaying individual letters or marks without any grooves. To sum up, the Finnish finds seem to support different techniques, perhaps also those with cold inlaying before welding.
And, besides carbon, I bet phosphorus was used in inlays too to increase the contrast, since phosphorus-rich iron was sometimes used in the pattern-welding of whole swords. Still I wonder, how the blade was etched, if the inlays were to remain brighter and elevated (if very strongly etched). I will dig up some references about this matter as soon as I have enough time.
And Jeff, do you happen to know if those Jaap Ypey's articles you mentioned are available online? They are impossible to get in Finland... 
|
|
|
|
|
|
Jeff Pringle
Industry Professional
Location: Oakland, CA Joined: 19 Nov 2005
Posts: 145
|
| Posted: Sun 01 Mar, 2009 11:08 am Post subject: |
|
|
I think I mentioned earlier in this thread that it is possible the inlays were not etched at all, by finishing the blade with polishing powders instead of sandpaper they show up really well in direct sunlight.
Another possible method – arrange the letters for an entire inscription on an iron bar or punch face, glued in place temporarily with an adhesive or flux component that could act as glue. The smith sets the bar down on the hot blade in the correct location and the apprentices have at it with the hammers. If this method was used, you might expect to find letters reversed or upside down, this would not be as likely with cut letters. We should be able to find indications of which methods were used by analysis of misplaced letters combined with careful, perhaps microscopic examination of the original blades, for instance punching and cutting should both leave traces adjacent to the inlaid letters in corners or where letter pieces meet up, which would be modified by subsequent forging but not entirely erased.
You can often find Ypey’s articles through internet book seller searches, in the Netherlands & elsewhere.
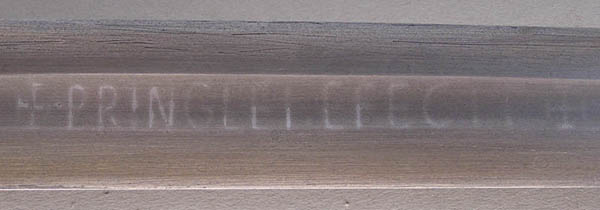
Here’s an original blade that has been cleaned up a bit, assembling the Es out of multiple pieces argues for cold inlay, I think.

Attachment: 93.39 KB
[ Download ]
|
|
|
|
|
|
Mikko Moilanen
Location: Turku, Finland Joined: 23 Aug 2008
Posts: 14
|
| Posted: Tue 03 Mar, 2009 6:37 am Post subject: |
|
|
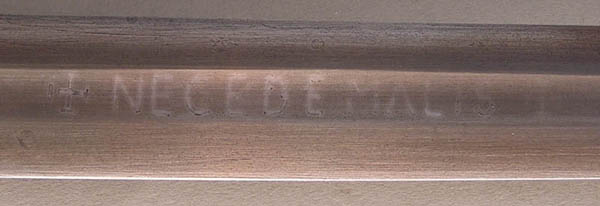
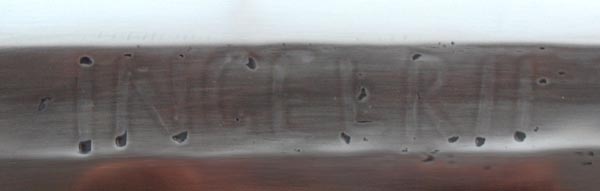
Indeed, the inlays can be seen without etching on the surface of a polished blade. In the attachment is an INGELRII blade I did few years ago as a part of my experiments. This blade was not etched, and still the inlays can be seen very clearly on the polished blade.
I have also thought about that theory of yours, Jeff. Maybe the inlays could have been arranged on a hot iron bar with welded flux on it, perhaps quartz sand. I think that flux is the only alternative, since the bar with letters have to be placed on a hot blade blank. I can't think of other "glue" that would hold. I guess this alternative needs testing...
The multiple pieces of inlays could indicate cold inlay, of course. I have managed to inlay for example letters E, F and M from multiple pieces without cold inlaying. The height of these letters was ca. 1 cm. Since the inlaid rods were so small in diameter, they had to be hammered quickly, and so one letter could be hammered with one heat. Of course the accuracy is not the same as doing cold inlay, but the technique is plausible. In connection with original blades, microscopic analyses are needed to find out more about the techniques. It is strange that scholars seem to be interested in what is inlaid, instead (and additionally) how it is inlayed. I personally believe that Iron Age blacksmiths have done it in multiple ways.
Attachment: 19.34 KB
|
|
|
|
|
|
Michael Pikula
Industry Professional
Location: Madison, WI Joined: 07 Jun 2008
Posts: 411
|
| Posted: Tue 03 Mar, 2009 7:44 am Post subject: |
|
|
With using flux as a glue I think this can be done fairly well in a gas forge, but I don't know about a coal or charcoal forge... I remember when I was doing pattern welded in a coal forge placing the steel into the fire and then building my fire seemed like it would create too many chances for a some kind of disturbance to the letters. Charcoal could be better since it is lighter and doesn't stick to itself so there are less chances of the letter catching on a fire as you pull it out to weld. With coal, it seems like the only way would be to make the "cave" fire and have it all fired up and very carefully slide the blade and letters in without touching the walls and hoping that a part of the wall doesn't collapse.
I think with using the flux as glue to hold the letters in position you would almost have to have a recessed groove for the inlay to sit in and also bring the blade and letters up to heat very slowly.
Another thing that I wonder about is if you have your groove cut out, and your letters in position would the letters pop out of position when first heating up the piece? I have noticed that on every blade that I have made, the outside naturally heats up faster then the inside which leads to the outside rods expanding more then the inside rods. I am working with bands holding everything in place and moving them around as I work to weld the piece which seems to help a great deal. Would a similar effect be experienced to some degree with the letters? I would imagine if they were in a tight fitting groove there would be too much surface area touching between the two to really allow them to get tweaked out of place, but if just resting on the surface and glued with flux I could see them tending to move around a bit.
Just my two cents worth. I have to say that I haven't tried doing inlay in this manner yet. I am hoping that in a few weeks I will have time to give it some tries. Just trying to apply what I have experienced to what I WILL experience.
|
|
|
|
|
|
Jeff Pringle
Industry Professional
Location: Oakland, CA Joined: 19 Nov 2005
Posts: 145
|
| Posted: Wed 04 Mar, 2009 4:52 am Post subject: |
|
|
Michael, you should try it out, maybe you'll like it!
Mikko, I agree we are not looking for THE way, but rather the wayS in which these were done. On the glued-in-place to a transfer bar or punch concept, an adhesive clay with refractory properties akin to the insulation traditionally used during quenching in Japan would be able to hold the letters in alignment to a cold bar as they were pressed against the hot blade, maybe even though the few hammer blows it would take to sink the inlay into the metal, and leave residues that would brush away or combine with the flux easily. A cold back would keep the letters from heating quickly as well.
|
|
|
|
|
Richard Furrer
Industry Professional

Location: Sturgeon Bay, WI Joined: 11 Jun 2004
Posts: 77
|
| Posted: Sat 05 Dec, 2009 8:16 am Post subject: inlay technique |
|
|
Hello All,
I only just found this discussion.
oddly I was at the BM looking at an Ingelrii when the last of this was discussed.
After viewing that sword and looking at the one cross-section photo I could find I would think that the blade was prepared with a shallow groove, a round twisted rod was placed in the groove and it was welded in place.
The forges were side draft yes? This allows for the placing of the blade in the fire, a good heat taken and a small "bounce tool" to be danced on the surface...think of it like a small tamping hammer used for striking the xylophone or in the doctor's office for your knee. you only need to strike hard enough to tack-weld the letters in place.
Then flip the blade over and set the other letters and do the same.
Doing the first welds in the fire or very close to it...an anvil just out of the fire.
I have done this in fire welding on small items and have also done the anvil near the fire as well (a few inches out of the wood coals).
I have also done "pinch welding" where the items to be joined were held with tongs or wedges till hot and then simply reach in with tongs and pinch the parts together...it is not a strong bond, but it holds well enough to get a larger fire going on it and be aggressive with the poking in the wood coals. It also lets you get the mass of billet or whatever to the anvil in one block for welding in the "proper" way.
A bit of punch work to set the rod on both sides cold would not hurt either.
BUT
in any even it appears to me that the welding was done on both side at the same time to join the letters to the blade...and the fit appears to be very good in the one I have seen in person. Anything else would have led to large distortion or unevenness.
I'll do some samples in February when I have a bit of time.
Ric
Ric Furrer
Sturgeon Bay, WI
www.doorcountyforgeworks.com
|
|
|
|
|
Jared Smith

|
| Posted: Sat 05 Dec, 2009 8:47 am Post subject: Re: inlay technique |
|
|
| Richard Furrer wrote: |
After viewing that sword and looking at the one cross-section photo I could find I would think that the blade was prepared with a shallow groove, a round twisted rod was placed in the groove and it was welded in place.
..... a small "bounce tool" to be danced on the surface...think of it like a small tamping hammer used for striking the xylophone or in the doctor's office for your knee. you only need to strike hard enough to tack-weld the letters in place. |
I was thinking a ball peen hammer would work to tap the wire inlays. To be careful, one could just engrave the grooves on one side at a time, and finish the inlay welding before engraving grooves on the other side. If working with coal and wire that was already interference fitted into the grooves, you could even just lay the inlay side down without heating the entire blade thickness through, ( Thus causing some hardening of the reverse non engraved side that would make subsequent engraving more difficult.)
Absence of evidence is not necessarily evidence of absence!
|
|
|
|
|
|
Michael Pikula
Industry Professional
Location: Madison, WI Joined: 07 Jun 2008
Posts: 411
|
| Posted: Sat 05 Dec, 2009 9:15 am Post subject: |
|
|
Thanks for your thoughts Richard! I am looking forward to seeing your samples
I have had a chance to play with the "beat the formed wire into a hot blade" technique and I found that the profile had to be triangular, otherwise the seam along the edges doesn't weld to the inlay all the way, since it is pushed away as the inlay is hammered in. I have found that this technique doesn't work too well since there is a great amount of force needed to drive the lettering into the blade. The small sample I made prior to trying it on a blade worked fine, but even with a blow from a 165lb. power hammer, it wasn't enough to fully sink one letter at a time, as was done on the small sample bit. This leads me to think that Richard and Jeff are right in that the wire must be hammered into a preexisting groove. Although using flux to stick letters onto a template to getting hammered in works very well, just can't get enough force to set the letter properly or deep enough. More testing is in order for sure!
|
|
|
|
|
Richard Furrer
Industry Professional
Location: Sturgeon Bay, WI Joined: 11 Jun 2004
Posts: 77
|
| Posted: Sat 05 Dec, 2009 6:25 pm Post subject: Re: inlay technique |
|
|
[quote="Jared Smith"] | Richard Furrer wrote: |
I was thinking a ball peen hammer would work to tap the wire inlays. To be careful, one could just engrave the grooves on one side at a time, and finish the inlay welding before engraving grooves on the other side. If working with coal and wire that was already interference fitted into the grooves, you could even just lay the inlay side down without heating the entire blade thickness through, ( Thus causing some hardening of the reverse non engraved side that would make subsequent engraving more difficult.) |
Jared,
This is not what I would call a wire inlay, but more of an iron/steel rod. It is a true forge weld not simply a standard mechanical lock as in wire inlay.
I have never been able to heat just one flat side of a blade..it is more an all or nothing in a fire. Possibly with induction heating one could do all sorts of odd things, but...
If I were to inlay a non-ferrous wire then I would do so at room temp on a soft blade with no heat.
Ric
Ric Furrer
Sturgeon Bay, WI
www.doorcountyforgeworks.com
|
|
|
|
|
|
|
You cannot post new topics in this forum
You cannot reply to topics in this forum
You cannot edit your posts in this forum
You cannot delete your posts in this forum
You cannot vote in polls in this forum
You cannot attach files in this forum
You can download files in this forum
|
All contents © Copyright 2003-2026 myArmoury.com — All rights reserved
Discussion forums powered by phpBB © The phpBB Group
Switch to the Basic Low-bandwidth Version of the forum
|

