
| myArmoury.com is now completely member-supported. Please contribute to our efforts with a donation. Your donations will go towards updating our site, modernizing it, and keeping it viable long-term.
Last 10 Donors: Adam James, Piotr H. Feret, Graham Shearlaw, Anonymous, Daniel Sullivan, Chad Arnow, Jonathan Dean, M. Oroszlany, Sam Arwas, Barry C. Hutchins (View All Donors) |
| Author |
Message |
|
Alex Indman
|
 Posted: Thu 06 Oct, 2016 11:49 am Post subject: XVI century Italian style falchion/storta – DIY project Posted: Thu 06 Oct, 2016 11:49 am Post subject: XVI century Italian style falchion/storta – DIY project |
 |
|
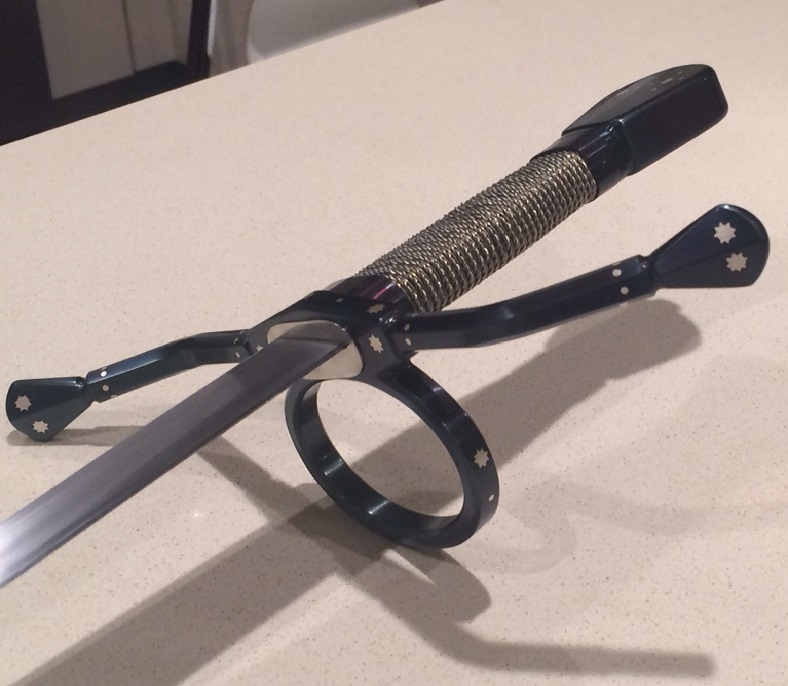
Hi guys,
Showing off my last hobby project, been in the works for a couple of year with interruptions. The sword is finally finished, just the scabbard left to be completed.
See the attached pictures.
The blade I used is Kris Cutlery’s Pinuti II (not produced anymore). I like KC blades in general and used them for many of my project over the years. They are affordable but perfectly functional, good well heat treated steel.
I consider Pinuti as just about the perfect blade shape/size for a short cut and thrust sword, so used it even though it isn’t exactly historically correct. I made an XVIIIc hanger/hunting sword with the original Pinuti blade about 5 years ago, and for this project got the next iteration of the blade, which actually has two advantages from my point of view: made of simple 1060 carbon steel (more period than the original’s 5160) and thicker blade.
The only problem with these blades is tang: it is relatively short, originally just epoxied into the wooden handle. So to use traditional peened handle/pommel construction, I had to extend it with a piece of mild steel. I did it with a very tight (hammered in) T shaped joint, and brass braised. No way it can be pulled out, and stood the stress of peening the tang just fine. The joint is under the handle, about an inch from pommel. So it can’t be laterally bent either, not without breaking the handle first.
The blade stats: 20” long, 5/16” thick at the guard (with strong distal taper), a little over 1 1/8” at the guard and 1 5/8” at the widest belly.
Balance point is about 2 ¾” in front of the guard, even with the solid steel guard/pommel. It is a pretty heavy little beast (unfortunately I don’t have suitable scale to weigh it). But still, very much maneuverable, thanks to just 20” of blade.
All fittings (guard, pommel, handle collars) are 1018 mild steel, heat blued, with fine silver inlays. Color and contrast came out better than I expected, much nicer than my pictures can show.
Handle is wood (poplar) core, wrapped with two wire strands (plain “gold” and twisted “silver”).
There is a nickel silver washer between guard and blade (couldn’t fit the guard without some unsightly gaps).
Peen block also of nickel silver, decorated with 4 round cuts on the sides.
Any thoughts/questions?
BTW, I am still researching design for the scabbard, going to start a separate topic on that.
Thanks.
Alex.
 Attachment: 139.61 KB Attachment: 139.61 KB
Attachment: 106.74 KB
[ Download ]
Attachment: 239.7 KB
[ Download ]
Attachment: 180.8 KB
[ Download ]
Attachment: 123.91 KB
[ Download ]
|
|
  |
 |
|
Alex Indman
|
| Posted: Thu 06 Oct, 2016 11:56 am Post subject: |
|
|
And a couple more pictures of the handle, front and back (can see hairline solder joints on the handle collars on the back side, can't figure out how to make them invisible).
Alex.
Attachment: 234.47 KB
[ Download ]
Attachment: 234.37 KB
[ Download ]
|
|
|
|
|
|
Jeffrey Faulk
|
| Posted: Thu 06 Oct, 2016 12:23 pm Post subject: |
|
|
Lovely work!
The only criticism I have is that the bend in the quillons seems a bit mechanical. If it was a bit more curved along the length of the quillons, it would be more suitable.
Apart from that, wonderful job. Great idea on using the Pinuti blade.
|
|
|
|
|
|
Alex Indman
|
| Posted: Thu 06 Oct, 2016 12:59 pm Post subject: |
|
|
Jeffrey,
funny thing is that I actually planned to make the bend evenly curved, just as you said. However, when I finished filing and sanding the guard and tried to bend the quillons, I found that I just couldn't do it. Bending 3/8" octagonal steel rod within just 2.5" length required so much force that I wasn't able to do it in a controlled manner. The most I worked with before was 1/4" round steel quillons, and that I could slowly bend over rounded wooden pads while held in my vise. With this one, wood pads just disintegrated before any bending happened. And my vise/bench were not big and rigid enough anyway to stand to the kind of pounding needed. So I ended up cobbling together some steel and copper pads and positioning them in the vise to bend quillons by squeezing. And even then I barely managed to bend them in the middle at all, forget about any controlled curves!
I guess the only way to produce nice curves would be to heat it red hot and actually forge to shape. But that would of course destroy the octagonal cross section of the quillons, so I decided not to go that way.
Alex.
|
|
|
|
|
M. Adair Orr

|
| Posted: Fri 07 Oct, 2016 9:51 am Post subject: |
|
|
Hi Alex,
Nice project. A bright heat on the guard to bend it as described would not ruin the file work. You would have to use care not to twist it as you bent it. By using a flat faced wood mallet you could avoid marring the work. The heat would leave a little texture to the finished piece. That might be desireable, if not a quick sanding would eliminate it.
-Adair
|
|
|
|
|
|
Alex Indman
|
| Posted: Fri 07 Oct, 2016 12:24 pm Post subject: |
|
|
Adair,
this would be a tricky proposition, for me at least. I don't have a forge, just a little oxygen-MAPP torch, no anvil, not even a really rock solid vise, and no experience with hot working steel. Plus at the point I realized my problem, the silver inlay was already in. I imagine I would have to heat just the place of bend locally, try to bend a little while keeping it hot enough, then move the heated area just a bit and try to bend some more, and so on.
I may try this on a scrap piece for possible use in some later project, but this time I decided not to risk ruining an almost finished piece.
More likely in future projects I will just keep the thickness of my steel quillons under 1/4", if they are to be bent.
Thanks.
Alex.
|
|
|
|
|
M. Adair Orr
|
| Posted: Fri 07 Oct, 2016 1:04 pm Post subject: |
|
|
Alex,
I did not intend to suggest that you revisit this. You've made a lovely piece. I just thought I would correct an assumption for future reference or for the benefit of others. Heat won't completely eliminate the challenges of varying cross-sections, but it will do wonders compared to cold working. Many often fail to consider that working hot steel over wood gives sufficient control to bend and shape while minimizing the risk of marring.
-Adair
|
|
|
|
|
|
Karl Knisley
|
| Posted: Fri 07 Oct, 2016 1:17 pm Post subject: |
|
|
|
Now that`s a good looking sword :-)
|
|
|
|
|
|
Alex Indman
|
| Posted: Tue 15 Nov, 2016 12:04 pm Post subject: |
|
|
An update - I completed the scabbard, so the project is finally done!
See the attached picture for the whole package being worn.
And there is this thread with more pictures of the scabbard, and a little discussion of historical examples:
http://myArmoury.com/talk/viewtopic.php?p=316003#316003
Alex.
Attachment: 128.13 KB
[ Download ]
|
|
|
|
|
|
Greg Ballantyne
|
| Posted: Fri 25 Nov, 2016 9:21 pm Post subject: |
|
|
|
I'm curious about the inlays in the blackened steel. What material did you use?
|
|
|
|
|
|
K. Robert
|
| Posted: Sat 26 Nov, 2016 4:00 am Post subject: Re: XVI century Italian style falchion/storta – DIY project |
|
|
| Alex Indman wrote: |
All fittings (guard, pommel, handle collars) are 1018 mild steel, heat blued, with fine silver inlays. Color and contrast came out better than I expected, much nicer than my pictures can show.
. |
He mentioned silver 
|
|
|
|
|
|
Alex Indman
|
| Posted: Mon 28 Nov, 2016 5:44 am Post subject: |
|
|
Yes, I used fine silver. Very soft and malleable material, easy to hammer into inlays. And surprisingly not too expensive, I estimate this project took only about $10 worth of it.
Alex.
|
|
|
|
|
|
|
You cannot post new topics in this forum
You cannot reply to topics in this forum
You cannot edit your posts in this forum
You cannot delete your posts in this forum
You cannot vote in polls in this forum
You cannot attach files in this forum
You can download files in this forum
|
All contents © Copyright 2003-2026 myArmoury.com — All rights reserved
Discussion forums powered by phpBB © The phpBB Group
Switch to the Basic Low-bandwidth Version of the forum
|

