Author |
Message |
Harry Marinakis
|
Posted: Thu 12 Mar, 2015 10:15 am Post subject: Need seax suspension advice |
|
|
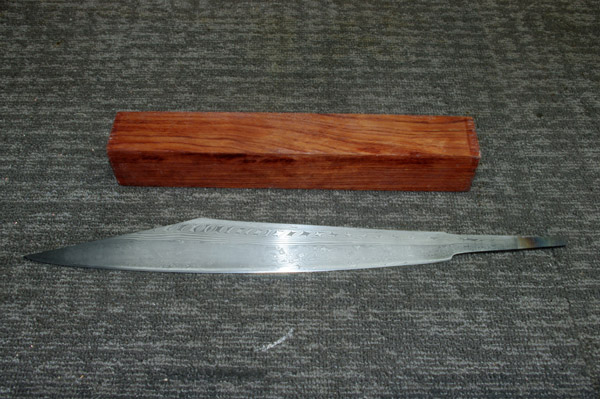
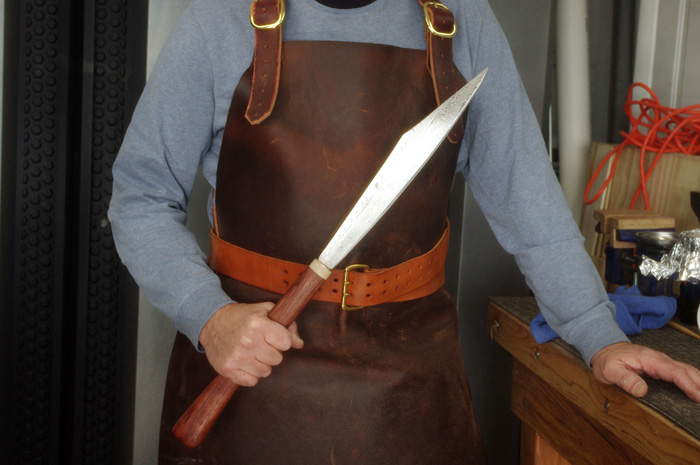
Currently in the process of making a handle for this Owen Bush seax. Next gotta make a sheath and suspension.
I am wondering how I should suspend this baby. Do you think it's too big to hang horizontally in front?
Or should I go with a vertical scabbard-like side suspension?
Attachment: 107.32 KB
|
|
|
|
Tim Jones
Location: United Kingdom Joined: 05 Nov 2013
Posts: 37
|
Posted: Thu 12 Mar, 2015 10:32 am Post subject: |
|
|
If you're trying to be historical, go for horizontal suspension, something like the York scabbard would suit it perfectly. However, I think the handle is too long for both options. Shortening it a bit might be an idea, and it might just be my love of fancy handles, but horn or bone spacers would look brilliant
|
|
|
|
Harry Marinakis
|
Posted: Thu 12 Mar, 2015 11:08 am Post subject: |
|
|
Thanks Tim.
Historical is my goal.
How much shorter? 20% shorter?
I plan to make a bronze bolster with a bone spacer in between
|
|
|
|
J. Nicolaysen
|
Posted: Thu 12 Mar, 2015 11:12 am Post subject: |
|
|
That is kind of a scary picture Harry: "The Butcher of Aethelmearc". But it is a very nice seax and I hope you show pictures of the completed work here.
|
|
|
|
Tim Jones
Location: United Kingdom Joined: 05 Nov 2013
Posts: 37
|
Posted: Thu 12 Mar, 2015 11:41 am Post subject: |
|
|
I tend to add around 10mm onto the total length of my hand when clenched. Should look nice, I've been making a Gotlandic war knife and finished the handle a little while back. It's got black horn, ash and leather spacers and a brass bolster at each end. I've still got to do the lanyard loop and of course the sheath. I suspect I might have bitten off a little more than I can chew with that one....
|
|
|
|
Matthew Bunker
Location: Somerset UK Joined: 02 Apr 2009
Posts: 483
|
|
|
|
Harry Marinakis
|
Posted: Thu 12 Mar, 2015 4:26 pm Post subject: |
|
|
I really don't want to shorten the handle, it feels good in my hand. Would it be historical to leave it this long?
|
|
|
|
Matthew Bunker
Location: Somerset UK Joined: 02 Apr 2009
Posts: 483
|
Posted: Thu 12 Mar, 2015 11:51 pm Post subject: |
|
|
Harry, have a look at the proportion of blade to handle on the 'Charlamagne' seax.
"If a Greek can do it, two Englishman certainly can !"
|
|
|
|
Tim Jones
Location: United Kingdom Joined: 05 Nov 2013
Posts: 37
|
Posted: Fri 13 Mar, 2015 9:36 am Post subject: |
|
|
I've just found this image of the Charlemagne seax, and after some further reading, I stand corrected about handle lengths. The sheath might provide some inspiration.
|
|
|
|
Harry Marinakis
|
Posted: Sat 14 Mar, 2015 4:43 am Post subject: |
|
|
Thanks Tim & Matt
I was using the proportions of the Charlemagne seax, but I assumed that my seax was a whole lot bigger and wasn't sure if the same proportions applied to a larger knife.
Tim, I have never made a "fancy" handle, but at your insistence I added a bone spacer between the handle and bolster. I was surprised by how easy it was, and how quickly I did it.
I decided to keep the handle the sme length, and I'll just have a big seax. If I mount the seax in front, the sheath will have to be shorter than usual so that I will be able to draw the seax.
|
|
|
|
Harry Marinakis
|
Posted: Sun 15 Mar, 2015 2:49 pm Post subject: |
|
|
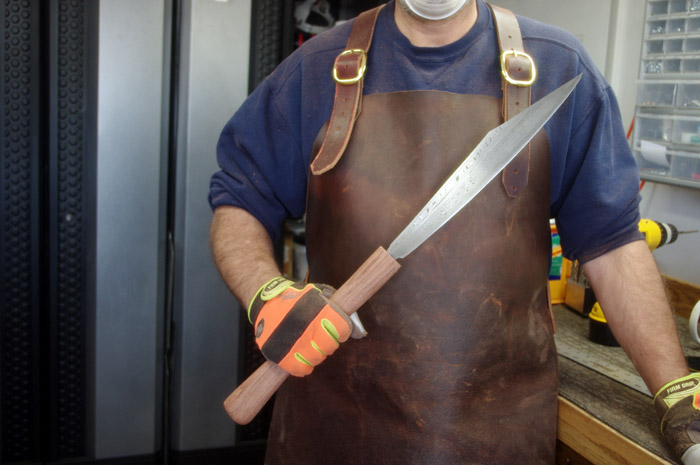
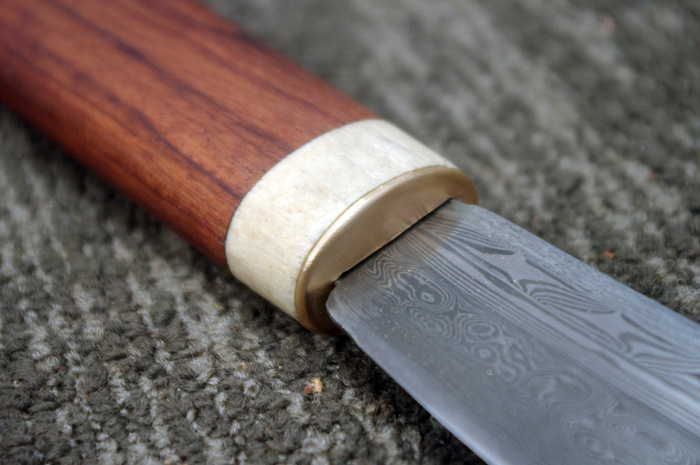
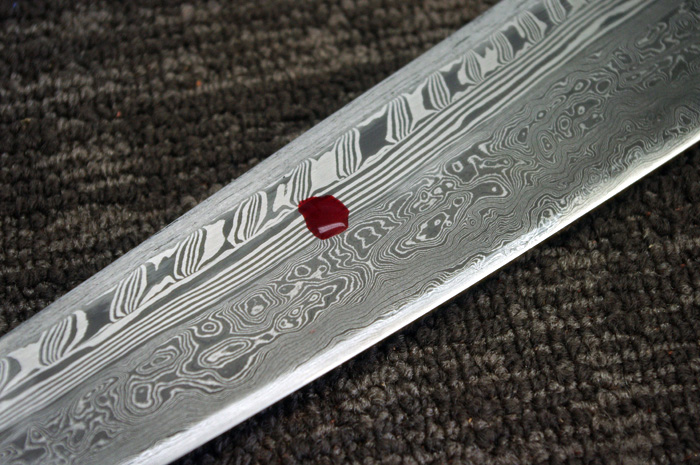
Finished the seax.
Owen Bush blade
Figured Bubinga handle
Horse bone spacer
16 gauge bronze bolster
I have never done any kind of handle work before, this was my first attempt. I was pleasantly surprised how easy it is to add a spacer and bolster - with the correct tools. This is as fancy as it gets for me at this stage.
Now gotta work on the sheath.
Does anyone besides me always bleed on everything that they make? I can't seem to finish anything without getting blood on it at some point.
Attachment: 134.05 KB
Attachment: 140.43 KB
Attachment: 197.34 KB
|
|
|
|
Marc Blaydoe
Location: Maryland Joined: 29 Sep 2006
Posts: 72
|
Posted: Sun 15 Mar, 2015 4:32 pm Post subject: |
|
|
Once drawn, a knife should not be sheathed until it has drawn blood! I'm that way with my tools in general.
An armed man is a citizen. An unarmed man is a subject.
|
|
|
|
Matthew Bunker
Location: Somerset UK Joined: 02 Apr 2009
Posts: 483
|
Posted: Mon 16 Mar, 2015 12:16 am Post subject: |
|
|
Harry Marinakis wrote: | a spacer and bolster - |
Ah, not going for the 100% authentic look then?
"If a Greek can do it, two Englishman certainly can !"
|
|
|
|
Harry Marinakis
|
Posted: Mon 16 Mar, 2015 5:47 am Post subject: |
|
|
Close enough (:
Spacers and bolsters were not unheard of in the 11th C.
It's not excessive and I learned a new skill.
|
|
|
|
Eric W. Norenberg
|
Posted: Mon 16 Mar, 2015 7:24 am Post subject: |
|
|
Marc Blaydoe wrote: | Once drawn, a knife should not be sheathed until it has drawn blood! I'm that way with my tools in general. |
Hey I had a hammer like that for years! Good ol' Nosebiter.
I wonder how my old roommate is getting along with it.
|
|
|
|
Tim Jones
Location: United Kingdom Joined: 05 Nov 2013
Posts: 37
|
Posted: Mon 16 Mar, 2015 12:14 pm Post subject: |
|
|
Very nice piece of work! Are you going to do a copy of the Charlemagne Seax sheath?
I keep shredding my hands on practically everything in the shop, especially when making things for a certain friend
|
|
|
|
Carl W.
|
Posted: Mon 16 Mar, 2015 11:40 pm Post subject: |
|
|
Harry,
Here is one reproduction suspension approach, at least partly echoing Matthew's post...
http://myArmoury.com/talk/viewtopic.php?t=269...t=seax+sax
How did you make & assemble the grip? (Brief main points, not every detail.)
Grip is one piece? Started with what stock? Kept entire tang? Drill or burn or...? Glue?
Thank you for sharing - this as well as your research & DYI topics.
|
|
|
|
Harry Marinakis
|
Posted: Tue 17 Mar, 2015 12:05 pm Post subject: |
|
|
Thanks for the link Carl. From what I've been reading my 14-inch blade is on the cusp between a hand seax and a langseax. I decided to go with the hand seax because of the shape of the blade, and thus used a longer handle.
I started with a stock piece of Figured Bubinga 2" x 2" x 12".
I drilled a series of holes for the tang and used very narrow straight chisels to enlarge and finish the cavity for the tang.
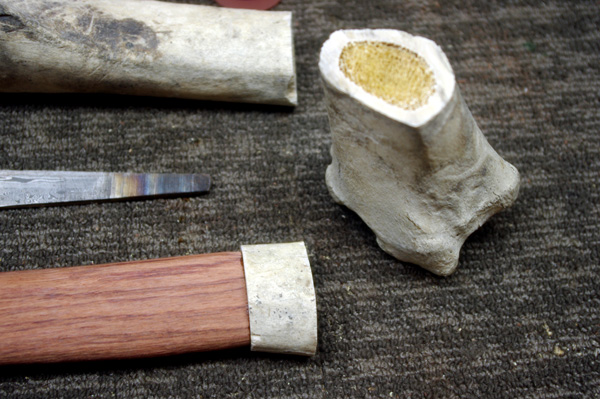
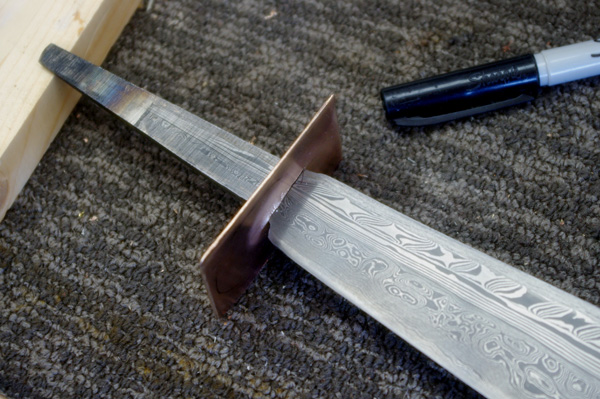
I did not use the burning method, as I feared that would ruin the temper of the blade. I did try heating just the tip of the tang, but that process discolored the tang (see picture below). If I had tried to heat the entire tang, I am terrified to think what I would have done to the blade itself.
I dug up a horse bone and cut a piece for the spacer. The hard part is finding a piece where the cortex is thick enough so that you can sand it down to match the handle.
I removed the fine trabeculae from the marrow and "stabilized" the bone by coating the inside with epoxy to prevent cracking while I was sanding. Then I epoxied the bone to the handle and took it to the belt sander again to finalize the handle's shape.
Finally I filled the tang hole with epoxy, and set the tang with the bolster in place.
In retrospect, I should have probably done some things in a different order, but I am still trying to figure out how that would have worked.
Attachment: 121.76 KB
Attachment: 146.9 KB
Attachment: 155.84 KB
|
|
|
|
|