| Author |
Message |
|
Marc C
Location: Tallahassee, FL Joined: 20 Feb 2007
Posts: 2
|
 Posted: Tue 20 Feb, 2007 9:12 am Post subject: Trying my hand at a swept hilt - start me out right, people Posted: Tue 20 Feb, 2007 9:12 am Post subject: Trying my hand at a swept hilt - start me out right, people |
 |
|
I'm a new member making my first post.
I'm researching methods and equipment required to try and reproduce a 3-ring swept hilt as a project; any good source images of museum pieces would be appreciated!
If you're an experienced maker of hilts, what stories and advice do you have? What to be careful of, what to not try, and what methods work best? Originals were hand-forged, but what modern concessions do you make - do you arc weld, torch-braze, or hand-forge? Do you use a jig, just a vice or free-hand with an anvil?
Any advice and instruction is appreciated,
Marc
Friends come and go...enemies accumulate.
|
|
       |
 |
Nathan Robinson
myArmoury Admin


|
| Posted: Tue 20 Feb, 2007 9:15 am Post subject: Re: Trying my hand at a swept hilt - start me out right, peo |
|
|
| Marc C wrote: | | I'm researching methods and equipment required to try and reproduce a 3-ring swept hilt as a project; any good source images of museum pieces would be appreciated! |
There are many hundreds of images of museum pieces on this site, several of which are 3-ring swept hilts.
Cheers
.:. Visit my Collection Gallery :: View my Reading List :: View my Wish List :: See Pages I Like :: Find me on Facebook .:.
|
|
 |
|
Bill Grandy
myArmoury Team

|
| Posted: Tue 20 Feb, 2007 10:10 pm Post subject: |
|
|
As a start, I would absolutely purchase a copy of AVB Norman's "The Rapier and Smallsword". It not only has a typology of the various hilt styles used, but it also goes into detail about the pommels and inner guards. I'm no hilt maker, but I would say that anyone attempting to make rapier hilts without this book would probably be spending a lot of time reinventing the wheel.
HistoricalHandcrafts.com
-Inspired by History, Crafted by Hand
"For practice is better than artfulness. Your exercise can do well without artfulness, but artfulness is not much good without the exercise.” -anonymous 15th century fencing master, MS 3227a
|
|
|
|
|
|
Tim Harris
Industry Professional
Location: Melbourne, Australia Joined: 06 Sep 2006
Posts: 168
|
| Posted: Wed 21 Feb, 2007 4:38 am Post subject: Re: Trying my hand at a swept hilt - start me out right, peo |
|
|
| Marc C wrote: |
If you're an experienced maker of hilts, what stories and advice do you have? What to be careful of, what to not try, and what methods work best? Originals were hand-forged, but what modern concessions do you make - do you arc weld, torch-braze, or hand-forge? Do you use a jig, just a vice or free-hand with an anvil?
Any advice and instruction is appreciated,
Marc |
Hi Marc,
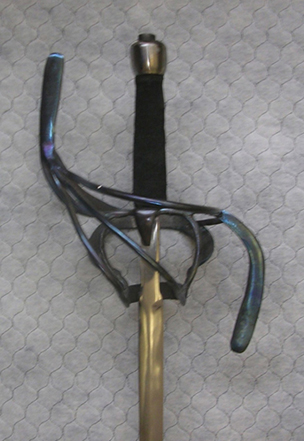
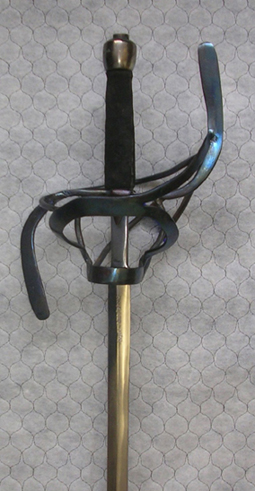
This is a bit fortuitous...I was just about to post some pics of a swept hilt I finished recently for a left-handed swordsman - and no, "Princess Bride" fans, he has the usual compliment of fingers. I'll put them in here.
I forge as appropriate, and forge weld where I can, but often resort to oxy acetylene. If you're a skilled arc welder it would be possible, but personally, I prefer oxy. It's less messy in my hands. I've never tried TIG welding, but I hear it gives good results. One of the pics shows a bt of a pit where the counterguards meet the knucklebow. Try to avoid blasting craters like that. (Physician heal thyself).
For me, the main thing with a hilt like this is to finish the components as much as you can before assembling them. There's no fun to be had trying to clean up an area trapped behind a nest of bars.
Also, do whatever it takes to make solid welds. Bevelling well to ensure a good fill helps a lot with this if gas welding.
Other makers have their own ways of doing things, so the following is just my approach:
You can always take metal away, but it's tricky to add it. I work over-long and cut back to size. I don't usually work to a pattern, and tend to do things by eye. I work out general sizes with wire, allow a bit extra and adjust back.
The hilt in the pictures was made in this sequence:
1. Forge quillon block and quillons. 2 pieces in this case, forge welded together. The block sits over the quillon like a saddle. This may not be historically accurate, but works for me. The slot for the tang was done hot with a special slotting punch, which is shaped to leave a depression in the underside for seating the blade. Quillons bent over anvil horn and with bending fork.
2. Forge enarmes and side ring. Assemble these and fit to quillon. The rest of the hilt attaches to these.
3. With the essential bits done, other components can now be shaped to fit. Here, the larger bars were forged, but the counterguards at the rear were roughed out by cold bending, then adjusted with the oxy torch.
Once assembled, tweak the lines if needed (rubber mallet and wooden block help here), clean up and finish as desired. This one was taken to 240 grit, then worked over with a hard sisal buff and coarse compound. The blueing was done in an electric kitchen oven on max. It took an hour or so to get the colour. Gas would be better, possibly.
Oh, one more important thing: make sure the edges of the quillon are smooth and rounded where fingers will be wrapping - before it is all put together. This is not an easy adjustment to make if done after assembly.
Hope that helped.
Cheers
Tim Harris[/u]
 Attachment: 112.98 KB Attachment: 112.98 KB
Attachment: 114.33 KB
Attachment: 83.72 KB
[ Download ]
|
|
|
|
|
|
Marc C
Location: Tallahassee, FL Joined: 20 Feb 2007
Posts: 2
|
| Posted: Wed 21 Feb, 2007 11:57 am Post subject: |
|
|
Great work Tim! If I can get anywhere close to that craftsmanship, I'm golden :-)
Thanks for the great advice and step-by step instruction; that's what I was looking for; all I need is to brush up on my basic torch skills and convince the Mrs. to let me invest in a portable tank/torch setup ;-)
Marc
Friends come and go...enemies accumulate.
|
|
|
|
|
|
Tim Harris
Industry Professional
Location: Melbourne, Australia Joined: 06 Sep 2006
Posts: 168
|
| Posted: Wed 28 Feb, 2007 7:01 pm Post subject: |
|
|
| Marc C wrote: | Great work Tim! If I can get anywhere close to that craftsmanship, I'm golden :-)
Thanks for the great advice and step-by step instruction; that's what I was looking for; all I need is to brush up on my basic torch skills and convince the Mrs. to let me invest in a portable tank/torch setup ;-)
|
No mate, you'd be bronze-ish... I'm not THAT good!
Happy to oblige, and good luck.
Tim
|
|
|
|
|
|
|
You cannot post new topics in this forum
You cannot reply to topics in this forum
You cannot edit your posts in this forum
You cannot delete your posts in this forum
You cannot vote in polls in this forum
You cannot attach files in this forum
You can download files in this forum
|
All contents © Copyright 2003-2026 myArmoury.com — All rights reserved
Discussion forums powered by phpBB © The phpBB Group
Switch to the Basic Low-bandwidth Version of the forum
|

