| Author |
Message |
|
Peter Raskila
Location: Finland Joined: 18 Oct 2006
Posts: 1
|
 Posted: Wed 18 Oct, 2006 3:21 am Post subject: how to make a very basic COOL wooden sword Posted: Wed 18 Oct, 2006 3:21 am Post subject: how to make a very basic COOL wooden sword |
 |
|
hey everyone, can anyone give me any advice or full detailed answer on how to make a 'cool' wooden sword out of big branches/wood found in forest?
myself i carved a pretty nice 50 cm long sword out of a big branch  .. it didnt succeed so well, so i decided to make another. .. it didnt succeed so well, so i decided to make another.
-peter
Hey, I am Peter, I'm from finland and im 16 years old.
|
|
   |
 |
|
Michael Olsen
|
 Posted: Wed 18 Oct, 2006 6:03 am Post subject: Posted: Wed 18 Oct, 2006 6:03 am Post subject: |
 |
|
What do you want this wooden sword for? Training (i.e. a waster) or for aesthetics - something to put on your mantle as a piece of art?
If you want it for training, you will want to find a good straight grained piece of wood - hickory seems to be the wood of choice. Assuming you want it for training means that you will want it to conform more or less to historical sizes and shapes, as this provides inherent balance in the sword (without this, you might as well just use a flattened dowel). So, assuming you are wanting a longsword, that means you'll want a cross guard and a pommel, as well as defined (but not sharp!) edges and (hopefully) a grip with an oblong cross-section. Fashioning it is up to you - most people I know of who have made their own wasters have started with pretreated lumber and used a number of modern tools (table saws, routers, circular saws) to actually make the waster. If you don't want to go this route, I don't have any advice for you - I think it may be a first for a hand carved waster of self-selected natural wood.
I suggest that, if you get the wood green (from a growing or living tree), you find out a proper way to dry and season the wood before using it - I understand wood shrinks, so you may get some warping and cracking if you make it first and dry it after the cutting process.
You may also want to just look around the web (ARMA forums, SwordForum, etc) to get some examples of both commercial and "home made" wasters before starting out on your own. This way, you can understand the process and engineering of common construction and try to avoid any mistakes others have already found their way around. If you plan on training with this, remember - safety first! Don't use it if it feels very unstable, and give it a few progressive strength tests before sparring with it. Having it snap and splinter during a practice could lead to nasty splinters.
Here is a link to a recent ARMA discussion about wasters. It starts off discussing commercial offerings, but more recent discussion has been about the DIY work.
Good luck!
(Hooray - first post?)
|
|
  |
 |
|
Geoff Wood
|
 Posted: Wed 18 Oct, 2006 7:23 am Post subject: Posted: Wed 18 Oct, 2006 7:23 am Post subject: |
 |
|
Hi Peter and Michael
To add to what Michael said about fresh wood warping and cracking, I found, by much error, that I was best leaving wood to dry with the bark still on (just stack it somewhere out of the rain for a few months) before working it. It seemed to reduce cracking markedly with the woods I messed about with (holly, willow, elm, hawthorn etc.). Long time ago, but I used to use mine for the serious business of beheading thistles.
Geoff
|
|
  |
 |
|
Ben Strickling
Location: Raleigh, NC Joined: 27 Oct 2005
Posts: 9
|
 Posted: Wed 18 Oct, 2006 12:52 pm Post subject: Posted: Wed 18 Oct, 2006 12:52 pm Post subject: |
 |
|
Hey Peter,
To add to what's already been suggested: if you're looking for a good DIY guide for making a wooden training sword there's a nice set of instructions on ARMA Ogden's webpage here:
http://www.arma-ogden.org/content/view/7/30/
_________
Ben
|
|
  |
 |
Sean Flynt

|
 Posted: Wed 18 Oct, 2006 1:05 pm Post subject: Posted: Wed 18 Oct, 2006 1:05 pm Post subject: |
 |
|
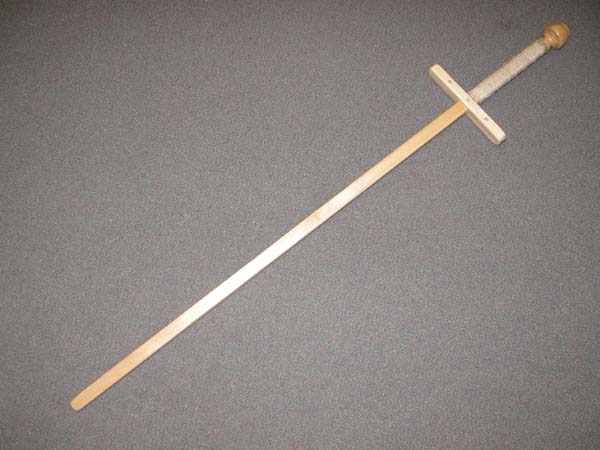
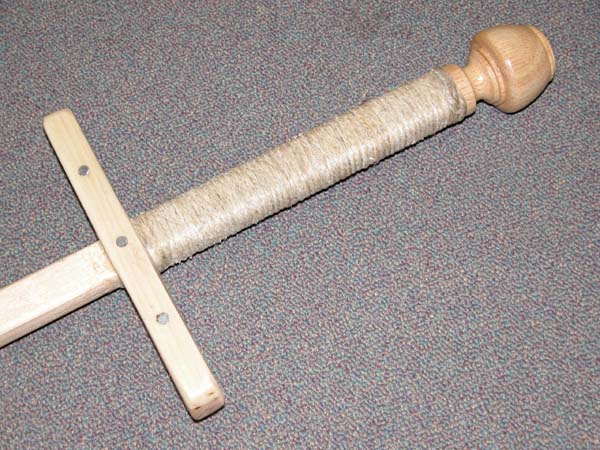
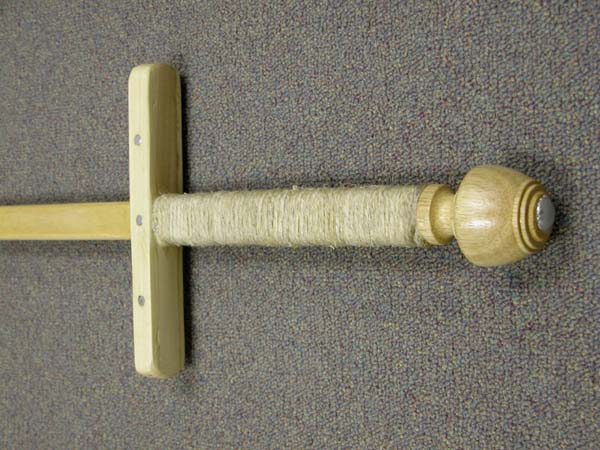
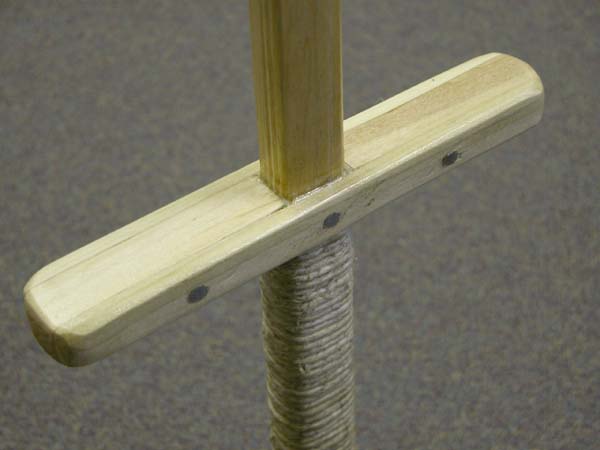
This may not be what you're looking for, but it's a very simple and inexpensive longsword design I created a few years ago. The blade and cross are from a single cheap street hockey stick. These sticks are made of dense laminated wood, so should be extremely durable. The pommel is a drapery rod finial attached with a long heavy bolt. A long threaded rod is inserted into the tip to provide additional weight and adjust balance. The cross is secured by epoxy and three threaded rods. The hemp grip wrap is secured by epoxy. I made these prototypes for a friend. I don't how they held up in sparring or even if they were ever used for that. They looked and felt pretty nice. They would at least be useful for solo drills and basic instruction.
 Attachment: 41.27 KB Attachment: 41.27 KB

 Attachment: 80.97 KB Attachment: 80.97 KB

 Attachment: 64.93 KB Attachment: 64.93 KB

 Attachment: 28.02 KB Attachment: 28.02 KB

-Sean
Author of the Little Hammer novel
https://www.amazon.com/Little-Hammer-Sean-Flynt/dp/B08XN7HZ82/ref=sr_1_1?dchild=1&keywords=little+hammer+book&qid=1627482034&sr=8-1
|
|
   |
 |
|
David Fictum
|
 Posted: Thu 26 Oct, 2006 11:31 am Post subject: Posted: Thu 26 Oct, 2006 11:31 am Post subject: |
 |
|
|
This talk of wooden swords brings up a question in my mind. In a European history context, do these wooden swords have any relations to cudgels? I have been looking for information on European cudgels for a long time, and I keep on hitting dead ends. So far all I can conclude is that they seem to be items used in sword training (at least in the 18th century, I have read of an account of how a privateer issued out cudgels for his crew to train with). Can I get any help?
|
|
  |
 |
Sean Flynt

|
|
   |
 |
|
George Hill
Location: Atlanta Ga Joined: 16 May 2005
Posts: 614
|
 Posted: Thu 26 Oct, 2006 12:44 pm Post subject: Posted: Thu 26 Oct, 2006 12:44 pm Post subject: |
 |
|
| Sean Flynt wrote: | | This may not be what you're looking for, but it's a very simple and inexpensive longsword design I created a few years ago. The blade and cross are from a single cheap street hockey stick. These sticks are made of dense laminated wood, so should be extremely durable. The pommel is a drapery rod finial attached with a long heavy bolt. A long threaded rod is inserted into the tip to provide additional weight and adjust balance. The cross is secured by epoxy and three threaded rods. The hemp grip wrap is secured by epoxy. I made these prototypes for a friend. I don't how they held up in sparring or even if they were ever used for that. They looked and felt pretty nice. They would at least be useful for solo drills and basic instruction. |
Could you give a bit more detail on how you attached the pommel? Where does one find drapery rod finials? At craft stores?
You don't have a construction montage do you?
To abandon your shield is the basest of crimes. - --Tacitus on Germania
|
|
    |
 |
Sean Flynt

|
 Posted: Thu 26 Oct, 2006 1:01 pm Post subject: Posted: Thu 26 Oct, 2006 1:01 pm Post subject: |
 |
|
You can find the finials at K-Mart (IIRC, this is a Marth Stewart waster!  ). They have a little cup shape on their base and I just quickly knocked that off so the base would sit flush against the end of the "tang". These finials come with a threaded bolt, but I wanted something beefier so I screwed that bolt out of the finial, used the hole as a guide to drill all the way through the finial, then slapped some expoxy on the base and used a long carriage bolt to secure the pommel to the stick (epoxy on bolt/in hole as well). ). They have a little cup shape on their base and I just quickly knocked that off so the base would sit flush against the end of the "tang". These finials come with a threaded bolt, but I wanted something beefier so I screwed that bolt out of the finial, used the hole as a guide to drill all the way through the finial, then slapped some expoxy on the base and used a long carriage bolt to secure the pommel to the stick (epoxy on bolt/in hole as well).
I don't have in-progress photos, unfortunately, but you can get a pretty good idea how I did this just taking a close look at the photos. The sandwich-construction cross was the tricky part, but I was using hand tools. That's thoroughly epoxied. To pin the cross together, I just used a threaded steel rod, threading it into a too-small hole using a pair of locking pliers for leverage. Then I just used a hacksaw or dremel to cut off the rod flush with the surface of the cross. I used the same threaded rod in the tip of the blade, drilling as deep into the end as I could to add weight and take the balance out that direction as well.
-Sean
Author of the Little Hammer novel
https://www.amazon.com/Little-Hammer-Sean-Flynt/dp/B08XN7HZ82/ref=sr_1_1?dchild=1&keywords=little+hammer+book&qid=1627482034&sr=8-1
|
|
   |
 |
|
George Hill
Location: Atlanta Ga Joined: 16 May 2005
Posts: 614
|
 Posted: Thu 26 Oct, 2006 2:54 pm Post subject: Posted: Thu 26 Oct, 2006 2:54 pm Post subject: |
 |
|
| Sean Flynt wrote: | You can find the finials at K-Mart (IIRC, this is a Marth Stewart waster!  ). They have a little cup shape on their base and I just quickly knocked that off so the base would sit flush against the end of the "tang". These finials come with a threaded bolt, but I wanted something beefier so I screwed that bolt out of the finial, used the hole as a guide to drill all the way through the finial, then slapped some expoxy on the base and used a long carriage bolt to secure the pommel to the stick (epoxy on bolt/in hole as well). ). They have a little cup shape on their base and I just quickly knocked that off so the base would sit flush against the end of the "tang". These finials come with a threaded bolt, but I wanted something beefier so I screwed that bolt out of the finial, used the hole as a guide to drill all the way through the finial, then slapped some expoxy on the base and used a long carriage bolt to secure the pommel to the stick (epoxy on bolt/in hole as well).
I don't have in-progress photos, unfortunately, but you can get a pretty good idea how I did this just taking a close look at the photos. The sandwich-construction cross was the tricky part, but I was using hand tools. That's thoroughly epoxied. To pin the cross together, I just used a threaded steel rod, threading it into a too-small hole using a pair of locking pliers for leverage. Then I just used a hacksaw or dremel to cut off the rod flush with the surface of the cross. I used the same threaded rod in the tip of the blade, drilling as deep into the end as I could to add weight and take the balance out that direction as well. |
Thank you Sean. I may be making one of these soon, as I just shattered my red oak waster. (just am inute ago too.)    How much do street hock sticks retail for? I need a new stick fast, I have pell fever. How much do street hock sticks retail for? I need a new stick fast, I have pell fever.
To abandon your shield is the basest of crimes. - --Tacitus on Germania
|
|
    |
 |
Sean Flynt

|
|
   |
 |
|
|
You cannot post new topics in this forum
You cannot reply to topics in this forum
You cannot edit your posts in this forum
You cannot delete your posts in this forum
You cannot vote in polls in this forum
You cannot attach files in this forum
You can download files in this forum
|
All contents © Copyright 2003-2026 myArmoury.com — All rights reserved
Discussion forums powered by phpBB © The phpBB Group
Switch to the Basic Low-bandwidth Version of the forum
|

