| Author |
Message |
|
Kenton Spaulding
|
 Posted: Mon 06 Mar, 2006 11:06 am Post subject: Scabbard Project Posted: Mon 06 Mar, 2006 11:06 am Post subject: Scabbard Project |
 |
|
I've got a question concerning how tightly a scabbard should hold a sword. I'm making a wood core for my Gaddhjalt, and am, at least, near competing it. It may be complete now, but I'm not sure. I've never seen or played with (I mean studied  ) a quality scabbard, so I'm honestly not sure how tight is tight. I know that people talk about holding their scabbards nearly upsidedown and the sword not falling out. I can hold mine literally upside down and the sword ain't goin anywhere. To remove it, though, it only takes a fairly light jerk. It feels like only about the first inch or two is what is holding it, so once that is freed it will slide right out. Does this sound too tight, or does it sound about right? Anybody who has made or played...umm studied, a nice scabbard I would appreciate your input. ) a quality scabbard, so I'm honestly not sure how tight is tight. I know that people talk about holding their scabbards nearly upsidedown and the sword not falling out. I can hold mine literally upside down and the sword ain't goin anywhere. To remove it, though, it only takes a fairly light jerk. It feels like only about the first inch or two is what is holding it, so once that is freed it will slide right out. Does this sound too tight, or does it sound about right? Anybody who has made or played...umm studied, a nice scabbard I would appreciate your input.
Thanks,
Kenton
P.S. I've edited the title to be more encompassing.
Last edited by Kenton Spaulding on Mon 06 Mar, 2006 2:08 pm; edited 1 time in total
|
|
  |
 |
|
Kenton Spaulding
|
| Posted: Mon 06 Mar, 2006 1:32 pm Post subject: |
|
|
Update: I decided to just work the core with sandpaper and trim it down a wee bit. I think that after this modifacation it is now ready. Fit is snug, when upsidedown it slowly creeps out for about 1 inch, and then will fall. I think that this is probibly about right.
Now, next question...what is the best treatment for the wood? It is made of poplar.
Again, I appreciate any suggestions
Kenton
|
|
|
|
|
Chad Arnow
myArmoury Team


|
| Posted: Mon 06 Mar, 2006 1:38 pm Post subject: |
|
|
On my good-fitting scabbards, they can be turned upside down without the sword falling out. A little jerk, though, and they slide out easily. That seems to be standard among good scabbard makers.
For treating the wood, some people seal it with something like polyurethane. Others use boiled linseed oil. Others probably do nothing at all. Some period scabbards were over-wrapped with linen cord or something, too.
Scabbards are an under-studied field, I think. I'd love to see some high-quality research done on the subject. Unfortunately, so few scabbards survive that it's hard to know how it was done back in the day. The ones that do survive likely won't be dissected to get a peak at what's inside.

ChadA
http://chadarnow.com/
|
|
  |
|
|
Kenton Spaulding
|
| Posted: Mon 06 Mar, 2006 2:29 pm Post subject: |
|
|
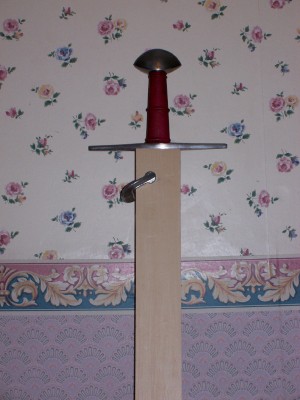
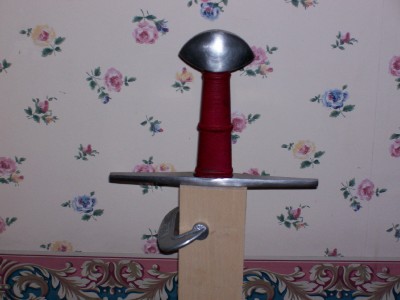
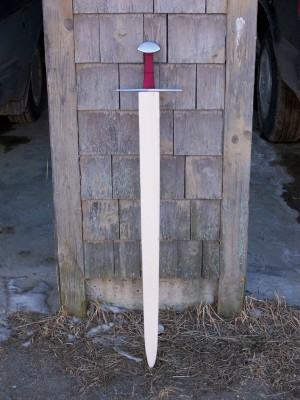
Here are a few pics of what I've gotten done so far...
 Attachment: 65.29 KB Attachment: 65.29 KB
Attachment: 59.97 KB
Attachment: 69.83 KB
Attachment: 61.07 KB

Attachment: 62.97 KB
|
|
|
|
|
|
Kenton Spaulding
|
| Posted: Wed 08 Mar, 2006 1:09 pm Post subject: |
|
|
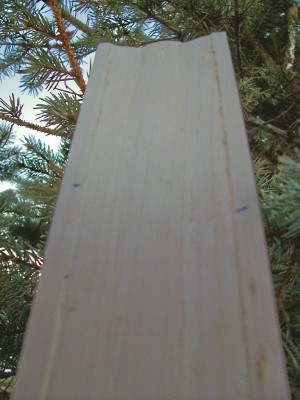
New pictures of the finished core. It may still be a bit thick. I didn't think so when I was making it, but upon seeing a picture of it, it looks bulkier than some of the cores I have seen here. Still, I'm very happy with how it came out, being my first try. The leather work though.....
Attachment: 86.12 KB
Attachment: 84.58 KB
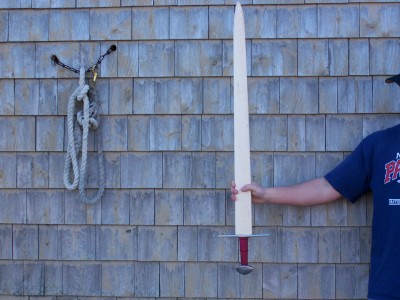
The money shot. The fit seems to be about perfect. Comes out with a lil tug.
Attachment: 71.43 KB
This is the pic that worries me. In person it doesn't look that thick or blocky.
|
|
|
|
|
Chad Arnow
myArmoury Team
|
| Posted: Wed 08 Mar, 2006 1:14 pm Post subject: |
|
|
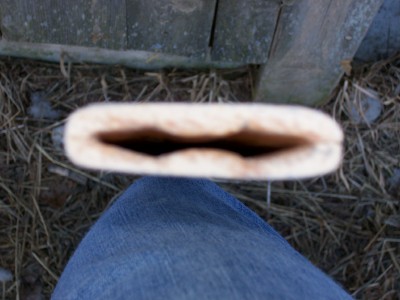
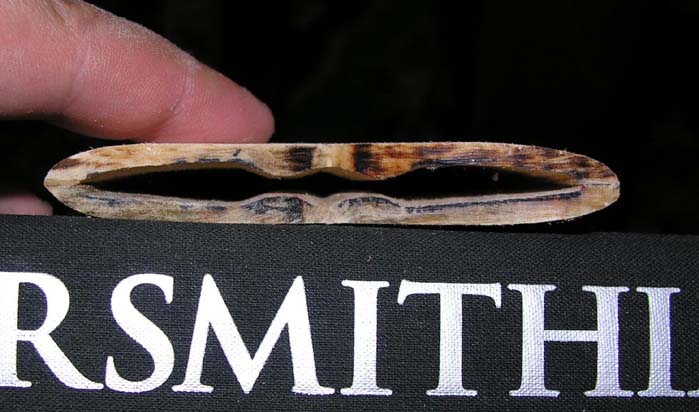
I'm far from an expert, but it does look a bit bulky in that last shot. You've probably seen these before, but here are pics of the core of my Sovereign Scabbard (core by Aaron S.). The first shot is the bulkier of the two. The second has been worked down further.

ChadA
http://chadarnow.com/
|
|
|
|
|
|
Kenton Spaulding
|
| Posted: Wed 08 Mar, 2006 1:33 pm Post subject: |
|
|
Chad,
I had seen the first pic, I'm not sure about the second. That certainly is thin. What I did was trace the cross guard and thinned it to the same width as the cross. I got the idea looking through Aaron's photo album of his Knight scabbard. I might thin it out some more with sandpaper, but I don't think I'm going back to the desktop sander. Right now the walls are approx 3/16 of an inch. What do you think would be an appropriate thickness?
Kenton
|
|
|
|
|
Jared Smith

|
| Posted: Wed 08 Mar, 2006 3:49 pm Post subject: |
|
|
As you make the walls thinner, the wood will be more likely to take a set if the sword is stored in the scabbard. This means the fit will loosen over time. I would estimate that ones I made which initially took 10 lbs of force or so to draw, decayed to a point where it only took 5 lbs of force after a couple of months. When you glue it, avoid clamping on the center as this will deform the wood inward and actually result in a pinched centerline fit. I find it best to stack paint cans over the slats when gluing up the type of assembly you have shown. You must test fit the assembly in a similar manner (clamp large pieces of wood over the slats so as not to pinch the center) in order to judge the glued results. Laminating over the glued slats (cloth glued to wood) will stiffen them and keep the fit more consistent over time.
"Good fit" may be subjective today and historically. I like mine tighter than average (want them secure during transport, and do not want young children to be able to pull them out...also consistent with a few historical legends that in some cases, only strong warriors could get their sword out of the scabbard.) My 10 year old son can not draw a sword from any of my scabbards, while my 13 year old daughter can do it with some effort. For me it is no problem. I would probably loose any "quick draw contest" but have not seen movies or heard tales of rapid draw featuring medieval sword quick draw!
Absence of evidence is not necessarily evidence of absence!
|
|
|
|
|
|
Al Muckart
|
| Posted: Wed 08 Mar, 2006 4:47 pm Post subject: |
|
|
| Kenton Spaulding wrote: | Chad,
I had seen the first pic, I'm not sure about the second. That certainly is thin. What I did was trace the cross guard and thinned it to the same width as the cross. I got the idea looking through Aaron's photo album of his Knight scabbard. I might thin it out some more with sandpaper, but I don't think I'm going back to the desktop sander. Right now the walls are approx 3/16 of an inch. What do you think would be an appropriate thickness?
Kenton |
Hi Kenton,
I did the "draw around the crossguard" thing with my knight scabbard, and it came out Ok. I'll probably take the next one down maybe another 1.5mm thinner though. The slats ended up a touch over 3mm thick at the throat. There are pictures of the slats in this thread:
http://www.myArmoury.com/talk/viewtopic.php?t=6226
I finished the wood in mine with a few coats of boiled linseed oil. Be very careful though if you are oiling the scabbard before trying to glue the scabbard slats together - oil will completely compromise the glue up if you get it on the glue surfaces.
For fine controlled stock removal I highly recommend a sharp block plane. These are little planes that are held in one hand. The one I used had an adjustable throat which when cranked right down took off tiny thin slivers of wood. I found it gave both an excellent degree of control over what I was taking off and left a beautifully smooth finish on the wood. It was also useful for fine tuning the fit by carefully planing down the join edges of the slats. The plane I used was sharpened by a woodworker using fine-grit water stones and was far, far sharper than I could have gotten it though, so if you don't know anyone good at sharpening woodworking kit it might be an issue.
Fit-wise my scabbard ended up quite tight, which is fine with me as I will have cause to wear it at SCA events and I don't want idiots grabbing it out of the scabbard.
--
Al.
http://wherearetheelves.net
|
|
|
|
|
|
Kenton Spaulding
|
| Posted: Wed 08 Mar, 2006 7:21 pm Post subject: |
|
|
Well after a couple of hours, a few sheets of 150 grit sandpaper, and a minor case of carpal tunnel I've got my core down a little more. Again, it looked a lot better before I saw a picture of it. I think the thickness must be relative to what scale I see it on. Anyway, here is where it stands now...I may work it down more tommorow, I may leave it as it is. The walls are between 2/16 - 3/16 of an inch now (I'm too American for metric  ) )
Al, your scabbard is great by the way.
Attachment: 73.79 KB

|
|
|
|
|
|
Al Muckart
|
| Posted: Wed 08 Mar, 2006 8:36 pm Post subject: Cross Section Profiles |
|
|
Hi Kenton,
That's looking good.
I'm no expert on this, I'm just coming from a position of still processing my learning experiences from building my first one and remembering all the things that went wrong. Hopefully if I'm completely wrong about what I'm about to say one of the many people on here who know far far more about this than I do can correct me, but here goes...
It looks to me a bit like part of the chunkyness you perceive when you see the photos of this is because your cross section is quite rectangular. If you made it more oval then you could get a much daintier looking cross section without having to thin the walls down over the center of the flats of the blade. The material in the corners of the cross section is almost redundant because your blade is so thin there.
I've just knocked this picture up to try and illustrate what I mean. The top one is a rounded, but still quite rectangular cross section, the one below it is just as thick at the center of the blade but is oval in cross section, with the result that it looks less chunky. The next one down is just the two shapes superimposed, and the bottom one is a very slightly thinner oval.

If using sandpaper and a sanding block is giving you carpal tunnel, but a belt sander is too quick, try finding rubber sanding wheels that mount in a drill. I've got one of these that I've used for other things and they're quite handy for shaping wood. It's just an 8" or so rubber wheel with an axle that goes in a drill and can take different grades of sanding disc on the face of the wheel. It's flexible so you can do curved things nicely and if you put it in a cordless drill it doesn't remove stock so fast that you risk going too far.
--
Al.
http://wherearetheelves.net
|
|
|
|
|
|
Kenton Spaulding
|
| Posted: Wed 15 Mar, 2006 7:30 am Post subject: |
|
|
I'm getting ready to cover the scabbard, but I'm not sure on what type of leather is appropriate. I've been looking around on TandyLeather.com , anybody have any suggestions on what I should be looking for? Also, is the belt the same weight as the scabbard cover? Would that be kinda flimsy? How would a piece like this work? http://www.tandyleather.com/prodinfo.asp?numb...p;mitem=39 (as you can probably tell I know nothing about leather  ) Is leather difficult to dye? I'm thinking about dying it myself if it isn't too much trouble to do. ) Is leather difficult to dye? I'm thinking about dying it myself if it isn't too much trouble to do.
Thanks,
Kenton
|
|
|
|
|
David Quivey

|
| Posted: Wed 15 Mar, 2006 8:04 am Post subject: Re: Cross Section Profiles |
|
|
Al, Kenton - I've always used a small plane to shape my scabbards - I'm always paranoid of cutting down too much wood too fast, and I've found the plane to be an excellent (and period) alternative to sand paper (either hand held or belt). I also have more controll over how much wood I'm taking off compared to a spoke shave, or another similar hand tool.
| Al Muckart wrote: | | If using sandpaper and a sanding block is giving you carpal tunnel, but a belt sander is too quick, try finding rubber sanding wheels that mount in a drill. I've got one of these that I've used for other things and they're quite handy for shaping wood. It's just an 8" or so rubber wheel with an axle that goes in a drill and can take different grades of sanding disc on the face of the wheel. It's flexible so you can do curved things nicely and if you put it in a cordless drill it doesn't remove stock so fast that you risk going too far. |
For leather, you'd probably want something light, say around a .035 or 1/32 (2-3 ounce). Your belt weight you'd want quite thick, say a six ounce (.094 metric, 3/32 english). But like you, I'm no expert when it comes to that. That piece looks good and about the right weight for the scabbard - you could probably stitch a double thickness of it for your belt and that would work just fine.
Awesome scabbard! Can't wait to see it finished 
|
|
 |
|
James Barker

Location: Ashburn VA Joined: 20 Apr 2005
Posts: 365
|
| Posted: Wed 15 Mar, 2006 8:16 am Post subject: |
|
|
I used these sides for my 2 scabbards:
https://www.siegelofca.com/itemdetail.asp?prodid=1017
I used a 2-3oz for the scabbard cover and 5-6oz for my belts. The price is always better than tandy and sometimes there are great sales.
Here is the scabbard I made for my Paul Binns blunt for 11th century reenactment:


I also just finished one for my Del Tin 2157 "ITALIAN MEDIEVAL SWORD" I will have pictures of it after my reenactment this weekend.
|
|
|
|
|
|
Al Muckart
|
| Posted: Wed 15 Mar, 2006 11:42 pm Post subject: Re: Cross Section Profiles |
|
|
| David Quivey wrote: | Al, Kenton - I've always used a small plane to shape my scabbards - I'm always paranoid of cutting down too much wood too fast, and I've found the plane to be an excellent (and period) alternative to sand paper (either hand held or belt). I also have more controll over how much wood I'm taking off compared to a spoke shave, or another similar hand tool.
|
I used a block plane to shape my one and it worked beautifully and left me with zero abraisive finishing to do on the core. I'm not much of a woodworker but I had access to someone who is who showed me how it worked and importantly sharpened it for me. I've become convinced that planes really need to be scary sharp to work well, and that requires infrastructure that non-woodworkers like myself don't tend to have, hence my suggestion for sanding discs.
| David Quivey wrote: |
For leather, you'd probably want something light, say around a .035 or 1/32 (2-3 ounce). Your belt weight you'd want quite thick, say a six ounce (.094 metric, 3/32 english). But like you, I'm no expert when it comes to that. That piece looks good and about the right weight for the scabbard - you could probably stitch a double thickness of it for your belt and that would work just fine.
|
I used 1.5mm for the covering of mine, and wished I'd had slightly thinner, say 1mm or less. Bookbinding calfskin seems like the dream material. I used the same leather for the belt, and it's maybe a little bit light but looking through Dress Accessories a lot of the straps ends in there seem to be for straps about that thick. The other leather I had available was 3mm, and that just seemed too chunky.[/u]
--
Al.
http://wherearetheelves.net
|
|
|
|
|
David Quivey
|
| Posted: Fri 17 Mar, 2006 10:48 am Post subject: Re: Cross Section Profiles |
|
|
| Al Muckart wrote: |
I used a block plane to shape my one and it worked beautifully and left me with zero abraisive finishing to do on the core. I'm not much of a woodworker but I had access to someone who is who showed me how it worked and importantly sharpened it for me. I've become convinced that planes really need to be scary sharp to work well, and that requires infrastructure that non-woodworkers like myself don't tend to have, hence my suggestion for sanding discs. |
That's right, you do have to keep the blades super sharp - especially when working with softer woods like popler, a dull blade tends to gouge the wood. I've found that the best and least hassel way is to give the edge a very light once-over with a good super fine stone after each use. I let a blade dull down over time once, and never again will I let that happen! I'm not the best sharpener, and it took a good long time to get it back to shape! 
|
|
|
|
|
|
Al Muckart
|
| Posted: Fri 17 Mar, 2006 1:06 pm Post subject: |
|
|
Hi Kenton,
| Kenton Spaulding wrote: | | I'm getting ready to cover the scabbard, but I'm not sure on what type of leather is appropriate. I've been looking around on TandyLeather.com , anybody have any suggestions on what I should be looking for? Also, is the belt the same weight as the scabbard cover? Would that be kinda flimsy? How would a piece like this work? http://www.tandyleather.com/prodinfo.asp?numb...p;mitem=39 (as you can probably tell I know nothing about leather ) Is leather difficult to dye? I'm thinking about dying it myself if it isn't too much trouble to do. |
Sorry, I missed this question when you originally posted it.
The leather you want is thin, vegetable tanned cowhide or calfskin if you can get it. 2-3oz is about perfect for the cover. I'd use 4-5oz for the belt though. I did the whole lot of mine in 1.5mm (3-4oz) and ended up wanting something slightly lighter for the cover and slightly heavier for the belt. It all worked fine though.
Feel free to PM me with questions as you go, but here's a brain dump of what I worked out as I went.
I have no idea how to pattern tips. I left excess, started stitching from the throat and winged it when I got to the tip and chopped off the excess with a scalpel. If anyone reading this has a trick for patterning the tip please share :)
If in doubt, remember that the tip will be covered by a chape Consider the chape design when building the seam, if the last 1/4 inch or so is a bit messy, don't panic.
The leather will shrink a bit lengthways as you stitch it up, so leave excess length when you pattern it. I discovered this experimentally and ended up with this:

You want the leather tight over the core, but not so tight that you blow out the stitches pulling it tight.
To make a pattern, draw a centerline a bit longer than your core on a piece of card. Measure the circumference of your core at regular intervals, add the thickness of your leather and transfer the resulting measurement on a line perpendicular to the centerline you have drawn so you end up with a tree diagram. Think about the way you plan to finish the throat, and make sure you allow for that.
If you don't add some, then you end up with this, which is too big a gap to pull tight without blowing out stitches.

You can have a bit of a gap, but the leather will stretch as a percentage of it's width, so you get less stretch as you get closer to the tip. The gap between your edges shouldn't be more than about 1/4 inch at the top, and should decrease with the taper of your core.
Here is a picture of my pattern so you can hopefully see what I mean. Mail me if you want a bigger copy. Be aware that the tip of this pattern needed modifying because I didn't add enough length.

Use fairly heavy linen thread if at all possible and wax it well. On a seam this long polyester thread is just icky to work with.
Veg tanned leather stretches when wet, so you will want to sew it on while it is thoroughly damp, but not soaking wet. It will relax a little bit as it dries depending on what chunk of the side you used. If it dries and your stitching ends up a little loose, just pull it tighter working down the seam and re-tie the ends. If you can avoid dampening the leather where your stitches are then it won't stretch so much there when you stitch it up.
If you get damp veg tanned leather dirty it is impossible to clean afterwards. Wear surgical gloves and work on a clean surface. After it has dried, keep it wrapped in saran wrap until you have dyed and sealed the leather. I didn't, and I regret it :/
If you want to tool the leather at all, do it after you have stitched it on, but before you dye it. Do it with the leather slightly damp, just run a wet sponge over it. Experiment with scrap pieces and make sure it is backed by a hard surface when you're tooling it.
Dyeing can be tricky, a lot depends on the dye you use and the color you want it. I don't tend to use modern dyes very much any more so someone like Aaron, who got an excellent color on his Gaddhjalt scabbard might be better to ask.
Brain dump on dyeing:
Keep the leather clean, and wash it down thoroughly with denatured alcohol or acetone then let it dry before you dye it. Any grease or oils on the leather will affect your dye job, even grease from your fingers.
Leather dye does not come out of skin. Wear surgical gloves. I learned this experimentally, too :/
Pour the dye into a plastic tray or tub a little at a time and top it up as needed. Use a wad of sponge held in a clothespeg to apply the dye and try to keep it as even as possible.
Once the dye is dry, buff the surface with a white, lint-free cloth. I use old t-shirts.
Once you have dyed the leather it will be very dry because you will have stripped out all of the oils. At this point you can either top coat it with some kind of acrylic, or treat the leather. I tend to treat the leather since I haven't found a top-coat I like. I use stuff made by Effax which comes in a brown tub. I get it from a saddlers down the road from where I work.
This stuff looks like it would do the trick:
http://www.tandyleather.com/prodinfo.asp?numb...p;mitem=28
If you haven't done this before, experiment with playing-card sized pieces of leather before you dye the final product.
Hope that helps. Good luck, I look forward to seeing the final product.
--
Al.
http://wherearetheelves.net
|
|
|
|
|
|
R. Howard Dawkins
Location: NE Florida Joined: 10 Mar 2006
Posts: 11
|
| Posted: Sat 18 Mar, 2006 9:23 pm Post subject: |
|
|
Al,
Excellent brain dump! Pictures are worth a thousand words...thanks for the in-depth tips!
Rob
|
|
|
|
|
Jared Smith
|
| Posted: Sun 19 Mar, 2006 2:31 pm Post subject: |
|
|
I agree with Al.
There is no great way to do the tip. I wrap a stiff paper or very thin cardboard with overlap. After drawing a centerline on this pattern piece, I slice it down the centerline. Unless the patterning material is slightly elastic (like wet leather) it will still be imperfect. Excess leather is needed and has to be trimmed while sewing. Similar issues occur if there are areas where you have glued on risers, embossed shapes, downturned wool "socks" (from liners), etc. The only way I have found to really get a perfect centerline is to cover once, mark in ink on the leather where and how much adjustments need to be made....then start over with a new piece of covering. Alternatively, you can cut the covering extra wide and punch holes fairly far apart (at least 3/8") from the seam. If you trim the seam as you go, the stiching will not be evenly spaced in terms of width when you use this "trim as you go" approach. I have just settled on uneven width between the stiches since I hate to through away a piece of leather that I have probably paid something like $10 to $20 U.S.
Fiebing's analine (alcohol based, not the water based institutional stuff) die works vastly better than Tandy's. I have tried both. Also, the Fiebing's Carnuba wax finish (different from the balm with Atom wax) gives the most professional looking finish. You need to burnish the leather both as the dye is drying and after applying the balm/wax to give it a shiny closed grain look like a professionally made shoe. I actually dye part way, then burnish as the wet look goes away when the dye is soaked up. This is done by rapidly rubbing the surface with a piece of canvas (painters canvas drop cloth will work... I use an empty bag from a 20 pound lead shot bag for shotgun shell reloading.) A friend of mine sewed up about 1 square foot of canvass like an oven mit, and has used it for hundreds of knife scabbards. Burnishing is done by very rapidly rubbing the canvass back and forth. You need friction and some noticeable temperature increase (like rubbing hands togather quickly can heat up the skin.) If you can get a hair dryer gun type blower, you should be able to dry the alcohol out within 5 to 10 minutes between covering, dyeing, and proceed right to the carnuba wax finish within the same hour that you finished stitching. When you stop the dryer, if the leather cools to the touch quickly, it indicates that alcohol is still evaporating and you need to dry more. The wax finish needs to dry slowly so that oils are absorbed. Set the waxed scabbard aside (after burnishing the wax finish) and do not disturb it for about two days. It may show finger prints if you handle it too soon after the waxing. Otherwise, it should look as nice as any store bought leather good you will ever see. A buff with a shoe shine finishing buffing brush should be the last step.
If you live in the U.S., you can order the Fiebing's professional dyes and the Carnuba wax finish from Siegal of California.
The image I posted in a previous post on my Knight scabbard is really as satin shiny/ glossy and smooth looking as it appears. It is not just lighting. That is due to the burnishing steps which close up the grain of the leather.
http://www.myArmoury.com/talk/viewtopic.php?t=6096&highlight=
Absence of evidence is not necessarily evidence of absence!
|
|
|
|
|
|
Al Muckart
|
| Posted: Sun 19 Mar, 2006 8:57 pm Post subject: |
|
|
| Jared Smith wrote: | I agree with Al.
There is no great way to do the tip. I wrap a stiff paper or very thin cardboard with overlap. After drawing a centerline on this pattern piece, I slice it down the centerline. Unless the patterning material is slightly elastic (like wet leather) it will still be imperfect. Excess leather is needed and has to be trimmed while sewing. Similar issues occur if there are areas where you have glued on risers, embossed shapes, downturned wool "socks" (from liners), etc. The only way I have found to really get a perfect centerline is to cover once, mark in ink on the leather where and how much adjustments need to be made....then start over with a new piece of covering. Alternatively, you can cut the covering extra wide and punch holes fairly far apart (at least 3/8") from the seam. If you trim the seam as you go, the stiching will not be evenly spaced in terms of width when you use this "trim as you go" approach. I have just settled on uneven width between the stiches since I hate to through away a piece of leather that I have probably paid something like $10 to $20 U.S. |
I said lots of rude words when I blew the first covering for my knight scabbard. Still, piecing things together out of leftover scraps is an incredibly period leatherworking technique, so into the scrap bin it goes :)
I'm fairly sure that there is a way to pattern the cover at the tip of a scabbard, and even to do so in a way that allows you to pre-mark your stitching and get it nice and evenly spaced all the way down. I just don't know what that technique is It's sufficiently key to getting a good end product that I might start a separate thread and see if anyone else cares to wade in.
The problem is similar to building shoes, you can make a flat 2d pattern but the stretch in the leather allows it to become a 3d object in the lasting process which has no clean 2d analogue. I am starting to suspect that this is why Peter Johnsson suggests starting to close the scabbard cover at the tip rather than from the throat, it will be easier to close a bit of the tip and shove it on to the core, thereby stretching the leather, if you haven't already covered the rest of the core. I'm planning on a more dressy scabbard for my knight since I have leftover wood for slats so I'll have a go at doing it that way once I've figured out the other details I want to include.
| Jared Smith wrote: | | Fiebing's analine (alcohol based, not the water based institutional stuff) die works vastly better than Tandy's. I have tried both. Also, the Fiebing's Carnuba wax finish (different from the balm with Atom wax) gives the most professional looking finish. You need to burnish the leather both as the dye is drying and after applying the balm/wax to give it a shiny closed grain look like a professionally made shoe. I actually dye part way, then burnish as the wet look goes away when the dye is soaked up. This is done by rapidly rubbing the surface with a piece of canvas (painters canvas drop cloth will work... I use an empty bag from a 20 pound lead shot bag for shotgun shell reloading.) A friend of mine sewed up about 1 square foot of canvass like an oven mit, and has used it for hundreds of knife scabbards. Burnishing is done by very rapidly rubbing the canvass back and forth. You need friction and some noticeable temperature increase (like rubbing hands togather quickly can heat up the skin.) |
That is a neat idea. I'm going to have to sew one of those up when I get home tonight.
| Jared Smith wrote: | | If you can get a hair dryer gun type blower, you should be able to dry the alcohol out within 5 to 10 minutes between covering, dyeing, and proceed right to the carnuba wax finish within the same hour that you finished stitching. When you stop the dryer, if the leather cools to the touch quickly, it indicates that alcohol is still evaporating and you need to dry more. The wax finish needs to dry slowly so that oils are absorbed. Set the waxed scabbard aside (after burnishing the wax finish) and do not disturb it for about two days. It may show finger prints if you handle it too soon after the waxing. Otherwise, it should look as nice as any store bought leather good you will ever see. A buff with a shoe shine finishing buffing brush should be the last step. |
Be very careful applying direct heat to veg-tanned leather. If you have any moisture in the leather at all you risk causing it to shrink and harden locally if you get it too hot. I've hit this problem pitching jacks and costrels. I just let stuff dry naturally these days and gently force-dry it in a 50degC oven if I'm going to be heating it directly. Rubbing alcohol only takes a few minutes to evaporate in a moderately warm environment anyway.
I don't have the luxury of access to Tandy or Siegels without paying daft shipping costs, so I've never tried the carnuba wax stuff, does it penetrate much? I tend to grease the leather, even if I am going to surface wax and polish it (which I do with beeswax). Getting grease well penetrated into the leather will make it last longer than just sealing the surface of otherwise dry leather. This probably isn't a big problem on leather as thin as good scabbard-covering though.
To seque into random information about leather stuff, In medieval London at least, leather was generally dyed as part of the tanning process (common colours black, brown, red, blue and green) and then sent to curriers whose job was to grease-stuff and surface finish the leather. From the curriers it went to the cordwainers, sheathers, etc who would turn it into finished products. In other places without London's rigid guild structures protecting trade monopolies, end users like cordwainers were probably tanning their own and doubtless there were different grades of leather. I imagine makers must have been able to get less grease-stuffed leather for things like costrels and jacks which require extensive wet-forming, but as far as I'm aware the concept of buying undyed fairly dry russet and dying finished products is a modern one.
--
Al.
http://wherearetheelves.net
|
|
|
|
|
|
|
You cannot post new topics in this forum
You cannot reply to topics in this forum
You cannot edit your posts in this forum
You cannot delete your posts in this forum
You cannot vote in polls in this forum
You cannot attach files in this forum
You can download files in this forum
|
All contents © Copyright 2003-2026 myArmoury.com — All rights reserved
Discussion forums powered by phpBB © The phpBB Group
Switch to the Basic Low-bandwidth Version of the forum
|

