| Author |
Message |
Geoff Freeman

|
 Posted: Sun 30 Oct, 2005 7:03 am Post subject: Making a shield Posted: Sun 30 Oct, 2005 7:03 am Post subject: Making a shield |
 |
|
The shield thread in the General section has got me thinking about making a better shield than the ones that I've made so far.
Thus far, my shields (round and heater style) have been flat, just cut out from a sheet of 1/2" plywood. I now want to make a Norman-style kite shield, but a flat kite just doesn't look quite right.
So, what I'm wondering is: how would I best go about making a curved shield (of either kite or heater shape)?
Thanks!
Geoffrey C. Freeman
Durendal Fencing Club
|
|
  |
 |
|
Aaron Schnatterly
|
| Posted: Sun 30 Oct, 2005 7:26 am Post subject: |
|
|
Some form of press or form, and the lamination of 2-3 layers of thin plywood with a good even coat of wood glue between is really the recipe.
The press can take many different incarnations. I've seen people use trees, culvert pipe, 55 gallon drums or pickel barrels, or a number of other already-round objects. If you can find something that meets the curve you want that you can strap boards to for a few hours, you're set. It will relax a little bit, so overcurve it slightly.
I personally didn't want to have as drastic a curve as any of these objects had, so I built my own press. I figured the curve I wanted, cut a series of ribs out of 2x4s, and put them on runners. Take 1/4 sheet of 5mm or 1/4 inch plywood, lay it on, spread glue, lay another piece of ply on top, and use ratchet straps to slowly pull it down on the curve. I use a number of straps to keep waviness out - insures an even curve.
I have seen successful shields made by placing 2 rail ties parallel on the ground, laying ply on top, gluing, ply, then weighting in the middle. This pushes the center down between the ties. The closer the ties are and the more weight you add, the more drastic the curve. This is a lot simpler to make in the first place (the form I made took a couple hours and now takes up space in the shop), it's more difficult to obtain a good gluing and even curve.
I don't have pics at the moment, but do plan to do some work in the shop this afternoon - I'll try to remember to snag some then for you.
-Aaron Schnatterly
_______________
Fortior Qui Se Vincit
(He is stronger who conquers himself.)
|
|
 |
|
Elling Polden

|
| Posted: Sun 30 Oct, 2005 7:28 am Post subject: |
|
|
The simplest way is to use two layers plywood, thickness about 3-4 mm.
These can be bent in a number of ways. The simplest is to use straps/belts/chains.
Apply generous amounts of glue between the two plates.
The bend them, and tighten the straps around them to keep them bent while the glue dries. You will need 4+ strapps, depending on the size of the shield.
While this method do not yield millimeter perfect shield, it does give you a decent curve, and is the least demanding in terms of infrastructure or space.
The next time I do this, I will try to use chains instead of cargo straps, as they do not give away over time, and you can make sure that they are tightened evenly by buying chains of equal length and counting the links.
Another method is to strap the plates to a oil barrel or similar round surface. It increases the chances of a even curve, but demands a oil barrel, and more space.
Finally, you could make a mould, which is a good if you are going to make a lot of shields, but is a lot of work if you are only to make one.
ONE VERY IMPORTANT THING: Plywood has one flexible and one inflexible direction. Make sure that you cut your plywood correctly. (Your truly is in the possesion of two 60x60 heathers made from a plate that should have been a 100x60 kite...)
When your shield is curved, apply linnen or cotton canvas to the front, using liberal amounts of glue. Make sure to stroke out any pockets of air or other uneven features.
Let the glue dry, and repeat.
The canvas makes the shield much more durable.
Add rawhide edges if you intend to use the shield for fighting.
"this [fight] looks curious, almost like a game. See, they are looking around them before they fall, to find a dry spot to fall on, or they are falling on their shields. Can you see blood on their cloths and weapons? No. This must be trickery."
-Reidar Sendeman, from King Sverre's Saga, 1201
|
|
 |
|
|
Aaron Schnatterly
|
| Posted: Sun 30 Oct, 2005 7:37 am Post subject: |
|
|
| Elling Polden wrote: | ONE VERY IMPORTANT THING: Plywood has one flexible and one inflexible direction. Make sure that you cut your plywood correctly. (Your truly is in the possesion of two 60x60 heathers made from a plate that should have been a 100x60 kite...)
When your shield is curved, apply linnen or cotton canvas to the front, using liberal amounts of glue. Make sure to stroke out any pockets of air or other uneven features.
Let the glue dry, and repeat.
The canvas makes the shield much more durable.
Add rawhide edges if you intend to use the shield for fighting. |
Both good points, Elling. The ply does want to bend one way much easier than the other - but it's apparent if you try to bend it before you do anything. If you try to bend a 4ft x 4ft sheet of ply one way or the other, whichever way it bends easiest should be cut in half along that so the "flexier axis" is used as the midline of your shield.
I've used canvas and a mix of 2/3 wood glue, 1/3 water to paste it to the shield. The water thins the glue a bit, but helps saturate the canvas.
-Aaron Schnatterly
_______________
Fortior Qui Se Vincit
(He is stronger who conquers himself.)
|
|
|
|
|
Bob Burns

|
| Posted: Sun 30 Oct, 2005 1:07 pm Post subject: |
|
|
Would it help to buy 1/4 ply made of ash, apply water or steam to the ash before affixing to the form? Also, what about spreading the glue between layers with a brush, so that the entire surface has an even coat of glue.
Bob
|
|
 |
|
Chuck Russell

|
|
 |
|
Geoff Freeman
|
| Posted: Sun 30 Oct, 2005 4:10 pm Post subject: |
|
|
Thanks for the pictures, Chuck. Those are very helpful.
Do you have a favorite glue that you use? Also, about how long does the process take (not like this is extremely important...the project has no due date)?
Thanks again!
Geoffrey C. Freeman
Durendal Fencing Club
|
|
|
|
|
Gavin Kisebach

|
| Posted: Sun 30 Oct, 2005 4:47 pm Post subject: |
|
|
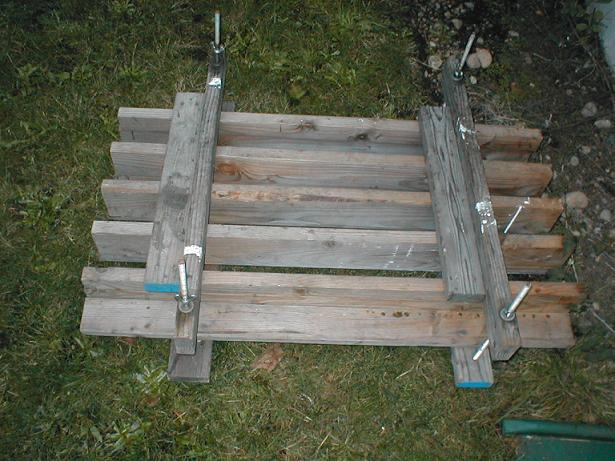
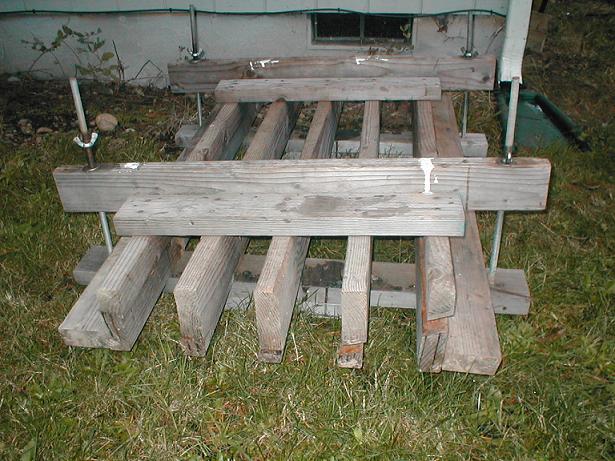
Here's the shield press my group uses. Its a got to be fifteen years old, but it keeps crankin' em out. My large war shield is included so you can see the curve. They're not that hard to make, but once people see the results, you'll be making shields for everyone you ever met. 
A few notes on curving shields, let my sweat and expense save your sweat and expense.
Not all half inch plywood is half inch thick. thinner is better, unless the wood is cheap. spend the extra money for better quality wood.
The grain of the wood MUST RUN LENGTHWISE. Make sure when you CUT the wood that you take this into consideration. I have two or three broken sheets of plywood rotting in my back yard. They could have been contenders.
use a brush and wood glue to get a good even coat between your two sheets. if you just pour glue like it was honey on toast, you'll have gaps where mildew and rot will set in.
Once the glue dries, it is what it is. Dont try to curve an already set piece.
As you tighten your press, keep an eye on the edges of the two sheets as they will shift out of alignment.
Do not pick you nose with glue on your finger. Get a tissue.
Hope that helps.
 Attachment: 59.21 KB Attachment: 59.21 KB
Attachment: 69.93 KB
Attachment: 30.97 KB
There are only two kinds of scholars; those who love ideas and those who hate them. ~ Emile Chartier
|
|
|
|
|
Gavin Kisebach
|
| Posted: Sun 30 Oct, 2005 4:49 pm Post subject: |
|
|
Use Elmers wood glue. Should take a day and a half, two days tops. 18hrs if you live in a hot dry climate.
There are only two kinds of scholars; those who love ideas and those who hate them. ~ Emile Chartier
|
|
|
|
|
Geoff Freeman
|
| Posted: Sun 30 Oct, 2005 5:41 pm Post subject: |
|
|
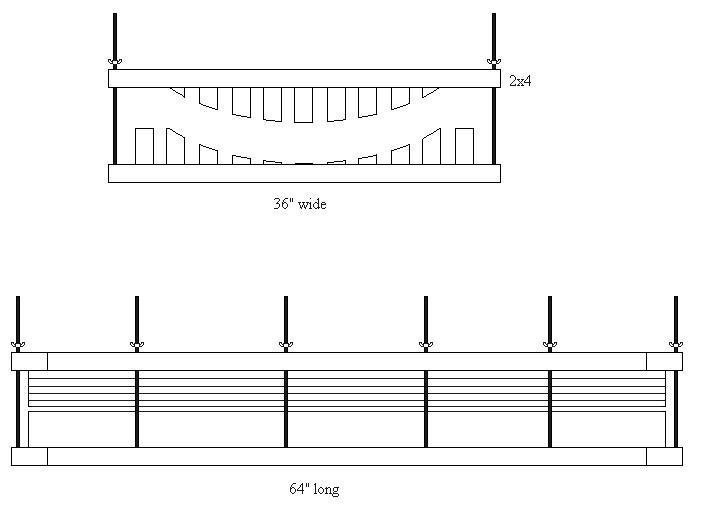
Something maybe like this?
btw, I'm just guesstimating numbers here.
Attachment: 30.08 KB
Geoffrey C. Freeman
Durendal Fencing Club
|
|
|
|
|
Steve Grisetti

|
| Posted: Sun 30 Oct, 2005 5:59 pm Post subject: |
|
|
Classic case of a picture worth a thousand words. Very helpful to those of us, like me (maybe only me?), having some difficulty visualizing the specifics of the process. Now, all is clear.
"...dismount thy tuck, be yare in thy preparation, for thy assailant is quick, skilful, and deadly."
- Sir Toby Belch
|
|
|
|
|
Gavin Kisebach
|
| Posted: Sun 30 Oct, 2005 6:17 pm Post subject: |
|
|
Nice drawing.  threaded rod at the corners does it, you dont need that many, but i see you've grasped the concept rather nicely. the angled sections are 2x6 studs cut at progressive angles. The rod is 1/2 inch. Five 2x6s works just fine, three doesn't give a good dish, it just bends in the center. You can charge your friends five bucks a pop till you cover the upfront cost. If you're really a mercenary, or if you're playing landsknechty type, you can charge more. threaded rod at the corners does it, you dont need that many, but i see you've grasped the concept rather nicely. the angled sections are 2x6 studs cut at progressive angles. The rod is 1/2 inch. Five 2x6s works just fine, three doesn't give a good dish, it just bends in the center. You can charge your friends five bucks a pop till you cover the upfront cost. If you're really a mercenary, or if you're playing landsknechty type, you can charge more. 
There are only two kinds of scholars; those who love ideas and those who hate them. ~ Emile Chartier
|
|
|
|
|
|
Aaron Schnatterly
|
| Posted: Sun 30 Oct, 2005 6:19 pm Post subject: |
|
|
| Geoff Freeman wrote: | Something maybe like this?
btw, I'm just guesstimating numbers here. |
That'd work, yeah. Just set your curve. That's a good bit fancier than mine is, but eliminates the issue of the straps.
Mine's more like the top piece of yours, though the concept is turned 90 degrees, with each rib having the full curve and the suports just keeping the spacing right, and you use the straps to draw the "ply and glue sandwich" to the curve. Never did make it out to the shop - metals work tomorrow, it was a textiles and leather day. I'll try again tomorrow for pics of the thing, possibly ones of how I set the curve, too.
-Aaron Schnatterly
_______________
Fortior Qui Se Vincit
(He is stronger who conquers himself.)
|
|
|
|
|
Geoff Freeman
|
| Posted: Sun 30 Oct, 2005 6:27 pm Post subject: |
|
|
Thanks, Gavin and everyone. This has been a big help. When I get around to getting the materials and time, I'll try to do some in-progress pics of my own.
By the way, Gavin,
| Gavin Kisebach wrote: |
Do not pick you nose with glue on your finger. Get a tissue.
|
This from experience?
Geoffrey C. Freeman
Durendal Fencing Club
|
|
|
|
|
Gavin Kisebach
|
| Posted: Sun 30 Oct, 2005 6:33 pm Post subject: |
|
|
I plead the fifth.
I wondered when I first saw how this worked if there are any historic examples of shield presses. I would assume in pictures or written histories, as the parts would certainly be long gone. I pictured the romans using this with wooden threaded rod perhaps. seems like a very simple, brilliant design. Very Roman. And when your not using it on shields, you can use it on prisoners.
Anybody know about ancient presses? I'd love to see an example.

There are only two kinds of scholars; those who love ideas and those who hate them. ~ Emile Chartier
|
|
|
|
|
Chuck Russell
|
|
|
|
|
Geoff Freeman
|
| Posted: Sun 30 Oct, 2005 8:27 pm Post subject: |
|
|
Another question now: Looking through the Bayeux tapestry and an effigy, I notice that there is a boss on a lot of kite shields. Is this a chronological thing (as in, was it found on "earlier" kite shields) or just an aesthetic/personal preferance thing?
Attachment: 71.35 KB
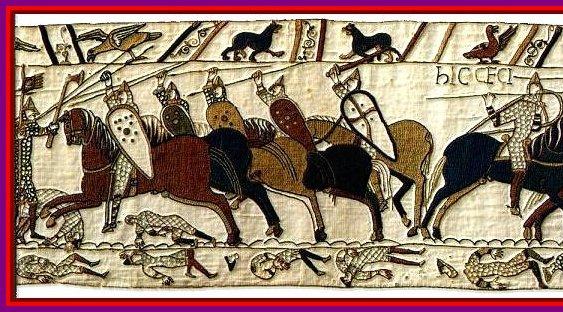
Attachment: 50.74 KB
Geoffrey C. Freeman
Durendal Fencing Club
|
|
|
|
|
|
Aaron Schnatterly
|
| Posted: Sun 30 Oct, 2005 8:36 pm Post subject: |
|
|
| Geoff Freeman wrote: | | Another question now: Looking through the Bayeux tapestry and an effigy, I notice that there is a boss on a lot of kite shields. Is this a chronological thing (as in, was it found on "earlier" kite shields) or just an aesthetic/personal preferance thing? |
On the round Viking style shields, the grip was a hole cut through the center with a bar for a handle. This would have left the knuckles exposed, so they stuck a boss on to protect the hand. As the shield evolved, the boss stayed as an ornament, and eventually fell out of favor. There are some cultural/geographic variences and reemergence (as in the Scottish targe).
-Aaron Schnatterly
_______________
Fortior Qui Se Vincit
(He is stronger who conquers himself.)
|
|
|
|
|
|
Patrick Kelly
|
| Posted: Sun 30 Oct, 2005 8:52 pm Post subject: |
|
|
|
Aaron is correct. This is why you see the boss get progressively smaller on the kite shield. It was a vestigal hold-over from the earlier round shield.
|
|
 |
|
Gavin Kisebach
|
| Posted: Sun 30 Oct, 2005 9:21 pm Post subject: |
|
|
Oh by the by, those flat 2x4s on top of the press are there so you can stand on top, to assist the press. This is one of those times when it helps to be a fat basilard 
There are only two kinds of scholars; those who love ideas and those who hate them. ~ Emile Chartier
|
|
|
|
|
|
|
You cannot post new topics in this forum
You cannot reply to topics in this forum
You cannot edit your posts in this forum
You cannot delete your posts in this forum
You cannot vote in polls in this forum
You cannot attach files in this forum
You can download files in this forum
|
All contents © Copyright 2003-2026 myArmoury.com — All rights reserved
Discussion forums powered by phpBB © The phpBB Group
Switch to the Basic Low-bandwidth Version of the forum
|

