| Author |
Message |
Leo Todeschini
Industry Professional

|
 Posted: Sat 31 Mar, 2018 2:24 am Post subject: Swiss sabre A489 Wallace WIP - Tods Workshop Posted: Sat 31 Mar, 2018 2:24 am Post subject: Swiss sabre A489 Wallace WIP - Tods Workshop |
 |
|
Hi All,
I have started on a pair of swords I have wanted to make for years and have finally got the chance to reproduce the amazing A489 Swiss Sabre from the Wallace Collection.
I have been posting up pictures of the progress on Instagram, but thought I would share it here with a more expanded story with more details.
The sword was made around 1530 in the very stylish and fashionable Swiss Sabre style using a complex guard and a wickedly sharp single edged blade at a whopping 102cm/40" long. The sword looks like a beauty and when you handle it, you realise just how lovely this sword actually is - I am in love.
Like all sabres, the blade is quite complex and this simply does not show from the pictures. The whole blade is very slightly curved, thou through some trick of the eye it looks far more curved than it is, and if you set it on its spine there is less than 10mm from the surface to the back of the blade even with the stepped down section.
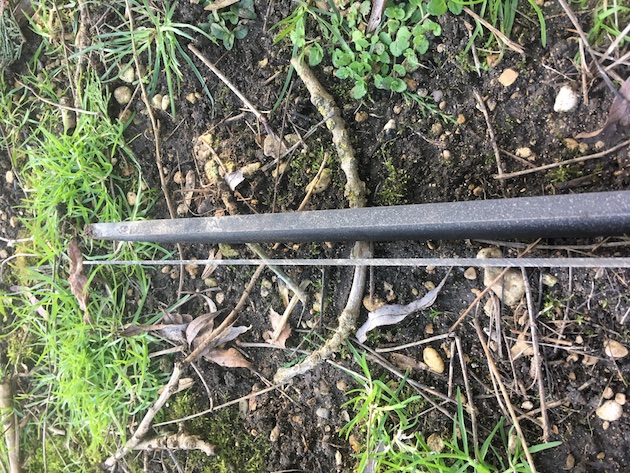
The first 15cm of the back of the blade is 'full height', then it steps down 2mm and goes along a further 45cm and lifts up again for the yelman. The whole blade is hollow ground and then goes into an appleseed edge so that the thickness of the peak at the transition between the fuller and the edge is significantly smaller than the back edge thickness at that point. The blade starts at 9.5mm thick but tapers down to 6mm over the first 15cm and the tapers down from there. What this all means in practice is that the blade is long but relatively light. The whole sword weighs in at 1620 grams.
I profiled the blade and the heat treated so there was some hard core grinding to get it down to 2mm by the tip. The next step was to grind a bevel in so that the transition point thickness between the fuller and bevel would be set, then the hollow went in, next the edge grind on the yelman and finally the appleseed grind to the main edge.
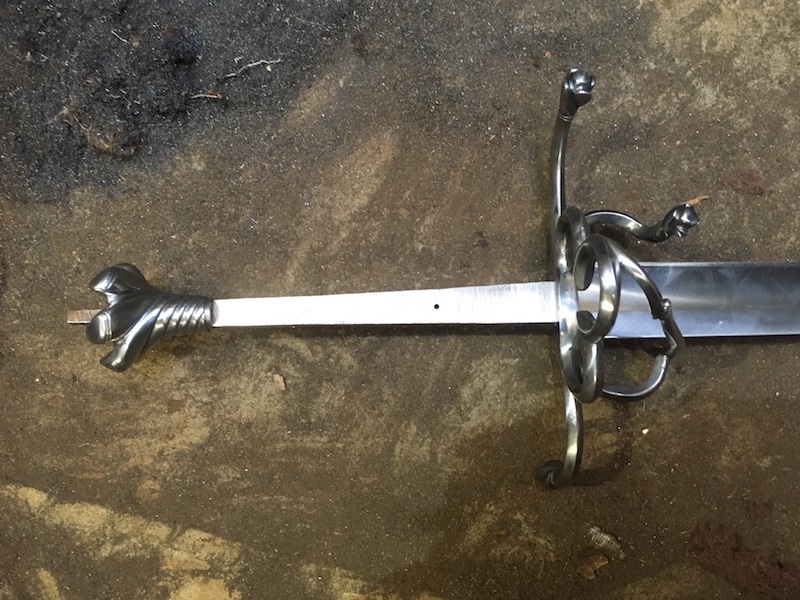
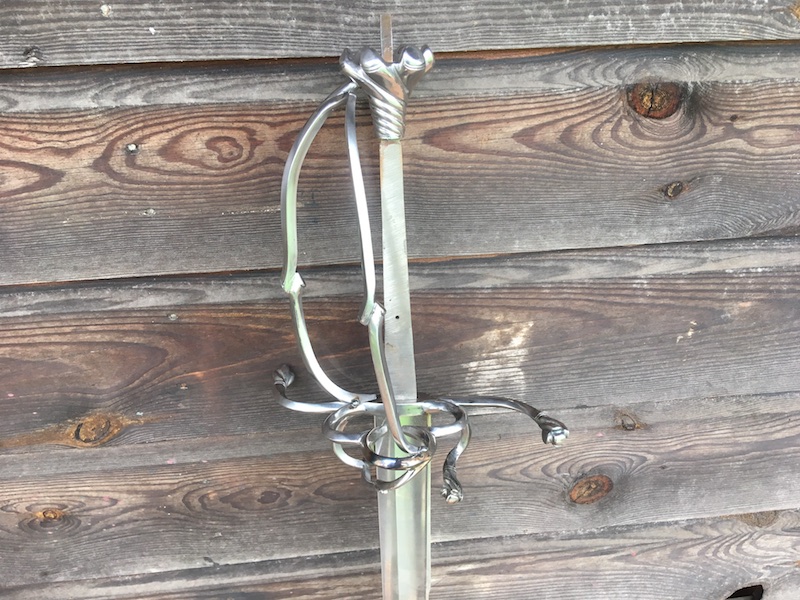
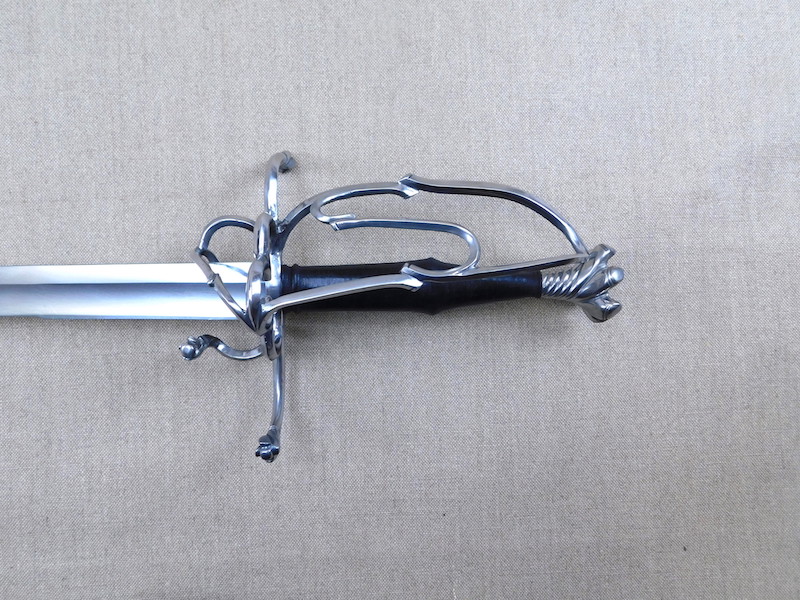
The guard is lovely and almost art nouveau in feel and like all complex guards must be made up piece by piece and welded and cleaned at each stage.
What is interesting is that it would be possible to make a sword with a guard like this much faster than I currently am able to. I could use this style as a target and simply bend the bars to shape, fit it in and move on. The result would be a perfectly good sword, but of course different to the original although if that was your destination it would of course be similar. When you are trying to copy a piece, the endless tweaking of shapes and checking and tweaking soaks up loads to time and so you would end up with two similar swords, but one which cost considerably more. My friend Owen Bush reckons that making a blade to dimensions takes 3 times as long as making a blade and I think he is on the right track.
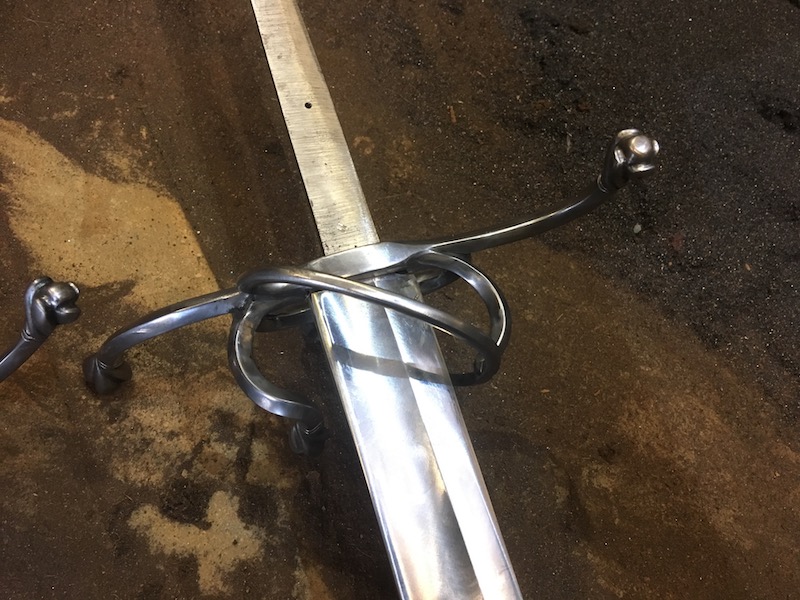
Back to the story. The main guard is the first place to start and then slowly each piece is added and the whole piece is filed back, cleaned up and polished and then the next piece is added and in this way even the hard to reach areas of a finished piece should be reasonably well finished - it avoids you 'painting yourself into a corner'. Saying that though, this sword is a actually quite roughly made and a number of the guard welds are fracturing and not great and a deal of the file work has left lots of cut marks. This is not at all unusual in original pieces; we just look at them through rose tinted glasses and think they were all perfect - they weren't.
The next stage will be to make the pommel and then I will go back to finishing the bars on the guard. One is spoken for and the other will be available.
The interaction between the pommel and the guard is sensitive and so if I were to carry on with tgeuard at this stage would most likely leave the guard not quite right.
More progress next week and I hope you like it so far.
Tod
 Attachment: 45.77 KB Attachment: 45.77 KB
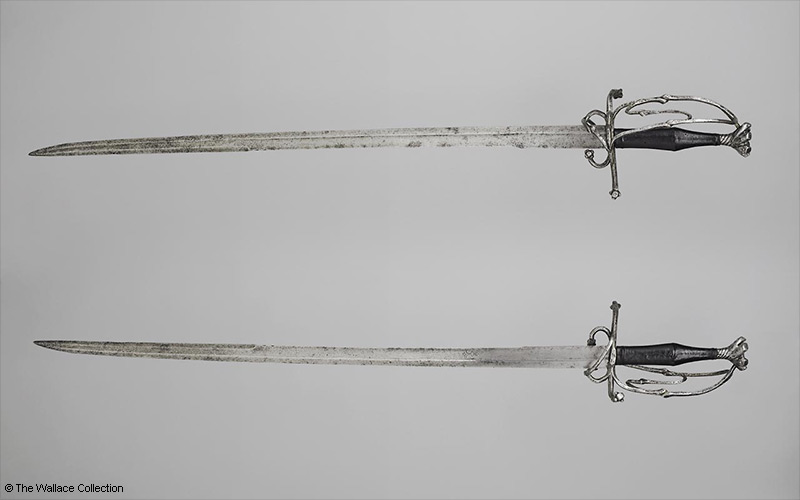
Original sword
Attachment: 211.2 KB
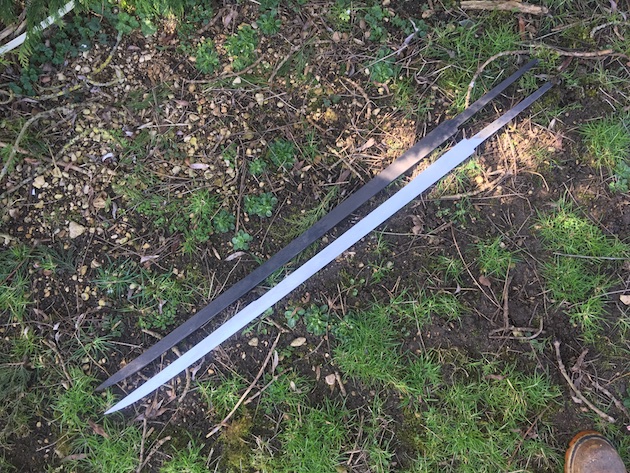
Profile cut at 10mm thick and one tapered down to correct thickness
Attachment: 208.4 KB

Showing the drastic thickness reduction over the first 15cm
Attachment: 218.52 KB
Showing the reduction of the tip thickness
Attachment: 222.46 KB
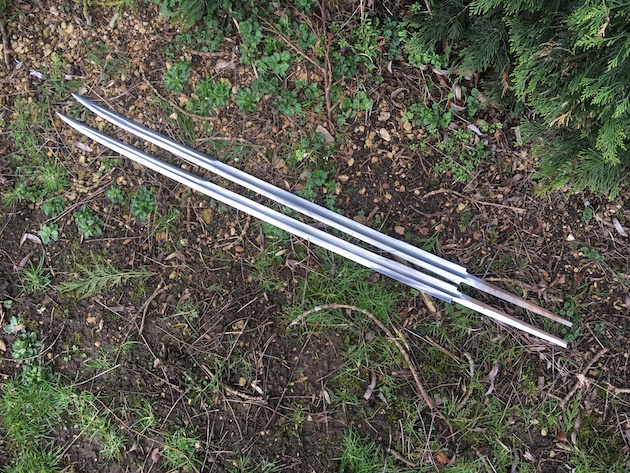
Sabre blades ground
Attachment: 202.84 KB

Ground tips
Attachment: 214.81 KB
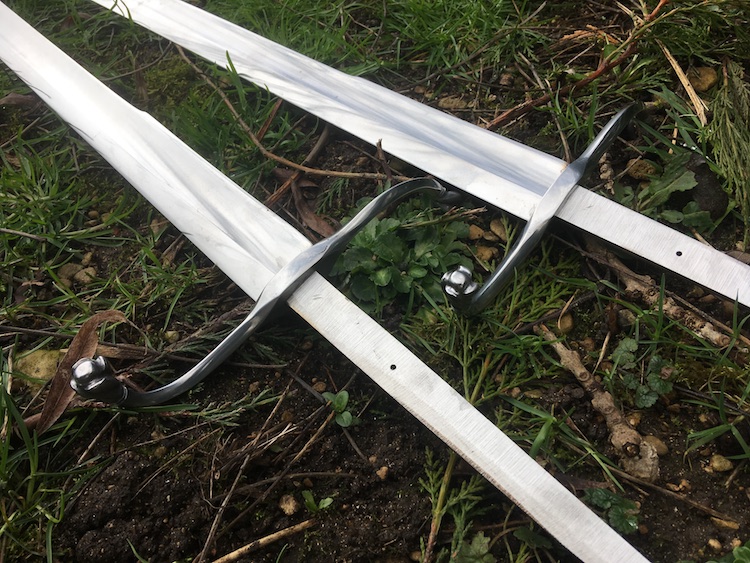
The guards start
Attachment: 174.67 KB
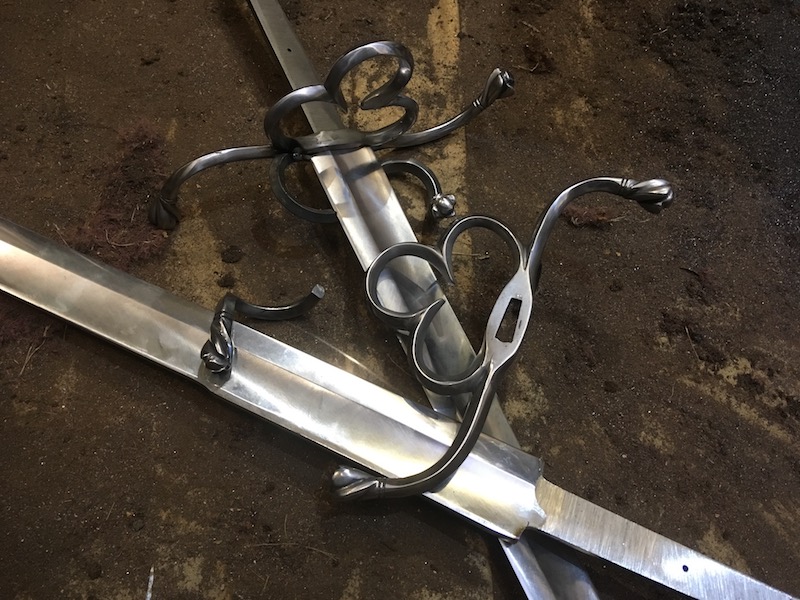
Guards piece by piece
Attachment: 165.8 KB
Attachment: 171.38 KB
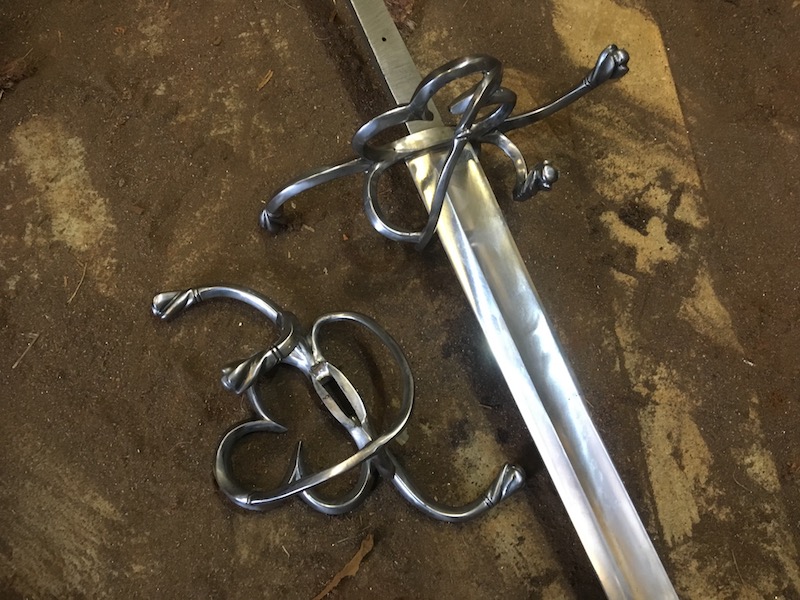
All the lower guard elements in place
www.todsworkshop.com
www.todcutler.com
www.instagram.com/todsworkshop
https://www.facebook.com/TodsWorkshop
www.youtube.com/user/todsstuff1
|
|
   |
 |
Guillaume Vauthier

|
| Posted: Sat 31 Mar, 2018 2:43 am Post subject: |
|
|
|
With the rapier you made for me recently I see that you're in complex guards this month! Eager to see the final result, I guess we all dreamed to handle this kind of sword once in our lives. I'm sure it will be an incredible weapon.
|
|
|
|
|
Preben B

|
| Posted: Sat 31 Mar, 2018 7:50 am Post subject: |
|
|
Well, now I know what I want for christmas.
That is going to be absolutely amazing.
|
|
|
|
|
Nathan Robinson
myArmoury Admin


|
|
 |
|
|
Peter Lyon
Industry Professional
|
| Posted: Sun 01 Apr, 2018 11:19 am Post subject: |
|
|
That is beautiful. Seeing it coming together piece by piece makes me appreciate how fiddly the hilt is too.
Still hammering away
|
|
|
|
|
Leo Todeschini
Industry Professional
|
|
|
|
|
|
Mark Moore
|
| Posted: Mon 02 Apr, 2018 4:43 pm Post subject: |
|
|
Tod, if I ever were to have a sword commissioned, YOU would be my go-to guy.  Those sabers are off the chart beautiful. (And I'm not a big fan of single-edged swords!!) Can't wait to see them finished! Those sabers are off the chart beautiful. (And I'm not a big fan of single-edged swords!!) Can't wait to see them finished!  ......McM ......McM
''Life is like a box of chocolates...'' --- F. Gump
|
|
|
|
|
Leo Todeschini
Industry Professional
|
| Posted: Tue 03 Apr, 2018 12:15 am Post subject: |
|
|
Sorry I didn't really respond last night.
Guillaume Vauthier wrote | Quote: | PostPosted: Sat 31 Mar, 2018 11:43 am Post subject:
With the rapier you made for me recently I see that you're in complex guards this month! |
Peter Lyon wrote | Quote: | | That is beautiful. Seeing it coming together piece by piece makes me appreciate how fiddly the hilt is too |
Yes, it does appear it is complex month and I have a zweihander with a complicated guard to do also, so it is definitely sword month for me, but my Lord, these complex hilts are fiddly and do take a long time. I mentioned above though that the original was actually rather crudely made and I suspect made far faster than I am making mine. It is a classic example of an aspect you see continually and just like the Wallace 479, it looks really well finished from a couple of feet away, but get in close and it is a little rough and ready.
Preben B wrote | Quote: | Well, now I know what I want for christmas.
That is going to be absolutely amazing. |
There two swords that I actually really want in this world and have been lucky enough to make both, this and the 479. I sold my spare 479 and I guess I will sell this, but with some luck I will have it for the summer season. Luckily I have a strange philosophy that being able to make something is almost as good as owning it, because if I do really want to own it I can just make it (I have the worlds most amazing imaginary collection).
Nathan Robinson wrote | Quote: | | One of my favorite originals! I'm lucky to have a reproduction of this sword. I'm really looking forward to seeing what you come up with. |
Well A and A has set a high bar. I remember seeing this repro 9 years ago - lovely.
Thank you Mark
www.todsworkshop.com
www.todcutler.com
www.instagram.com/todsworkshop
https://www.facebook.com/TodsWorkshop
www.youtube.com/user/todsstuff1
|
|
|
|
|
Leo Todeschini
Industry Professional
|
| Posted: Tue 03 Apr, 2018 3:05 pm Post subject: |
|
|
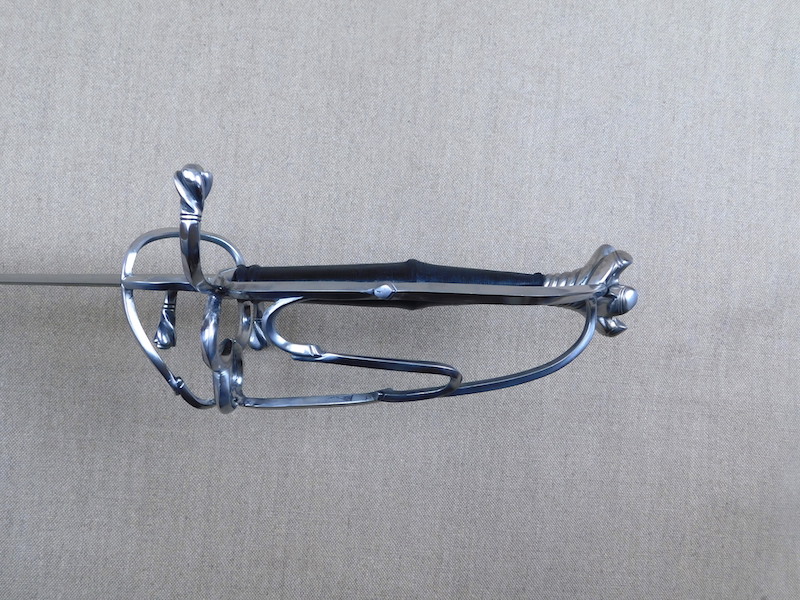
I have been back on the sabres.....
The lower guards are finished and of course the upper hand guard needs to be made, but this connects into the pommel, so before I make the hand guard, I need the pommel. So next up is the pommel.
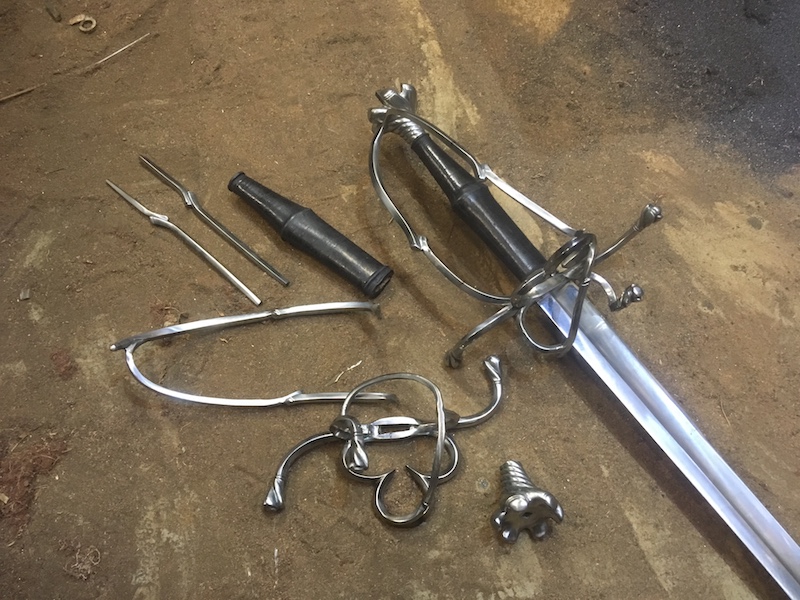
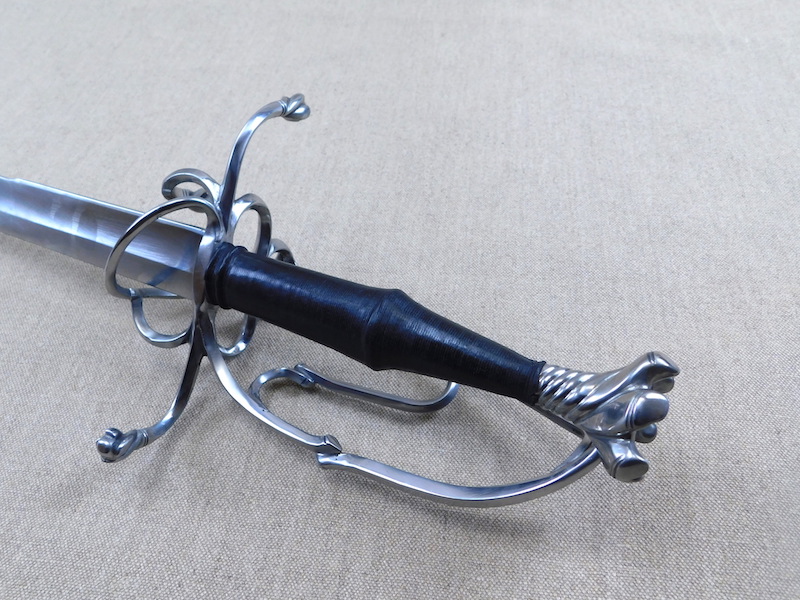
It starts with a block of steel, that I then turned to rough out the pommel form. I then marked out the twist lines and then hacksawed them in to provide guides for the file. I then filed in the twists.
And filed
And filed.
The tang is then stepped down to accept the pommel and this was slowly reduced until the pommel is the correct distance from the guard.
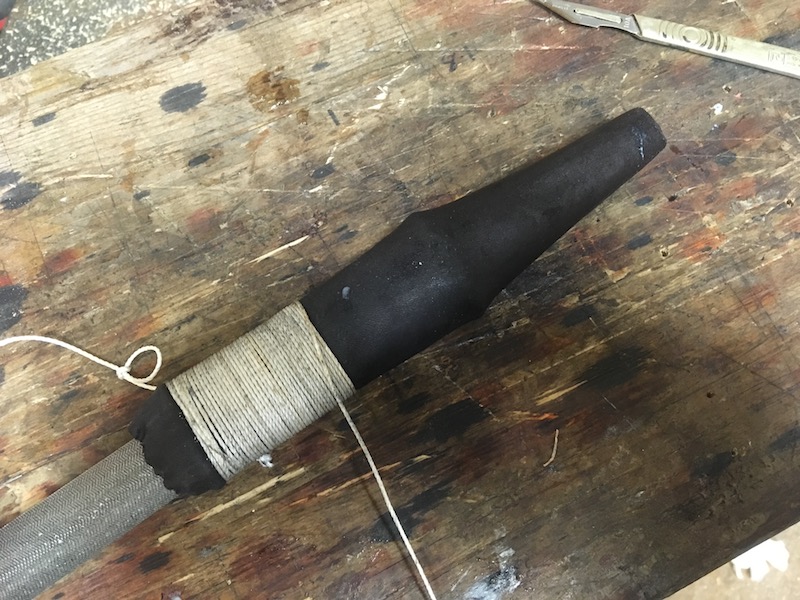
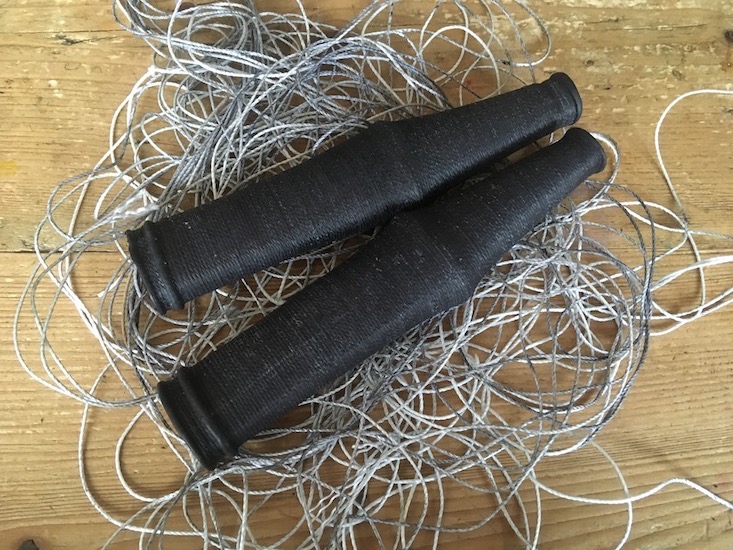
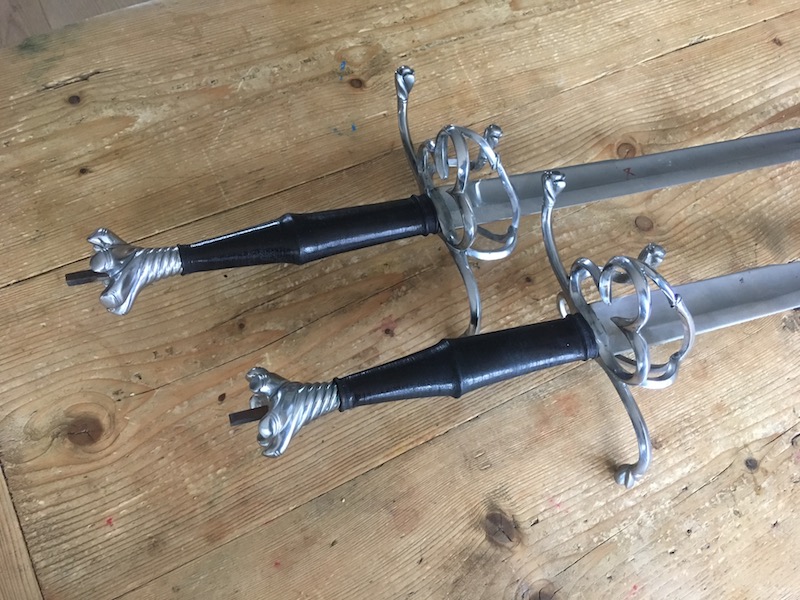
The grip is made from two slabs of ash, a hollow cut in for the tang, glued together and shaped.
The grip is then covered in leather, bonded in place and crushed down with a cord binding. The pressure exerted by the cord is massive and so it compresses the leather down, holds it closely to the glue and also drives the glue through the leather to create a glue/leather composite. This binding will be removed in the morning and the leather burnished as the original was.
For curiosities sake I have looked at the balance and it is a little forward of the original, but the hand guard is not on yet, so this point will come back, so hopefully looking all good.
I hope you like the progress.
Tod
Attachment: 249.41 KB
Attachment: 213.3 KB
Attachment: 161.97 KB

Attachment: 190.88 KB
Attachment: 222.1 KB
Attachment: 234.18 KB
Attachment: 176.4 KB
Attachment: 159.17 KB
www.todsworkshop.com
www.todcutler.com
www.instagram.com/todsworkshop
https://www.facebook.com/TodsWorkshop
www.youtube.com/user/todsstuff1
|
|
|
|
|
Preben B
|
| Posted: Tue 03 Apr, 2018 3:12 pm Post subject: |
|
|
|
Hmmm, sword bondage.
|
|
|
|
|
|
Tim Harris
Industry Professional
|
| Posted: Wed 04 Apr, 2018 8:22 pm Post subject: |
|
|
Tod, thank you very much for posting this.
I fell in love with the Wallace Swiss sabre from the first time I saw a picture, and I have attempted making something similar. I used a longer than usual plain sabre blade, so it lacked the complex geometry of the original. The hilt was an approximation based on pictures only, and I'd be embarrassed to show it now.
That said, it has been a glorious thing to use.
Being located in Australia, there is almost no opportunity to examine original pieces, so I was intrigued by your comment about the state of the original hilt. I had to retire mine due to cracking welds, and put that down to insufficient skill on my part. It's comforting to learn that it happened in the past.
I had assumed the original pommel was forge welded and twisted from bars. Interesting to see your take on it.
Out of curiosity, what method of welding are you using on the hilt?
https://www.facebook.com/TimHarrisSwords
|
|
|
|
|
Leo Todeschini
Industry Professional
|
|
|
|
|
J. Nicolaysen

|
| Posted: Thu 05 Apr, 2018 5:35 pm Post subject: |
|
|
I was going to save all my I love its and I wants its for the last picture, but I had to go ahead and tell you the description of your first dagger was the funniest thing I've read this week.
Anyhow the sabre is looking great so far and I can't wait to see more.
|
|
|
|
|
|
Tim Harris
Industry Professional
|
|
|
|
|
Leo Todeschini
Industry Professional
|
| Posted: Thu 05 Apr, 2018 11:08 pm Post subject: |
|
|
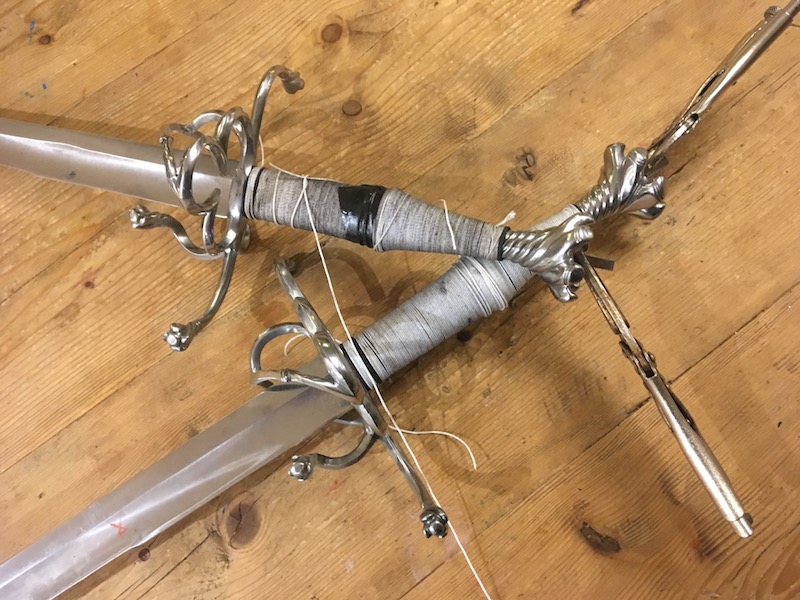
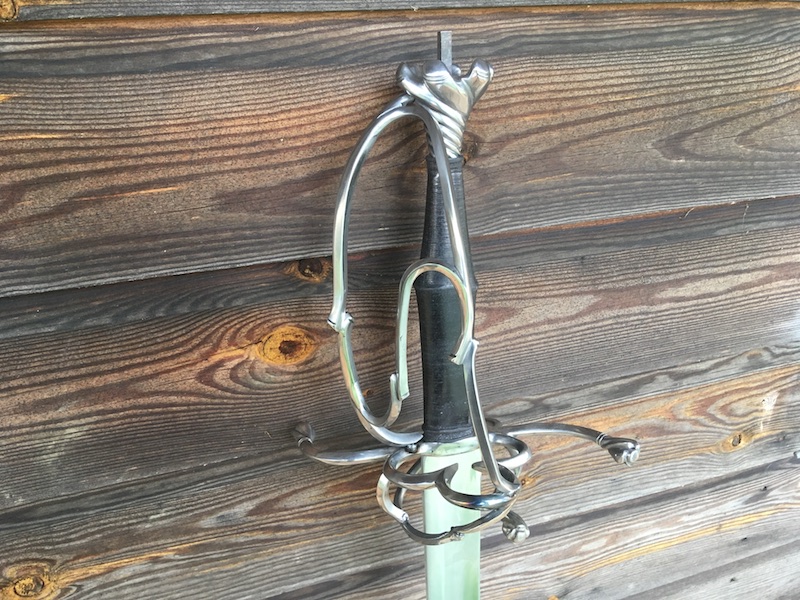
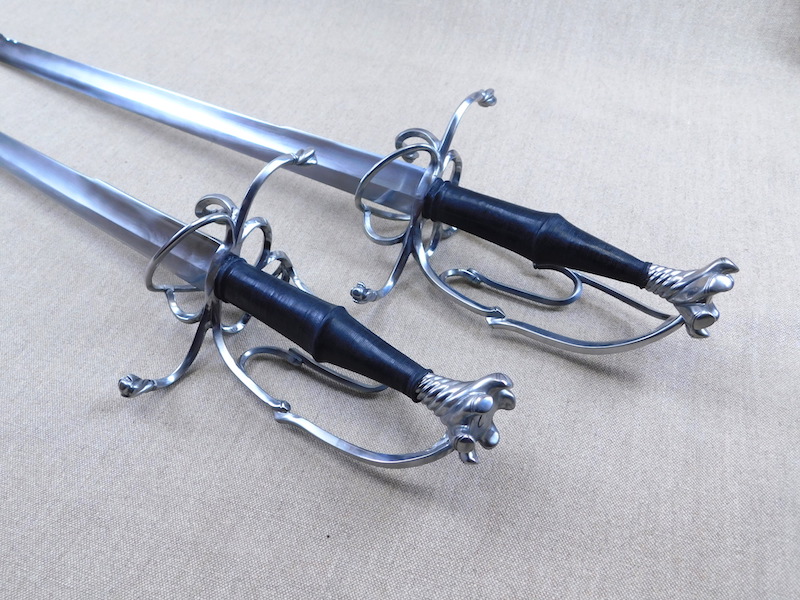
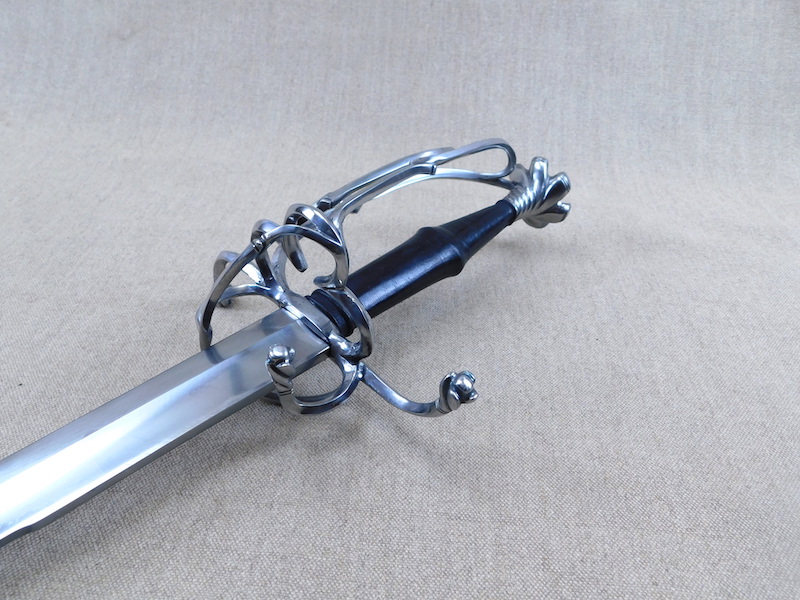
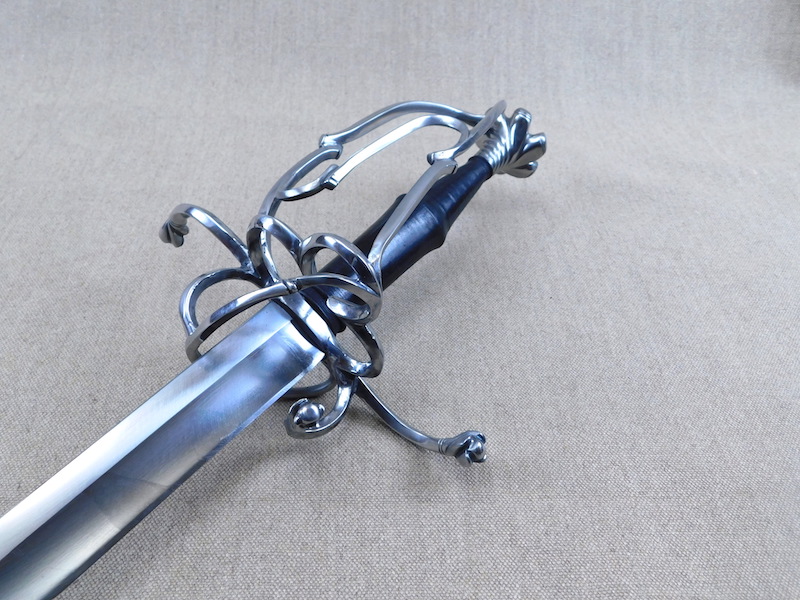
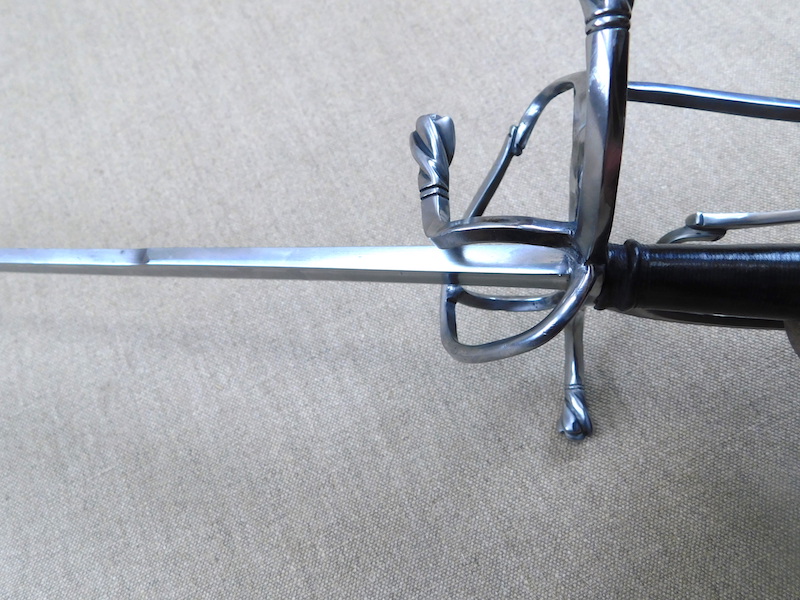
I unwrapped the grips and the leather was pressed down well and everything was neat and tidy - which is good. However the cord bound look was not what I was after in this case, so I burnished the leather to make it more gloss. The binding still shows a little.
Even without the knuckle guards this is a good looking sword; can anyone recall if there are longswords out there similar to this without the knuckle bow?
I then bent up the two principle knuckle guard rods and then finally bent up and fitted the 'S' guard section. The process for me at least is to make up a piece, finish and polish it and then tack weld it in place and then make up the next piece, tack it to the previous piece and then cut away the previous piece with the new piece attached. I then finish these two pieces and start again. I could weld everything together in one go and clean up after, which would be much faster, but there are nooks and crannies I would never get to.
These bent guards are always difficult as there are no straight lines to act as a reference points and the photos do not (of course) ever tell the whole story. What this means in practice is that I bend up a piece of wire as I think it should be. I then examine the photos at different angles, holding the wire form up and squinting a lot and then I tweak the wire form to suit. I then use this as a rough guide to bend the rods and then fit them into position. The 'S' guard for instance bends in all three dimensions.
Anyway, with some luck this will be finished today.
Hurrah!
Tod
Attachment: 183.47 KB
Attachment: 168.7 KB
Attachment: 203.04 KB
Attachment: 229.38 KB
Attachment: 221.04 KB
www.todsworkshop.com
www.todcutler.com
www.instagram.com/todsworkshop
https://www.facebook.com/TodsWorkshop
www.youtube.com/user/todsstuff1
|
|
|
|
|
Guillaume Vauthier
|
| Posted: Fri 06 Apr, 2018 3:50 am Post subject: |
|
|
Damn, to me it would look almost more beautiful without the knuckle guards, actually...
Can't wait to see the final result!
|
|
|
|
|
Craig Johnson
Industry Professional

|
| Posted: Fri 06 Apr, 2018 4:20 am Post subject: Love these |
|
|
Great work Tod!!!!!
These are exceptional swords and your pieces do them great justice. You have got the pieces just right. Do they sing in your hand when you pick them up :-)?
Craig
|
|
|
|
|
Leo Todeschini
Industry Professional
|
| Posted: Fri 06 Apr, 2018 3:07 pm Post subject: |
|
|
Guillaume Vauthier wrote | Quote: | Damn, to me it would look almost more beautiful without the knuckle guards, actually...
|
I like it both ways, but I still think it is a fine sword without the knuckle guards.
Craig Johnson wrote | Quote: | | These are exceptional swords and your pieces do them great justice. You have got the pieces just right. Do they sing in your hand when you pick them up :-)? |
Thanks Craig, very kind words and you set a very high bar back in 2009. You said at the time it was the hardest sword you had made and I concur - nothing about it was easy. Yes they are lovely pieces and a better swordsman than me could be more effusive, but it has an uncanny ability that when you pick it up it makes you feel you are ready for action; its just lively.
Right back to the swords.
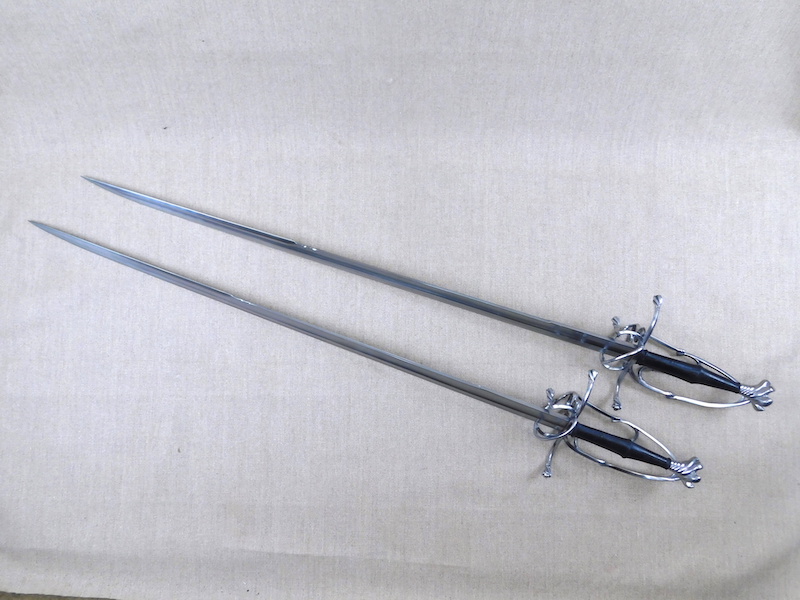
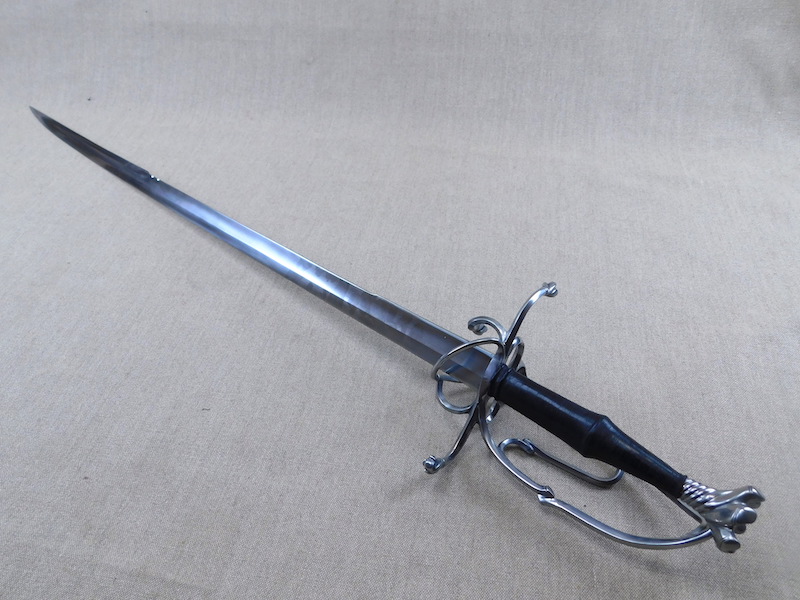
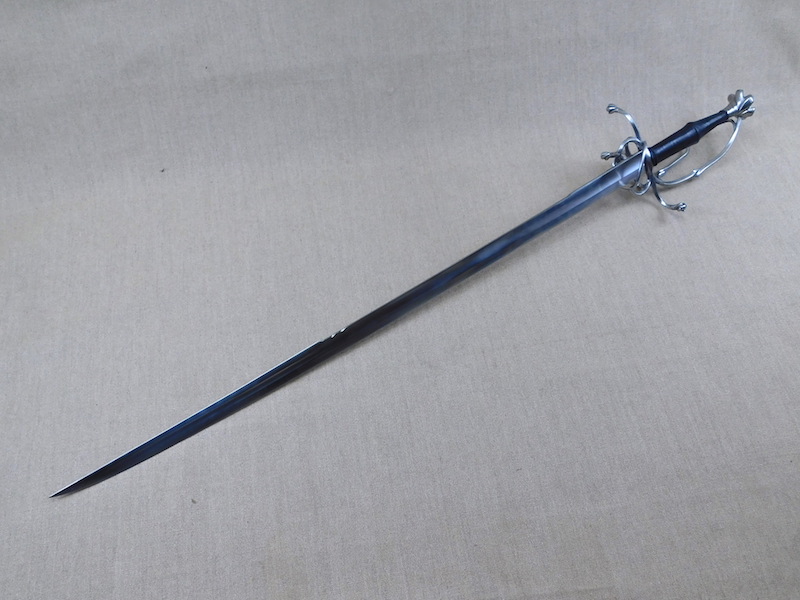
I have finished both swords and it was more of the same; welding and cleaning up and then the final assembly and peen and that takes us to the stats and the pictures.
When I make complicated pieces I like to make two and I lead with one and learn from it before doing the same stage on the next piece, so in that way the second piece incorporates the lessons of the first. This turned out to be a good move as on blade 1 at the first transition point I messed the fuller slightly, so there is a slight wobble in the line; annoying but thats life.
The original sword...
weight 1620g
blade length 1015mm
POB 97mm
sword 1
weight 1530g
blade length 1015mm
POB 95mm
sword 2
weight 1605g
Blade length 1018mm
POB 100mm
The weight difference is in the blade where on blade 1 I made it a bit thinner than it should be and I suspect the pommel may be missing that 15g of sword 2 but that is only 2CC of steel so it is really hard to tell - anyway the bottom line is that they both feel good.
Toby Capwell at the Wallace asked if I could bring them in and lay them next to the original, so there may be more photos and insights to come.
I hope you like it.
Tod
Sword 1 is available.
Attachment: 159.06 KB
Attachment: 181.87 KB
Attachment: 184 KB
Attachment: 178.78 KB
Attachment: 184.38 KB
Attachment: 182.88 KB
Attachment: 193.16 KB
Attachment: 146.33 KB
Attachment: 185.83 KB
Attachment: 125.77 KB
www.todsworkshop.com
www.todcutler.com
www.instagram.com/todsworkshop
https://www.facebook.com/TodsWorkshop
www.youtube.com/user/todsstuff1
|
|
|
|
|
Preben B
|
| Posted: Fri 06 Apr, 2018 3:47 pm Post subject: |
|
|
Stunning, this is definitely going on my "I need money so I can have Tod make it" list.
If you do end up getting pictures with them next to the original that will be really interesting to see.
Do you plan on making a video with it or perhaps have Matt Easton give it a go? I'm sure I'm not alone wanting to see this one moving in someones hand.
|
|
|
|
|
Guillaume Vauthier
|
| Posted: Sat 07 Apr, 2018 1:07 am Post subject: |
|
|
+1, definitely want to see these handled by someone!
| Quote: | | Toby Capwell at the Wallace asked if I could bring them in and lay them next to the original, so there may be more photos and insights to come. |
It is so great. I think this (a reproduction pictured together with the original) is the thing I would see the most often, together with a graph of the swords dynamics.
However, that's just gorgeous. And stunning. Congrats. Would you take one of them in Compiègne in november?
|
|
|
|
|
|
|

