| Author |
Message |
Julien M

|
 Posted: Sat 28 Apr, 2012 2:01 am Post subject: Hilting a moat blade - Squire/prince Posted: Sat 28 Apr, 2012 2:01 am Post subject: Hilting a moat blade - Squire/prince |
 |
|
Hi all,
As my yeoman project below is currently on hold because I can't find an effective way to drill through 1 cm of mild steel for a peen block (yeah, simple things can delay completion for month in my world  ), I decided to start working on another blade, the squire, which I was lucky enough to grab from the moat, as a second blade (again, pristine though I will regrind the tip to a needle). ), I decided to start working on another blade, the squire, which I was lucky enough to grab from the moat, as a second blade (again, pristine though I will regrind the tip to a needle).
http://www.myArmoury.com/talk/viewtopic.php?t=21636
For the yeoman, I went all the way for the cross guard, from anvil to grinder. I took a long time and efforts to get it right, so I decided to allow myself a shortcut here, and ordered a bunch of hilt components form Armour Class as they are UK based.
My intention was to rework most on the anvil/grinder, but to use these as a base, the idea being to spare me some painful steps such as punching the tang slot on the anvil etc...(Though some might say I could invest in a drill press...).
I ordered a pommel an 3 crosses. All serviceable and quiet nice but they will need some work to match the precision and finish of an Albion blade (the tang slot is not centered, and the guard much too thick for an Albion).
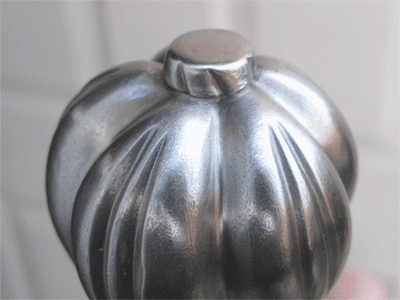
As soon as I took this guard out of the box, I knew it would be a good fit for the squire, and to be fair, the pommel is adequate as well for a type XVI sword. After some time filing the tang slot, there it is below.
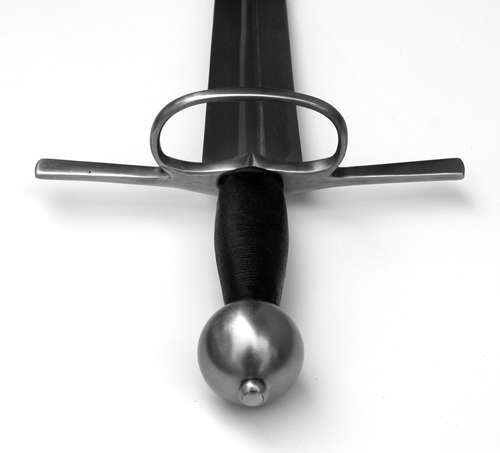
My initial idea what to go for the Copenhagen sword below, which I always liked, but to be fair, I like the ecusson area of the current cross and will likely keep it as it is. It is possible that this time I'll take the easy route without complicating things too much.
So next I will round the pommel and tweak it to adjust weight, will also need to fill the sides of the tang slot with a dab of weld (one thing I don't like is a squarish recess for the blade) then create the blade recess and thin the cross. Then I will even it and fine tune its geometry to match the aesthetic of the blade. Then the usual: grip, leather, scabbard done I'm really excited about this sword and glad to have reached that stage of completion with so little efforts.
Let me know what you think!
J


|
|
  |
 |
JE Sarge
Industry Professional

|
| Posted: Sat 28 Apr, 2012 5:29 am Post subject: Re: Hilting a moat blade - Squire/prince |
|
|
Looks great, man. I always enjoy seeing your work! 
| Julien M wrote: | Hi all,
As my yeoman project below is currently on hold because I can't find an effective way to drill through 1 cm of mild steel for a peen block...
|
In the past, I have taken a steel nut from the hardware store and just ground, filed, and sanded it down. If you get the correct size, you can make it square or any other shape you desire. This prevents from having to drill a hole as well (I don't have a drill press either).
J.E. Sarge
Crusader Monk Sword Scabbards and Customizations
www.crusadermonk.com
"But lack of documentation, especially for such early times, is not to be considered as evidence of non-existance." - Ewart Oakeshott
|
|
|
|
|
Randall Moffett

|
| Posted: Sat 28 Apr, 2012 5:30 am Post subject: |
|
|
Looks really nice! I will have to keep my eyes open for their next moat sale. That said I have intentions to buy some of their bare blades some day as well and make a sword.
Angle grinders are a super useful tool. I have to say I have found it useful around the house as well butting bolts and such down.
Everything looks good so far and lined up. What is your plan for the grip and such? Do you have a design for he grip itself, barrelled or the likes?
RPM
|
|
|
|
|
Julien M
|
| Posted: Mon 30 Apr, 2012 6:29 am Post subject: |
|
|
Thanks guys, glad you like it.
| JE Sarge wrote: | | In the past, I have taken a steel nut from the hardware store and just ground, filed, and sanded it down. If you get the correct size, you can make it square or any other shape you desire. This prevents from having to drill a hole as well (I don't have a drill press either). |
Yeah I've played with that idea as well (for repeening a gen 2 henry V sword...also in the works!). Never finalized anything with it though, and I want this one to be rounded at the base too and that rules out the nut solution I'll ask Owen (bush) to explain why my 2mm drill bits do little more than scratching the surface before breaking in a blitz of swearing on my end...I use a bit made for metal, at slow speed, with loats of oil, so don't get it really.
| Randall Moffett wrote: | | I will have to keep my eyes open for their next moat sale. That said I have intentions to buy some of their bare blades some day as well and make a sword.RPM |
If they ever have another one! I have bought a single handed type XVIII from their bare blade shop as well...very nice but crude compare to the next gen blades I got through the moat...a bit of work will be needed.
| Randall Moffett wrote: | | What is your plan for the grip and such?RPM |
plain and simple leather over cord.
Cheers,
J
|
|
|
|
|
Robert Rytel

Location: Pittsburgh Joined: 23 Oct 2011
Posts: 32
|
| Posted: Mon 30 Apr, 2012 7:34 am Post subject: |
|
|
| Julien M wrote: | | I'll ask Owen (bush) to explain why my 2mm drill bits do little more than scratching the surface before breaking in a blitz of swearing on my end...I use a bit made for metal, at slow speed, with loats of oil, so don't get it really. |
Have you tried a quality cobalt or titanium coated split point bit? Most plain HSS bits at home improvment stores are brittle Chinese junk.
|
|
|
|
|
Leo Todeschini
Industry Professional

|
| Posted: Mon 30 Apr, 2012 4:26 pm Post subject: |
|
|
Great work as ever Julien.
| Quote: | | Yeah I've played with that idea as well (for repeening a gen 2 henry V sword...also in the works!). Never finalized anything with it though, and I want this one to be rounded at the base too and that rules out the nut solution I'll ask Owen (bush) to explain why my 2mm drill bits do little more than scratching the surface before breaking in a blitz of swearing on my end...I use a bit made for metal, at slow speed, with loats of oil, so don't get it really. |
The bit cuts as a function of its edge speed. So the smaller the bit the faster you need to run it and inversely true. Most DIY drills will kill bits over about 5-6mm because they run far too fast and they burn up. A 2mm bit is pretty small though, so try running your drill at full speed and you won't be too far wrong; you need a steady hand too. Try bracing the drill against your body to hold it steady. Also if the block was a piece of steel picked up at Owens, it could be medium or high carbon, so that could also explain it. - Definitely mild?
Tod
www.todsworkshop.com
www.todcutler.com
www.instagram.com/todsworkshop
https://www.facebook.com/TodsWorkshop
www.youtube.com/user/todsstuff1
|
|
 |
|
Julien M
|
| Posted: Wed 02 May, 2012 1:50 am Post subject: |
|
|
Thanks Leo and Robert for the comments and tips.
Yes there is a stong possibility I might be trying to drill trough a piece of spring steel...I'll buy a cobalt bit online and will give it a last shot maybe...or by then I will have had access to a drill press, or will just peen the damn thing as it is, bare pommelled and coutersicked.
Cheers,
J
|
|
|
|
|
Randall Moffett
|
| Posted: Wed 02 May, 2012 4:40 am Post subject: |
|
|
You might want to make a stand or jig for the drill to sit in while you drill. Unless you think the torque is going to jerk the drill around a simple unit with two vertical boards and a support behind it will guide the drill up and down. Just put the boards close enough the drills back can nestle inside it. This will keep it steady.
RPM
|
|
|
|
|
Sean Flynt

|
|
|
|
|
Sean Flynt
|
|
|
|
|
Sean Flynt
|
| Posted: Wed 02 May, 2012 12:05 pm Post subject: |
|
|
By the way, these mods go easier if you screw the nut onto a bolt. The bolt gives you something to hold in the hand or vise. If the bolt head gets in the way you just reverse the nut and work on the unhindered side. You can even insert the bolt into your drill like a bit and do the polishing by simply running the drill while holding a sanding sponge or paper against the block (only for rounded blocks, of course).
I typically leave the top of the block roughly finished because I file and sand the peen anyway. Blending peen and block requires doing that whole top surface together.
Another tip: The mild steel block I made for the Type XIV drilled easily but you should cut the blank longer than you need, drill and THEN do the faceting/shaping. Drilling a finished piece is much dicier, as it will be obvious if you're even a few mm off center. Shaping the piece to the hole is much more forgiving. You probably already know that drilling a small pilot hole makes everything much easier. I use hand-drill bits rated for stainless steel, and they go right through pommel-size pieces of mild steel without any trouble at all. You need a solid bench and vise, though, because you have to lean into the drill.
-Sean
Author of the Little Hammer novel
https://www.amazon.com/Little-Hammer-Sean-Flynt/dp/B08XN7HZ82/ref=sr_1_1?dchild=1&keywords=little+hammer+book&qid=1627482034&sr=8-1
|
|
|
|
|
Julien M
|
| Posted: Thu 03 May, 2012 2:19 am Post subject: |
|
|
Nice work above Sean.
The hex nut method obviously works well for round/oval peen blocks.
For this one I want to drill through that thing, and won't rest until I succeed!
The peen I have in mind for the Yeoman should flare on both sides, making it rectangular.
J
|
|
|
|
|
Jason Mather

|
| Posted: Thu 03 May, 2012 6:06 pm Post subject: |
|
|
You could try to anneal it. Heat it up good and red, then quickly push it into wood ash or vermiculite. If its tool/spring steel that should do it. When you drill it, use 3-5 different sizes and step them up to the final size you are after.
To be nobody but yourself in a world that's doing its best to make you somebody else, is to fight the hardest battle you are ever going to fight. Never stop fighting.
|
|
|
|
|
Julien M
|
| Posted: Wed 22 Jun, 2016 7:08 am Post subject: |
|
|
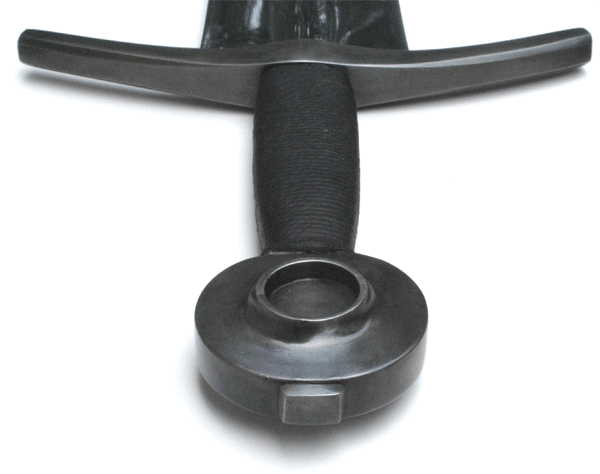
I've rebooted this project - now I'm going for the Copenhagen type XVI. I used to find the pommel too plain and borderline ugly but I love the overall lines and aesthetics of the sword - plus the A Moat Prince I have is bang on as far as measurements are concerned.
I've roughed up the guard using cutting disks and grinding wheel on my angle grinder, drilled a tang slot, hammered the cross into place. Now need to dremel the blade insert, and fine tune the guard symmetry (no matter how careful I am with measurements, I always end up with that problem once the guard sits on the should blade...)
I was planning to make a pommel out of two slices of 1.5 cm thick steel (4*4 tapering to 2*2) - that would have allowed me to carve out the tang hole with the grinder, even hollow it a bit to fine tune weight, then weld the two parts together.
But I worked outside using a clay flower pot (upside down) as a grinding table, and everything wiggled left and right and I think I messed it up. Since in the UK it's very easy to find mild steel on ebay, I'll change plan and will use a full block of mild steel
Blade also needs fine tuning (around the tip which I will shorten).
Rough guard and pommel below and one useful tip - bought rolls of fax paper (21cm * 10m) to print out swords to size in one go. Paper is crap and tears easily but taping A4 sheets together like I did before was really a pain.
Hope you like it - I'll try to finish this prompto (that probably means within a year )
Cheers,
J


|
|
|
|
|
|
Scott Kowalski
Location: Oak Lawn, IL USA Joined: 24 Nov 2006
Posts: 818
|
| Posted: Wed 22 Jun, 2016 7:25 am Post subject: |
|
|
That is looking very good Julien. And as you said the blade is spot on for the Copenhagen sword when you see the blade and printout of the sword side by side. It is also good to see you back at it. Keep up the good work!
Chris Landwehr 10/10/49-1/1/09 My Mom
|
|
|
|
|
Sean Flynt
|
|
|
|
|
Julien M
|
| Posted: Wed 22 Jun, 2016 8:03 am Post subject: |
|
|
Thx Scott! - good to be back at it, sanding my knuckles on the belt grinder and burning my fingers on hot steel I have not been good at carving time for this, and forgot how satisfying this is.
| Sean Flynt wrote: | | Very nice, as always! I need to get deeper into fabricating guards this year, and this is inspiring! |
I find this is the easiest part (at least on medieval swords) Pommel however are another story. I usually print a second hilt to size, and cut out the guard pattern with scissors. I use this and a fine sharpie to refine the work. I'm sure you know this, but don't start removing anything before you've drilled the tang slot and can assess the position of the guard on the blade shoulder. I didn't and cut mine before, and nearly messed it up. Always allow more material for error (look at that pommel! I should have made my tang insert in square 4*4 pieces, then weld top and bottom then start shaping...oh well...next time )
|
|
|
|
|
Julien M
|
| Posted: Thu 23 Jun, 2016 7:29 am Post subject: |
|
|
Some progress:
May not be very apparent from the pictures but spent another 3 hours on the guard yesterday, removing lots of material on all sides, shortening one quillon, adding the blade insert. It's now quiet thin, yet I will probably taper the quillons further as per the original seen on Soren great pictures. Also I will finish everything by hand. The curve (facing the blade down, is very subtle in the original, I will surely mess it up using powertools. Time for patience now - using with 60 grit sandpaper wrapped on a large round paint container...not in the mood now
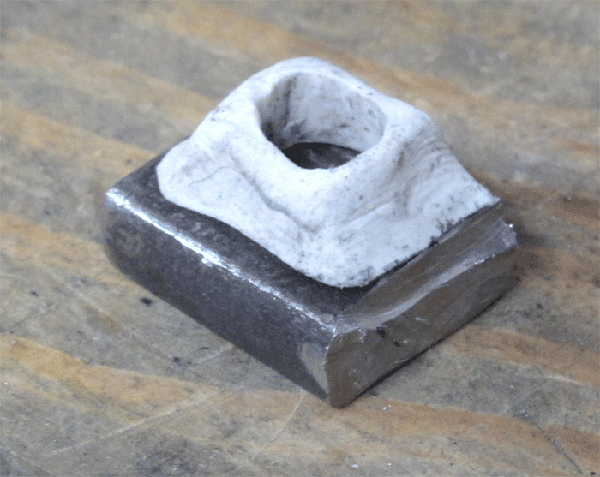
Then I cut 4cm * 4cm mild steel squares (1.5 cm thick plate), traced the tang outline, made some deep cuts lenghtwise (angle grinder) then used a grinding disk to hollow the tang slot further. Next I used the powerfile. Both these tools are now officially my new best friends, the powerfile is especially amazing fitted with zirconium belts - eats away metal in no time. Below you can see the tang sitting in place inside the tang slot, and the rough pommel held in place with a clamp. I will weld top and bottom then will move on to shaping all 4 sides - that way, I will make sure everything is centered with the tang - pretty much the same technique as making a wooden grip here - except that steel fights back a lot more
Onto the grip (5 min job with the powerfile - trace the tang, hollow, glue - done!) rough up the outer core with the powerfile. I am planning an angular grip, so I need the pommel to be finalized to go further and to do this I need to weld. I've never done it so I will do so this week end with my 65£ lidl arc (?) welder - and with time to think things over (and watch a few youtube tutorials I've gathered for that very purpose).
Scabbard - to my surprise, I had already cut poplar planks to size for this blade years ago from the leftovers of another scabbard. Time saved...
Below - pre assembly test. Anyone making swords will know the feeling. You work on these different elements independently, but put a piece of wood on the tang and a counter weight as a pommel and pick it up and bang - you realize that you suddenly have a sword in your hand This one rests freely on the hammer handle so that's the point of balance. It seems like once I'd shaped the pommel it will be bang on 10/15 cm down the blade - all good. I must say that in it's current state, it already feels quiet nimble an pleasing in hand...
TBC


|
|
|
|
|
Julien M
|
| Posted: Sat 25 Jun, 2016 9:15 am Post subject: |
|
|
Weld is done. Got myself welding gloves and apron on amazon - very cheap and these will come very handy for grinding too. It took a solid few hours to figure it out - setting the machine (arc weld), selecting the correct AMP, and more importantly, getting the technique right (or roughly right!).
I've grinded the inner sides of the plates to create a V shaped grove that is to get filled with weld. I'm welding top and bottom to be able to grind the sides of the pommel.
The Lidl arc welder comes with a mask, fitted with a lens that is extremely dark - Imagine doing something that requires precision in utter darkness - that's pretty much what it feels like, even outside by a sunny afternoon. I completely messed up a couple of times, found a great tutorial video on youtube (I did not know that once you get the arc going you have to hoover a couple of millimeter above the base metal), I kept getting my electrode stuck before and also accidentally looked at the arc sideways a couple of times, hopefully that's fine...I then realized that once the arc is launched, you can see just enough with the mask on (you have to hold it with one hand which is very annoying). I used a tool box to rest the arm holding the electrode at the right angle and height From that point on, things started to get interesting.
First correct attempt looked solid, but once I sanded it flat removing most of the weld in the process, it took very little pressure with a square file stuck inside to snap it off.
Second attempt - I made a much deeper V shaped grove, and by that time my technique was a little better. It's rock solid. I'll proceed with the the actual shaping of the pommel now. Then I will hollow on both sides where the plate meet and fill with weld to close the pommel completely.
I'm very happy - this little welder is delivering just what I need. Welding opens a lot of new possibility for hilts etc. I would not presume I'd be confident and skilled enough to weld critical part of a sword such a tang extension for instance , I'd ask a pro for that. But for a thumb guard or other complex hilts, no problems. I can also fill and add material to correct grinding mistakes or casting pits etc.
Pics below - they don't look like much, but to me the hard and challenging part is done.


|
|
|
|
|
Gary Gibson

|
| Posted: Sun 26 Jun, 2016 10:24 am Post subject: |
|
|
Julien,
Can you please detail the methodology / process for slotting the hilt and (1-piece) pommel ?
What dimensions do you cut (drill, then file?) the slot relative to the tang (width), what (final) size drill do you choose (relative to the desired finished slot width), and what pitch do you drill (distance between drill holes, assuming you drill multiple {overlapping?} holes) ?
From your earlier post I gather you start with a smaller drill size and step 3-5 different sizes up to the final size ?
This info will be very helpful in creating furniture such as you have done here wonderfully!
Gary Gibson
Member Schola San Marco, San Diego, CA
|
|
|
|
|
|
|
You cannot post new topics in this forum
You cannot reply to topics in this forum
You cannot edit your posts in this forum
You cannot delete your posts in this forum
You cannot vote in polls in this forum
You cannot attach files in this forum
You can download files in this forum
|
All contents © Copyright 2003-2026 myArmoury.com — All rights reserved
Discussion forums powered by phpBB © The phpBB Group
Switch to the Basic Low-bandwidth Version of the forum
|