| Author |
Message |
Leo Todeschini
Industry Professional

|
 Posted: Fri 18 Dec, 2015 11:38 am Post subject: Talhoffer bollock WIP Posted: Fri 18 Dec, 2015 11:38 am Post subject: Talhoffer bollock WIP |
 |
|
Hi All,
I am making an interesting dagger at the moment and thought it may be interesting to run a 'work in progress' thread.
A client contacted me looking for a bollock dagger based on a sketch from a Talhoffer manuscript, which means that inevitably a deal of interpretation is required. Talhoffer was a sword and weapons master that famously wrote the 'fight book' which covered the use of many weapons and weapon combinations. The book included many sketches of pieces that presumably he was proposing as weapon designs, as many are quite strange and have no extant examples, rather than sketches of existing pieces.
I was asked to base my piece on the sketch shown below. This dagger has some unusual aspects that must be considered in view of the slight fantasy element to many of his sketches and must be viewed in the wider context of daggers of the time.
The blade as shown appears to screw on and off, this is not exhibited on any daggers I know of. It is also double sided and hollow ground, with a central full length fuller, making this again a very unusual blade form, though not unheard of.
The grip shape is fairly normal, though the very domed head of the handle is unusual, it also certainly has precedents.
The knife has by-knives, which is established for bollock daggers and other dagger types and was a popular feature particularly of German knives; however this would emphasise the higher status nature of the piece. That said, the guard is very plain and there is no pommel or pommel cap at all, making indicating a lower status piece and this would not fit with the by knives. Altogether a mixed and confused message.
So IMHO the drawing cannot be replicated 'as is' if we wish to make a dagger that could have existed at the time, so we laid out the specification as follows.
Double sided hollow ground blade with central fuller, 2 by knives and a pricker, a larger more prominent guard and a large domed pommel cap.
I cut out the form of the blade and ground on the bevels to create a diamond section blade, leaving the tip a little thicker at this stage, as in my experience grinding hollows right to the tip requires a fair bit of work and rework to get everything to line up and blend well and if you start with the right size, by the time it is all correct it will be too thin.
The next stage is to grind in the central fuller to bring it close to the tip and then the edge bevels, making sure that all the lines defined by the fullers run smoothly.
Once this is done then the fullers are slowly drawn down toward the tip and blended out to leave the very tip as a reasonably robust diamond.
More to follow next week, but if you have any questions or comments, please fire away.
Tod
 Attachment: 46.08 KB Attachment: 46.08 KB

 Attachment: 34.32 KB Attachment: 34.32 KB

 Attachment: 40.2 KB Attachment: 40.2 KB

 Attachment: 33.84 KB Attachment: 33.84 KB

 Attachment: 41.48 KB Attachment: 41.48 KB

 Attachment: 41.11 KB Attachment: 41.11 KB

 Attachment: 45.04 KB Attachment: 45.04 KB

www.todsworkshop.com
www.todcutler.com
www.instagram.com/todsworkshop
https://www.facebook.com/TodsWorkshop
www.youtube.com/user/todsstuff1
|
|
   |
 |
Kai Lawson

|
 Posted: Mon 21 Dec, 2015 7:19 am Post subject: Posted: Mon 21 Dec, 2015 7:19 am Post subject: |
 |
|
Looking forward to watching this unfold!
"And they crossed swords."
--William Goldman, alias S. Morgenstern
|
|
  |
 |
Leo Todeschini
Industry Professional

|
 Posted: Tue 22 Dec, 2015 11:27 am Post subject: Posted: Tue 22 Dec, 2015 11:27 am Post subject: |
 |
|
Thanks Kai,
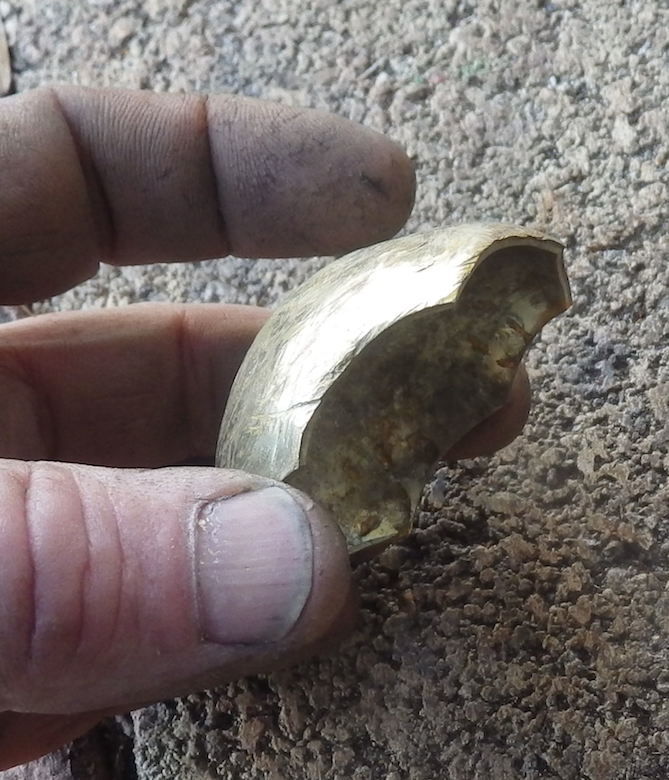
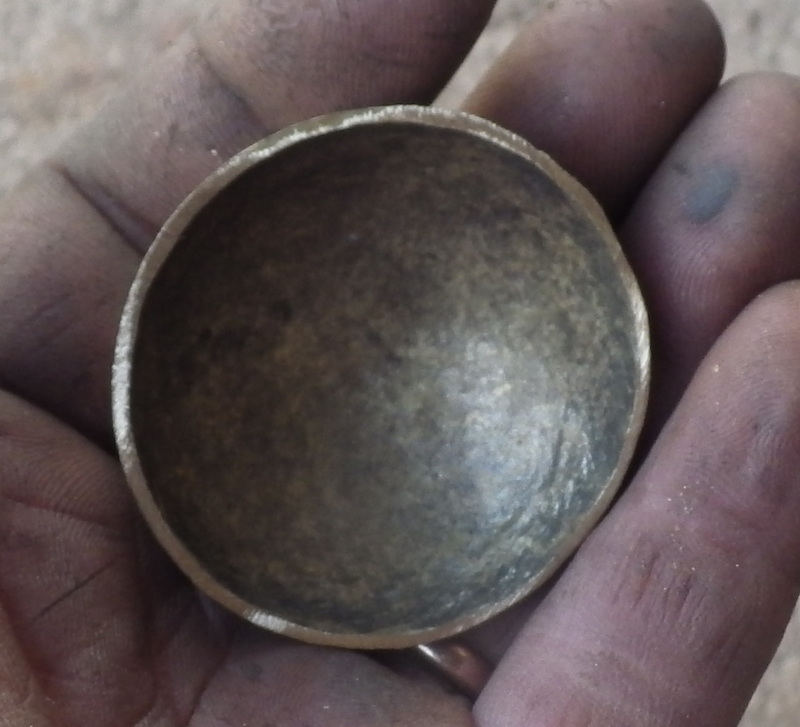
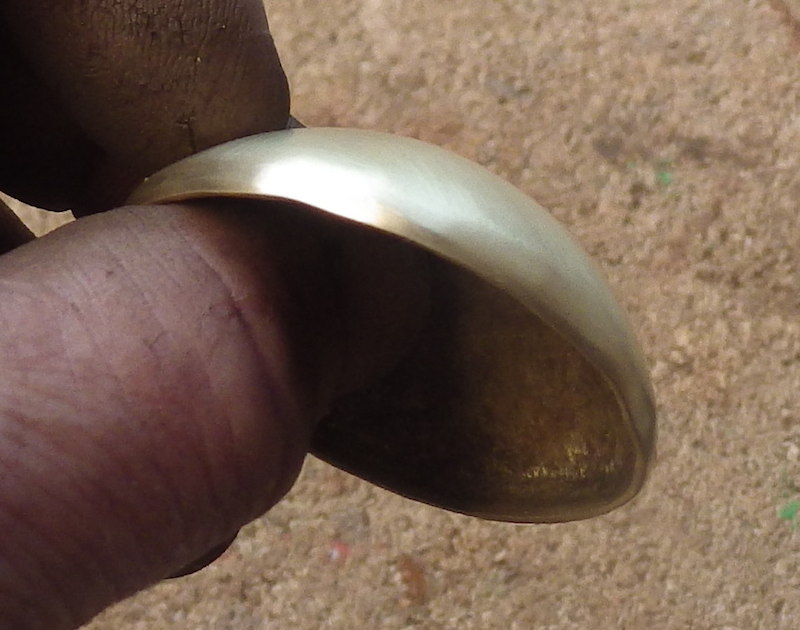
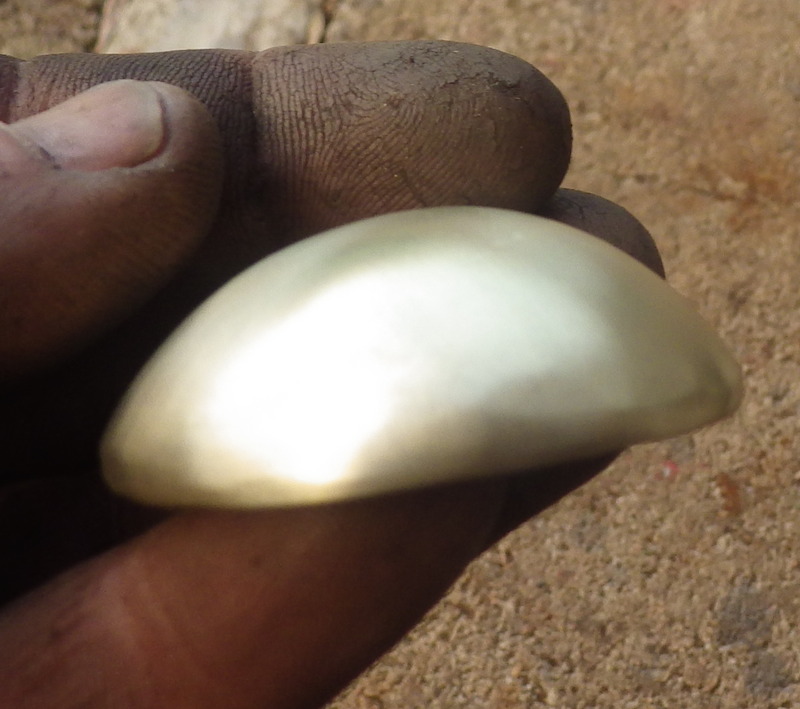
The next stage is to start the handle, but as wood is easier to shape than metal, I have started with raising the top cap and then will go back and turn the handle.
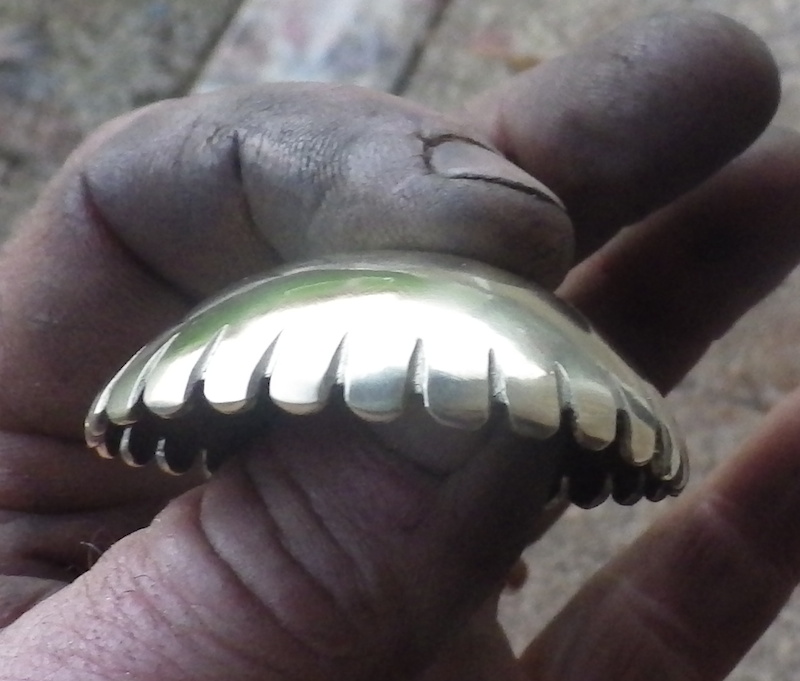
I started with some brass sheet, annealed it and beat it into a dished stake. The final stage of shaping was to slightly turn in the rim and then the cap was planished and polished.
The final stage of the cap was to cut some dags onto the edge to allow it to crimp down and then a repolish.
 Attachment: 102.07 KB Attachment: 102.07 KB
 Attachment: 126.08 KB Attachment: 126.08 KB
 Attachment: 85.32 KB Attachment: 85.32 KB
 Attachment: 110.42 KB Attachment: 110.42 KB
 Attachment: 130.19 KB Attachment: 130.19 KB
www.todsworkshop.com
www.todcutler.com
www.instagram.com/todsworkshop
https://www.facebook.com/TodsWorkshop
www.youtube.com/user/todsstuff1
|
|
   |
 |
Matt Corbin

|
 Posted: Tue 22 Dec, 2015 7:17 pm Post subject: Posted: Tue 22 Dec, 2015 7:17 pm Post subject: |
 |
|
I love these work in progress, step by step threads. Keep them coming.
?This was the age of heroes, some legendary, some historical . . . the misty borderland of history where fact and legend mingle.?
- R. Ewart Oakeshott
|
|
  |
 |
Gary Gibson

|
 Posted: Wed 23 Dec, 2015 10:46 am Post subject: Posted: Wed 23 Dec, 2015 10:46 am Post subject: |
 |
|
Tod, thanks for the wonderful work-in-progress post.
A couple of questions...
what is the purpose/advantage(s) of grinding the tip of the blade later, or more fully later, in the shaping process ?
What tools/how did you grind the fuller ?
Gary Gibson
Member Schola San Marco, San Diego, CA
|
|
  |
 |
Leo Todeschini
Industry Professional

|
 Posted: Mon 04 Jan, 2016 1:18 am Post subject: Posted: Mon 04 Jan, 2016 1:18 am Post subject: |
 |
|
Gary Gibson wrote | Quote: | A couple of questions...
what is the purpose/advantage(s) of grinding the tip of the blade later, or more fully later, in the shaping process ?
What tools/how did you grind the fuller ? |
I am sure we all work differently, but leaving the tip full allows me to grip something whilst the bulk of the blade is being shaped. I leave it a little thicker, so that as I grind in the 3 fullers a side and try to blend them, there is a room for error. The shaping of a complicated blade tip can be a little like shortening the legs on a table to get it to sit level; before you know it the tip is paper thin and much shorter than you wanted.
I have a custom made grinder, but only because all the regular US types are not available here, but it is based on a composite of standard designs with interchangeable wheels, plattens and other fittings. The one main difference is that when the maker made it, he used solid bar stock for everything, so it is more solid than a rock.
I grind the fullers by using a small wheel and roughly tracking in the path of the fuller, then using the same wheel I straighten it a bit, being careful to not go too deep. I then switch to a larger wheel and rework the fuller and this will naturally straighten everything up massively and then I slowly and carefully straighten it up completely, going a little deeper as required.
Tod
www.todsworkshop.com
www.todcutler.com
www.instagram.com/todsworkshop
https://www.facebook.com/TodsWorkshop
www.youtube.com/user/todsstuff1
|
|
   |
 |
J. Hargis

|
 Posted: Wed 13 Jan, 2016 8:59 am Post subject: Posted: Wed 13 Jan, 2016 8:59 am Post subject: |
 |
|
Tod:
The photos with your fingers tell a tale. If those digits could only talk. Or perhaps they do sometimes. 
Regards, Jon
A poorly maintained weapon is likely to belong to an unsafe and careless fighter.
|
|
  |
 |
Leo Todeschini
Industry Professional

|
 Posted: Mon 25 Jan, 2016 1:23 pm Post subject: Posted: Mon 25 Jan, 2016 1:23 pm Post subject: |
 |
|
Jon Hargis wrote | Quote: | | The photos with your fingers tell a tale. If those digits could only talk. Or perhaps they do sometimes. Happy |
Well lets just say I am not an office worker!
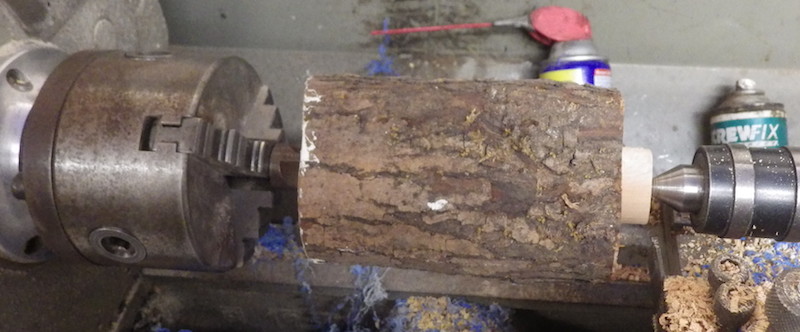
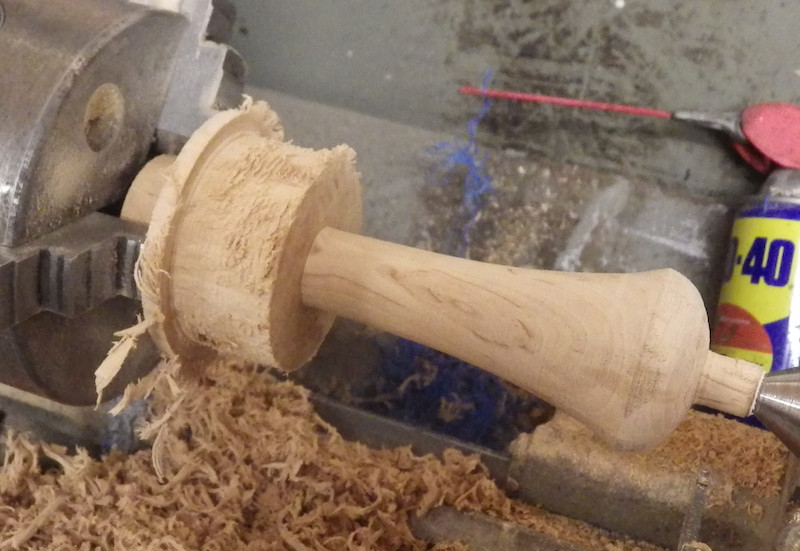
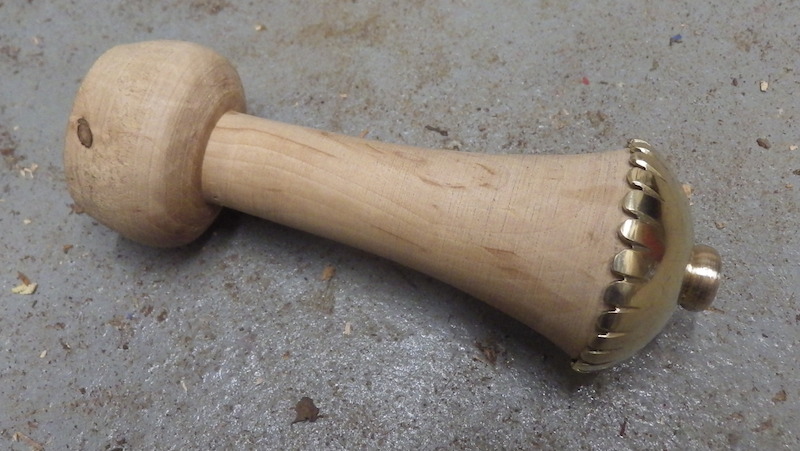
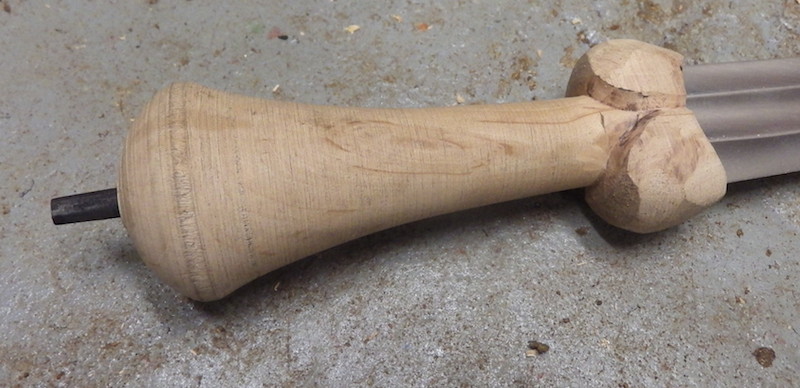
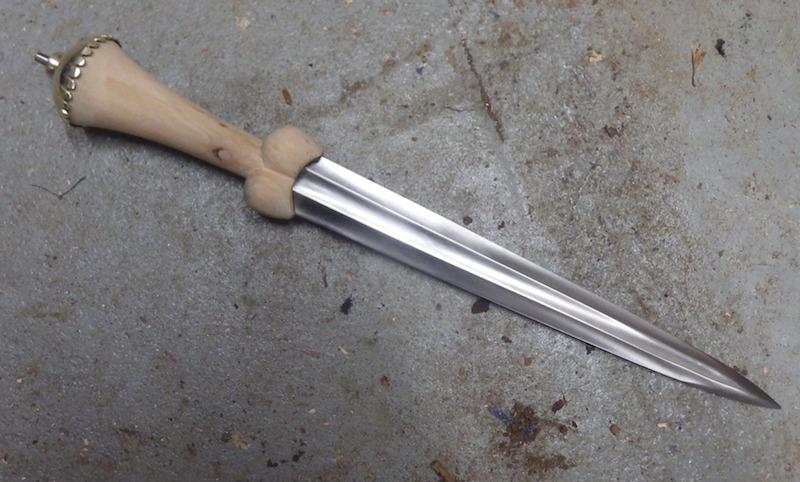
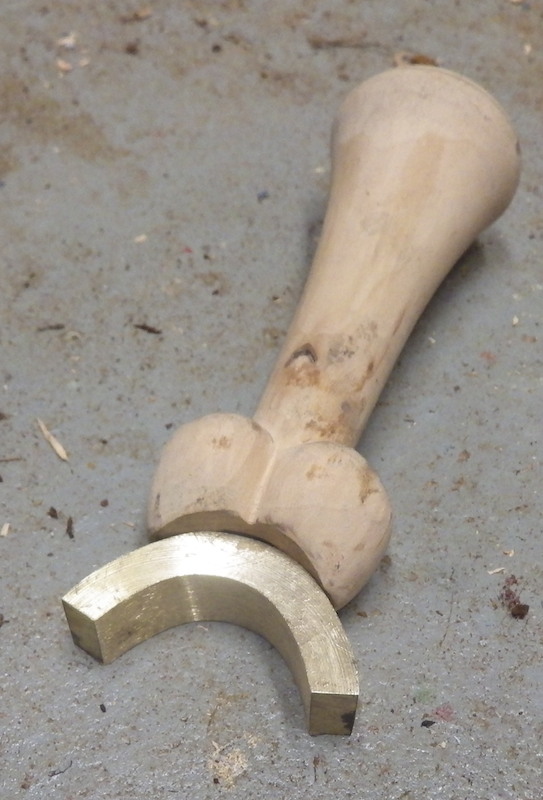
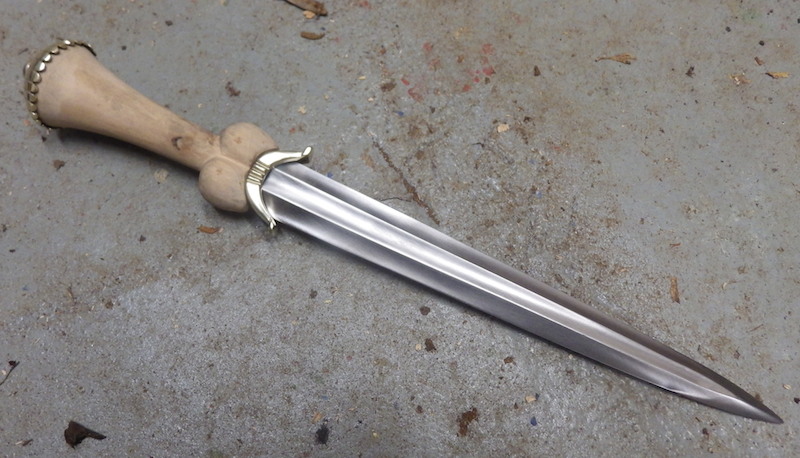
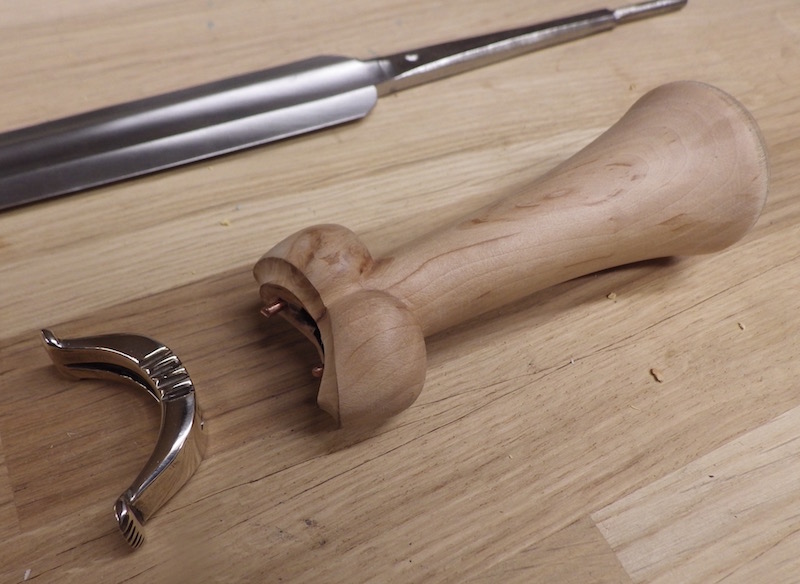
So the next round of work has started. Once I made the top cap I started turning the grip. This is done by turning the handle part of the grip and making that smooth and then the bollocks part of the grip is turned as well and central hole is drilled. The bollocks then have the main faces sawn off and and the blade tang burnt in and then the balls shaped a bit on a belt grinder. I burn the tang in at this point because it can sometimes go a little squiffy and so this can be corrected at the carving stage. I then carve the bollocks roughly but don't worry about the finish at this point.
The blade is now well seated in the grip and everything is square and so I made the guard. The one in the Talhoffer manuscript is a flat plate and though in the 16th this was common, I have not seen a 15thC piece like this (yes I am sure there are loads out there) so I opted for a more typical 15thC form. It starts by forming a piece of bronze and grinding in a recess to suit in the grip and then shaping the guard.
The last stage is to drill through the guard to fit pins, this stops everything moving about when you are fitting it together. I didn't like the look of the grip as it met the guard, so put an extra groove around the bollocks, which is a normal feature.
Tod
 Attachment: 76.02 KB Attachment: 76.02 KB
 Attachment: 108.38 KB Attachment: 108.38 KB
 Attachment: 118.29 KB Attachment: 118.29 KB
 Attachment: 34.21 KB Attachment: 34.21 KB

 Attachment: 95.38 KB Attachment: 95.38 KB
 Attachment: 129.89 KB Attachment: 129.89 KB
 Attachment: 104.6 KB Attachment: 104.6 KB
 Attachment: 122.91 KB Attachment: 122.91 KB
 Attachment: 110.99 KB Attachment: 110.99 KB
 Attachment: 51.42 KB Attachment: 51.42 KB

www.todsworkshop.com
www.todcutler.com
www.instagram.com/todsworkshop
https://www.facebook.com/TodsWorkshop
www.youtube.com/user/todsstuff1
|
|
   |
 |
|
Markus Nußbaumer
|
 Posted: Tue 26 Jan, 2016 3:27 am Post subject: Posted: Tue 26 Jan, 2016 3:27 am Post subject: |
 |
|
Hello Tod,
I love those "in progress" pictures and your detailled description. And a very nice bollock dagger that is!
One question: how do you "burn" the blade tang into the wooden grip? Do you just heat up the tang?
Best wishes,
Mark
|
|
  |
 |
|
Carl W.
|
 Posted: Tue 26 Jan, 2016 7:03 pm Post subject: Posted: Tue 26 Jan, 2016 7:03 pm Post subject: |
 |
|
|
Tod - Not sure if this & Beagnoth are your only WIP topics but thank you very much, & also I'd suggest they are a good idea occasionally. Besides fun & interesting to see, helps us appreciate your hard work & hours in addition to skills. After a few of them your regular posts can seem sort of like immaculate conceptions :) Now they don't - can almost hear the curses that went into their making..
|
|
  |
 |
Leo Todeschini
Industry Professional

|
 Posted: Wed 27 Jan, 2016 11:30 am Post subject: Posted: Wed 27 Jan, 2016 11:30 am Post subject: |
 |
|
Carl W wrote | Quote: | Tod - Not sure if this & Beagnoth are your only WIP topics but thank you very much, & also I'd suggest they are a good idea occasionally. Besides fun & interesting to see, helps us appreciate your hard work & hours in addition to skills. After a few of them your regular posts can seem sort of like immaculate conceptions  Now they don't - can almost hear the curses that went into their making.. Now they don't - can almost hear the curses that went into their making.. |
They are the only ones I am running at the moment, but I have made a few before, so search them out if you are interested. That is an interesting point you make and yes this way you all get to see the sweat that goes into these pieces. Also until you mentioned it I hadn't really considered the amount of stages that goes into a piece like this.
So onto the next stage.
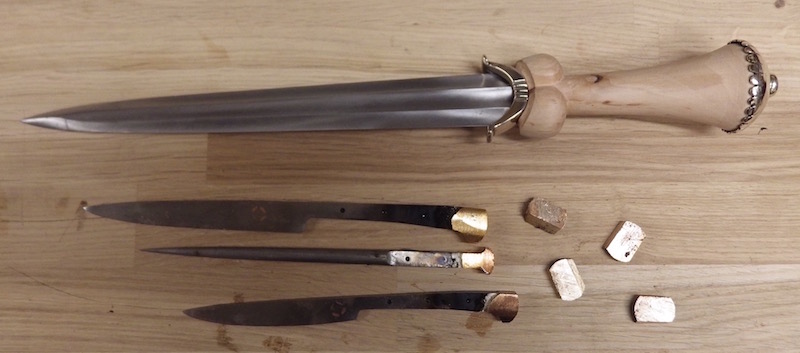
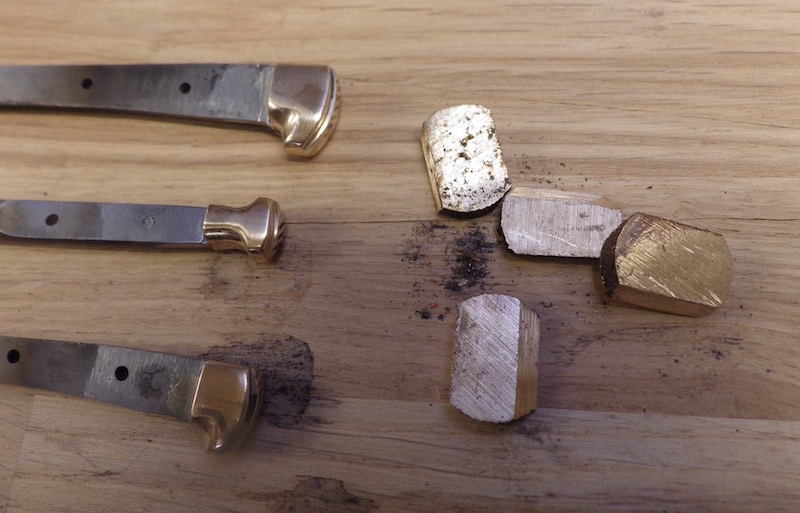
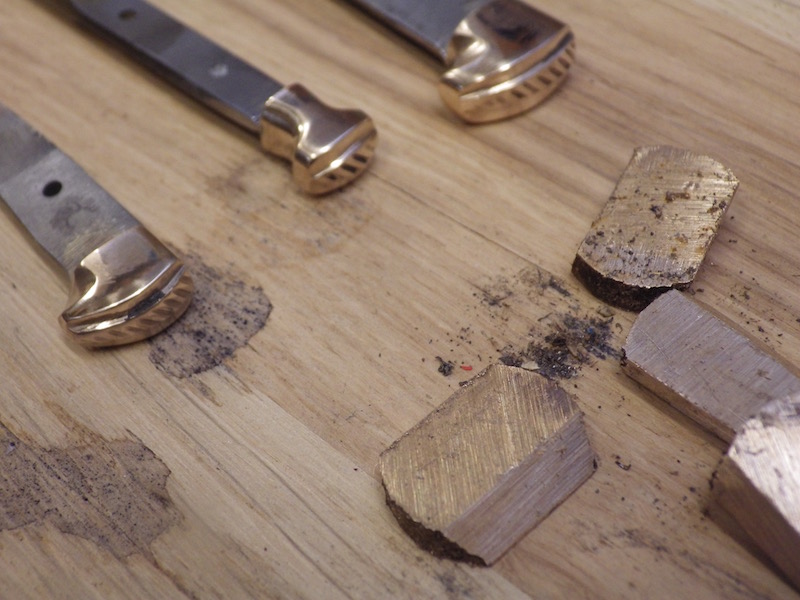
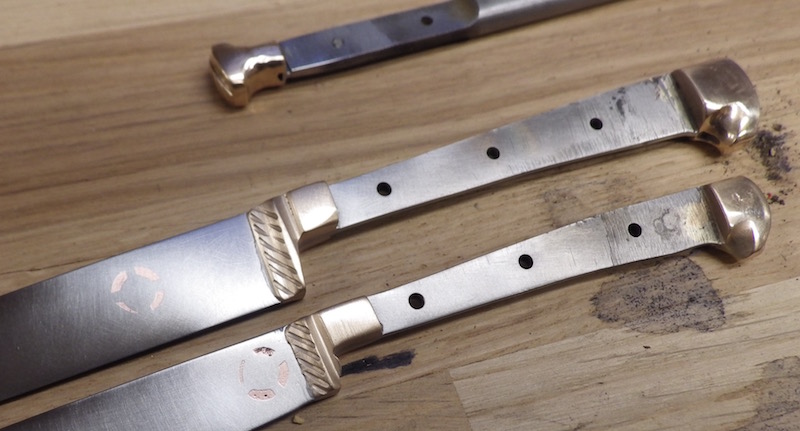
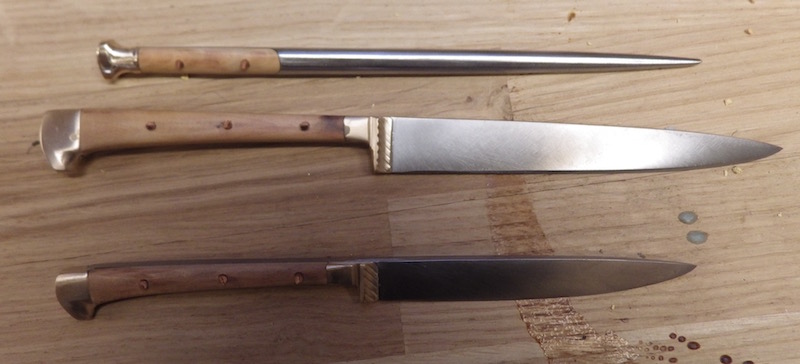
The dagger has a set of by knives and these blades were made a while back, but they need bolsters and pommels fitting. I have some bronze round bar that suits, so I cut slices of this and cut slots into those and silver soldered them into place on the blades and shape them in situ.
The bolsters are also soldered on and shaped in situ. Sometimes they were riveted and sometimes they were soldiered, of these small fiddly ones I like to solder.
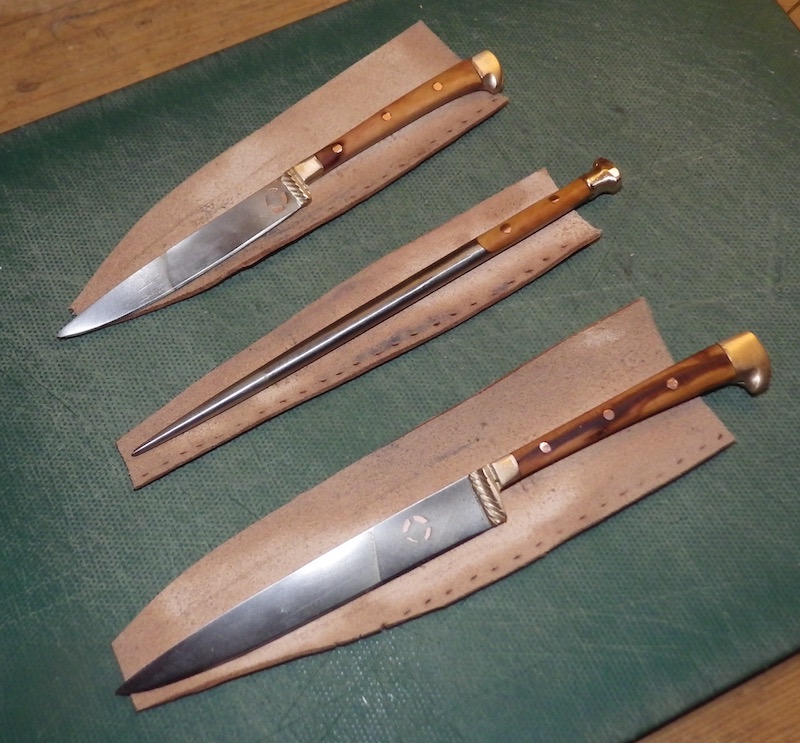
Hawthorne scales were cut and drilled and copper rivet pins were placed to make sure everything lines up. They were then riveted and cleaned back and the main dagger grip and the knives were soaked in linseed oil overnight.
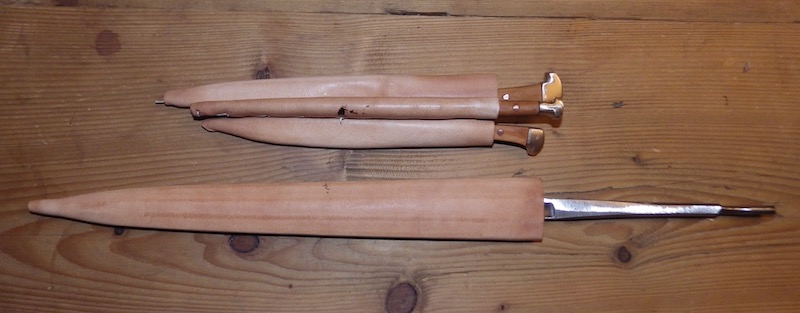
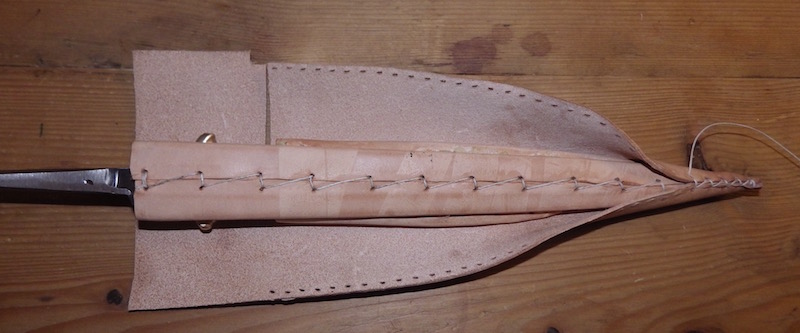
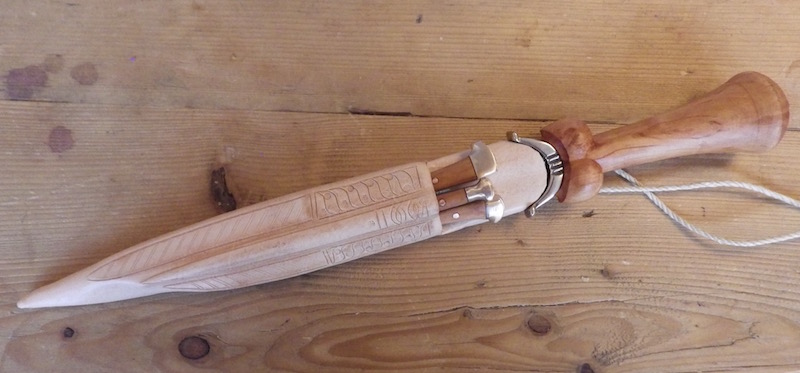
Now it is onto the scabbard. The first stage is to make liners for the blades from leather and then arrange them so that they make a good stack and look like the original artwork. These are then stuck together and the outer scabbard covering is cut and shaped and then sewn up.
The final stage is then to decorate the scabbard. It is hard to make out for the image the exact decoration, so I have made something that looks similar to the blurred image detail.
Final assembly tomorrow!
 Attachment: 70.3 KB Attachment: 70.3 KB
 Attachment: 112.23 KB Attachment: 112.23 KB
 Attachment: 127.2 KB Attachment: 127.2 KB
 Attachment: 92.39 KB Attachment: 92.39 KB
 Attachment: 69.7 KB Attachment: 69.7 KB
 Attachment: 179.34 KB Attachment: 179.34 KB
 Attachment: 67.2 KB Attachment: 67.2 KB
 Attachment: 73.05 KB Attachment: 73.05 KB
 Attachment: 38.08 KB Attachment: 38.08 KB

 Attachment: 81.88 KB Attachment: 81.88 KB
www.todsworkshop.com
www.todcutler.com
www.instagram.com/todsworkshop
https://www.facebook.com/TodsWorkshop
www.youtube.com/user/todsstuff1
|
|
   |
 |
Julien M

|
 Posted: Thu 28 Jan, 2016 11:18 am Post subject: Posted: Thu 28 Jan, 2016 11:18 am Post subject: |
 |
|
I like this very much, the blade geometry, the handle shape and cap, and the by knives stacking up on the scabbard.
is this a commission or will it be up for sale? edit - checked post beginning and got my answer 
Cheers,
J
|
|
  |
 |
Leo Todeschini
Industry Professional

|
|
   |
 |
|
|

