| Author |
Message |
Boris Bedrosov
Industry Professional

|
 Posted: Fri 22 May, 2015 9:12 pm Post subject: DIY Project: Making of a Plank Shield Posted: Fri 22 May, 2015 9:12 pm Post subject: DIY Project: Making of a Plank Shield |
 |
|
Hi there!
I've not been written here for a long time.
I have some strong doubts if I should start this thread or not - sometimes I think all my DIY threads seem like an auto-advertisement to you and the well-respected audience here might be tired of them. Anyway, as I've got a lot of knowledge (and still do) from this wonderful source, I think it would be good to share mine with the community.
Well, this thread is about shields. As you'll see later, my way is very different from the way, shared by Gregory J. Liebau here http://forums.armourarchive.org/phpBB3/viewto...ter+shield but the result is still good, and at least - looks like historical examples.
I hope you would like it!
"Everyone who has the right to wear a long sword, has to remember that his sword is his soul,
and he has to separate from it when he separates from his life"
Tokugawa Ieyasu
Find my works on Facebook:
Boris Bedrosov's Armoury
|
|
   |
 |
Boris Bedrosov
Industry Professional
|
| Posted: Fri 22 May, 2015 10:10 pm Post subject: |
|
|
And here we go.....
As I've hesitated if started this thread or not, the first pictures I've taken are from some point well after the start.
Here

are what left from the planks, some tongues from the joinery and some essentials - PVA glue and F-clamps.
The wood I use is lime (known also as linden, or basswood), cut in planks with appropriate sizes from a larger board; then a single grooves were cut at the edges of each plank. The tongues were cut from 6 mm plywood.
As the shape of the future shield was known, it was traced on a hard surface - a large piece of plywood in my case. After that, using this contour as a guideline, from the longer boards the planks for the shield were cut. This process started from the middle of the shield (plank #0) and moved to each side (planks R#1, R#2, R#3 and R#4 to the right and planks L#1, L#2, L#3 and L#4 to the left). Of course all were cut with some allowance of about an inch.
The glueing took place on a metal frame with "ribs" bent to the appropriate diameter, then welded together in a monstrous construction.

As the "ribs" are symmetrical, I'm able to use any part of the frame I want. Here I glue the shield while its #0 plank is placed far from the middle of the frame. The planks themselves were hold in place by two sets of belts - the first set (red belts with hooks) presses the planks against each other; while the second holds them tightly to the metal frame.
When the glue dried off, I removed the belts in order to prepare the shield for the next glueing -

in this case here

the outer R#3 and R#4 planks. As you also see, now the shield was placed right in the middle of the frame; the R#4 plank was protected from the hooks of the belts with a piece of square metal tube.
And finally - the finished blank after the whole glueing was completed

"Everyone who has the right to wear a long sword, has to remember that his sword is his soul,
and he has to separate from it when he separates from his life"
Tokugawa Ieyasu
Find my works on Facebook:
Boris Bedrosov's Armoury
|
|
|
|
|
M. Curk

|
| Posted: Sat 23 May, 2015 11:04 am Post subject: |
|
|
Glad to see another project of yours Boris, I find them very inspiring!
Keep it up!
Miha
|
|
|
|
|
|
Andrew Gill
|
| Posted: Mon 25 May, 2015 1:54 am Post subject: |
|
|
Hi Boris
Out of interest, are there any historical examples of keyed or tongued joints between shield planks? It is a very elegant solution, and I will probably "steal" it when I finally get around to making a planked shield, whether or not the technique is historical. Which is, in my opinion, exactly why your (and others') DIY threads are extremely useful; less experienced DIYers (like me) learn a lot from seeing how someone else does things. It is also encouraging to see what can be achieved with sufficient persistence and skill.
Andrew
|
|
|
|
|
Boris Bedrosov
Industry Professional
|
| Posted: Mon 25 May, 2015 7:17 pm Post subject: |
|
|
Well, I haven't seen historical evidences for such joint so far; I also "stole" the idea when I found it on the Web sometime ago.
Jan Kohlmorgen in his wonderful "Der Mittelalterliche Reiterschild" (The Medieval Knight Shield) - maybe the best book on shields I have access to

doesn't mentioned such construction. Instead, he suggests reconstruction in wich the planks are glued without any additional details. Such construction could be seen in the previously shown link to Gregory J. Liebau's work.
The main advantage of the tongue joint is greater structural strength - something I want to achieve, making this shield for a close-contact fight, not for the wall.
"Everyone who has the right to wear a long sword, has to remember that his sword is his soul,
and he has to separate from it when he separates from his life"
Tokugawa Ieyasu
Find my works on Facebook:
Boris Bedrosov's Armoury
|
|
|
|
|
|
Gregory J. Liebau
|
| Posted: Tue 26 May, 2015 9:08 am Post subject: |
|
|
Boris, I look forward to the rest of your construction process being posted! Never hesitate to share your work - it's very inspiring, and you've taught yourself an incredible array of skills that are all worthy of admiration. So far I can see that you put quite a bit of thought into finding a method for attaching your planks... Perhaps the most important part of the entire process, if you want to get a decent finished product! 
Andrew, the only example of a shield style I've seen with a solution similar to those you mentioned for constructing planks is the use of dowels for 'pinning' the planks together on some of the shields discovered in Tutankhamun's tomb, c. 1200 BCE! I do not know many details about the design in particular, but Todd Feinmann has done some excellent research and he has assured me that evidence (whether from broken shields or x-ray inspection, I cannot say) of the doweling is there for said shields.
I presume that some later pavises may have incorporated keyed joints or some similar technique - perhaps even motise and tenon - in order to join the planks that came together at such sharp angles as is commonly seen. Cheers!
-Gregory
|
|
|
|
|
|
Andrew Gill
|
| Posted: Wed 27 May, 2015 5:15 am Post subject: |
|
|
Boris: Thanks for the information! I like your construction method because it is a very unobtrusive way of making a strong shield- even if the shield is not covered (as for some shields from the viking age or earlier) it won't be readily apparent.
Gregory: So King Tut's shields had dowelled construction - very interesting! It makes sense though; although not quite as strong as a full-length key or tongue, it is much easier to do by hand (you don't need an abnormally steady chisel hand or a special plane or scraper, just a drill). I might have to steal and try out this piece of Ancient Egyptian intellectual property as well. Although given how well the casein glue held up during the tests you did on it, I can understand why medieval shield-manufacturers might not have bothered - it looks as if it's stronger than some cheaper modern PVA wood glue I've used.
|
|
|
|
|
Boris Bedrosov
Industry Professional
|
| Posted: Fri 29 May, 2015 6:03 pm Post subject: |
|
|
The next step in the process is to cut the blank.
This was done with a jig-saw; the cutting followed the thin, but yet well-visible black line seen on the last image.

And the butt end of the shield - the slots and tongues are very well visible

Being glued from planks, the surface is a succession flat surfaces with well-defined angles between them instead one smooth one.
This was re-worked with a hand-held belt sander on the outside and with hand-drill with attached relatively soft rubber wheel with sanding paper on the inside. Then all cavities were filled with putty and whole shield re-sanded by hand.

"Everyone who has the right to wear a long sword, has to remember that his sword is his soul,
and he has to separate from it when he separates from his life"
Tokugawa Ieyasu
Find my works on Facebook:
Boris Bedrosov's Armoury
|
|
|
|
|
Boris Bedrosov
Industry Professional
|
| Posted: Tue 02 Jun, 2015 2:37 pm Post subject: |
|
|
After the wooden blank was ready, I moved on and covered both surfaces of the shield with double layers of heavy linen.
The first layer doesn't covers the sides

while the second one does, overlapping the opposite surface.

In such way I've got every possible exposed wood with two layers of cloth, while the outer-most, about an inch wide strip - with three layers.

As the PVA glue contents a good volume of water, the linen widens during glueing; after that, when dried again, the wooden blank shows great tendency to reduce its curvature. I managed to counter this with a pair of belts - the same used when the planks have been glued.
The image, painted on the shield will repeat the well-known blue griffon from the Osprey's Warrior Series "Norman Knight 950-1204 AD" by Christa Hook
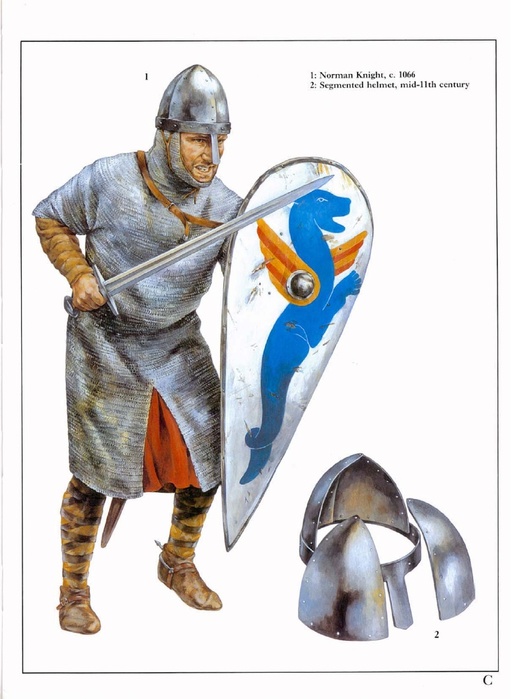
I printed the original image, made some calculations in order to determine how much I need to expand it (in sense of a number), then traced a net of identical squares on the image. After that, similar net, but multiplied by the previously calculated number, was drawn on the shield. The rest was simply to transfer the griffon on the shield, but with bigger proportions.

"Everyone who has the right to wear a long sword, has to remember that his sword is his soul,
and he has to separate from it when he separates from his life"
Tokugawa Ieyasu
Find my works on Facebook:
Boris Bedrosov's Armoury
|
|
|
|
|
|
Radovan Geist
|
| Posted: Tue 02 Jun, 2015 10:58 pm Post subject: |
|
|
|
It´s coming up really nicely, Boris. Let me have just one technical question: when cutting the slots and/or shaping the tangs, did you cut them in some angle, or did you cut tangs bit thinner, to ease achieving curvature of the shield?
|
|
|
|
|
Aaron Hoard

|
| Posted: Wed 03 Jun, 2015 6:03 am Post subject: |
|
|
|
Fantastic project - thanks for taking us along with you.
|
|
|
|
|
|
S. Sebok
|
| Posted: Wed 03 Jun, 2015 2:49 pm Post subject: |
|
|
|
Honestly, I would pay to have a shield done like this for me, but might be able to do it myself if I tried hard enough.
|
|
|
|
|
|
Mike Ruhala
|
| Posted: Thu 04 Jun, 2015 11:10 pm Post subject: |
|
|
Cool!
I did a "Viking" round shield project a while back using simple butted planks and was very surprised by the strength of the finished piece. My feeling is that the wood in a shield has very little to do with its strength, a shield like this is more akin to a composite structure whose strength is greater than the sum of its parts. The planks seem to be there mostly to give the shield it's shape, kind of like foam coring used in fiberglass structures such as a boat. The basic idea of wood covered with fabric and leather laminate seems to be an ancient analog to our fiberglass, really. They used it in all kinds of stuff like sword handles, shields of course, books, scabbards, etc. Basically anywhere they needed something to be strong and light weight but not necessarily hard like steel.
|
|
|
|
|
Boris Bedrosov
Industry Professional
|
| Posted: Sat 06 Jun, 2015 8:36 pm Post subject: |
|
|
# Rado
The slots were cut straight, just a bit wider - about 4.5-5 mm, instead 4 as the thickness of the tongue.
The main trick here is to trim the plank itself, in order to facilitate glueing.
This sketch here

shows how I remove the tiny, but extremely important parts left and right from the red lines, getting a plank with trapezoid cross-section.
You could glue the planks without removing them, but in this case the cavities on the front surface would be really great - with the size of what you should remove, but have not done.
Additionally, the edges on front surface of the tongue could be trimmed also - in a manner to get some flat pentagonal cross-section instead of rectangular.
"Everyone who has the right to wear a long sword, has to remember that his sword is his soul,
and he has to separate from it when he separates from his life"
Tokugawa Ieyasu
Find my works on Facebook:
Boris Bedrosov's Armoury
|
|
|
|
|
Boris Bedrosov
Industry Professional
|
| Posted: Sun 07 Jun, 2015 12:13 am Post subject: |
|
|
Before covering the front surface with the raw-hide, I attached the suspension system.
The straps with some of the holes and slots were cut from caw leather, then dyed in wine-red colour and finally - oiled with linseed oil

All nails were made from short carriage bolts

via re-forging - now I got them with square, tipped shanks and square pyramidal heads.

Although some of the threading remains, it would act almost as a series of inverted cones (top down), thus facilitating the nailing.
On the right of the same image are the nails for the raw-hide. They were re-forged from ordinary nails, using the same techniques and achieving similar results - square shanks and heads with pyramidal, un-identical shapes, creating an impression of old-school, hand-made work.
After all the strips were nailed in place, the suspension was almost ready

The shield of our interest is on the right. The other one - on the left - is made of planks also, and when finished will be quite similar; the main differences are the suspension system, an umbo on the front and almost straight lines of the bottom section.
The suspension at closer look

"Everyone who has the right to wear a long sword, has to remember that his sword is his soul,
and he has to separate from it when he separates from his life"
Tokugawa Ieyasu
Find my works on Facebook:
Boris Bedrosov's Armoury
|
|
|
|
|
Boris Bedrosov
Industry Professional
|
| Posted: Thu 11 Jun, 2015 12:09 am Post subject: |
|
|
With suspension ready, I moved on the raw-hide covering. As usual, for this project I used hide from a pig. And although I would prefer to use calf or caw, the pig is what is mostly available here.
The raw-hide with appropriate shape was cut from a sheet

and soaked in water (in the bath just behind the hide) for several hours.
When the hide was soaked enough, I placed it on a flat surface

and with the shield precisely centered over it

started to hammer the nails.
My initial idea was first to fix the hide with some staples (which should be removed after that), but I couldn't find my stapler  , that's why the hammering was done directly. This doesn't change anything - just the work was done with more care. , that's why the hammering was done directly. This doesn't change anything - just the work was done with more care.
The first ten nails were driven in

Note the distance between the nails is twice as on the finished piece - my previous planked shield showed me it's better to drive nails in such manner.
And the shield almost at the end

"Everyone who has the right to wear a long sword, has to remember that his sword is his soul,
and he has to separate from it when he separates from his life"
Tokugawa Ieyasu
Find my works on Facebook:
Boris Bedrosov's Armoury
|
|
|
|
|
Jean Thibodeau

|
| Posted: Thu 11 Jun, 2015 7:51 am Post subject: |
|
|
Very interesting project as are all of your projects. I always enjoy reading about your work and seeing the pics.
With the linen plus the raw hide it should be a very strong and resilient shield with blows bouncing of a springy and tough surface.
You can easily give up your freedom. You have to fight hard to get it back!
|
|
|
|
|
|
Niels Just Rasmussen
|
| Posted: Thu 11 Jun, 2015 8:29 am Post subject: |
|
|
As for use of raw hide.
Why is calf regarded as better for shields, than pig, lamb, seal or whatever?
Is it a combination of strength and flexibility of the material that is better, than the other types?
|
|
|
|
|
Boris Bedrosov
Industry Professional
|
| Posted: Fri 12 Jun, 2015 12:12 pm Post subject: |
|
|
| Niels Just Rasmussen wrote: | As for use of raw hide.
Why is calf regarded as better for shields, than pig, lamb, seal or whatever?
Is it a combination of strength and flexibility of the material that is better, than the other types? |
Personally, I have quite limited experience with hide different from pig.
Except some edging, made from calf hide, everything else is pig. And I really consider the calf better.
"Everyone who has the right to wear a long sword, has to remember that his sword is his soul,
and he has to separate from it when he separates from his life"
Tokugawa Ieyasu
Find my works on Facebook:
Boris Bedrosov's Armoury
|
|
|
|
|
Boris Bedrosov
Industry Professional
|
| Posted: Fri 12 Jun, 2015 12:23 pm Post subject: |
|
|
The piece when the covering was completed
* back

** and front

Note, the hide is so wet at this moment, that it completely lost its transparency.
On the next morning, although still quite wet, the matters were very different

and now I was able to see the contours of the griffon through the hide. This was actualy my goal - to paint on the hide, without tracing the picture on it.
There were also changes on the back - a buckle was added and the right strap sewn.

"Everyone who has the right to wear a long sword, has to remember that his sword is his soul,
and he has to separate from it when he separates from his life"
Tokugawa Ieyasu
Find my works on Facebook:
Boris Bedrosov's Armoury
|
|
|
|
|
|
|
You cannot post new topics in this forum
You cannot reply to topics in this forum
You cannot edit your posts in this forum
You cannot delete your posts in this forum
You cannot vote in polls in this forum
You cannot attach files in this forum
You can download files in this forum
|
All contents © Copyright 2003-2026 myArmoury.com — All rights reserved
Discussion forums powered by phpBB © The phpBB Group
Switch to the Basic Low-bandwidth Version of the forum
|

