Info Favorites Register Log in
myArmoury.com Discussion Forums

Forum index Memberlist Usergroups Spotlight Topics Search


myArmoury.com is now completely member-supported. Please contribute to our efforts with a donation. Your donations will go towards updating our site, modernizing it, and keeping it viable long-term.
Last 10 Donors: Anonymous, Daniel Sullivan, Chad Arnow, Jonathan Dean, M. Oroszlany, Sam Arwas, Barry C. Hutchins, Dan Kary, Oskar Gessler, Dave Tonge (View All Donors)

Forum Index > Historical Arms Talk > Hilting a moat blade - SolingenDIY Project Reply to topic
This is a standard topic Go to page 1, 2  Next 
Author Message
Julien M


Location: Austin TX
Joined: 14 Sep 2005

Spotlight topics: 1
Posts: 1,086

PostPosted: Sat 14 Mar, 2015 11:24 am    Post subject: Hilting a moat blade - Solingen         Reply with quote

Starting a new project!

I've decided to go for a beautiful Spanish sword, from the National Archaeological Museum , Madrid , Spain, 15th century (according to the website).

Sword hilt with gold and copper enamels and cardinas work of interwoven cords . The knob is almost spherical and wearing a red coat with a fleur de lis and the inscription AVE MARIA , which is continuous with GRATIA FULL hawks and ORA PRO NOBIS in Gothic characters , and between cardinas in relief.
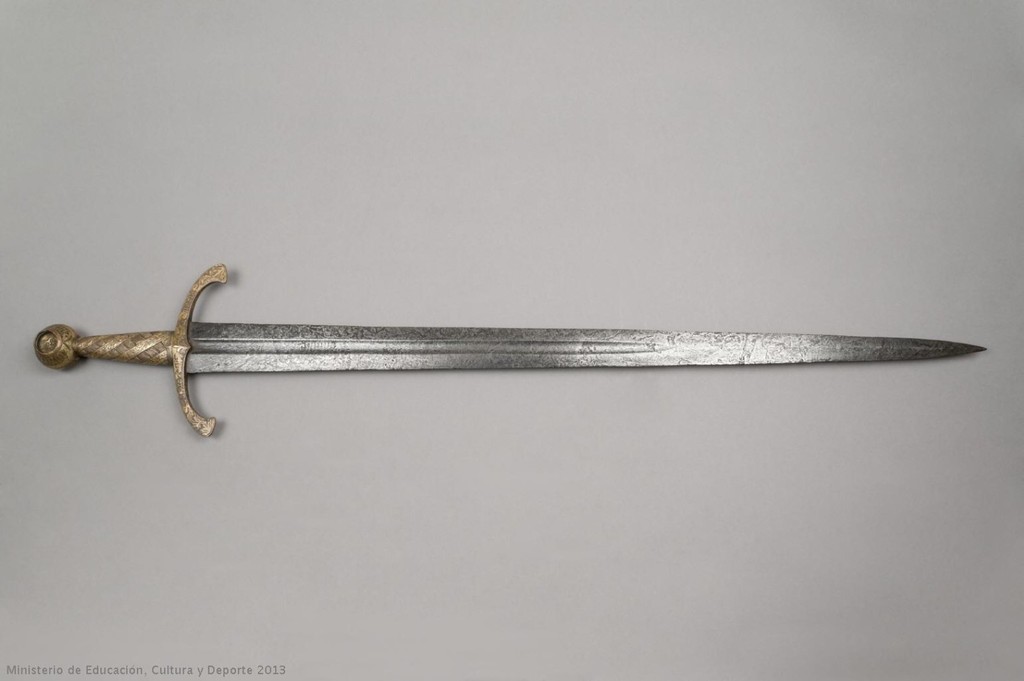
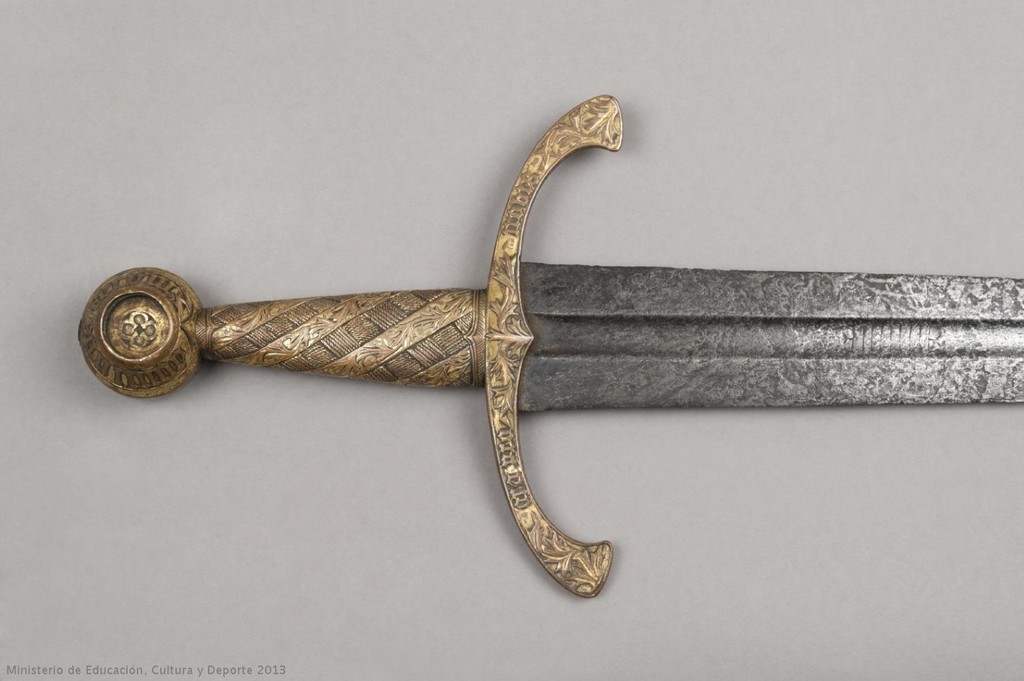


I have read that this sword is considered to be a type XII - but it looks like the sword lower end is of diamond section. Since I also have a knight and a squire/prince blade ready to mount, I was hesitant...until I snatched a Solingen.

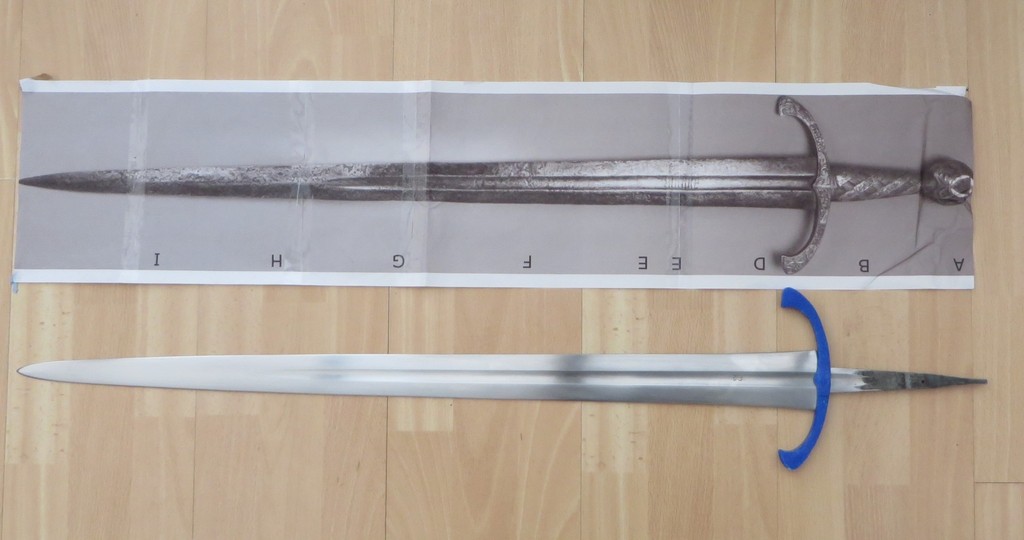
You will (rightfully) argue that the Solingen is an elongated type XIV - however the blade fits the bill almost perfectly, as you can see on the picture below (at least as far as contours are concerned...I would not presume of the blade geometry). Let me know what you think.

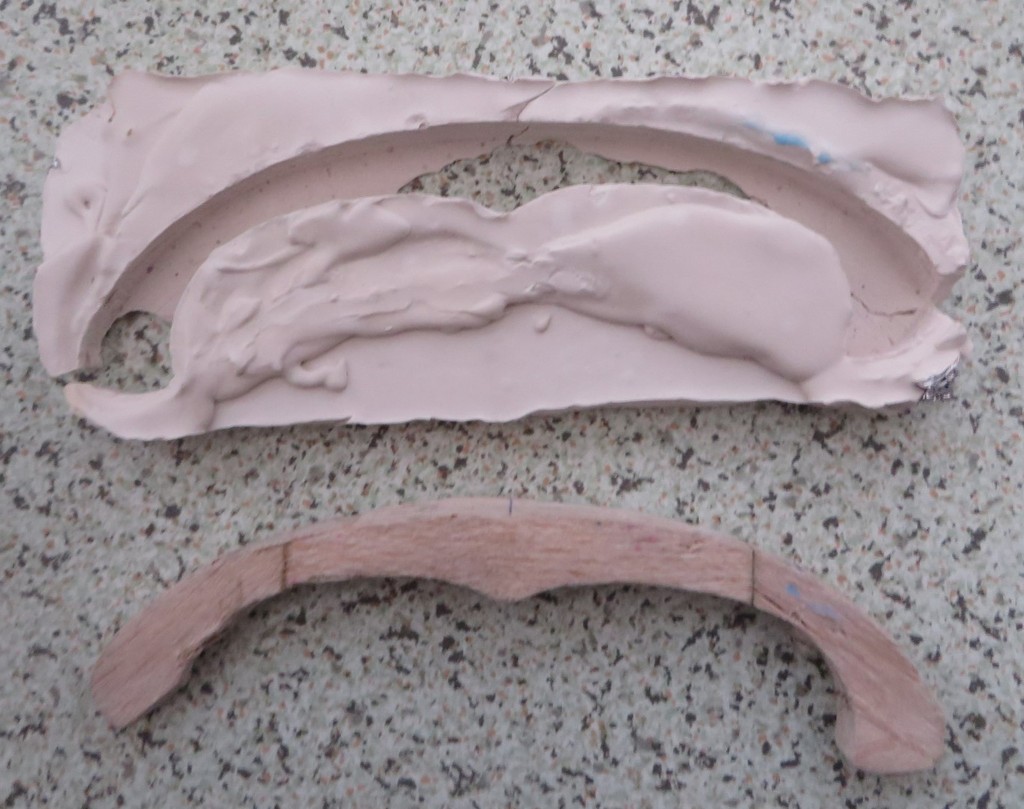
In any case this project interest me because it involves wax carving and bronze cast...something I have been willing to try for a while. A year ago I did a mock up of the guard in balsa, after printing the hilt to size.

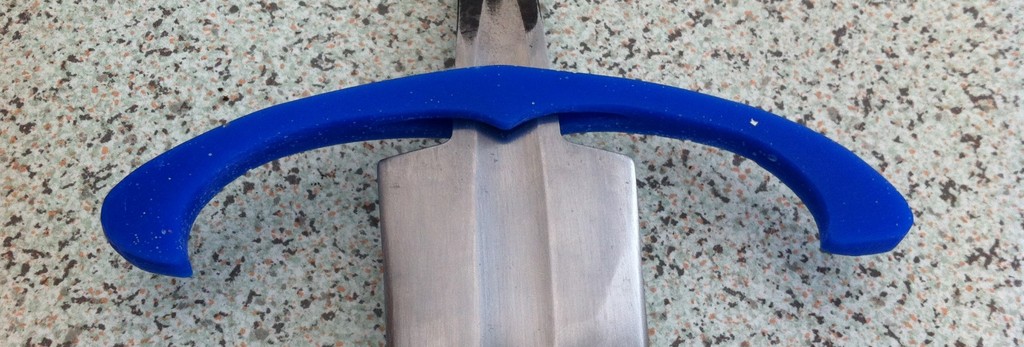
Then I made a plaster mold for it - then chopped chunks of that beautiful block of blue wax I had bought 5 years ago (yeah, I plan ahead!) and tried to melt these in a pan. This was taking ages, so 20 min in the microwave did the trick. I poured generously in the open mold - the wax cracked while drying in the middle...so I did it again and this time it worked. I've read that heating wax in such a brutal way will make it bubble, trapping air in the process - it did (as you can see from the pics, the little white dots). If anyone as a better way, I'm all hears. I hope this won't be problematic when trying to have a nice surface finish, or sculpt tiny details...even worse, be detrimental to the casting process.

I've made the tang slot. I like working wax, same as steel, just super fast and easy Happy

I've reproduced the slight asymmetry of the guard. For a blade with perfect contours like an Albion, it might have been a mistake. I should have photoshoped/mirrored one half and go from there...We'll see if I manage to attenuate this when removing more material and thinning it down.

To be fair I'm not sure this will lead to anything at this point...will see how it goes. In any case, glad to work wax at last.

Cheers,

J


View user's profile Send private message
Kai Lawson


Joined: 26 Aug 2010
Likes: 7 pages

Posts: 589

PostPosted: Sat 14 Mar, 2015 12:33 pm    Post subject:         Reply with quote

Love it--keep going! I really appreciate your project descriptions and photos. Very motivating!
"And they crossed swords."
--William Goldman, alias S. Morgenstern
View user's profile Send private message
Julien M


Location: Austin TX
Joined: 14 Sep 2005

Spotlight topics: 1
Posts: 1,086

PostPosted: Sun 15 Mar, 2015 2:08 am    Post subject:         Reply with quote

Refining the shape. All goes well, but as expected I struggle to accept the asymmetry of the quillons - I'll need to add material (solder, on one side to make it better. This could go wrong but I'll give it a go nonetheless.


View user's profile Send private message
Lukas MG
Industry Professional


Location: Germany
Joined: 23 Feb 2010

Posts: 330

PostPosted: Sun 15 Mar, 2015 3:01 am    Post subject:         Reply with quote

Great project. Having never worked with wax or casting, this is very interesting for me.

I would give the quillons a bit more distal taper, btw. Too bad there are no pics of the sword from other perspectives, that would be quite helpful.

Custom sword maker:

http://www.lukasmaestlegoer.com
View user's profile Send private message Visit poster's website
Julien M


Location: Austin TX
Joined: 14 Sep 2005

Spotlight topics: 1
Posts: 1,086

PostPosted: Sun 15 Mar, 2015 4:53 am    Post subject:         Reply with quote

Lukas MG wrote:
Great project. Having never worked with wax or casting, this is very interesting for me.

I would give the quillons a bit more distal taper, btw. Too bad there are no pics of the sword from other perspectives, that would be quite helpful.


Hey lukas, sure yes, i m nowhere near done. I ve partially sorted the symetry issue by melting bits of wax adding material so that i can make both similar. A lot of unecessary work, but i am now starting to get a good feel for the material - all part of the learning curve Happy then i will thin it further, then tackle the engraving. I love it, very suited work for an evening after a day in the office.
View user's profile Send private message
Rim Andries


Location: The Netherlands
Joined: 31 Oct 2006
Likes: 10 pages
Reading list: 5 books

Posts: 151

PostPosted: Sun 15 Mar, 2015 8:13 am    Post subject:         Reply with quote

Very interesting destination for a Solingen blade. I will follow your progress closely. Thank you for sharing your journey and bon voyage!
Sir Dreamin'
View user's profile Send private message
Jack Sutter


Location: United States
Joined: 15 Mar 2015

Posts: 62

PostPosted: Sun 15 Mar, 2015 12:54 pm    Post subject:         Reply with quote

Well done sir! It's looking great so far!

I am in point of fact about to embark on a similar project myself, using a number of Albion moat blades which I acquired last year. I was wondering where you got your wax and plaster, and how satisfied you are with them as a material?

"To my mind, all good things come to a point....swords, for instance." -GK Chesterton.
View user's profile Send private message
Jack Sutter


Location: United States
Joined: 15 Mar 2015

Posts: 62

PostPosted: Sun 15 Mar, 2015 12:56 pm    Post subject:         Reply with quote

Ah, goodness, I already have another question!

What sort of condition was your blade in when you got it? It's very nicely polished in your pictures, did you do this yourself? My blades all have varying levels of rust on them, and I haven't yet determined how best to clean them up.

"To my mind, all good things come to a point....swords, for instance." -GK Chesterton.
View user's profile Send private message
Julien M


Location: Austin TX
Joined: 14 Sep 2005

Spotlight topics: 1
Posts: 1,086

PostPosted: Mon 16 Mar, 2015 9:58 am    Post subject:         Reply with quote

Jack Sutter wrote:
Well done sir! It's looking great so far!

I am in point of fact about to embark on a similar project myself, using a number of Albion moat blades which I acquired last year. I was wondering where you got your wax and plaster, and how satisfied you are with them as a material?


Hi Jack -

The blue wax I bought in a shop in London - but you can find some pretty much anywhere, starting on Amazon. Have a quick search for Blue Carving Wax and it won't be long before you find what you need. this for instance:
http://www.amazon.co.uk/Blue-Carving-Wax-Bloc...arving+Wax

Plaster I also got from amazon - it's Gedeo Resin Plaster.

Regarding the cleaning of the blade, the answer for your question is here:
http://www.myArmoury.com/talk/viewtopic.php?t...p;start=40

I would suggest using sandpaper (120 grit) in my case, on a piece of wood you can press down your blade with both hands. Place your blade on a raised piece of wood (I use a fence post (1"x1" thick), clamped with the blade on a table. Work with long strokes, use oil too. It's not long to clean up a blade with this technique, even a badly rusted one (talking surface rust here, not excavated type of rust Happy )

hope this helps.

Cheers,

J
View user's profile Send private message
Jonathan Hopkins


PostPosted: Mon 16 Mar, 2015 10:49 am    Post subject:         Reply with quote

Brilliant choice for a replica. I will watch this thread with great anticipation!
View user's profile Send private message
Justin H. Núñez


Location: Hyde Park, UT
Joined: 24 Aug 2007
Likes: 1 page

Spotlight topics: 1
Posts: 142

PostPosted: Mon 16 Mar, 2015 1:02 pm    Post subject:         Reply with quote

That will be gorgeous!
"Nothing in fencing is really difficult, it just takes work." - Aldo Nadi
View user's profile Send private message
Jack Sutter


Location: United States
Joined: 15 Mar 2015

Posts: 62

PostPosted: Mon 16 Mar, 2015 9:43 pm    Post subject:         Reply with quote

Julien M wrote:
Jack Sutter wrote:
Well done sir! It's looking great so far!

I am in point of fact about to embark on a similar project myself, using a number of Albion moat blades which I acquired last year. I was wondering where you got your wax and plaster, and how satisfied you are with them as a material?


Hi Jack -

The blue wax I bought in a shop in London - but you can find some pretty much anywhere, starting on Amazon. Have a quick search for Blue Carving Wax and it won't be long before you find what you need. this for instance:
http://www.amazon.co.uk/Blue-Carving-Wax-Bloc...arving+Wax

Plaster I also got from amazon - it's Gedeo Resin Plaster.

Regarding the cleaning of the blade, the answer for your question is here:
http://www.myArmoury.com/talk/viewtopic.php?t...p;start=40

I would suggest using sandpaper (120 grit) in my case, on a piece of wood you can press down your blade with both hands. Place your blade on a raised piece of wood (I use a fence post (1"x1" thick), clamped with the blade on a table. Work with long strokes, use oil too. It's not long to clean up a blade with this technique, even a badly rusted one (talking surface rust here, not excavated type of rust Happy )

hope this helps.

Cheers,

J


Thank you sir! That's very helpful!

"To my mind, all good things come to a point....swords, for instance." -GK Chesterton.
View user's profile Send private message
Leo Todeschini
Industry Professional


Location: Oxford, UK
Joined: 12 Nov 2006
Likes: 1 page

Spotlight topics: 1
Posts: 1,731

PostPosted: Tue 17 Mar, 2015 1:15 am    Post subject:         Reply with quote

Interesting project Julien and good work so far.

I look forward to this one.

Tod

www.todsworkshop.com
www.todcutler.com
www.instagram.com/todsworkshop
https://www.facebook.com/TodsWorkshop
www.youtube.com/user/todsstuff1
View user's profile Send private message Visit poster's website
J.D. Crawford


Location: Toronto
Joined: 25 Dec 2006

Spotlight topics: 1
Posts: 1,903

PostPosted: Tue 17 Mar, 2015 10:46 am    Post subject:         Reply with quote

Julien, nice pick - I don't think I've every seen this sword before. Based on your past work you'll do it fine justice!

Looks like XVI to me and those other swords are borderline XII/XIV for what its worth. This blade interests me because it looks a lot like Solingen, and the similar English sword, and the XVI that I just had replicated by A&A: myArmoury.com/talk/viewtopic.php?t=30378

Could these blades have all been made in the same shop? The other 3 have W pommels but this one is obviously fancied up for a noble.

Do we have a firm date for this blade?
What is the length of the original blade?
What is the pattern on it? Is that cleaned corrosion or was something done to decorate it?

-JD
View user's profile Send private message Visit poster's website
Julien M


Location: Austin TX
Joined: 14 Sep 2005

Spotlight topics: 1
Posts: 1,086

PostPosted: Tue 17 Mar, 2015 12:47 pm    Post subject:         Reply with quote

Hi JD,

I have some documentation on this sword, in a book about Spanish arms and Armor on pdf...somewhere.

I agree it looks more like a type XVI to me. I will show the guard on my prince/squire blade too, as well as on the knight before I make a final decision on which blade I will mount the hilt on.

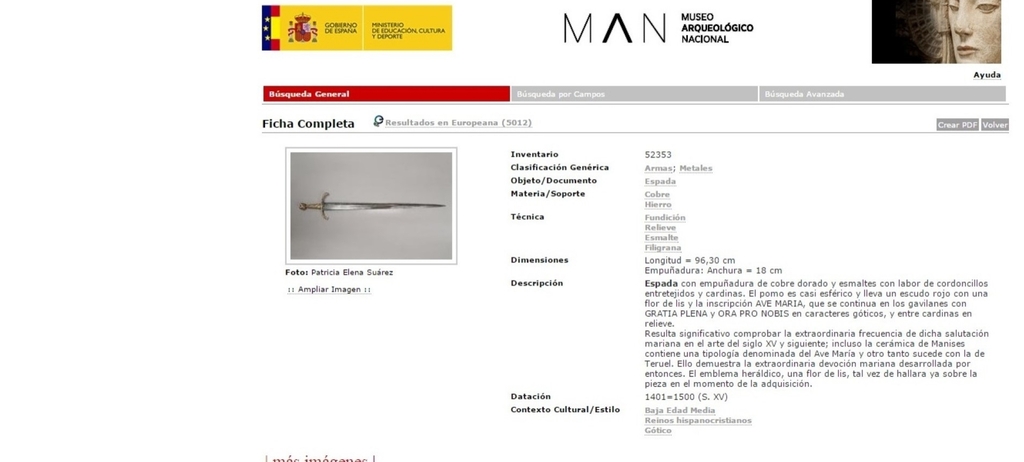
in the meantime, for basic stats, a screenshot of the museum site.

Cheers,

J

View user's profile Send private message
Luka Borscak


Location: Croatia
Joined: 11 Jun 2007
Likes: 7 pages

Posts: 2,307

PostPosted: Wed 18 Mar, 2015 3:54 am    Post subject:         Reply with quote

I can't really decide if this spanish sword has flat fuller or not. If it has, than its blade is really similar to yours XVI J.D.
View user's profile Send private message
Kai Lawson


Joined: 26 Aug 2010
Likes: 7 pages

Posts: 589

PostPosted: Wed 18 Mar, 2015 3:27 pm    Post subject:         Reply with quote

I definitely think that the distal end of the blade is a diamond cross section, and it almost looks as though the blade either had some flaring near the shoulders, or a short ricasso--the section of blade just past the cross looks somewhat duller, I think, when seen up close. My guess is that the shoulders flared a bit and over the working life of the sword, the portion of the blade nearest the guard was not sharpened as frequently as the rest of the blade.

I'll also throw in my 2 cents and say that I am going to vote for a rounded or mostly rounded fuller, based on the shadow sizes and the lettering on the blade

"And they crossed swords."
--William Goldman, alias S. Morgenstern
View user's profile Send private message
Jonathan Hodge


Location: East Tennessee
Joined: 18 Sep 2015

Posts: 132

PostPosted: Mon 07 Dec, 2015 11:00 am    Post subject:         Reply with quote

I'm resurrecting a bit here, but I'm just curious to see if you've achieved any more progress on this blade Julien. Thanks!
View user's profile Send private message
Julien M


Location: Austin TX
Joined: 14 Sep 2005

Spotlight topics: 1
Posts: 1,086

PostPosted: Mon 07 Dec, 2015 2:16 pm    Post subject:         Reply with quote

Hi Jonathan,

None at all unfortunately...I have not touched a sword for month, spending my free time on alcoves cabinets, wardrobes, laying floorboards and other DIY jobs around the house. I am planning to reward myself by making a bit of work on this one or another very soon Happy

For this specific project, I'm not sure to continue with this blade (I've got a prince blade that may be a better choice) nor commit to lost wax but switch to 3D modeling/printing for the hilt. I have to train myself with blender, but I feel it's worth it, given what I've seen done in that department lately.

Cheers,

J
View user's profile Send private message
Jonathan Hodge


Location: East Tennessee
Joined: 18 Sep 2015

Posts: 132

PostPosted: Tue 08 Dec, 2015 7:26 am    Post subject:         Reply with quote

I understand the DIY house stuff - been busy there myself lately! I too have seen some pretty impressive 3D printed stuff as of late, and I've had my eye on some stuff from the Printed Armoury - https://printedarmoury.wordpress.com. Thanks for the update!
View user's profile Send private message


Display posts from previous:   
Forum Index > Historical Arms Talk > Hilting a moat blade - SolingenDIY Project
Page 1 of 2 Reply to topic
Go to page 1, 2  Next All times are GMT - 8 Hours

View previous topic :: View next topic
Jump to:  
You cannot post new topics in this forum
You cannot reply to topics in this forum
You cannot edit your posts in this forum
You cannot delete your posts in this forum
You cannot vote in polls in this forum
You cannot attach files in this forum
You can download files in this forum


All contents © Copyright 2003-2024 myArmoury.com — All rights reserved
Discussion forums powered by phpBB © The phpBB Group
Switch to the Basic Low-bandwidth Version of the forum