| Author |
Message |
|
George Hill
Location: Atlanta Ga Joined: 16 May 2005
Posts: 616
|
 Posted: Sat 20 Dec, 2014 6:25 pm Post subject: What is the state of the scabbard market? Posted: Sat 20 Dec, 2014 6:25 pm Post subject: What is the state of the scabbard market? |
 |
|
Who is good for scabbards these days? I have a Atrim blade that wants an upgrade from it's plain leather sheath.
I've heard good things about Christian Fletcher, though his prices are high, (that said, I won't say a high price isn't valid for the work!) I'm also debating a pommel/cross upgrade, but that likely deserves it's own thread.
I was looking at Albion's page, and it looks like they are between scabbard makers? IS that right?
So I thought I'd come over here and ask what the state of the scabbard market is these days.
Also, don't you think it's kinda weird that a saya always comes with a Japanese blade, but European blades often seem to have a scabbard as an afterthought? ......What's up with that?
Do other collectors have loads of naked razors sitting around the house?
BTW, if this has had a recent thread, please link me. I did a search since I've been out of the loop for a few years.
To abandon your shield is the basest of crimes. - --Tacitus on Germania
|
|
    |
 |
|
Gregory J. Liebau
Location: Dinuba, CA Joined: 27 Nov 2004
Posts: 669
|
| Posted: Sat 20 Dec, 2014 7:45 pm Post subject: Re: What is the state of the scabbard market? |
|
|
| George Hill wrote: | | Also, don't you think it's kinda weird that a saya always comes with a Japanese blade, but European blades often seem to have a scabbard as an afterthought? ......What's up with that? |
I think this question can be reasonably addressed. Saya are pretty indistinguishable from one another in their general construction and form. Many original saya survive and there is little dispute in what they should be. At least within the modern collecting community (and to a great extent among originals), they are rarely personalized beyond matching color with the cord used for their blade's grip. The saya lacing is easily replaceable.
European scabbards, on the other hand, come in a multitude of styles even within the same period and region, and are very specifically attributed through evidence ranging from artistic to archaeological - with few actual scabbards surviving. They may integrate baldrics and belts, and often have no rhythm or reason in their form and decor considering the sword they accompany. Therefore, with a majority of European swords, the scabbard is a much more "custom" than a saya.
As far as modern makers go, I recommend one of the two posted below, for quality and reliability... I have seen both Leo and Brian in person, though I own work by neither. Both makers are held in high regard on myArmoury:
http://www.dbkcustomswords.com/index.html
http://www.todsstuff.co.uk/index.htm
Cheers!
-Gregory
|
|
|
|
|
Mark T

|
| Posted: Sat 20 Dec, 2014 7:56 pm Post subject: |
|
|
Hi George,
I thought we had a thread about this during the last year, but couldn't find it in the most recent dozen pages or so ... a Google Advanced search using myA as the domain might get you there, though!
I have scabbards from quite a few makers, ranging from low to high end, and my personal recommendation for best price to outcome ratio is Arms & Armour in the USA and Tod's Stuff in the UK. Both have very reasonable entry level prices, and also the skill and flexibility to produce right up to very high end pieces.
Scabbards I've seen and/or commissioned from other makers have often either been of poor quality, drastically overbuilt, embarrassingly ahistorical (even on what were meant to be high-end 'historical' pieces), or simply not to specification and/or with not great customer service - which is not acceptable for a custom item of high cost, IMHO.
Hope that's of some use.
Chief Librarian/Curator, Isaac Leibowitz Librarmoury
Schallern sind sehr sexy!
|
|
|
|
|
Harry Marinakis

|
| Posted: Sun 21 Dec, 2014 4:14 am Post subject: |
|
|
Hi George
Have you considered making your own scabbard?
Like you, I had similar questions and decided to try my hand at making my own scabbards. It's an interesting and fun path.
|
|
|
|
|
|
Jonathon Janusz
|
| Posted: Sun 21 Dec, 2014 10:06 am Post subject: |
|
|
I know he mentioned seax and axes starting back up, but Eric McHugh just posted getting himself back in this game.
For reference, Eric was making scabbards (among all the other tasks in the cutlery shop) for Albion before Aaron specialized and took on the gig. Considering Aaron isn't currently doing crafty work last I knew, I can think of few people stateside finer than Eric's work. Might be worth an email to see if he could pick up a project.
|
|
|
|
|
|
George Hill
Location: Atlanta Ga Joined: 16 May 2005
Posts: 616
|
| Posted: Mon 22 Dec, 2014 2:36 am Post subject: |
|
|
| Harry Marinakis wrote: | Hi George
Have you considered making your own scabbard?
Like you, I had similar questions and decided to try my hand at making my own scabbards. It's an interesting and fun path. |
I've thought about it, and was looking around for a site on the subject. I think a wooden core is beyond my abilities, though I have a friend who might be good for it, and I rather suspect I can do the leather. I saw a tutorial on it some time ago, but I can't find it now...
@Jonathon, Do those fellows have web pages?
To abandon your shield is the basest of crimes. - --Tacitus on Germania
|
|
|
|
|
|
Jeffrey Faulk
|
| Posted: Mon 22 Dec, 2014 9:12 am Post subject: |
|
|
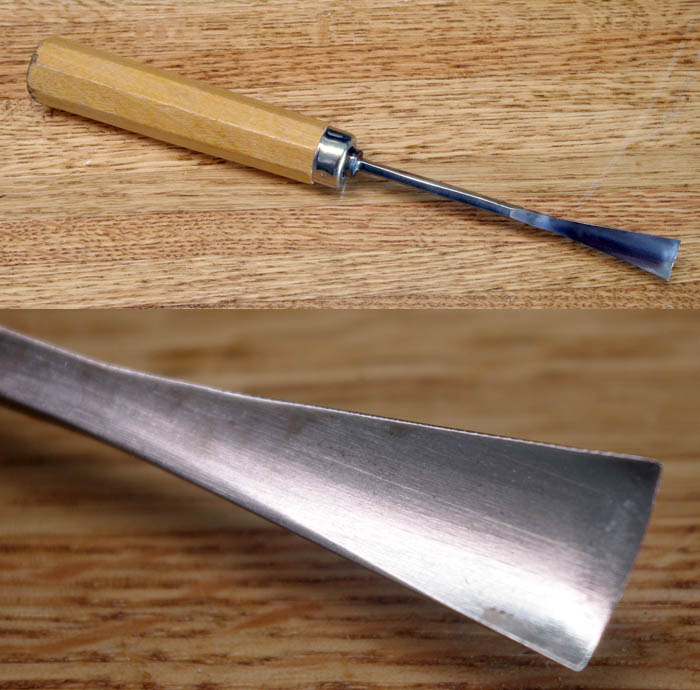
Anybody can carve a simple wooden core. All it takes is a sharp chisel (sharp fixes many difficulties) and time.
The 'sandwich' method where you cut out an outline and glue it between two plates is also viable for a simple scabbard.
Gaffer's tutorial is still out there and is quite adequate:
http://www.yeoldegaffers.com/project_scabbard.asp
This is not terribly historically accurate, but it will do two things: give you experience in woodworking, and give you a place to put your sword safely while you arrange for a better scabbard. The cost is negligible even if you have to buy some simple hand tools; it can be done with a jig-saw, a Surform rasp, three pieces of poplar, and some decent glue. Under $40 easily. Clamping can be obviated with some heavy books and a flat surface (don't forget to put some wax paper under it to prevent gluing the scabbard to your dining-room table).
For more historically accurate methods, there are a number of other tutorials out there, ranging from simple (carving recesses in wood plates) to complex (forming thin slices of wood veneer over the blade itself).
|
|
|
|
|
|
George Hill
Location: Atlanta Ga Joined: 16 May 2005
Posts: 616
|
| Posted: Mon 22 Dec, 2014 2:02 pm Post subject: |
|
|
| Jeffrey Faulk wrote: | Anybody can carve a simple wooden core. All it takes is a sharp chisel (sharp fixes many difficulties) and time.
The 'sandwich' method where you cut out an outline and glue it between two plates is also viable for a simple scabbard.
Gaffer's tutorial is still out there and is quite adequate:
http://www.yeoldegaffers.com/project_scabbard.asp
For more historically accurate methods, there are a number of other tutorials out there, ranging from simple (carving recesses in wood plates) to complex (forming thin slices of wood veneer over the blade itself). |
I'm not sure I could manage to get a good shape out of a chisel, especially for a blade whose morphology changes along it's length. Here's a link to someone else's atrim 1506, which is very like my own. http://s616.photobucket.com/user/InsaneX/medi...i.jpg.html
As you can see, it's a wide shoulder with a long taper. How tightly are these things suppose to fit?
That said, I like this gluing method! I might have to try this, it's brilliantly simple . I haven't been in the market for wood in a long time. Can you get these thin slats at home depot? Also, if you are gluing it around the blade, how do you ensure you aren't gluing it into the core?
If you know where the other tutorials can be found, I'd be much obliged.
Also, weren't many historical scabbards lined with something like canvas or wool, which was in turn impregnated with oil?
To abandon your shield is the basest of crimes. - --Tacitus on Germania
|
|
|
|
|
Matthew Bunker

Location: Somerset UK Joined: 02 Apr 2009
Posts: 483
|
| Posted: Mon 22 Dec, 2014 2:14 pm Post subject: |
|
|
| George Hill wrote: |
Also, weren't many historical scabbards lined with something like canvas or wool, which was in turn impregnated with oil? |
Early medieval (pre-12th century) were usually lined with lamb/sheepskin or some other 'fur on' skin product, although it wasn't universal and I have my doubts as to whether they were impregnated with oil or not (many authors have written that they would leave the lanolin in to act as a preservative and lubricant...in my practical experience as a maker and user, you end with with a scabbard that stinks of rancid lanolin after a few months and have a blade with all manner of crap stuck to it).
After that, the practice seems to go into decline, presumably as the fashion moves towards having slimmer scabbards.
"If a Greek can do it, two Englishman certainly can !"
|
|
|
|
|
Dean F. Marino

Location: Midland MI USA Joined: 24 Aug 2011
Posts: 229
|
| Posted: Mon 22 Dec, 2014 2:18 pm Post subject: |
|
|
| George Hill wrote: | | Harry Marinakis wrote: | Hi George
Have you considered making your own scabbard?
Like you, I had similar questions and decided to try my hand at making my own scabbards. It's an interesting and fun path. |
I've thought about it, and was looking around for a site on the subject. I think a wooden core is beyond my abilities, though I have a friend who might be good for it, and I rather suspect I can do the leather. I saw a tutorial on it some time ago, but I can't find it now...
@Jonathon, Do those fellows have web pages? |
Humbly submitted - I don't do historical, for the most part. But the DATA is applicable to anything you wish to create....
FREE....
http://findlithui.deanandsandy.dyndns.org:808...ter1.2.pdf
"Make a Poplar Core with a router"
http://findlithui.deanandsandy.dyndns.org:808...ore1.1.pdf
"Leather wrap a core"
Example using this data - Dordogne....

In edhil, hai edhil. In edain, hai edain.
|
|
|
|
|
Harry Marinakis
|
| Posted: Wed 24 Dec, 2014 4:08 am Post subject: |
|
|
The first two methods described in that tutorial are historically accurate methods.
The carved scabbard goes back at least as far as the Iron Age. Detailed analysis of Migration and Viking Period scabbards confirm that some scabbards were, in fact, carved (Esther Cameron, Sheaths and Scabbards in England AD400-1100). The wall thickness of a Viking scabbard was only 1/16th of an inch (or less!).
The bent slat method also goes back at least as far as the Iron Age (I.M. Stead, British Iron Age Swords and Scabbards). You've got to find a way to soften the slats with steam or soaking, then you've got to heavily grease or oil your sword to keep it from rusting while the scabbard is clamped and drying.
The 3rd method described in the above tutorial has no historical basis, and while some people say that it is "easy" I disagree that it is any easier than the other methods. The big disadvantage of the 'easy' method is that the wood core ends up being too thick.
I think that the carved method is the easiest. Get a couple of poplar boards and a 3/4-inch fishtail wood gouge. Hand carving goes quick and easy (and you don't even need a hammer). You need a belt sander to get the wood core sanded down quickly and easily, but otherwise the rest of the work can be done with tools that every guy should have around the house.
I am currently writing a pamphlet (book?) on DIY scabbards (Bronze Age to medieval), with heavy ephasis on historical accuracy. It's a project that's getting bigger and bigger, up to a couple of hundred pages so far. Don't think I'll be finished with it anytime soon. I am planning on having it available for public distribution, like the other tutorials described above.
 Attachment: 107.81 KB Attachment: 107.81 KB
Last edited by Harry Marinakis on Wed 24 Dec, 2014 7:18 am; edited 1 time in total
|
|
|
|
|
|
George Hill
Location: Atlanta Ga Joined: 16 May 2005
Posts: 616
|
| Posted: Wed 24 Dec, 2014 4:34 am Post subject: |
|
|
Harry, that sounds FASCINATING. Maybe you should consider working it up as a series of articles, so as to let us get a look at it sooner?
Anyway, I'll certainly be interested in giving it a read when you finish.
BTW, what were dagger scabbards like? The same but scaled down? Or are you more likely to see a plain leather there?
To abandon your shield is the basest of crimes. - --Tacitus on Germania
|
|
|
|
|
Harry Marinakis
|
| Posted: Wed 24 Dec, 2014 7:17 am Post subject: |
|
|
| George Hill wrote: | | BTW, what were dagger scabbards like? The same but scaled down? Or are you more likely to see a plain leather there? |
I have not spent a lot of time researching knives.
My limited research shows that most knives were kept in leather sheaths.
|
|
|
|
|
|
Jonathon Janusz
|
|
|
|
|
Matthew Bunker
Location: Somerset UK Joined: 02 Apr 2009
Posts: 483
|
| Posted: Mon 29 Dec, 2014 1:15 pm Post subject: |
|
|
| George Hill wrote: |
BTW, what were dagger scabbards like? The same but scaled down? Or are you more likely to see a plain leather there? |
You find a lot more decoration on seax/knife sheaths than you do on sword scabbards in the early medieval period.
"If a Greek can do it, two Englishman certainly can !"
|
|
|
|
|
Dean F. Marino
Location: Midland MI USA Joined: 24 Aug 2011
Posts: 229
|
| Posted: Mon 29 Dec, 2014 2:40 pm Post subject: |
|
|
| Harry Marinakis wrote: |
The first two methods described in that tutorial are historically accurate methods.
The carved scabbard goes back at least as far as the Iron Age. Detailed analysis of Migration and Viking Period scabbards confirm that some scabbards were, in fact, carved (Esther Cameron, Sheaths and Scabbards in England AD400-1100). The wall thickness of a Viking scabbard was only 1/16th of an inch (or less!).
The bent slat method also goes back at least as far as the Iron Age (I.M. Stead, British Iron Age Swords and Scabbards). You've got to find a way to soften the slats with steam or soaking, then you've got to heavily grease or oil your sword to keep it from rusting while the scabbard is clamped and drying.
The 3rd method described in the above tutorial has no historical basis, and while some people say that it is "easy" I disagree that it is any easier than the other methods. The big disadvantage of the 'easy' method is that the wood core ends up being too thick.
I think that the carved method is the easiest. Get a couple of poplar boards and a 3/4-inch fishtail wood gouge. Hand carving goes quick and easy (and you don't even need a hammer). You need a belt sander to get the wood core sanded down quickly and easily, but otherwise the rest of the work can be done with tools that every guy should have around the house.
I am currently writing a pamphlet (book?) on DIY scabbards (Bronze Age to medieval), with heavy ephasis on historical accuracy. It's a project that's getting bigger and bigger, up to a couple of hundred pages so far. Don't think I'll be finished with it anytime soon. I am planning on having it available for public distribution, like the other tutorials described above. |
Now - I must ask... when CARVING out a scabbard - how does this produce a thinner core than ROUTING out a scabbard? Both will need to be sanded down. Just curious - willing to post the scabbard thicknesses you achieve with carving?
Bent slat? Yes, I can well believe that this will produce a thinner core.
In edhil, hai edhil. In edain, hai edain.
|
|
|
|
|
Terry Thompson

Location: Suburbs of Wash D.C. Joined: 17 Sep 2010
Posts: 165
|
| Posted: Mon 29 Dec, 2014 2:43 pm Post subject: |
|
|
| George Hill wrote: | [
That said, I like this gluing method! I might have to try this, it's brilliantly simple . I haven't been in the market for wood in a long time. Can you get these thin slats at home depot? Also, if you are gluing it around the blade, how do you ensure you aren't gluing it into the core?
If you know where the other tutorials can be found, I'd be much obliged.
Also, weren't many historical scabbards lined with something like canvas or wool, which was in turn impregnated with oil? |
I've made a few wooden cores from the bending method. I've done them out of 1/8" and 3/32" poplar wood which you can order pretty affordably. I think I'm partial to the 3/32" as it just tends to work easier, though I suspect that 1/8" might be authentic for certain periods and locations. I've gotten wood in the past from D&D hardwoods. Order it in 3' to 4' lengths depending on your blade.
Here's the method I have used (I've made over a dozen in the past for Albions and Arms & Armor blades):
Lay out the blade on the wooden slats, and trace around it tightly to the blade. Then trace another line 1/8" off of the first to create a larger pattern for a glue line and sanding it down to size. Cut the blank out on this larger silhouette line. You can trace the other half from this first silhouette as the pattern.
You'll need to soak or steam the wood thoroughly. Filling a tub with about 2" of steaming hot water and setting something heavy (full shampoo bottles) to keep it submerged will do fine. I usually let it soak for about an hour. While that is going on, I spray the blade liberally with storage grease, then wrap the blade and hardware in cellophane and tape it up snugly with masking tape.
Take the wet wooden blanks and dab them with a towel to remove excess water and prevent dripping water all over the place. Sandwich the damp wooden slats on either side of the taped-up sword blade. And clamp in place.
I actually use only a couple of spring clamps, and a very long piece of oil tanned leather strapping that I spiral wrap around the wooden slats and then clamp at either end. You could use a whole mess of clamps, but they can leave depressions on the wood.
Let the wooden slats dry for at least 24 hours clamped on the blade, preferably near an air register or some other source of moving air, before you un-clamp and remove the sword blade. I prefer to let it go for a few days to be sure.
Once it's dry and you've removed the blade, you can pull it apart, lay a fine bead of glue along the edge of one of the slats, and then put them together, once again by spiral wrapping the core and letting it dry for a few hours before handling. You can check the fit by unwrapping the sword from it's binding of cellophane and tape (being careful not to cut yourself), but leaving the grease as much as possible on the blade, to prevent any undried glue seepage from getting on the blade.
Once the glue has cured, you can sand it as you would any wood working project. You want to take down the edges and rough areas with coarse grit and work to a fine (500 or so) grit.
Once that step is done, shellac, varnish or lacquer the slats well before applying the leather scabbard cover.
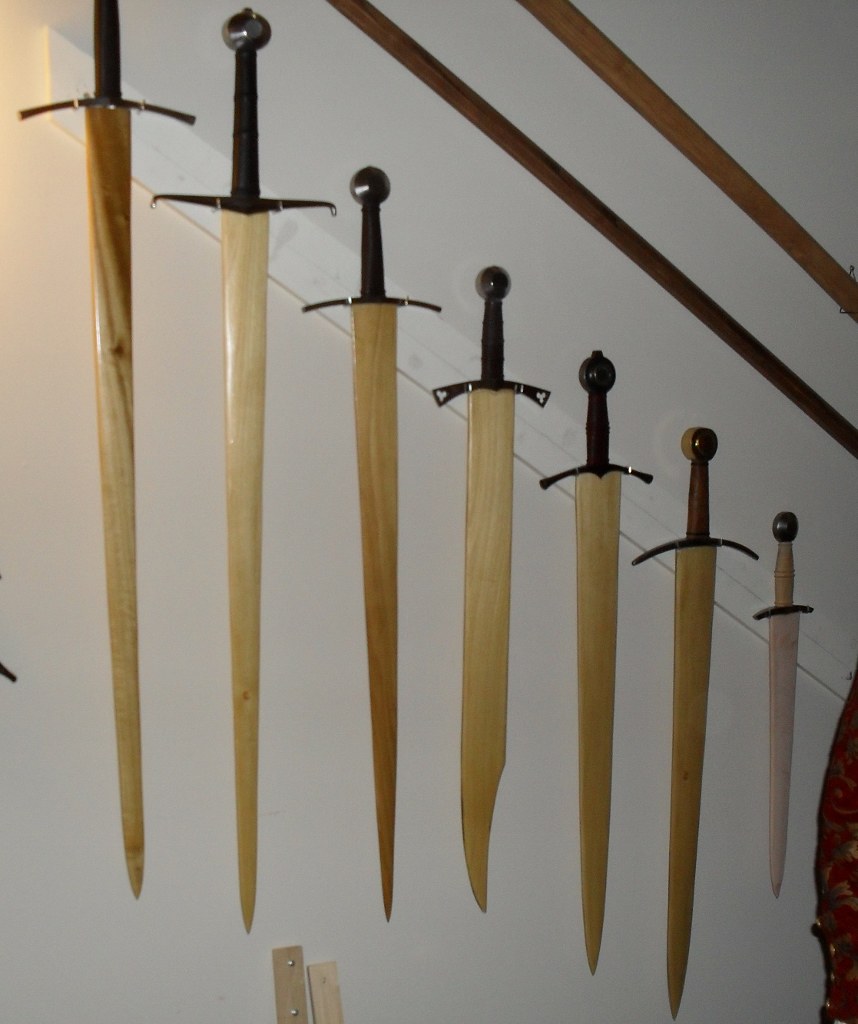
In all the ones I'd done so far, this makes a pretty snug scabbard that will stay on the blade even when you've got it hanging on a wall, and won't fall off, but it's loose enough that you can pull it free without any effort. The swords in this photo are all hanging by their crosshilts, and the scabbard cores are just being suspended by friction on the blade.
Be careful with the glue that you use, normal wood glue is not kind to steel and could discolor or rust the blade. I suggest the use of a contact glue or archival glue for the project. And know that you do not need gobs of glue. The smallest amount of glue is really needed if you're gluing all along the edges, and also the final varnish/shellacking will also keep them together in my experience.
-Terry
|
|
|
|
|
Harry Marinakis
|
| Posted: Mon 29 Dec, 2014 5:36 pm Post subject: |
|
|
| Dean F. Marino wrote: | | Now - I must ask... when CARVING out a scabbard - how does this produce a thinner core than ROUTING out a scabbard? |
Well, you're comparing apples and oranges here, and it's just an issues of terminology.
The word "carved" means that scabbards are carved (or chiseled or routed) to fit the blade. This is in contrast to the bent slat method in which thin slats of wood were warped around the blade.
"Carved" has nothing to do with wall thickness, it's just a label to differentiate the method from the bent slat method.
In modern times, I am sure that most people use a sander to thin out the scabbard walls.
Using a hand gouge doesn't produce a scabbard with a thinner wall than a router. Carving the inner blade cavity with a hand gouge (or a chisel or a rouoter) is easier than trying to steam and warp slats (i think). And using the "modern" method to make a scabbard just gives a really thick scabbard that cannot be thinned out. So I say again: I think the "carved" method is easier and better (as opposed to the steamed slat or "modern" methods).
| Dean F. Marino wrote: | | Just curious - willing to post the scabbard thicknesses you achieve with carving? |
I do not thin scabbard cores with carving.
The only carving that I do is the carving of the inner cavity for the blade, which has nothing to do with wall thickness. I use a belt sander to thin out my scabbards, and finish them by hand sanding. Typically I can get my scabbards wall thickness down to 3/16" on the belt sander. I have occasionally achieved a wall thickness of 1/8" but that is not typical for me.
Last edited by Harry Marinakis on Mon 29 Dec, 2014 5:39 pm; edited 1 time in total
|
|
|
|
|
Brian K.
Industry Professional

Location: Salt Lake City, Utah Joined: 01 Jan 2008
Posts: 727
|
| Posted: Mon 29 Dec, 2014 5:38 pm Post subject: |
|
|
| Terry Thompson wrote: | Be careful with the glue that you use, normal wood glue is not kind to steel and could discolor or rust the blade. I suggest the use of a contact glue or archival glue for the project. And know that you do not need gobs of glue. The smallest amount of glue is really needed if you're gluing all along the edges, and also the final varnish/shellacking will also keep them together in my experience.
-Terry |
Hi,
All that is needed is a non-toxic wood glue. For example, the 'Titebond' original wood glue in the red bottle is the non-toxic version and is what I use. The blue bottle is a toxic version and would not be appropriate for scabbard making.
Brian Kunz
www.dbkcustomswords.com
|
|
 |
|
Dean F. Marino
Location: Midland MI USA Joined: 24 Aug 2011
Posts: 229
|
| Posted: Mon 29 Dec, 2014 5:58 pm Post subject: |
|
|
| Harry Marinakis wrote: | | Dean F. Marino wrote: | | Now - I must ask... when CARVING out a scabbard - how does this produce a thinner core than ROUTING out a scabbard? |
Well, you're comparing apples and oranges here, and it's just an issues of terminology.
The word "carved" means that scabbards are carved (or chiseled or routed) to fit the blade. This is in contrast to the bent slat method in which thin slats of wood were warped around the blade.
"Carved" has nothing to do with wall thickness, it's just a label to differentiate the method from the bent slat method.
In modern times, I am sure that most people use a sander to thin out the scabbard walls.
Using a hand gouge doesn't produce a scabbard with a thinner wall than a router. Carving the inner blade cavity with a hand gouge (or a chisel or a rouoter) is easier than trying to steam and warp slats (i think). And using the "modern" method to make a scabbard just gives a really thick scabbard that cannot be thinned out. So I say again: I think the "carved" method is easier and better (as opposed to the steamed slat or "modern" methods).
| Dean F. Marino wrote: | | Just curious - willing to post the scabbard thicknesses you achieve with carving? |
I do not thin scabbard cores with carving.
The only carving that I do is the carving of the inner cavity for the blade, which has nothing to do with wall thickness. I use a belt sander to thin out my scabbards, and finish them by hand sanding. Typically I can get my scabbards wall thickness down to 3/16" on the belt sander. I have occasionally achieved a wall thickness of 1/8" but that is not typical for me. |
Now I am truly confused  . .
"Using a hand gouge doesn't produce a scabbard with a thinner wall than a router" vs " And using the "modern" method to make a scabbard just gives a really thick scabbard that cannot be thinned out" (?) . So.... which "Modern" method were you referring to? Perhaps Sandwich?
I'm going to go with wall thickness: I see that your carved scabbards are 3/16" to 1/8" wall thickness. 1/8" is pretty much exactly what I end up getting with a router. Not surprising - both a gouge & a router are wood REMOVAL methods - I can't see how the results would be drastically different .
I THINK you were trying to contrast the general process of hollowing out wood vs the process of BENDING wood. I really want to try the bent wood method, as I absolutely believe it will result in a far more UNIFORM wall thickness.
In edhil, hai edhil. In edain, hai edain.
|
|
|
|
|
|
|
You cannot post new topics in this forum
You cannot reply to topics in this forum
You cannot edit your posts in this forum
You cannot delete your posts in this forum
You cannot vote in polls in this forum
You cannot attach files in this forum
You can download files in this forum
|
All contents © Copyright 2003-2026 myArmoury.com — All rights reserved
Discussion forums powered by phpBB © The phpBB Group
Switch to the Basic Low-bandwidth Version of the forum
|

