
| myArmoury.com is now completely member-supported. Please contribute to our efforts with a donation. Your donations will go towards updating our site, modernizing it, and keeping it viable long-term.
Last 10 Donors: Adam James, Piotr H. Feret, Graham Shearlaw, Anonymous, Daniel Sullivan, Chad Arnow, Jonathan Dean, M. Oroszlany, Sam Arwas, Barry C. Hutchins (View All Donors) |
| Author |
Message |
Harry Marinakis

|
 Posted: Sat 11 Jan, 2014 3:11 pm Post subject: Del Tin 2121 customization project Posted: Sat 11 Jan, 2014 3:11 pm Post subject: Del Tin 2121 customization project |
 |
|
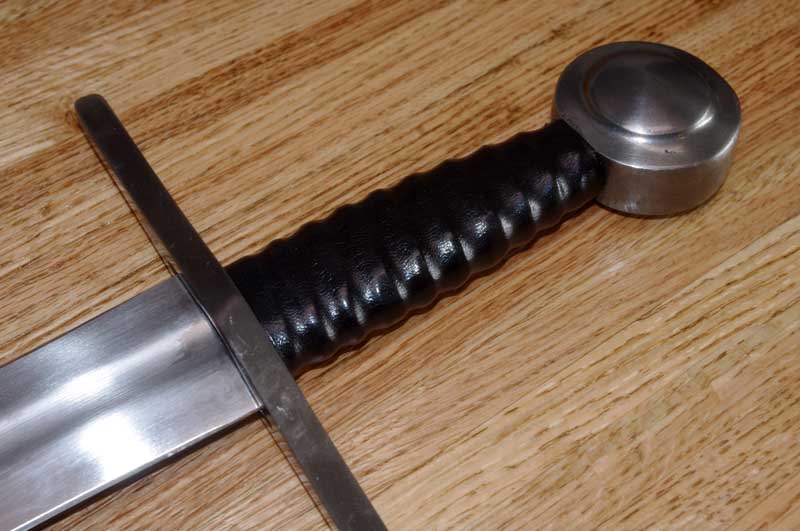
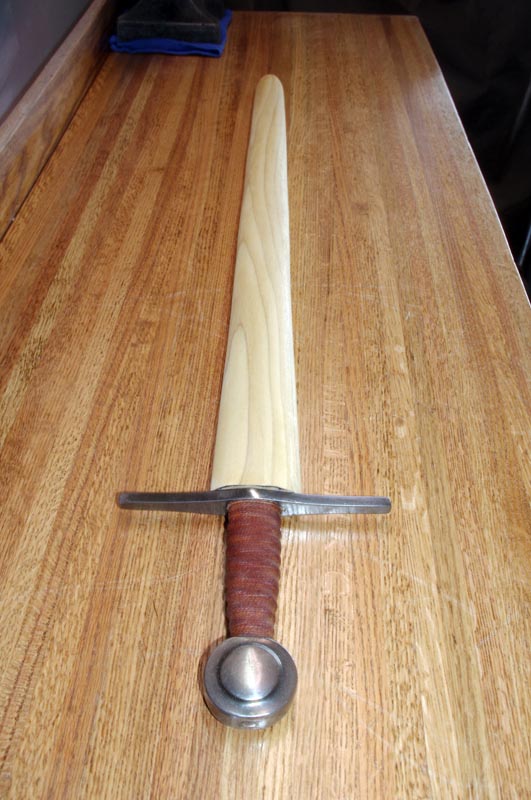
Del Tin 2121 - Oakeshott Type XI arming sword
I received a Del Tin 2121 from Kult of Athena - my first Del Tin sword. I was pleasantly surprised, it's a real chopper! I had the sword sharpened by KoA, and - WoW! - is it sharp!
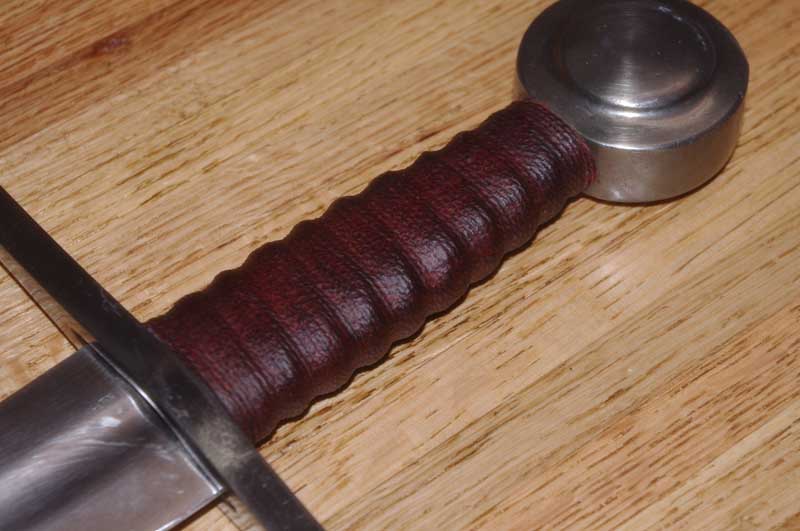
The sword arrived with a beveled edge and black grip, both of which I decided to change. (The smooth black leather was actually kind of slippery.) I also decided to try my hand with making a scabbard (sorry Sarge!). I've never attempted any of this before.
Part 1 of the project: re-wrapping the grip.
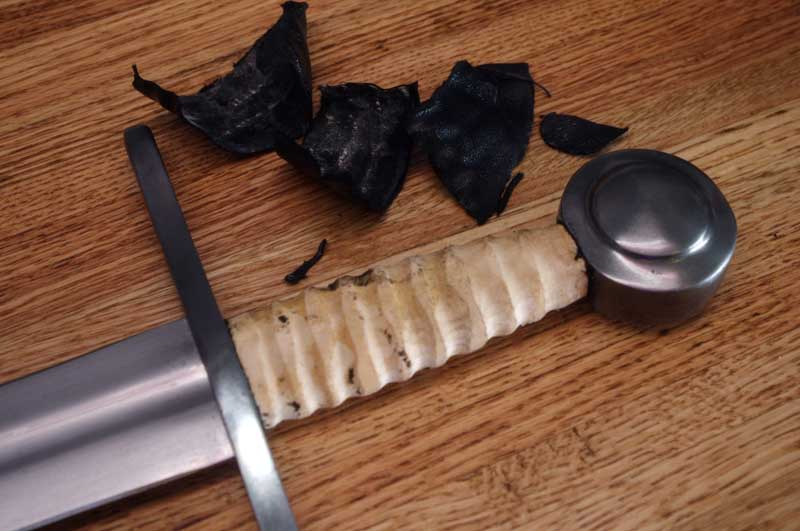
First I stripped the black leather to reveal the carved wood handle beneath. The leather was actually under the guard and pommel, so it took some careful digging to clean it up.
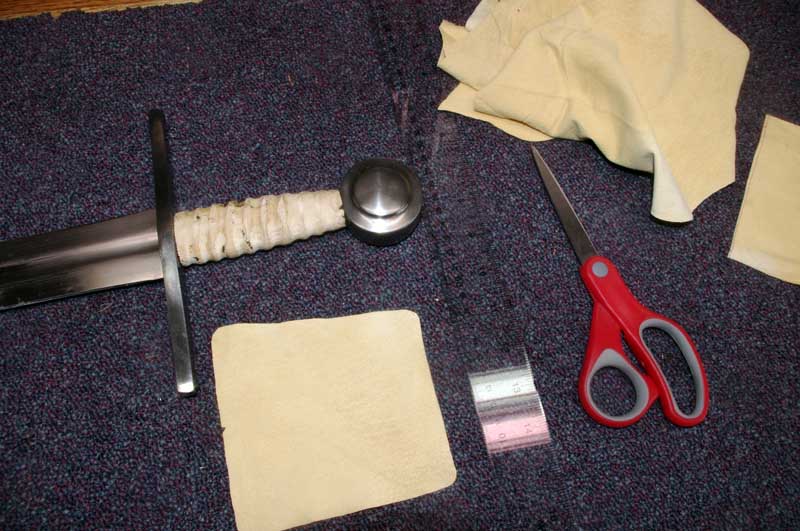
Then I cut a new wrap from chamois cloth and fitted it to the grip.
 Attachment: 86.91 KB Attachment: 86.91 KB
Attachment: 83.23 KB
Attachment: 102.64 KB
Last edited by Harry Marinakis on Sat 11 Jan, 2014 4:29 pm; edited 8 times in total
|
|
  |
 |
Harry Marinakis
|
| Posted: Sat 11 Jan, 2014 3:18 pm Post subject: |
|
|
The tedious came part when I had to skive the chamois. I used a Craftool Super Skiver. I guess there's no really easy way to skive leather that thin. I started with a new blade, but I ended up feathering the edge of the chamois rather than skiving it. Next time I will strop the new blade even more to get it super sharp. Any other suggestions?
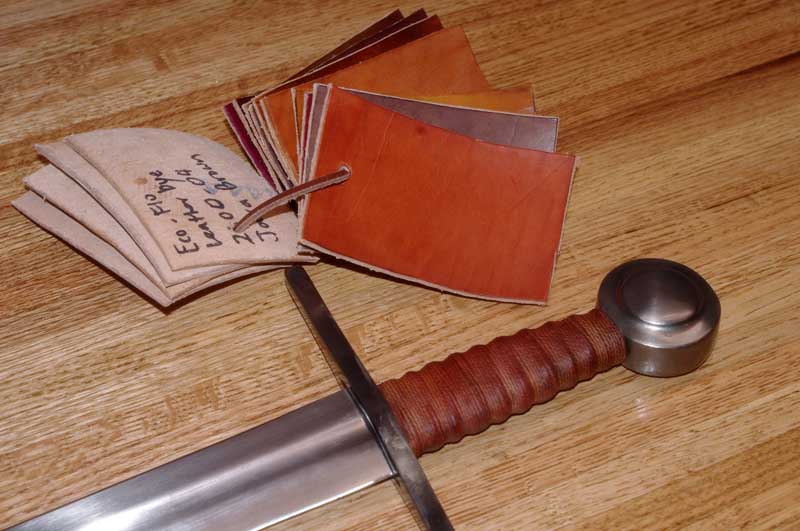
After choosing my color scheme for the grip, scabbard and belt, I dyed the chamois with Tandy Eco-Flo Leather Dye 2600-06 Canyon Tan.
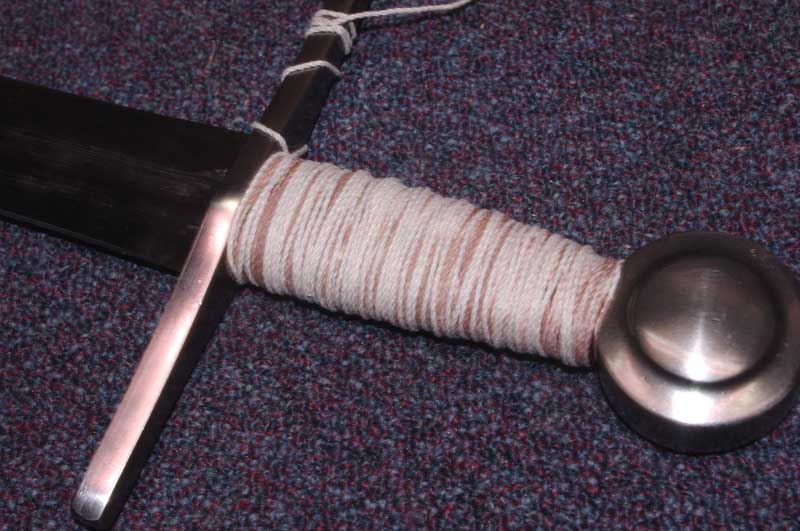
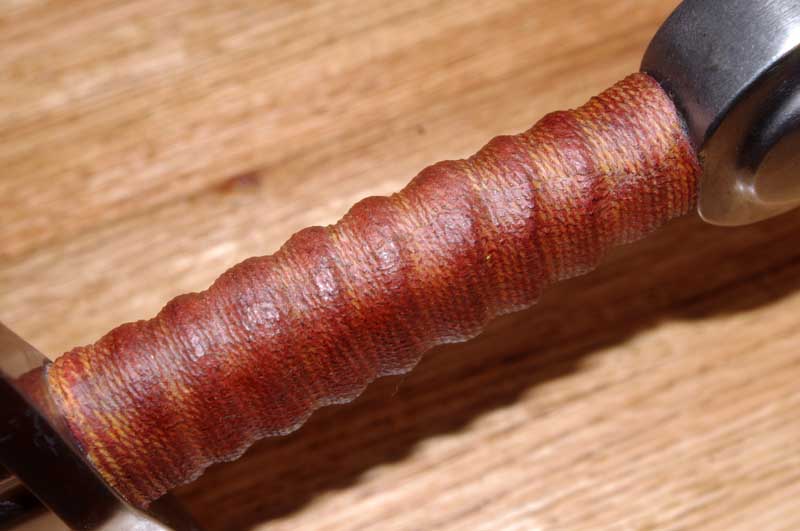
While the leather was still wet from the dye, I applied wood glue to the handle, folded the upper and lower chamois edges over, wrapped the chamois around the grip, wrapped the handle with cord, and set it aside to dry.
Attachment: 63.78 KB

Attachment: 93.79 KB
Last edited by Harry Marinakis on Sat 11 Jan, 2014 4:33 pm; edited 5 times in total
|
|
|
|
|
Harry Marinakis
|
| Posted: Sat 11 Jan, 2014 3:32 pm Post subject: |
|
|
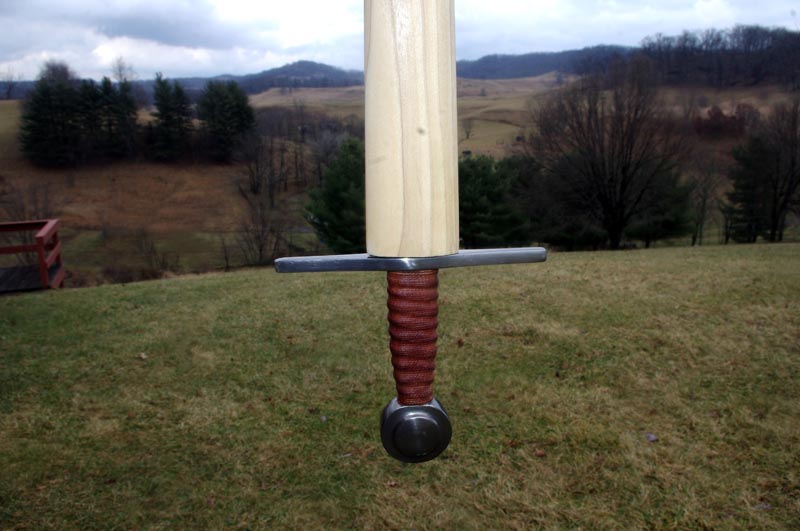
After the grip dried, I removed the cord. The new grip color was fantastic! But when I applied Renaissance wax the grip darkened so much that I was afraid that I had ruined my project.
But later the wax dried and the proper color came back (see 2nd photo with color swatch). It kinda looks like Albion's "campaign worn" wraps.
Attachment: 78.06 KB
Attachment: 89.57 KB
Last edited by Harry Marinakis on Sat 11 Jan, 2014 4:26 pm; edited 2 times in total
|
|
|
|
|
Harry Marinakis
|
| Posted: Sat 11 Jan, 2014 3:34 pm Post subject: |
|
|
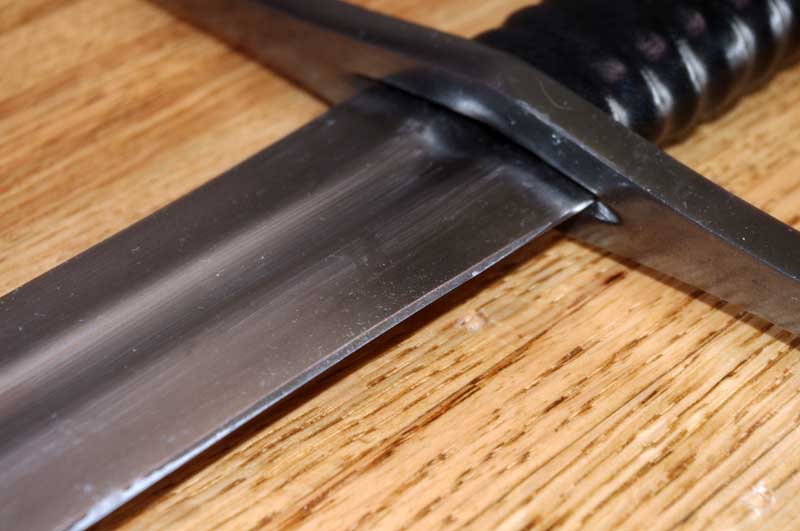
Here's the seam on the side of the grip. Can you see it? Careful attention to properly skiving the edge really pays off.
Next:
Part 2 of the project: sand down the blade's bevel and polish the blade.
Part 3: Make a scabbard.
Attachment: 69.73 KB
Attachment: 73.2 KB
|
|
|
|
|
|
Edward Lee
|
| Posted: Sat 11 Jan, 2014 5:06 pm Post subject: |
|
|
|
Now that's a nice sword, congratulation on your first DT sword. I recall this sword is one of their light one, the other one handed models are really heavy.
|
|
|
|
|
Harry Marinakis
|
| Posted: Sat 11 Jan, 2014 5:20 pm Post subject: |
|
|
It's still a bit heavy at 2 pounds 12 oz, but it's feels solid in hand and it has a lot of blade presence. You really feel like you want to whack something with it, and it would do a lot of damage.
None of the other Del Tin swords interest me, especially since none of them are sharp.
This is not one of my collectable swords, it's something that I can cut with and carry around (e.g., at Pennsic) and I won't worry about scratches here and there.
Last edited by Harry Marinakis on Sat 11 Jan, 2014 5:25 pm; edited 2 times in total
|
|
|
|
|
Roger Hooper

|
| Posted: Sat 11 Jan, 2014 5:22 pm Post subject: |
|
|
The revisions make the sword look very good.
I have a DT2121 that I bought about 12 years ago. I wonder how much Del Tin has tweaked the design since then, especially in the matter of distal taper. Mine is an OK sword, but not exactly lively.
|
|
|
|
|
Dean F. Marino

Location: Midland MI USA Joined: 24 Aug 2011
Posts: 229
|
| Posted: Sat 11 Jan, 2014 8:22 pm Post subject: |
|
|
| Harry Marinakis wrote: | The tedious came part when I had to skive the chamois. I used a Craftool Super Skiver. I guess there's no really easy way to skive leather that thin. I started with a new blade, but I ended up feathering the edge of the chamois rather than skiving it. Next time I will strop the new blade even more to get it super sharp. Any other suggestions?
....... |
Yes - if you have a dremmel, try using a FINE sanding drum to "skive" your rough sides. I've always found that this works VERY well....  . .
In edhil, hai edhil. In edain, hai edain.
|
|
|
|
|
William Swiger

|
| Posted: Sun 12 Jan, 2014 12:11 am Post subject: |
|
|
Nice job on the new grip wrap.
Non Timebo Mala
|
|
|
|
|
Bryan Heff

|
| Posted: Sun 12 Jan, 2014 2:53 am Post subject: |
|
|
Very nice job! I have always liked that model DT. Your grip mods have certainly made it look even better. I am sort of surprised that the grip is carved like that, I always assumed there was some sort of thick cord wrapped around the grip that gave it that deep channeled look. Interesting.
I have used chamois for a few grips and what I have come to find is because it IS so thin, you almost don't need to do any skive work. I will echo Findluthui as well, a small sanding disk on a dremel will sometimes do nice job of removing material along the edge, but with the chamois I am not even sure its needed, but I am sure it couldn't hurt. Thanks for sharing your progress so far. I look forward to the next steps.
|
|
|
|
|
Harry Marinakis
|
| Posted: Tue 14 Jan, 2014 10:45 am Post subject: |
|
|
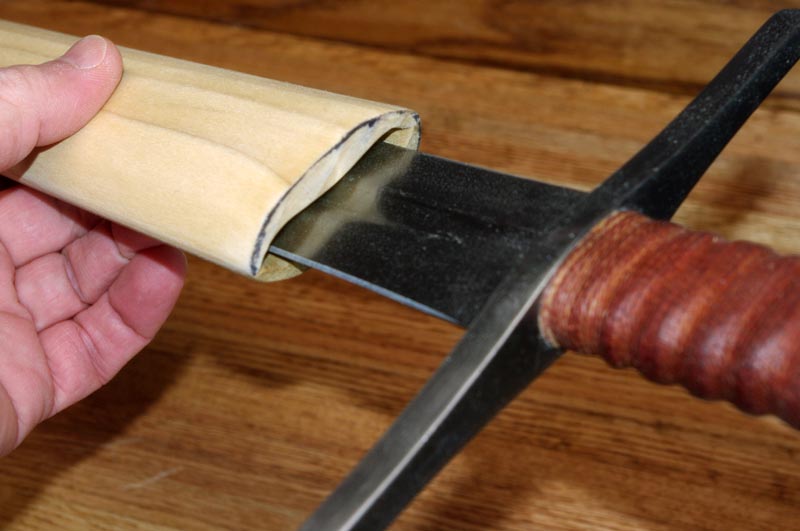
I finished making the poplar core for the scabbard (2-piece carved core). It's got a nice lenticular shape. The sword goes in and out smoothly, and stays in the scabbard when inverted.
As I get ready to work on the leather, I have a couple of questions for the scabbard gurus.
(1) How do I cover the flat top of the scabbard (where the sword is inserted)? Do I cut an oval piece of leather and glue it into place before I apply the scabbard cover? I plan to make triangular rain guards - can I extend the inner rain guard flaps so that they cover the top?
(2) I do not plan on using a chape (most scabbards for Oakeshott Type XI swords did not have a chape). I am a bit nervous about sewing the leather cover closed at the tip so it looks good even without a chape. Any suggestions on how to do this? Or should I just bite the "Period" bullet and use a chape to cover up the tip?
Attachment: 109.24 KB
Attachment: 92.25 KB
Attachment: 79.24 KB
|
|
|
|
|
|
Patrick Kelly
|
| Posted: Tue 14 Jan, 2014 11:30 am Post subject: |
|
|
Where did you get the idea that scabbards of this period didn't have chapes? Very nice job do far. It looks as if you have a lot of wood left on the scabbard flats. Have you thought of trimming it down even further?
"In valor there is hope.".................. Tacitus
|
|
 |
|
Julien M

|
| Posted: Tue 14 Jan, 2014 11:38 am Post subject: |
|
|
Hi Harry,
Nice Job on the grip wrap! I too was surprised to see how del tin achieved the roping effect by carving it straight on the wood.
Not sure if I qualify as a scabbard guru but I can tell you how I did mine below, as it was the first for me featuring an extended "rain guard".
I covered the scabbard with leather as I usually do, allowing the leather to extend far above the top of the wooden core, then stitched the back. I then made a cut on each the side of the leather extending above the top (Once I did that, I picked an advertising catalog that was the same thickness as the scabbard core, and I inserted it in. I traced the round pattern for the rain guard on a piece of cardboard and translated it to the leather (easy to draw as the leather rest flat on the catalog inside the rain guard). I was able to tweak as I wanted that way, against cutting prior to wrapping and finding out something went wrong.
I then cut the leather, again resting flat on that catalog I was not worried to damage. Once It was done, I laid the scabbard face down on a piece of cardboard (both flaps of the rain guard resting on the cardboard + the width of the scabbard core), and I traced the pattern around for the inside of the rain guard. After that I did the stitching. To finish I took my sharpest hobby knife, and sliced the leather open in the scabbard mouth, in a lenticular shape. I humidified the leather and put the sword in to rest for a night. When I pulled it out, the leather had been pressed against the wood core, and I finished by trimming off the leather, removing the excess that goes in (that way you are able to follow the exact contours of the wooden core). That's just my way, I'm sure there are plenty of others
No need to be nervous about the stitching. Just start at the bottom and go your way up. You should end up with something neat if you don't rush it.
Good luck and looking forward to see the final piece.
J
edit: forgot to comment about thickness but Patrick was faster. I agree you'll have a much better looking core with less material on the flats. True as well regarding the shape, you can go for one and be true to period, whether it is metal, leather, or none.


|
|
|
|
|
Harry Marinakis
|
| Posted: Tue 14 Jan, 2014 12:05 pm Post subject: |
|
|
| Patrick Kelly wrote: | | Where did you get the idea that scabbards of this period didn't have chapes? |
I spent a lot of time researching scabbard for Type XI swords. Most of the swords on the early 12th C were Type X and XI, so you can presume that swords shown in manuscripts from that time were Types X and XI. Even if you start to include Type XII swords from the latter part of the 12th C, you still see a lot of scabbards without chapes (although chapes are more common than not with Type XII sword scabbards).
It's not that they don't have chapes, it's that most do not.
For example:

I did find a few with chapes, but not many:

| Patrick Kelly wrote: | | It looks as if you have a lot of wood left on the scabbard flats. Have you thought of trimming it down even further? |
Then I'll end up with more of a flattened rectangular shape with rounded corners rather than a lenticular shape. Right now the core is no wider than the crossguard. Do you really think I should sand it down further?
Thanks Julien.
|
|
|
|
|
Bryan Heff
|
| Posted: Tue 14 Jan, 2014 12:52 pm Post subject: |
|
|
| Harry Marinakis wrote: | I finished making the poplar core for the scabbard (2-piece carved core). It's got a nice lenticular shape. The sword goes in and out smoothly, and stays in the scabbard when inverted.
As I get ready to work on the leather, I have a couple of questions for the scabbard gurus.
(1) How do I cover the flat top of the scabbard (where the sword is inserted)? Do I cut an oval piece of leather and glue it into place before I apply the scabbard cover? I plan to make triangular rain guards - can I extend the inner rain guard flaps so that they cover the top?
(2) I do not plan on using a chape (most scabbards for Oakeshott Type XI swords did not have a chape). I am a bit nervous about sewing the leather cover closed at the tip so it looks good even without a chape. Any suggestions on how to do this? Or should I just bite the "Period" bullet and use a chape to cover up the tip? |
When I did mine, I made the semi-circle rain guards that rise above the top of the scabbard core, I just left the core wood bare at the very top where it meets the cross guard. At that point as you can't see it unless the sword is out of the scabbard and you look straight down. I imagine you could glue a small piece of leather on the wood there if you wanted to.
I also made mine without a chape. This was my first and I did not do a great job at getting the tip to look clean, so I simply glued in some additional leather bits to sort of hide it. My second one I just went super slow, gluing it down, trimming some away and it turned out super clean at the bottom. Its possible, just takes time.
First


Second


|
|
|
|
|
Harry Marinakis
|
| Posted: Tue 14 Jan, 2014 1:31 pm Post subject: |
|
|
|
Bryan, can you post a photo of the sewn side of your 2nd scabbard? Looks great, thanks.
|
|
|
|
|
|
Patrick Kelly
|
| Posted: Tue 14 Jan, 2014 1:44 pm Post subject: |
|
|
[quote="Harry Marinakis"] | Patrick Kelly wrote: |
It's not that they don't have chapes, it's that most do not. |
We shall simply agree to disagree on that point.
| Quote: | | Then I'll end up with more of a flattened rectangular shape with rounded corners rather than a lenticular shape. Right now the core is no wider than the crossguard. Do you really think I should sand it down further? |
Most scabbards made today are far too over built, even those made by craftsmen charging for the service. Scabbards are far too bulky and belts typically suffer from the gunfighter syndrome, being far too thick and heavy.
I think you'd wind up with a much more aesthetically pleasing end result if you take the flats of the core down just a bit further. Like this......................

"In valor there is hope.".................. Tacitus
|
|
|
|
|
Alan Schiff
Industry Professional

|
| Posted: Tue 14 Jan, 2014 1:48 pm Post subject: |
|
|
Hi Harry, something that I have found helps with covering the bottom is to wrap the core in masking tape to create a pattern to go from. Poster board can also be used. The trick is to really get the shape right on the taper there so that it fits snugly.
As for the rain guard, I did the triangular ones on one of my scabbards similarly to what Julien did. I wrapped the core just like normal, leaving some excess leather at the top. After the wrap was done I cut the excess on each side to separated the flaps. Fold the edges in and stitch or glue to create the triangular shape. On mine the guard rests against the bottom of the inner pieces I folded over so no additional leather was needed to cover the core on top.
Hope that helps,
Alan
|
|
 |
|
Bryan Heff
|
| Posted: Tue 14 Jan, 2014 2:01 pm Post subject: |
|
|
Ah...haha, well you got me there. I did not stitch the second one, but only glued it. It was an HT viking and I was selling it, made a scabbard for it to help the sale but to save time did not stitch. Howerver I feel that had I stitched the back, it would have looked good. As you can see, the back side is a bit rougher without the stitching. I feel that with glue and stitching, you don't really need to take the stitching down to the very end, but you probably could....
2nd scabbard, not stitched

First scabbard I did stitch..I definitely could have stitched it further too...

|
|
|
|
|
Dean F. Marino
Location: Midland MI USA Joined: 24 Aug 2011
Posts: 229
|
| Posted: Tue 14 Jan, 2014 2:23 pm Post subject: |
|
|
First - you did a really good job on that core . ANYONE with enough balls to get up, go out, and MAKE a core should be commended .
Yes - the flats are a bit thick. If you can use a good belt sander prior to wrapping - shooting for about 1/8" thickness? You will be happier in the long run.
I have two PDF tutorials available FREE - one on Making a core with a Router, one on Leather Wrapping a core. I am not a professional - these are documents covering MY methods. Links:
http://findlithui.deanandsandy.dyndns.org:808...ter1.2.pdf
http://findlithui.deanandsandy.dyndns.org:808...ore1.1.pdf
I've made an effort to include a LOT of photos... scabbard tips, in particular, CAN be a challenge while wrapping. The sample scabbard I show has a fitted throat - the trick to good rain guards is fairly simple:
1) Add about 2" of leather to the throat ABOVE the top of the core.
2) Cut a 3" piece of leather and laminate this, rough to rough, at the TOP of your main scabbard piece - use contact cement.
This gives you about 1" of excess throat leather INTO the main scabbard wrap.
3) Diagram, and cut, the ENTIRE UNIT... you may go for a semi circle, a triangle, or something totally off the wall . But cut everything as a UNIT. Be VERY CAREFUL to mark your scabbard edges. When you cut, you may ABSOLUTELY reduce the height of the rain flap . I said 2" in step 1) so you could pick whatever height you like - and not run out of leather .
4) When you glue up - have a good solid line on the INSIDE rain flap, 1" UP from the edge. This should align all around with the top of the core.
5) DO stitch the rain flap edges - it makes the entire thing into a solid unit. You will find this to be a bit easier if you do it prior to wrapping - it can be a NIGHTMARE to get those stitches in around the side areas once everything is glued.
That was short... but if you have questions as you go along? Please PM me... no charge, no grief.... I LOVE to help folks making their own scabbards .
In edhil, hai edhil. In edain, hai edain.
|
|
|
|
|
|
|
You cannot post new topics in this forum
You cannot reply to topics in this forum
You cannot edit your posts in this forum
You cannot delete your posts in this forum
You cannot vote in polls in this forum
You cannot attach files in this forum
You can download files in this forum
|
All contents © Copyright 2003-2026 myArmoury.com — All rights reserved
Discussion forums powered by phpBB © The phpBB Group
Switch to the Basic Low-bandwidth Version of the forum
|


