| Author |
Message |
Jesse Belsky
Industry Professional

|
 Posted: Fri 01 Nov, 2013 12:15 pm Post subject: I need some advice on quillon terminals..... Posted: Fri 01 Nov, 2013 12:15 pm Post subject: I need some advice on quillon terminals..... |
 |
|
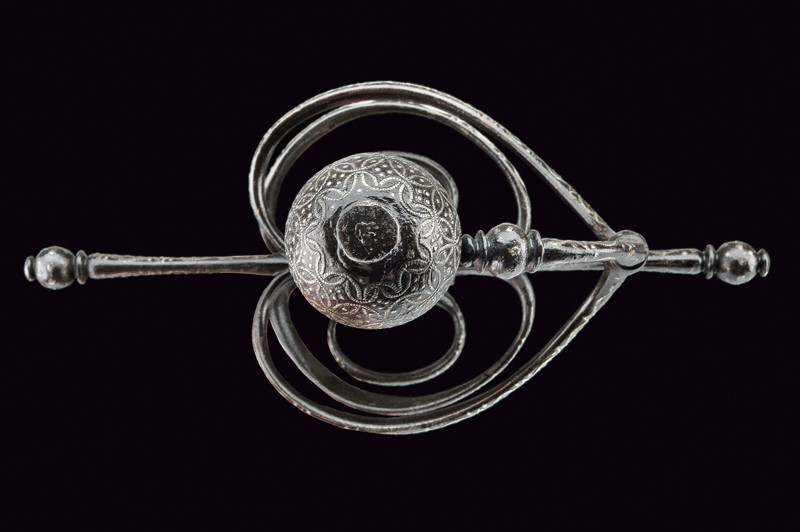
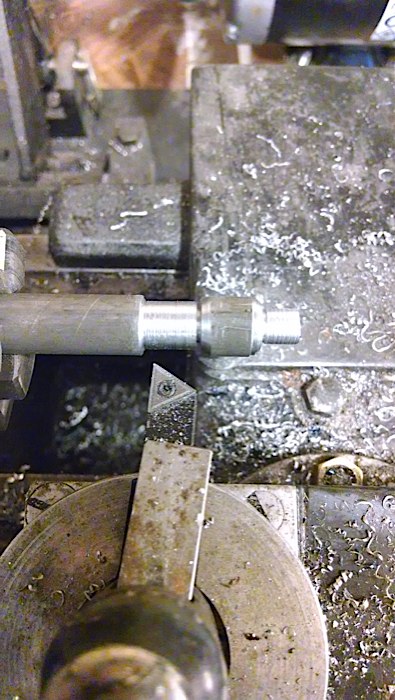
I was hoping the myArmoury brain-trust could help me out. I'm struggling to devise a technique for creating "beaded" style quillon terminals. In looking at originals, like the ones in the photo below, there is essentially zero clearance between the round ball shapes and the small disk shapes that separate them from the rest of the quillon. None of my lathe tools can match this. I got tired of trying to do this freehand, and I bought a small "radius turning" attachment for my lathe. However, when that tool swings to the side, it eliminates too much metal on the outside of the cut. I.e., if I am turning the ball shape, the lathe tool obliterates the metal where the disk shape would be.
Does anyone have some advice for me? I've seen other contemporary makers do this well, but i can't figure out how. Assuming lost wax casting, and CNC are out, what's left? Are these finials always forged with some kind of die? Does one make specialized lathe tools with the bead profiles?
I'd really appreciate any advice......
thanks
Jesse
 Attachment: 63.11 KB Attachment: 63.11 KB
|
|
   |
 |
Sean Flynt

|
|
|
|
|
Jesse Belsky
Industry Professional
|
| Posted: Fri 01 Nov, 2013 7:54 pm Post subject: |
|
|
Doing upsetting that specific is way beyond my smithing skills, although I don't doubt someone good enough could do something like that. Filework doesn't seem like the right answer either. I considered "beading" little steel shapes onto a thinner shaft, but without brazing or something it doesn't seem like they would stay fixed and not rotate. I think historically it was probably done with swaging dies like in this video: http://www.youtube.com/watch?v=QFqBfLtrHz0
The ball swage i could probably fabricate....not sure how to do the little discs though. Maybe if I could forge in the balls I could put the piece back on the lathe to turn the disks......hmm.
|
|
|
|
|
Mikko Kuusirati

|
| Posted: Fri 01 Nov, 2013 10:34 pm Post subject: |
|
|
There's any number of ways one could come up with, and I'm sure most of them were used historically at some point.
If I had to guess, I'd say in the picture you posted the quillon ends were forged club-shaped, much like a bowling pin, and then three grooves were filed with a small triangular file to separate the disks from the ball and the inner disk from the rest of the quillon; the rest is clean-up (like rounding out and smoothing the ball).
"And sin, young man, is when you treat people as things. Including yourself. That's what sin is."
-- Terry Pratchett, Carpe Jugulum
|
|
|
|
|
Daniel Wallace

|
| Posted: Sat 02 Nov, 2013 7:38 am Post subject: |
|
|
I've always looked at terminals like this and wondered, how did period smiths do this without a lath of some kind?
i look and think a swage block is possible, but in order to make one, you have to first make the 'positive' to transfer into the swage to make the 'negative' unless you just get a dermal and carve it all out to make your negative.
|
|
|
|
|
|
Peter Johnsson
Industry Professional
|
| Posted: Sat 02 Nov, 2013 7:55 am Post subject: |
|
|
If you are using a lathe, your best option is to grind a tool (of high speed steel) to have the precise shape of the terminal.
This is similar to the blade of those wood planes that are used to shape decorative edges.
In the old days, these were forged in a pair of top and bottom dies, or fullering tools.
When I do these things, I do not spend the time to make special forging tools for every different finial shape I need (they tend to be different each time): Instead I leave the material thick, or upset it to leave enough volume for me to file to shape. Compared to the time spent making a special forging tool, it is quicker but it till takes a bit of time...
|
|
|
|
|
|
Peter Johnsson
Industry Professional
|
| Posted: Sat 02 Nov, 2013 8:06 am Post subject: |
|
|
| Daniel Wallace wrote: | I've always looked at terminals like this and wondered, how did period smiths do this without a lath of some kind?
i look and think a swage block is possible, but in order to make one, you have to first make the 'positive' to transfer into the swage to make the 'negative' unless you just get a dermal and carve it all out to make your negative. |
You are correct.
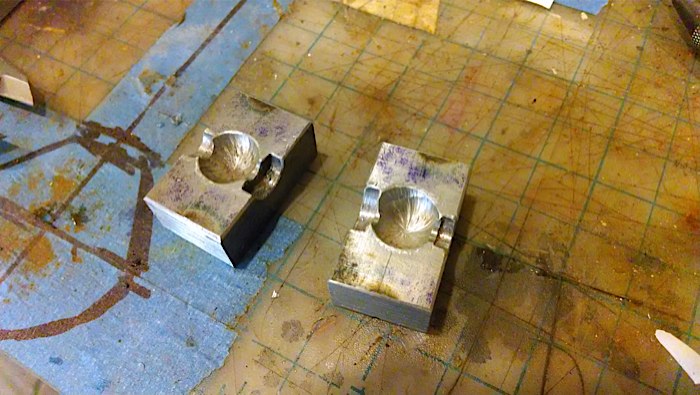
First form a template form of the shape you want to reproduce. Then make two tools that are to be the upper and lower dies. Use a drift, a chisel or a rotating burr to cut out a slight hollow in each face that is a little bit smaller than the final form.
Heat both halves to a good bright yellow. Place one tool in the hardy hole of the anvil and hold the other handy while placing the template form so it overlaps with the hollow you made in each half.
Strike the tools together with a sledge hammer so that a depression is formed that will precisely math the form of the template. You want to rotate the template form as you keep striking.
You may also have to reheat the tool halves a few times until you have a good impression and fit.
Cool the template form frequently during the operation.
|
|
|
|
|
|
Peter Johnsson
Industry Professional
|
| Posted: Sat 02 Nov, 2013 8:08 am Post subject: |
|
|
Looking at the photograph again with more care, I notice that there is so much irregularity and difference between the two ends, that both probably were rough forged free hand and then filed to shape.
A lot of the fine shaping of sword hilts was accomplished with filing, I think.
|
|
|
|
|
|
Lee O'Hagan
|
| Posted: Sat 02 Nov, 2013 12:20 pm Post subject: |
|
|
Apart from the excellent information above,
you could alway's treat the two end's the same as a threaded and peened pommel,
heat shrunk, and a decent peening tool should leave you with a nice finish,or,
solder-braze the two component's, seen that on a few nice Shamshir over the year's.
you have to look very-very close to see it isn't forged and filed,
|
|
|
|
|
Jesse Belsky
Industry Professional
|
| Posted: Sat 02 Nov, 2013 2:04 pm Post subject: |
|
|
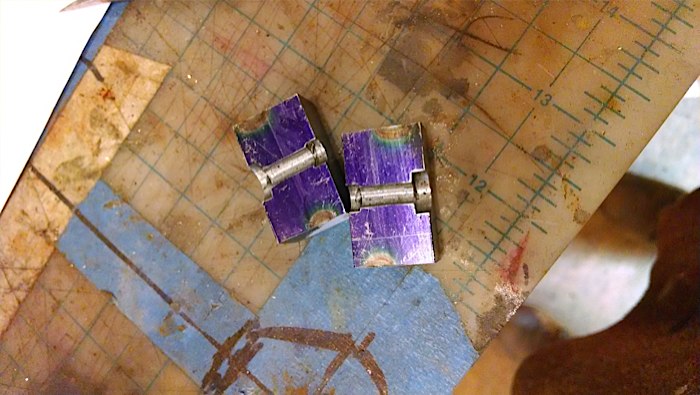
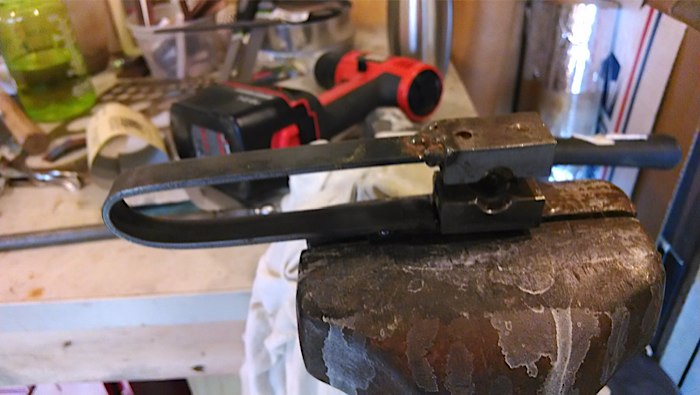
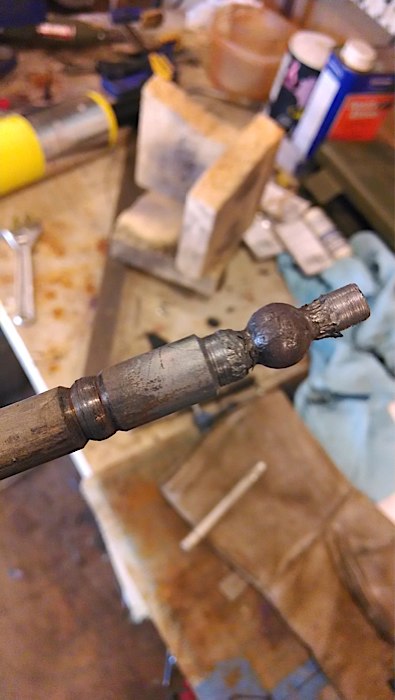
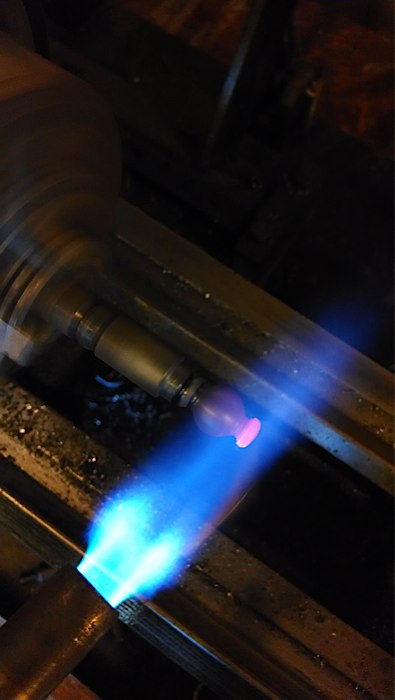
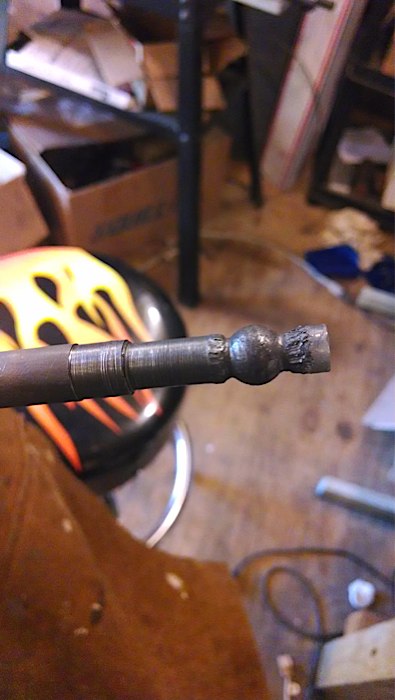
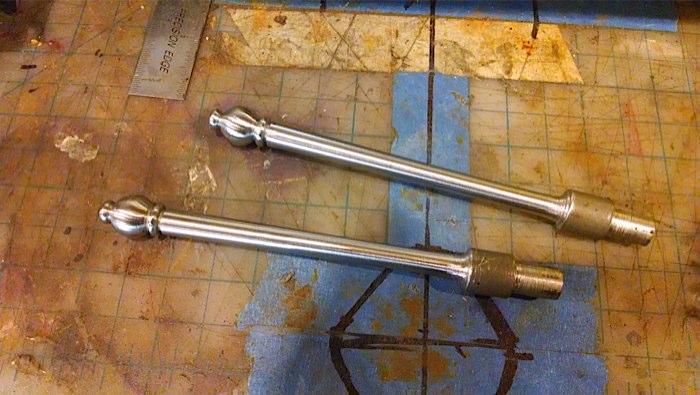
Thanks for all the replies. Peter, I appreciate your describing the swaging technique. I was actually out in the shop trying that this morning when you posted....i'd call it a moderate success. I machined by dies, rather than forging them. I'm not sure I accomplished anything I couldn't have done on the lathe...the clearances on my die may not be tight enough, or perhaps my torch can't get the material hot enough. I put it back on the lathe when I was done to clean it up, and while it was turning I hot peened the end bit into a bit of a mushroom. I still have too much space between the shapes. This is limited by the narrowest hacksaw blade I have on hand. I will try to find a slimmer blade.
I've attached some pics of my test piece. I'm going to give it another shot tomorrow with some better "pre-shaping" on the lathe...if only I had your skills at freehand filing 
I'm curious, have you ever tried to make a cutting tool for a lathe like the one you describe? Would you create one tool with the profile of all 3 shapes (disc/ball/button)? I'm very much an amateur machinist and prefer the durability of carbide tipped tools to make up for my lack of technique, but I imagine such slender "extensions" on HSS tool would be very fragile. I suppose it depends on what material you are turning too....
Lee, threading is a good idea to help stop rotation. Thanks for the suggestion....if plans A, B, and C don't work out, I may give it a try
Attachment: 73.33 KB
Attachment: 81.29 KB
Attachment: 59.38 KB
Attachment: 53.83 KB
Attachment: 38.8 KB
Attachment: 59.68 KB
Attachment: 80.29 KB
|
|
|
|
|
Nate C.

|
| Posted: Sat 02 Nov, 2013 4:01 pm Post subject: |
|
|
Hi Jesse,
there are a couple things to try.
- realize that the original you show isn't a full ball with a disk. It is an abbreviated ball with disks. A jewelers file should be able to handle this groove easily. Just make the clubbed shape and progressively refine it with smaller files.
- buy a HSS (not carbide) threading cutter for your lathe and modify it. Do clean up with files.
- buy HSS lathe cutter stock and grind a custom cutter with your ideal shape. Look up how on the net or the machinist's handbook.
Good luck.
Nate C.
Sapere Aude
"If you are going to kill the man, at least give him a decent salute." - A. Blansitt
If they ever come up with a Swashbuckling School, I think one of the courses should be Laughing, then Jumping Off Something. --Jack Handy
|
|
|
|
|
Scott Roush
Industry Professional

|
| Posted: Sat 02 Nov, 2013 5:23 pm Post subject: |
|
|
If I were you I'd use the lathe to remove as much material as possible and then finish with files? If it were me.. I'd wish I had a lathe..but would have to do it via forging and filing.
http://www.bigrockforge.com
|
|
|
|
|
|
Julian Reynolds
|
| Posted: Sat 02 Nov, 2013 11:55 pm Post subject: |
|
|
I have had success combining a lathe and files (at slower speeds, of course). For one-off quick parts, I've even just used a variable speed drill and files. A fine V-profile file will give you the profile you need for this type of finial, without the trough between disc and ball.
Julian
|
|
|
|
|
|
Radovan Geist
|
| Posted: Mon 04 Nov, 2013 12:38 am Post subject: |
|
|
|
I can only second what couple of other people suggested - for this kind of job I either use a combination of lathe and files, or only hand-filing.
|
|
|
|
|
Daniel Wallace
|
| Posted: Mon 04 Nov, 2013 8:35 am Post subject: |
|
|
i don't have much experience with steel cutting laths, but i do some turning on a wood lath in little hobby shop. it looks very possible to by lath alone - but i would use several different positions of the skew chisel to achieve what you have there. there's a lot of tool rolling with wood lath work.
i personally look at these and think its a job for needle files. but when working something round its hard to keep it round. when i used to file out a tendon to be peen over on a round object, i would first score it with a triangular file. then do an initial cut with it into the material, but splitting the cuts into four on each side of the work. its easier for me to keep things reasonably round. now for your disk and ball transition, i would dump the triangular file for a bastard file. (flat and half round) this file turned on edge will dig in like a single beveled knife. i would also break down this 4 sided cut into 8 and really dig in but not finalize the cut. when done you should have a 90 degree cut into the work from the flat, and a grove on the other side to start the ball.
I'd have to get a piece of metal and give this a try myself before I'd go much further, too bad you just can't use the files on the lath, it'd cut down on time, although i don't think that is a very safe thing to do with needle files.
|
|
|
|
|
|
Julian Reynolds
|
| Posted: Mon 04 Nov, 2013 2:15 pm Post subject: |
|
|
Daniel,
I, too, would not suggest using needle files around a lathe (you need to be able to hold on firmly and apply some pressure, a needle file would just bend and you risk being skewered with it!).
However, I don't agree with you about not being able to use larger files on a lathe, or any chuck-equipped machine for that matter (I've even used a drill press in lieu of a lathe). You have to find the optimum speed that allows the file to 'bite' rather than just skim the surface (usually a very slow speed) and move the file back and forth to stop it clogging up. It takes a little effort and is slower, but I find I can get more complex, even more subtle shapes doing it this way because you are removing only a little at a time.
As always with machine tools, be careful, safe and patient.
Julian
|
|
|
|
|
Jesse Belsky
Industry Professional
|
| Posted: Wed 06 Nov, 2013 8:14 pm Post subject: |
|
|
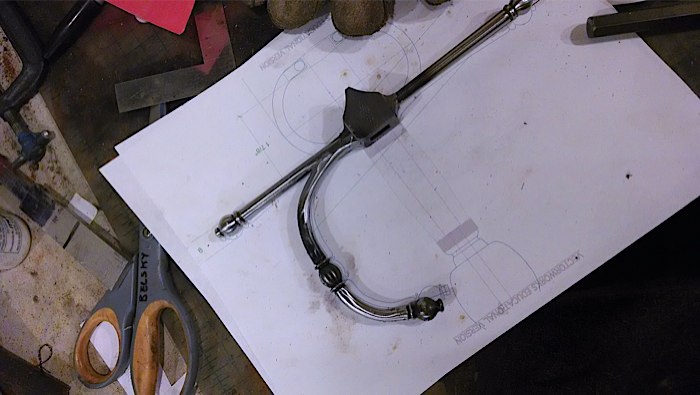
I want to thank everyone for their various suggestions and advice. Clearly there are many ways to skin this cat, depending on which tools and techniques you have mastery of.
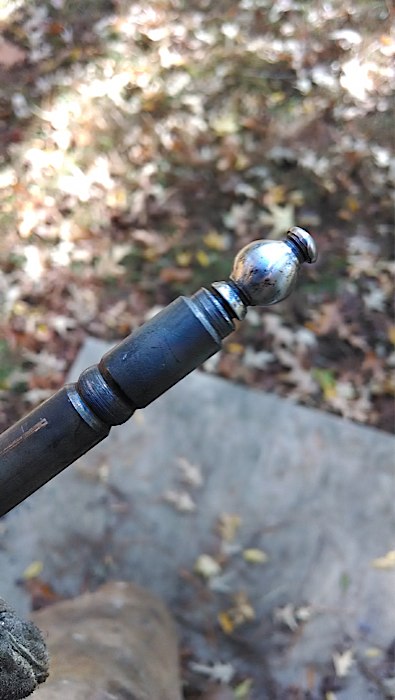
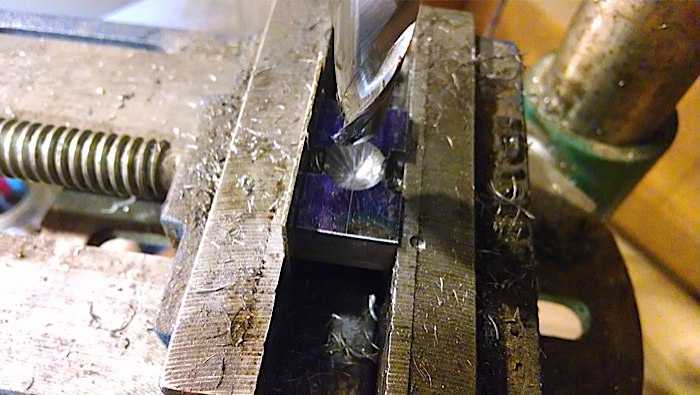
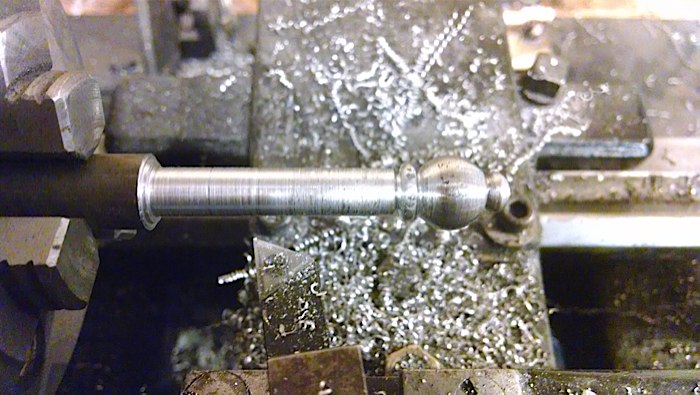
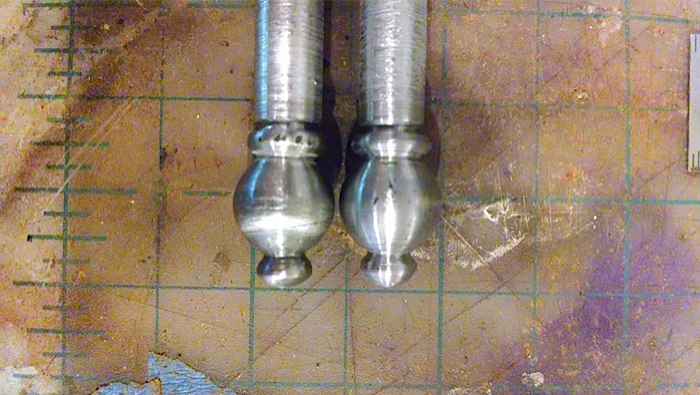
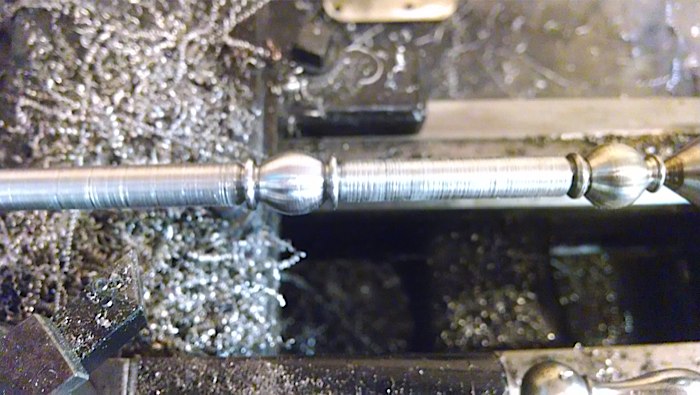
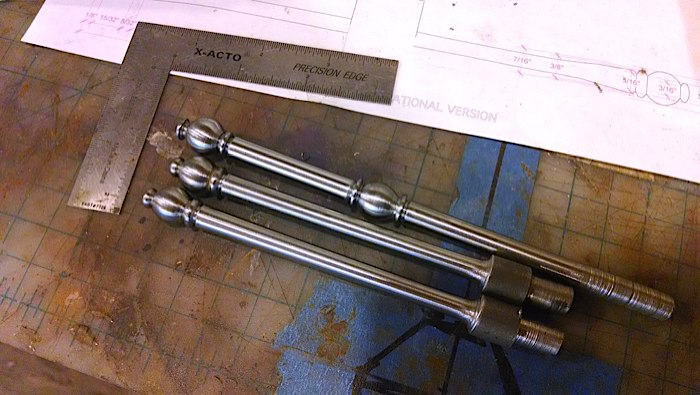
After quite a bit of experimenting, I'm reasonably pleased with my end product. I modified the forging die I posted pics of earlier, so that the junctions between the center ball shape and the outside disc shapes were much narrower. I turned by 1/2" round stock down to 3/8" on either side of the ball, and took the corners off the area that would become the ball. The I forged the rough lathed bar in the die into a ball shape. After that it was back onto the lathe for cleanup with files and sandpaper, and lathe turning and hacksawing of the rest of the shapes. Once the ball was mostly forged, I found I could work down into the joint with a hacksaw blade coming in at an angle...not straight down, but following the contour of the ball. Sorry if that doesn't make sense...it wasn't something I could photograph while doing
I could have lathed this shape, but the forging allowed me to get all the ball shapes exactly the same size, which I'm not sure I could have done freehand on the lathe. Making matched pairs is so much harder that just a one-off.
The slightly elongated ball in the knucklebow was turned with my radius-turning attachment. Its not quite as symmetrical as I'd like, but fortunately it doesn't have to match anything else.
So, onwards to the next bits.....
Attachment: 90.83 KB
Attachment: 53.96 KB
Attachment: 81.29 KB
Attachment: 87.07 KB
Attachment: 79.64 KB
Attachment: 76.57 KB
Attachment: 75.46 KB
Attachment: 56.85 KB
|
|
|
|
|
Sean Flynt
|
|
|
|
|
|
Radovan Geist
|
| Posted: Thu 07 Nov, 2013 6:54 am Post subject: |
|
|
looks really good.
may I have a technical question? how do you attach quillons to the quillon block? do you drill hole in the block, set the quillon and then weld it? Or do you use additional pin going through the block and end of the quillon? (that´s what I did on my rapiers posted on this forum some time back).
Anyhow, once you finish this rapier, I´d love to see the pictures.
|
|
|
|
|
Daniel Wallace
|
| Posted: Thu 07 Nov, 2013 7:10 am Post subject: |
|
|
very nice looking - I'm curious as to how you weld the quillons on too as i seem to be far from casting myself if i ever get to making a decent looking guard like this.
as for one being a little misshapen ed or off to your eye, it never matters in my opinion, period originals are never truly perfect there's always some human touch in them - and when your finished, your probably going to be one of the only people that notice it because you made it. the rest of us will look at it and probably never even notice there's a difference in them.
|
|
|
|
|
|
|

