
| myArmoury.com is now completely member-supported. Please contribute to our efforts with a donation. Your donations will go towards updating our site, modernizing it, and keeping it viable long-term.
Last 10 Donors: Adam James, Piotr H. Feret, Graham Shearlaw, Anonymous, Daniel Sullivan, Chad Arnow, Jonathan Dean, M. Oroszlany, Sam Arwas, Barry C. Hutchins (View All Donors) |
| Author |
Message |
Marik C.S.

|
 Posted: Tue 22 Oct, 2013 4:06 am Post subject: DIY Scabbard for a new Regenyei Sword Posted: Tue 22 Oct, 2013 4:06 am Post subject: DIY Scabbard for a new Regenyei Sword |
 |
|
Well good-day to you folks.
As today will be mostly spent waiting for glue to cure on the leather for the scabbard I thought I'd let you take part in the wonderful adventure that is first-time scabbard making.
Ok that's not quite true. I did make a scabbard for my Messer some while back, but as I really didn't work precisely on the chiselling of the inside and got sick of hand-planing the thing really fast it is more like a club that the messer fits into rather than a real scabbard.
So yes, technically this is a second scabbard. But it is the first real one.
But let's start from the Top with a picture of the sword in question. Sadly I'm not much of a photographer and the angle of the shot really doesn't do the blade justice, it looks much shorter than it really is.

Now the odyssey behind that sword is a story in itself and not really relevant for the scabbard anyway so I'll skip that for now.
For the Scabbard itself I'm going to give you a whole lot of pictures and a handy caption for everyone including mistakes I noticed - I'm sure there are many I didn't - and also a bit of self-reflecting feedback on what I've learned so far while doing all this.
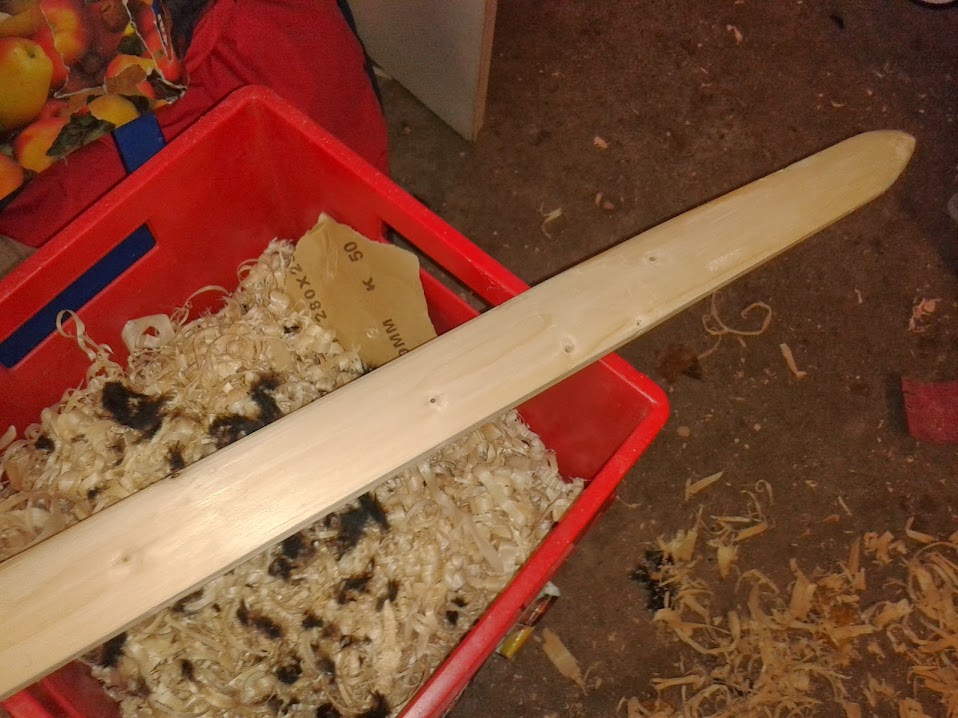
We start by marking the blade-shape on the piece of spruce board

And instantly the first mistakes.. or rather things that I would do differently if I were to start again (which I hopefully won't have to).
Spruce is really, really terrible wood for making a scabbard. It is full of knots, pretty weak (which makes planing the scabbard down a bit of a gamble) and has a tendency to include pockets of sap which is not something I want on my sword. But it is also dirt cheap and easy to work (apart from the blasted knots) so I'm not regretting using it but I wouldn't do so again.
Also it would have been smart to cut out the overall outside shape of the scabbard now so it is identical on both sides.
Meh, live and learn.
Now comes the fun part, drilling out the core.

As I don't have a router and don't feel competent enough with the chisel to get an even inside (which in term would make it harder to plane down from the outside, as you never now quite sure when you are going to break through) I tried something else.
Using a 2cm Forstner bit and a drillpress that gives me a pretty even core. It doesn't exactly match the taper of the blade nor does it match the crosssection of it, but it works out fine overall.
I'm going to skip some pictures here because.. well they all look the same and just show different parts of the boards with the holes in them.

Now this is after smoothing out the shape using a rasp drill bit, that also worked out fine and while the shape isn't perfect, the fur inside is going to make up for any issues there and is going to ensure a very tight fit, but more on that later.
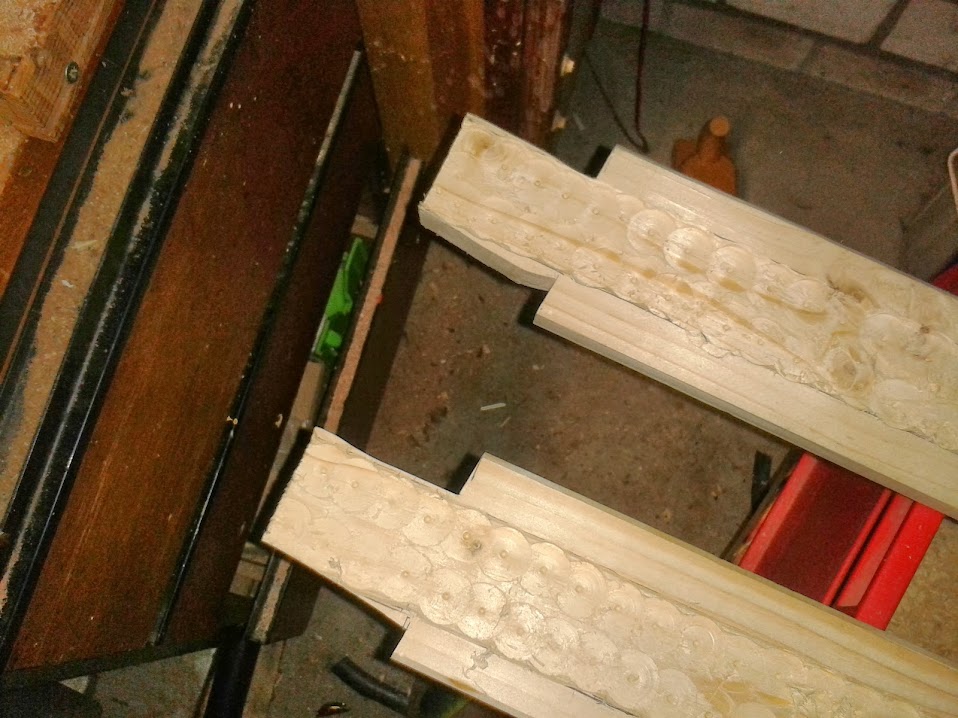
After cutting the wood down to fit inside the guard of the sword - turns out I have no idea how to use a scrollsaw correctly or with any skill, but that can all be smoothed out with a rasp and some ellbow-grease.
I don't have any pictures of dry-fitting the blade without fur, nor any of the fur pinned into place and fitting the blade so the next step is glueing in the fur.
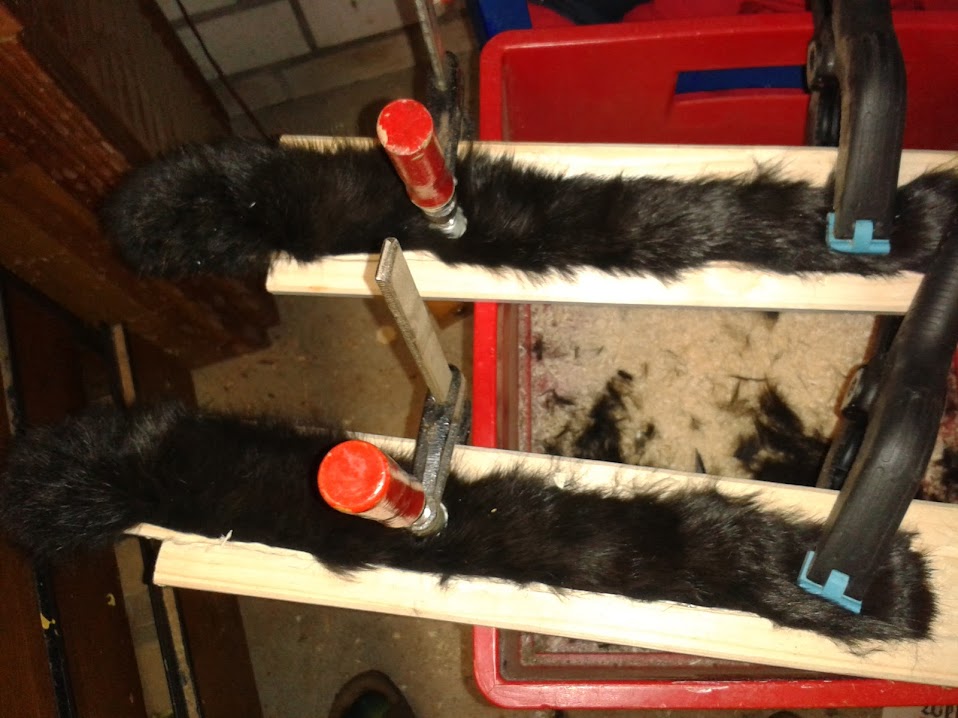
As you can see the fur is pretty long. Nice pretty rabbit fur. Or hare. one of those furry little critter things. The fur might not look perfect for the task but the long fur has a couple of advantages.
First of all it gives over time, I noticed that on my messer scabbard. While the fit might be insanely snug at first, after a while the fur is matted down and the fit becomes much more reasonable while still holding tight.
Also, as the fuller on the sword is pretty deep, the thick fur should hold on there pretty well.
And testing the fit after the fur has been glued in but before glueing the boards together. See those spring clamps? Yeah that is going to cause some trouble later. A lot of trouble.
Turns out those clamps are not strong enough to withstand the pressure of a blade pushing into the scabbard. So a snug fit with those clamps means no fit with glue. Yep, the sword didn't fit after gluing up the boards.
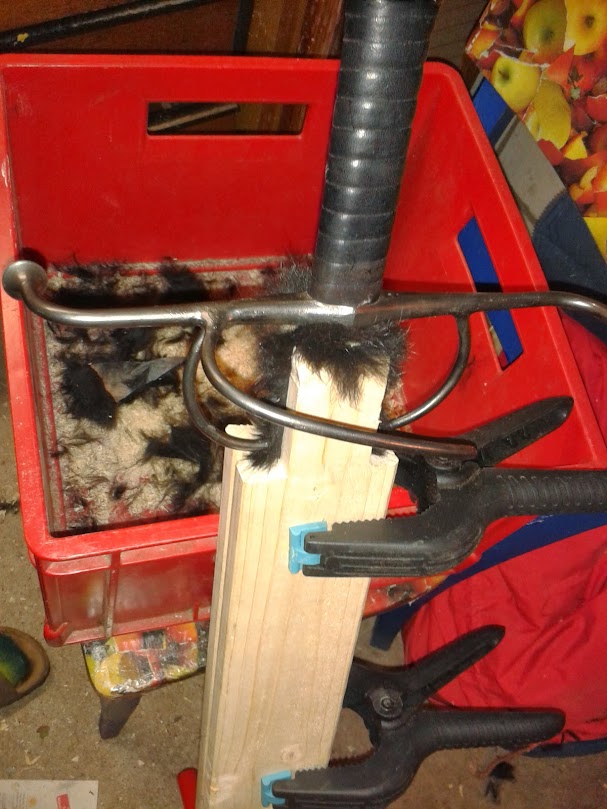
I decided to finish the wood core before trying to mutilate that fur into allowing the sword to enter - somehow that sounds wrong - and cut down the outside shape of the scabbard.

Not really precise and not really fancy but as you saw before, the scrollsaw isn't my friend anyway so this is just a rough cut that will be worked down by hand later.
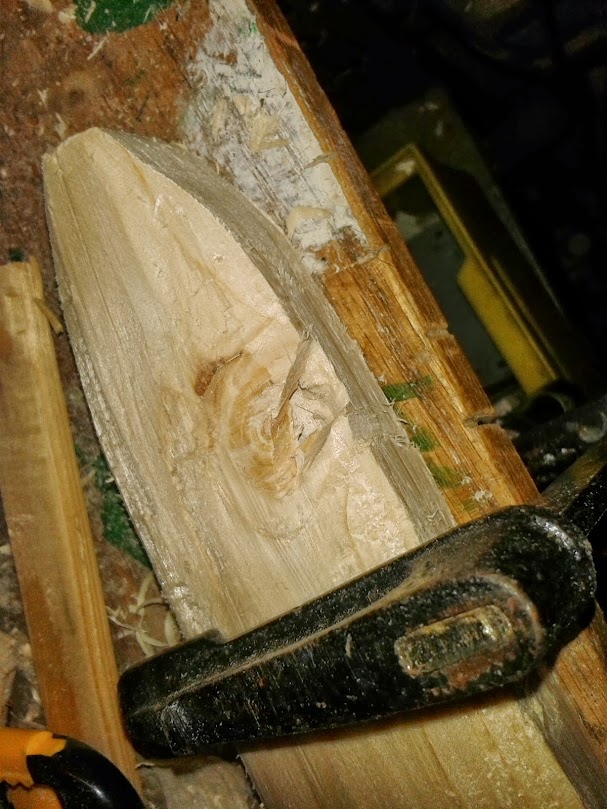
This is why spruce is bad. Trying to force the plane over a knot in the wood is a terrible idea and this is what it gave me - not the best of photographs, I know. But the whole where the knot broke is pretty clear.
On the plus side, now I have a gauge for checking how thick my wall strength is on the tip. Swings and roundabouts.
After a lot of planing and sanding we are finally getting somewhere, doesn't look half bad now, does it?

Still a bit wonky and far from even thickness on both sides. The thicker top has a knot right on the end, that's always fun to work around and even the final version of the core is a little thicker on top. I try and see the positive in it, that tells me which way around the sword should go in.
And yes, the sword does go in. But it took me hours of scraping out chunks of fur with a makeshift hook to finally manage a fit. I'm very glad the fur only goes down about one third of the scabbard and was very close to breaking it open again to rework the inside.
Now the fit is very much what you'd expect from such an ordeal, the first try left me feeling like King Arthur with Merlins Sword. After about a week of leaving the sword in there and occasionally pulling it out and putting it back in again the fur has already started to give and it is much easier to get the sword in and out now.
But it is still a very, very snug fit which makes me doubt that this sword will ever be drawn from the hip.

Now today my leather arrived so I've glued on the risers already and have started attaching the leather, which is what I'll continue to do now.

I'm not too sure about the riser spacing, it feels a little off but I tested the position of the knots beforehand and by my calculations the spacing should be fine for them as well.
If shipping on the belt fittings and the leather paint - I really can't be bothered to try my hand at actually dyeing it properly so I'm going the easy&cheap way, we'll see how that pans out - is on time I should have those things tomorrow and might manage to finish the project by the end of the week.
Overall it has been fun so far - for the most part - with the occasional frustrating moment. I had much less problems planing it down, after the hard time the messer scabbard gave me, I expected that to take much longer and be even more work than it turned out to be.
Not sure if anyone made it though this wall of text, but I hope this insight was somewhat entertaining to read. And who knows, it might even show someone starting out what not to do in such a project 
Europe - Where the History comes from. - Eddie Izzard
|
|
    |
 |
Terry Thompson

Location: Suburbs of Wash D.C. Joined: 17 Sep 2010
Posts: 165
|
| Posted: Tue 22 Oct, 2013 4:42 am Post subject: |
|
|
I'm not at all versed in this style of sword or scabbard, and don't take this as a negative in any way. I think you're doing a fantastic job with the tools at hand. But, hollowing out a wood core tends to appear, I believe, mostly on earlier medieval period swords. And it would be a much easier task if you had the right tools to do it. As you've noticed, getting both sides to taper appropriately is tricky bit of skill. On the inside, a shaped convex bitted rabbit plane would have made short work of the inside.
Now, it might also be appropriate for the geographic location and period of this sword to make a hollowed-out core, but I know more than a few are created with the layered plywoods. And the thin veneer type of construction is much less a labor to fabricate. I've made about a dozen. The core can be made in about 2 day's time (most of that is just waiting for wood and glue to dry). In the curved slat method, you're actually removing a lot less material. Mostly just rolling over the edges and some over-all thinning if you used a thick (3/16" or thicker slat).
|
|
|
|
|
Marik C.S.
|
| Posted: Tue 22 Oct, 2013 5:00 am Post subject: |
|
|
Thanks for your input, I thought about layering plywood, I also thought about using 6 thin triangles of wood to make a hexagonal cone that matches the sword profile in both crosssection and taper perfectly.
I really like the hexagonal shape of the blade on the sword and had originally planned to mirror that shape on the outside of the scabbard - which would have meant cutting down the gluelines to almost nothing if I did use layers of wood, at least I think so.
A half-round plane would have been awesome, but I couldn't find one anywhere nearby and for such a one time project - I'm unlikely to build another scabbard soon unless this one breaks or I get a new sword - I really couldn't get myself to ordering one online.
The core could took me about 2,5 days or so, with a lot of time of me taking breaks to let the glue set - or stop myself from throwing the plane against the next wall.
And at the end of the day this one is really more about looks and function rather than authenticity. Most of what I looked up about scabbards was at best about 15th century ones, 16th century complex hilted swords and scabbards surely are a topic of their own but before I make something with the intention of being true to history, getting the feel of the work right felt like a good idea.
I'm glad you like how it turned out, I'm really not a woodworker at all so this one is a first in a lot of ways.
Europe - Where the History comes from. - Eddie Izzard
|
|
|
|
|
Terry Thompson
Location: Suburbs of Wash D.C. Joined: 17 Sep 2010
Posts: 165
|
| Posted: Tue 22 Oct, 2013 5:23 am Post subject: |
|
|
Yes. I think it looks great so far. But getting it thin enough to look correct with leather on top, while at the same time trying to keep the symmetry is the laborious part. That's even with the right tools. I realize that most of us don't have access to custom planes, but I was just pointing out that, it is what they probably would have used originally on a hollowed-out core.
Most of us (myself included) tend to over estimate how thick the scabbard walls should be initially. 3/16" seems really thin in slat form, Until you cover it in leather, and then you think "Wow! That is way thick!. I should have planed that down some more." My 1/8" thick core scabbards seem extremely thick now and I feel like they should be sanded thinner.
I did my Albion Vigil in 1/16" slats, with very minimal light sanding to take down the lifted grain and it looks spot on.
-Terry
|
|
|
|
|
Daniel Wallace

Location: Pennsylvania USA Joined: 07 Aug 2011
Posts: 580
|
| Posted: Tue 22 Oct, 2013 7:33 am Post subject: |
|
|
maybe if you attempt another - go with poplar. its usually pretty easy to find, easy to carve in the fact that i think its soft, and give a chisel a try. once you get the feel for the wood, and pay attention to grain patterns, its not too difficult. the only problem is with softer woods is that you may take off too much at one time. a way to avoid that though is to use the chisel with the angle down and running the bevel of the chisel against the wood, this will make a scoop like cut, turn the chisel over with the bevel up, with a good hand you can use this to level, but more of less using a chisel this way, really digs into the material and instead of scooping, it will break out an entire section in soft woods.
other woods - maple is excellent it is sometimes extremely hard, but so nice to carve.
even though its almost impossible these days to find wood without a knot in the middle of it, they are best avoided. they carve out more like dense stone and with spruce will be full of sap at times.
using a scroll saw is somewhat tough at times, the blade will want to 'walk' in one direction or the other. the same thing happens with ban saws. a jig saw works great because of the tight turns you can make for corrections but they usually aren't made big enough for sword scabbards. i used to cut as much as i can on the jig saw, and finish with a scroll.
|
|
|
|
|
Dean F. Marino

Location: Midland MI USA Joined: 24 Aug 2011
Posts: 229
|
| Posted: Tue 22 Oct, 2013 2:14 pm Post subject: |
|
|
This may, or may not, be of value to you.... In any case, it's totally free  . If it can help in any way? Glassen ( "I have been pleased")... . If it can help in any way? Glassen ( "I have been pleased")...
http://findlithui.deanandsandy.dyndns.org:808...ter1.2.pdf
"Make a Poplar Scabbard Core with a Router" (pdf file, relating my own poor experience in crafting about eight cores).
In edhil, hai edhil. In edain, hai edain.
|
|
|
|
|
Marik C.S.
|
| Posted: Thu 24 Oct, 2013 5:18 am Post subject: |
|
|
Sorry for not getting back to this sooner, but I wanted to finish the scabbard before training tonight to show it off, so I was sort of engrossed in the work.
I think if I make another one, it will be entirely hand-crafted. I feel like hand-tools give me more control over the work - though they are by far less precise in their results, which is mainly up to poor skill and virtually no planning.
"Let's work on this spot now and see how it goes" is a fun and relatively quick way of working, but it doesn't yield the best results if the spot you are working on decides to throw a spanner in your works.
So where were we?

After the risers I started attaching the leather, now it won't win any beauty contests (the seam in particular is a hideous mess) but the front is pretty smooth and looks quite good I think

First test with the straps and.. well looks didn't deceive me, the risers aren't spaced properly. Also a little small, especially with those thick straps. I didn't account for the fact that the straps will never sit perfectly flush next to each other and would have minor gaps between them, that and the thickness of the leather threw off my spacing by quite a large margin.
Result? I only use the top riser, the lower one on each pair gets covered by the strap.
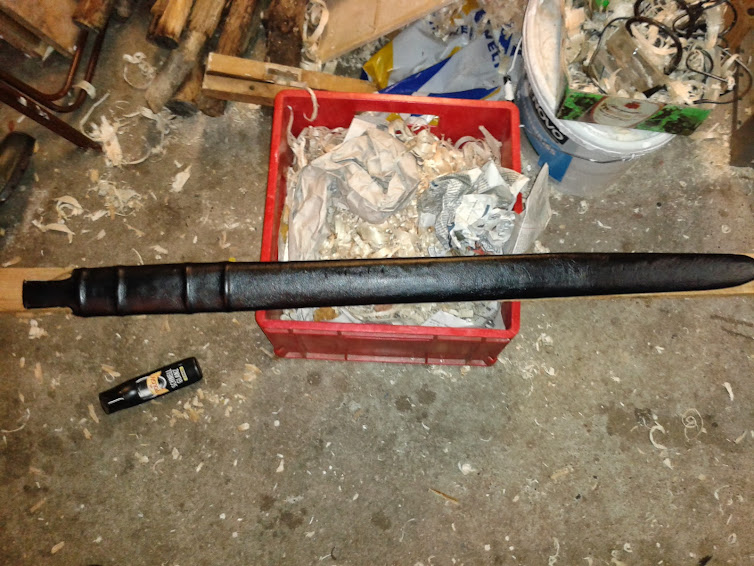
Painting the leather turned out really well (and managed to hide a bit of the mess that is the seam) and the colour is pretty neat.

And there we are, finished belt and hooks and buckles. The riveting on the buckles is a little off - somehow those turned out far worse than the hooks, might be due to the buckleplates moving on the leather or something like that - and the strap-cutting on the belt is pretty wonky, I might clean that off some more at a later date. As you can see the leather between the risers has a bit of give to it, or rather looks to have. It is pretty snug and not loose at all, but I used too much glue on that spot and left a dent in it I'm afraid. Though in retrospect as I look at these pictures, it would have been an opportunity to tie some string around it to mirror the wrap on the grip.
But for the most part I'm really happy with it.
It is a fairly massive scabbard and far more so than I had initially hoped it would turn out to be but overall it comes together nicely. The bulky scabbard goes great with the thick straps - and I really like the colour combination of black&brown - and at the end of the day the sword isn't exactly dainty either so it isn't too bad together.
Plus the thick straps&knots help in getting some purchase on the scabbard to pull out the sword, it is still a very, very tight fit. 
And of course the whole belt setup works, it wears very well and that's what counts.
What's left to do? Well some minor tweaks on the belt couldn't hurt and I'm not perfectly happy with the attachment of the leather around the mouth of the scabbard and I need to get a chape for the sword.
I'd like to make my own - mainly cause I'm cheap and the parts for this were expensive enough - and I'd like it to be in (mild) steel to match the hilt furniture of the sword - so you get Black+steel on the scabbard and brown+brass on the belt&straps - but that is something for another day.
In the end nearly none of this turned out as I'd hoped or planned but somehow most of these failures either present themselves to be taken as an opportunity or as a way to improve and I like what has come out of it.
Europe - Where the History comes from. - Eddie Izzard
|
|
|
|
|
Dean F. Marino
Location: Midland MI USA Joined: 24 Aug 2011
Posts: 229
|
|
|
|
|
Marik C.S.
|
| Posted: Thu 24 Oct, 2013 1:43 pm Post subject: |
|
|
That helps, and how. Great tutorial.
I wish I had this - or thought to look something similar up online - half a week ago. But yeah, I like to glue first and ask questions later.
Europe - Where the History comes from. - Eddie Izzard
|
|
|
|
|
|
Foong Chen Hong
|
| Posted: Fri 25 Oct, 2013 3:05 am Post subject: |
|
|
I actually didn't expect Regenyei would make some beautiful sharp sword, I though he can only make great training sword.
I had plan to order one from him, I just need to register a permit for importing it and gather enough money.
Descanse En Paz
|
|
 |
|
Marik C.S.
|
| Posted: Fri 25 Oct, 2013 3:21 am Post subject: |
|
|
That sword is not a sharp one, it is a very nice blunt - though the edge thickness makes it look almost sharp, in particular around the point.
Europe - Where the History comes from. - Eddie Izzard
|
|
|
|
|
Greg E

|
| Posted: Sun 27 Oct, 2013 4:19 pm Post subject: |
|
|
Just made my second scabbard core using Dean F. Marino's method. This one is for an Albion Squire Line Vinland.
 
|
|
|
|
|
Dean F. Marino
Location: Midland MI USA Joined: 24 Aug 2011
Posts: 229
|
| Posted: Sun 27 Oct, 2013 7:43 pm Post subject: |
|
|
| Greg E wrote: | Just made my second scabbard core using Dean F. Marino's method. This one is for an Albion Squire Line Vinland.
|
VERY nice Greg E... gotta ask: how did your blade fit come out? Will you be leather wrapping this one?
In edhil, hai edhil. In edain, hai edain.
|
|
|
|
|
Greg E
|
| Posted: Mon 28 Oct, 2013 7:51 pm Post subject: |
|
|
Blade fit is good. Even though my router had a problem keeping the depth that I set for it. So that made for some interesting fitting. Glad that a couple places were spot on and have a bit of hold to the blade. Won't come out if turned upside down. It will if given a hard shake though.
As for wrapping it I am not sure. Having a hard time finding good leather for it. AND my wife is a vegetarian so that makes it questionable. Was thinking of staining it or using faux leather, but would like it leather wrapped.
How does one fit and attach chapes and other scabbard fittings onto the scabbard?
|
|
|
|
|
Dean F. Marino
Location: Midland MI USA Joined: 24 Aug 2011
Posts: 229
|
| Posted: Tue 29 Oct, 2013 3:55 am Post subject: |
|
|
| Greg E wrote: | | ....How does one fit and attach chapes and other scabbard fittings onto the scabbard? |
Don't know about others - I use good 5 minute Epoxy. Just have to remember to put the Epoxy on the inside of the CHAPE, not on the leather. That's so when you push it onto the tip, Epoxy is forced DOWN toward the metal, not UP & over the chape lips.
In edhil, hai edhil. In edain, hai edain.
|
|
|
|
|
|
|
You cannot post new topics in this forum
You cannot reply to topics in this forum
You cannot edit your posts in this forum
You cannot delete your posts in this forum
You cannot vote in polls in this forum
You cannot attach files in this forum
You can download files in this forum
|
All contents © Copyright 2003-2026 myArmoury.com — All rights reserved
Discussion forums powered by phpBB © The phpBB Group
Switch to the Basic Low-bandwidth Version of the forum
|


