| Author |
Message |
Kai Lawson

|
 Posted: Fri 15 Mar, 2013 12:08 pm Post subject: Hilting Horror Posted: Fri 15 Mar, 2013 12:08 pm Post subject: Hilting Horror |
 |
|
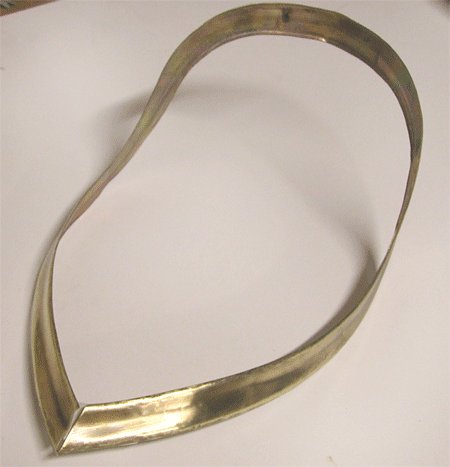
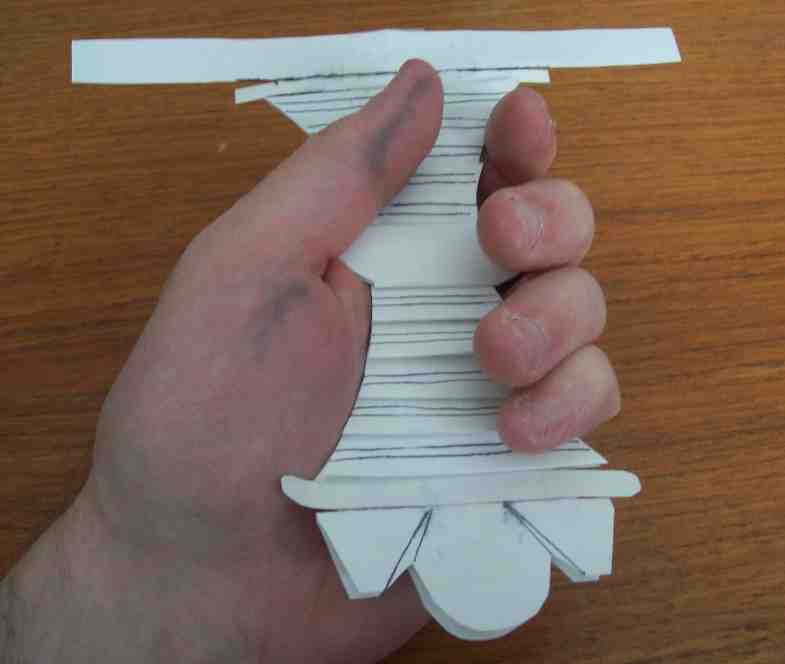
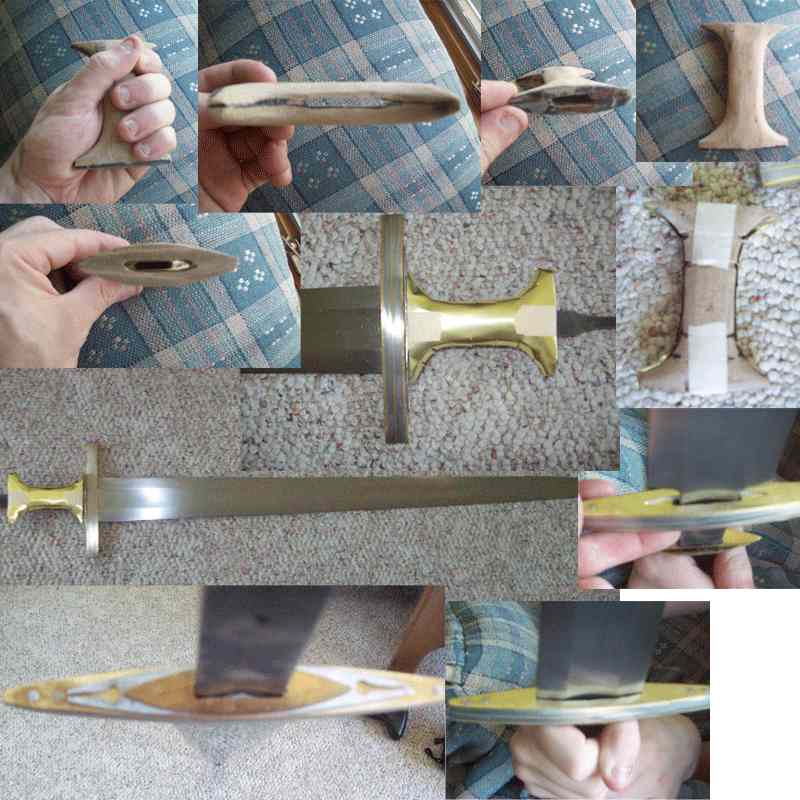
I've never done anything like this before, but I've decided to try my hand at hilting up a blade. I bought an Albion Second blade off a forum member here, and have yet to do anything to it. My initial hilt designs I abandoned slowly, as I could never really see them being pulled off well by myself. As of late, I have been a part of the crowd bit by the 'Migration-era Bug', and decided to check out some earlier hilt styles, as I find them beautiful and fascinating. I then began to play around with the idea of an 'Adventure Sword' (I recently started playing multiple Legend of Zelda games again) and I decided that I wanted a usable sword with a fantasy/historical merger. The paper mock-up is the initial design. A thin (sideways) metal cross-guard with a wasp-waisted grip, and a metallic pommel, taken from a carved South african tribal knife. The waisted grip is clearly based off of the metallic Kragehul/Nydam sword hilts, but will be done in overlapping metal strips, with the edges providing a pleasant 'scale' grip (after they have been sanded a bit). The drawn lines represent a bulged line in the metal strips--like a hammered-in riser.
I plan on adding a decent bit of mass to the hilt, as I have no issue swinging a 3lb-ish sword for a long while, but would like to have something a bit faster feeling (gotta have good recovery swings against monsters  ). ).
The result is something that is a historical nightmare, but seems like it would feel good in-hand, and be quick, sharp and relatively stiff blade to kill foes with, while not being too long or heavy for dungeon-style combat. The blade is a Geibig 4, with a slightly overground profile, which I take to mean narrower, not thinner. It does seem a little bit stiffer than Albion's other Geibig type 4s, which aren't too 'bendy' to begin with. I may change the design as time goes on; it is rather odd-looking...
 Attachment: 25.73 KB Attachment: 25.73 KB
Attachment: 30.29 KB
[ Download ]
Attachment: 40.37 KB
[ Download ]
Attachment: 28 KB
[ Download ]
Attachment: 24.73 KB
[ Download ]
"And they crossed swords."
--William Goldman, alias S. Morgenstern
|
|
  |
 |
Luka Borscak

|
| Posted: Sat 16 Mar, 2013 4:53 am Post subject: |
|
|
It doesn't look bad but I would shorten the cross a bit. 
|
|
|
|
|
|
Joel Minturn
|
| Posted: Sat 16 Mar, 2013 7:20 am Post subject: |
|
|
Looks cool.
Over all I like the look. I assume the crossguard will be shaped in the 3 dimensions so it goes with the rest of the hilt.
So the cross guard might look cool if it had thinner tips than the middle. Giving it a lenticular look when viewed from above. I don't think it would have to be super extreme but enough to flow from the rest of the handle. I hope I'm explaining it well.
But can't wait to see the final product as the initial mockup has potential.
|
|
|
|
|
David Lewis Smith

|
|
 |
|
Kai Lawson
|
| Posted: Sat 16 Mar, 2013 11:37 am Post subject: |
|
|
I would personally prefer a thinner cross, like a type 1. Additionally, a thinner central profile and more elegant waisting would look better, I think. However, the tang is literally as wide as the central waisting, and so I am somewhat stymied there, as I don't really want to remove material from the tang. As for the cross, I played around with a wider, thinner style, and a shorter, thicker baltic-esque style. I'm still not sure exactly what I want to do with it yet.
"And they crossed swords."
--William Goldman, alias S. Morgenstern
|
|
|
|
|
|
Greg Ballantyne
|
| Posted: Mon 25 Mar, 2013 12:48 pm Post subject: |
|
|
|
I like the looks of it. Of course I'm a little biased, that is my favorite blade type/profile. Perhaps as Luka suggested a slightly smaller cross, but at the same time method of construction will enter in if the project gets past the paper stage...if you go for sandwiched material construction like a migration era weapon that will likely drive the shapes somewhat.
|
|
|
|
|
Kai Lawson
|
| Posted: Fri 17 May, 2013 3:40 pm Post subject: |
|
|
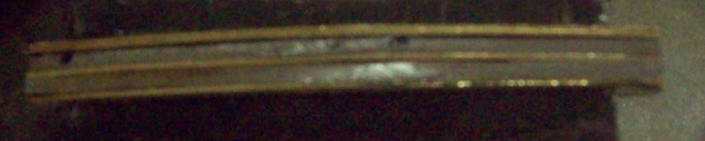
Finally got something of an update--had to scrap first design and construction methods partway through. Then school and finals and my job got in the way, and I just had a few hours free time this week to work. New guard is setting up with glue now. I put it between two steel plates and pieces of paper in the vice, and beat the handle/twisty part closed with a hammer. It's in there tightly. Checked with a flashlight underneath the piece before and after gluing to check for light slits--none showed up.
Turns out, epoxy is a fiddly beast--and sticky like you won't believe. Those ether bonds won't let go for nothin'.
Attachment: 159.3 KB
Attachment: 166.09 KB

Full length
Attachment: 218.59 KB
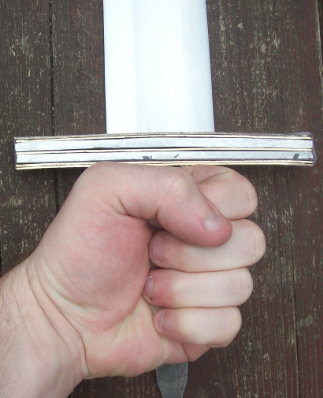
'In hand'
"And they crossed swords."
--William Goldman, alias S. Morgenstern
|
|
|
|
|
Daniel Wallace

Location: Pennsylvania USA Joined: 07 Aug 2011
Posts: 580
|
| Posted: Sat 18 May, 2013 8:27 am Post subject: |
|
|
I've had to scrap ideas tons of times. turns out that some ideas work well when you have the correct tools to make them work. but nothing beats the feeling of making something your own.
your getting to a spot that i usually hate though. punching the upper guard of pummel. i don't know what tools you have available to you but no matter what i use, i always hate that part. I've honestly though about just hot punch and drifting guards just so i wouldn't have to deal with a drill bit walking all over the place or slipping out of place. but if you have a some kind of mill, that would work best.
|
|
|
|
|
|
Mark Moore
|
| Posted: Sat 18 May, 2013 10:30 am Post subject: |
|
|
I'm likin' what I see, man! The sandwich guard looks great so far. Don't ever be discouraged...we only earn from our mistakes. I , personally, like the longish guard on a 'Viking-inspired' sword. I'm sure it will be a wild lookin' beast when you're done with it! I have a pieced-together wallhanger in my living room right now with a 5-lobe Viking pommel, quatrefoil Claymore guard, and an OLD Toledo-made blade that I love! Don't be afraid to mix it up....It's your sword.  ......McM ......McM
|
|
|
|
|
Kai Lawson
|
| Posted: Sat 18 May, 2013 12:50 pm Post subject: |
|
|
I'm seeing how this goes--it's an organic process that sort of materializes/evolves on me as I go. I plan on using the hole drilled in the center (not visible above) and using a jeweler's saw to cut out a rectangle. I'll then fill to fit and add the top brass plate with the blade cut-out to the guard and stick it all together. I was nervous about the guard being heavy, but with the rough-shaped plates as is, the POB is about 7-8'' out from the blade shoulders. I can add some more weight and it should be fine
"And they crossed swords."
--William Goldman, alias S. Morgenstern
|
|
|
|
|
Kai Lawson
|
| Posted: Wed 26 Jun, 2013 12:05 pm Post subject: |
|
|
So I'm a little stuck. I have fiddled with tape stencils, ideas, drawings, and all manner of metal types, but I cannot seem to make the sheet metal cover the grip as I want. I had piddled with using metal piping and flaring it out to the shape I desired, but I couldn't get that to work cleanly, so I went back to my carved wooden grip. I have cut crude insets for wire risers, but can't even seem to get a clean metallic covering to take shape, much less show features underneath. Any suggestions?
Attachment: 60.78 KB
"And they crossed swords."
--William Goldman, alias S. Morgenstern
|
|
|
|
|
Daniel Wallace
Location: Pennsylvania USA Joined: 07 Aug 2011
Posts: 580
|
| Posted: Thu 27 Jun, 2013 7:37 am Post subject: |
|
|
yeah what your attempting there is a really tricky piece to work with due to its shape. those big curves, in order to get them to fit flush, you would have to resort to a lot of stretching and possibly shrinking on the metal to get a good fit clear around the grip. then if you'd want that to look seem less, (if your choosing brass) brazen them together, a really ugly task.
now it takes a good bit of skill, and if you want to give it an attempt, try it, but don't pull your hair out - because this shaping will be pretty tough to do but I'll break it down for you the best way i would try it.
-start out with the rough shape cut out, and make it very 'proud' or over sized, the metal you stretch out you can cut off later and will have to.
-take a ball peen hammer clamp it in a vise the the peen up. get yourself a light hammer (preferable 1lb or less that has a cross peen on it but if you don't have one another small peen hammer will do.)
-place your metal on the peen, work from the beginning of the curve from inner most point you want the edge to curve
-if your using thin sheets of brass/bronze that's shown here, using your other hammer use light hammering actions. brass will move without a lot of thwack, but cheap brass has a tenancy to crack when being worked. and the metal will begin to dome over and follow the peen of the ball peen hammer.
-when you begin to work on the top and bottom where those big curvatures are, use the same process, but you may have to make a few relief cuts in the metal into the curve. this would prevent the metal from making a wrinkle or begin to fold on itself.
-to get the look of the risers underneath, get a small chisel (not a wood chisel) and simply punch out the lines you want for the risers until they become the desired height and with.
try it, my method may not be the best for what your attempting i would say that steel would be better to use due to the availability of bronze (bronze will shape much better than either steel of brass)
|
|
|
|
|
Sean Flynt

|
|
 |
|
Kai Lawson
|
| Posted: Thu 27 Jun, 2013 12:26 pm Post subject: |
|
|
The sheet is 36 or 38 gauge or some such; scrapbook embossing metal. It's honestly an ugly yellow-green brass, but shaped and sanded I think it might contrast OK with the red brass I already have.
How would people suggest I anneal the metal? I have access to open flames (i.e. fire pit) and could put it in the oven, but I don't really have a torch or much stronger than the above. I'd love to shape it from a block of metal, but I don't have the tools to do it efficiently or the patience to worry away a solid chunk.
"And they crossed swords."
--William Goldman, alias S. Morgenstern
|
|
|
|
|
Daniel Wallace
Location: Pennsylvania USA Joined: 07 Aug 2011
Posts: 580
|
| Posted: Fri 28 Jun, 2013 8:25 am Post subject: |
|
|
with metal that thin it won't take much heat to anneal it. I'm not sure how brass works I'm more familiar with steel and its annealing process. if you had a plumber's propane torch that would be quick to heat it up. but actually for how thin this metal is an oven may work best as you'll have the ability to control the temp.
the metal your describing is Brass, your red brass you refer to is phosphoric bronze, this bronze is commonly refereed to as brass. the difference between brass and bronze alloys is zinc - a nasty crummy metal in my opinion.
brass = copper + tin + zinc (in the current era)
bronze = copper +tin (and other additives such as silicon, phosphorous) the term brass was interchangeable for the alloys until the industrial age.
last time i bough a brass rod and heated it, it actually crumbled, did not melt, did not become non metallic, just crumbled, so hopefully someone here can illustrate how to heat brass for you a little better than myself.
|
|
|
|
|
Sean Flynt
|
|
|
|
|
Kai Lawson
|
| Posted: Tue 22 Oct, 2013 12:29 pm Post subject: |
|
|
Update: I'm only working on this when I feel like it, and that's only when I'm not in class, at work, or studying, but some small progress has been made. The upper guard laminate has been peened and drilled, and almost fits on the tang to where I want it. Naturally I then decided to add a metal spacer (or upper guard, lower half). I still need to sand down and wire wrap the grip, and cut down the tang and peen it after adding the last brass plate, which will hopefully have curving, horn like pieces meeting in the middle and curling outward. I'm slowly warming up to the appearance of this sword; but it sure does feel good in the hand
Attachment: 215.94 KB
[ Download ]
Attachment: 226.58 KB
The dots mark out where silver dots will be inlayed [ Download ]
"And they crossed swords."
--William Goldman, alias S. Morgenstern
|
|
|
|
|
Daniel Wallace
Location: Pennsylvania USA Joined: 07 Aug 2011
Posts: 580
|
| Posted: Wed 23 Oct, 2013 8:08 am Post subject: |
|
|
|
its overall shape is looking good.
|
|
|
|
|
Kai Lawson
|
| Posted: Fri 15 Nov, 2013 2:07 pm Post subject: |
|
|
Getting closer: gotta etch the blade and need to do a a final shaping/finish pass over all the metal bits to get them to line up just right, and then peen it, cap it and wire-wrap the grip. The weird metal bit is for a riser with a sheet metal base and red glass inlay. Almost there...
Attachment: 110.84 KB
[ Download ]
Attachment: 191.3 KB
[ Download ]
Attachment: 162.78 KB
[ Download ]
"And they crossed swords."
--William Goldman, alias S. Morgenstern
|
|
|
|
|
|
Mark Moore
|
| Posted: Fri 15 Nov, 2013 3:44 pm Post subject: |
|
|
|
You've surely taken the term 'full-tang' all the way home. That's lookin' great, brother!............Two thumbs up............McM
|
|
|
|
|
|
|