Info Favorites Register Log in
myArmoury.com Discussion Forums

Forum index Memberlist Usergroups Spotlight Topics Search


myArmoury.com is now completely member-supported. Please contribute to our efforts with a donation. Your donations will go towards updating our site, modernizing it, and keeping it viable long-term.
Last 10 Donors: Daniel Sullivan, Anonymous, Chad Arnow, Jonathan Dean, M. Oroszlany, Sam Arwas, Barry C. Hutchins, Dan Kary, Oskar Gessler, Dave Tonge (View All Donors)

Forum Index > Historical Arms Talk > DIY: BauerwehrDIY Project Reply to topic
This is a standard topic  
Author Message
Radovan Geist


Location: Slovakia
Joined: 19 Aug 2010
Likes: 5 pages

Posts: 399

PostPosted: Thu 13 Jun, 2013 11:02 pm    Post subject: DIY: Bauerwehr         Reply with quote

I have started a project that I had in mind already for some time - a bauerwehr from around the turn of 16th/17th century. I plan to use it in re-enactment, so it will be blunt weapon, not very much decorated.
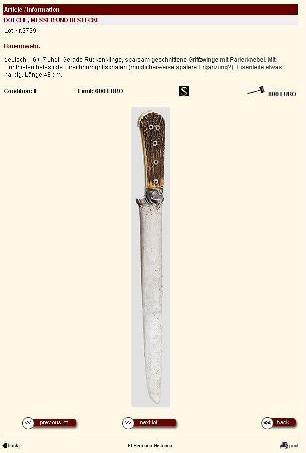
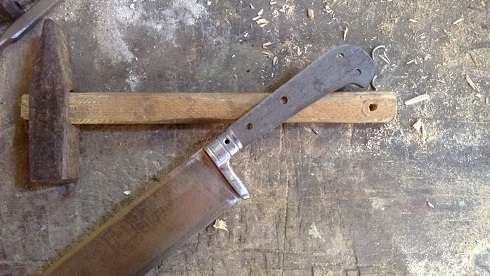
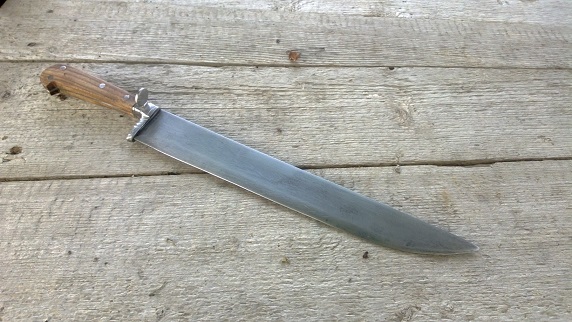
I took my inspiration from the original auctioned some time back at HH, but I decided to go for a wider blade. Originally I planned to use bronze or brass on the hilt, but I did not find any historic evidence for that (it had been discussed elsewhere on this forum), so I went for a mild steel. The original piece has its handle made of antler, but the description says it might be a later replacement. I will use some hard-wood - an elm or plum.
1st picture: the original.
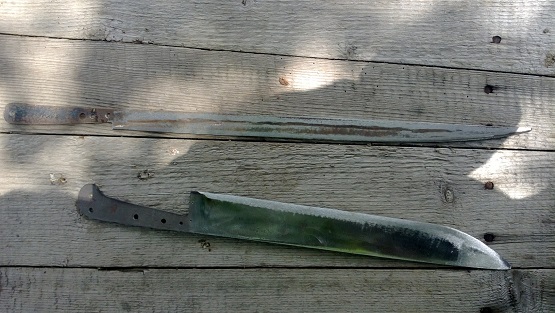
2nd: blade cut from the spring steel (N 14260) and roughly shaped by angle grinder (together with another one, for a different later project), with holes drilled for riveting the hilt components and the nagel. Later I have re-profiled the blade a little, making it more narrow to the point, but did not take picture of that.
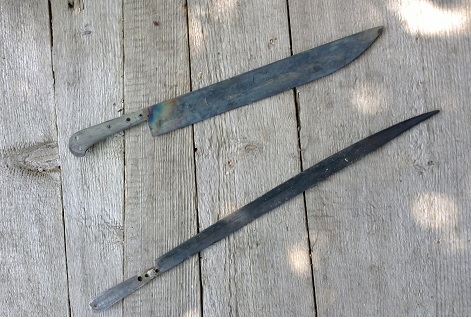
3rd: blades were hardened and quenched.
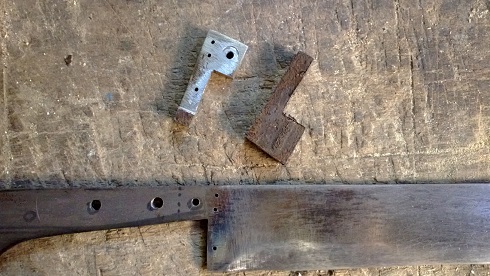
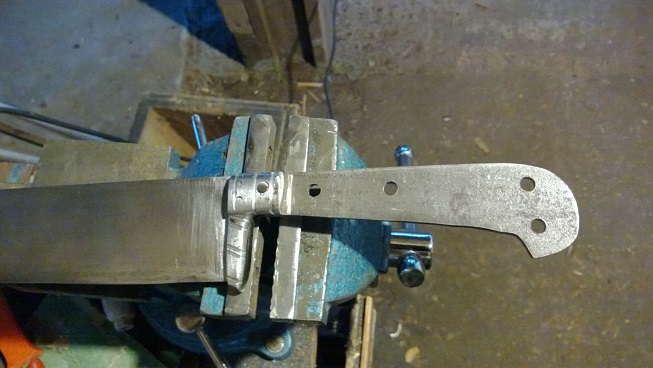
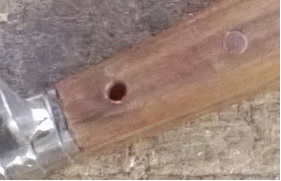
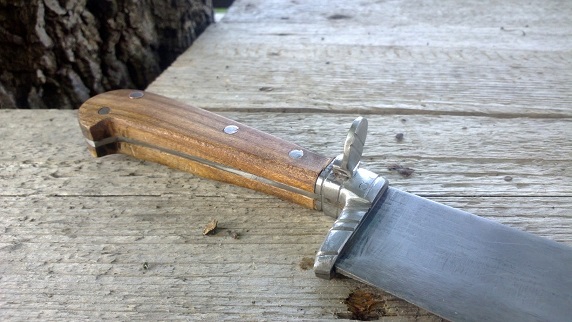
4th: I started making steel components for the hilt. it will be made from two halves riveted ant three points, plus secured by the nagel. Here you can see the first half with a recess already made, to accommodate the blade. another half is only cut from a piece of steel. Both were then shaped to match each other, and the blade, and riveted.
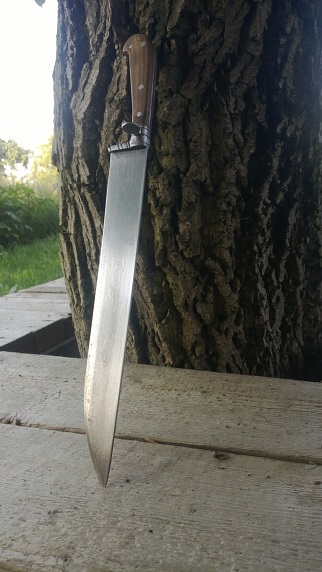
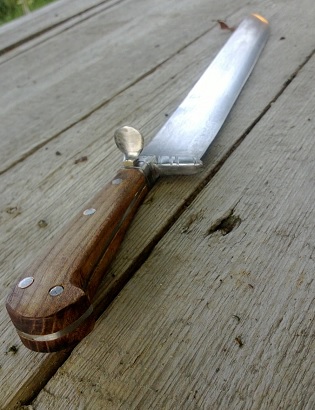
5th: they were riveted to the blade. then I have shaped them with grinder and hand files to the final shape (I can still do some re-shaping at the end, when I assemble the whole hilt), and cleaned by a sand-paper.

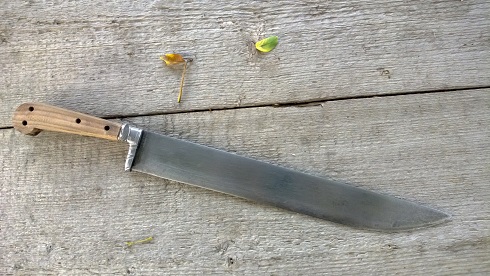
next steps: nagel, wood scales, cleaning and polishing.

I will be grateful for any comments, advices.


 Attachment: 13.97 KB
bauerwehr-german-small.jpeg


 Attachment: 99.13 KB
DIY-bauerwehr1.jpg


 Attachment: 76.44 KB
DIY-bauerwehr2.jpg


 Attachment: 90.8 KB
WP_20130613_001.jpg


 Attachment: 89.61 KB
WP_20130613_002.jpg

View user's profile Send private message
Jean Thibodeau


Location: Montreal,Quebec,Canada
Joined: 15 Mar 2004
Likes: 50 pages
Reading list: 1 book

Spotlight topics: 5
Posts: 8,310

PostPosted: Fri 14 Jun, 2013 1:49 pm    Post subject:         Reply with quote

Looking forward to see this project progress: DIY projects with progress pics is always a learning experience for the person making them and for us to see how the different parts of a project where approached from choosing materials or making due with found materials and improvising.

Even with found materials the results can be very good.

Using an angle grinder freehand is challenging to try to keep bevels clean and sharp.

Using hand tools like files can be a lot slower but it has the advantage of control as it's way too easy to make a bad pass with a hand held grinder and take off too much material at the wrong place.

You can easily give up your freedom. You have to fight hard to get it back!
View user's profile Send private message
Ken Speed


Joined: 09 Oct 2006

Posts: 656

PostPosted: Sat 15 Jun, 2013 8:59 am    Post subject:         Reply with quote

I think you've done a superb job of shaping the metal so far and I look forward to seeing more pictures as you progress.

What is that very long slender knife for?

Thanks for your picture and information, please keep us posted.
View user's profile Send private message
Radovan Geist


Location: Slovakia
Joined: 19 Aug 2010
Likes: 5 pages

Posts: 399

PostPosted: Sun 16 Jun, 2013 10:39 pm    Post subject:         Reply with quote

thank you all for your comments.
Jean: I usually cut (or grind) rough shape with angle grinder, and then clean it with files. But you are completely right - I have spoiled some smaller parts with angle grinder just because it "slipped" a bit. Patience is one of the mos challenging things here:) - at least for me.
Ken: That long blade is intended for a late-medieval bauerwehr.

Now, I have managed to spend some few more hours on the project this weekend. First, I have shaped the "nagel". It was made from a thick piece of mild-steel, using the angle grinder and files. Unfortunately, I did not take pictures of the finished piece, so I´m attaching only this very simple scheme (pic 1).

The next thing I did was putting everything together: riveting front pieces to the blade, and cold-pinning the nagel (pic2).

Next I have cut scales from a block of elm-wood and drilled holes for rivets. I have tried different ways before to ensure that the rivet-holes on tang and scales fit, but the best method seems to be:
- I have holes for rivets drilled into the tang at the beginning (usually I do it before hardening & quenching)
- I secure (glue) on of the scales on the tang, and drill holes through it - it is important to leave the scale unfinished, because you are drilling from inside-out, so you can fissure the outer part. I usually leave few millimeters of material that will be sanded out then.
- I secure (glue) the other half, and drill holes through it. Here it is important to have a firm hand, because you will be drilling from an already secured scale, and you don't want to damage it.
- then you clean-shape both scales (already attached to the blade), pin rivets, apply decoration, etc.

Well, I have managed to get up to the last step, so the last picture shown the knife with scales attached, waiting for final shaping and cleaning, then rivets, etc.


 Attachment: 13.68 KB
nagel.jpg


 Attachment: 96.37 KB
DIY-bauerwehr-4.jpg


 Attachment: 89.37 KB
DIY-bauerwehr-3.jpg

View user's profile Send private message
Radovan Geist


Location: Slovakia
Joined: 19 Aug 2010
Likes: 5 pages

Posts: 399

PostPosted: Tue 18 Jun, 2013 10:17 pm    Post subject:         Reply with quote

I have nearly finished the knife, and I will post some pictures later. But let me pose one question: Would by-knife be out of place for this kind of Bauerwehr? Or more generally - would it be out of place at the end of 16th ú beginning of 17th century? I am aware of hunting sets, with several by-knifes, fork, etc. Couple of them have been auctioned on HH, but mostly dated to second half of the 17th century, so out of my period of interest. Thank you for any advice.
View user's profile Send private message
Julien M


Location: Austin TX
Joined: 14 Sep 2005

Spotlight topics: 1
Posts: 1,086

PostPosted: Tue 18 Jun, 2013 11:43 pm    Post subject:         Reply with quote

I like this a lot! You make this look pretty straight forward really Happy

I think you could further refine a few details with files, but it looks great such as it is.

"blades were hardened and quenched" So the blade is hardened. Are you planning to temper it at some point?

What do you use to cut through a thick plate of steel such as this? Angle grinder and cutting disk?

Looking forward to see the finished piece.

J
View user's profile Send private message
Radovan Geist


Location: Slovakia
Joined: 19 Aug 2010
Likes: 5 pages

Posts: 399

PostPosted: Wed 19 Jun, 2013 12:44 am    Post subject:         Reply with quote

Julien, thanks for encouraging comments:)
Re. tempering: in fact, I should have written: it was hardened and quenched, and tempered. Sorry for this confusing omitance. In fact, I do try to temper all the blades that I´ve done, but I have to stress that it´s just very amateurish, learning by doing exercise. Here, I was trying to apply what I have learned on smaller blades (knifes) and the result is of course not perfect.
For cutting, yes I use angle grinder and a cutting disk, and then the lamellar disc for inner arcs. For this I had used 500*50*5 mm piece of spring steel, and it "cost" me nearly one cutting disc - which is not that awful, given the amount of material that needed to be cut-off. If you work slowly and don´t push much, the disc does not get worn-off so fast.
View user's profile Send private message
Radovan Geist


Location: Slovakia
Joined: 19 Aug 2010
Likes: 5 pages

Posts: 399

PostPosted: Wed 19 Jun, 2013 1:33 pm    Post subject:         Reply with quote

Here is one of the last steps: riveting the handle. I have used bi-metalic rivets, inspired by those posted in another thread in this forum. The outer layer is from a thin (0.5 mm) copper sheet, inner core from iron (cut from an old nail). Picture shows one of the rivets semi-finished, and another one finished, waiting for cleaning with files and sand paper.


 Attachment: 19.06 KB
DIY-bauerwehr-5.jpg

View user's profile Send private message
Radovan Geist


Location: Slovakia
Joined: 19 Aug 2010
Likes: 5 pages

Posts: 399

PostPosted: Wed 19 Jun, 2013 1:36 pm    Post subject:         Reply with quote

and, after final cleaning with sand paper, here are couple of pictures of the finished piece. comments and ideas are welcome.
also, let me repeat the previous question: would be a by-knife out of place with this kind of bauerwehr? thanks in advance.


 Attachment: 89.44 KB
bauerwehr-1-1.jpg


 Attachment: 54.69 KB
bauerwehr-1-2.jpg


 Attachment: 98.05 KB
bauerwehr-1-3.jpg


 Attachment: 109.26 KB
bauerwehr-1-4.jpg

View user's profile Send private message
Julien M


Location: Austin TX
Joined: 14 Sep 2005

Spotlight topics: 1
Posts: 1,086

PostPosted: Thu 20 Jun, 2013 12:08 am    Post subject:         Reply with quote

Hugely impressed with your work here. Project started on the 13th and wrapped up on the 20th? Bravo!
View user's profile Send private message
Eric W. Norenberg


Joined: 18 Jul 2008

Posts: 271

PostPosted: Thu 20 Jun, 2013 11:39 am    Post subject:         Reply with quote

Radovan, that knife is excellent! Your skills as a "hobbyist" are astounding, and you are building quite the body of work! This is one of the original bauernwehren that I have saved photos of to my Iphone, that I hope to replicate myself someday - you are setting a high mark to aim for!

I don't see any reason not to build your sheath with a by-knife, and possibly a pricker. I can't recall when the prickers kind of fall out of use but I'm pretty confident a by-knife would be appropriate. Make it as well as you did this big knife here and nobody will criticise it even if it isn't 100% period correct anyhow!

Cheers!
Eric
View user's profile Send private message
Radovan Geist


Location: Slovakia
Joined: 19 Aug 2010
Likes: 5 pages

Posts: 399

PostPosted: Thu 20 Jun, 2013 10:18 pm    Post subject:         Reply with quote

Gentlemen, thank you both. What I´ve learned from making couple of smaller eating knifes (most of them posted somewhere else on this forum) was helpful here, especially on making the handle and riveting it to the tang without spoiling it by cracking etc. Still, it would have been much-much more difficult without valuable advices and tutorials that could be found on this forum.
Julien - of course it took me more than 7 days: I´ve started researching some time in March / April. Blade was cut in April and hardened & tempered only in May (in fact, with a bunch of other blades for different projects - knifes, daggers, prickers). So it was long waiting on my work-bench, as I had other things to do around the house & garden. Then in June i started to work on iron parts for the handle. Fortunately, I did take some shots from the process, so when I posted first pictures, I could also show past steps. I´ve tried to count it, and after I had the blade cut, hardened and tempered, the rest took me some 20 work-hours.
View user's profile Send private message
Radovan Geist


Location: Slovakia
Joined: 19 Aug 2010
Likes: 5 pages

Posts: 399

PostPosted: Wed 24 Jul, 2013 4:44 am    Post subject:         Reply with quote

I´m planning a scabbard for this piece, and my question is: wooden core, or all-leather (with outer and inner layer)? I suppose "b" is the right answer, but I´d rather check with more knowledgeable people.
Also, how would it be attached to a belt? I have checked some painting and it seems that these "messer" were hanging vertically, but I have no specific information on the way they´d be attached to it. Thanks in advance for any hint.
View user's profile Send private message
Sean Flynt


Location: Birmingham, Alabama
Joined: 21 Aug 2003
Likes: 10 pages
Reading list: 13 books

Spotlight topics: 7
Posts: 5,981

PostPosted: Wed 24 Jul, 2013 7:23 am    Post subject:         Reply with quote

Congratulations on a fantastic project!

I'd vote for a double-layer scabbard with integral sheaths for byknives. If you don't want to immediately start the byknife project you could model those in balsa and use them as forms for the scabbard.

For suspension, you could do something like this, with slots cut in the back to create a channel for a thong. More shots of that scabbard are here: http://www.myArmoury.com/talk/viewtopic.php?t...ght=eating


 Attachment: 219.33 KB
tod3_101.gif


-Sean

Author of the Little Hammer novel

https://www.amazon.com/Little-Hammer-Sean-Flynt/dp/B08XN7HZ82/ref=sr_1_1?dchild=1&keywords=little+hammer+book&qid=1627482034&sr=8-1
View user's profile Send private message Visit poster's website
Sean Flynt


Location: Birmingham, Alabama
Joined: 21 Aug 2003
Likes: 10 pages
Reading list: 13 books

Spotlight topics: 7
Posts: 5,981

PostPosted: Wed 24 Jul, 2013 7:28 am    Post subject:         Reply with quote

Lots of messer suspension ideas in this thread: http://www.myArmoury.com/talk/viewtopic.php?t...r+scabbard
-Sean

Author of the Little Hammer novel

https://www.amazon.com/Little-Hammer-Sean-Flynt/dp/B08XN7HZ82/ref=sr_1_1?dchild=1&keywords=little+hammer+book&qid=1627482034&sr=8-1
View user's profile Send private message Visit poster's website
Sean Flynt


Location: Birmingham, Alabama
Joined: 21 Aug 2003
Likes: 10 pages
Reading list: 13 books

Spotlight topics: 7
Posts: 5,981

PostPosted: Wed 24 Jul, 2013 7:35 am    Post subject:         Reply with quote

If you decide to make a wooden scabbard, note that the typical German sword knot worked perfectly for the wood core scabbard of this toy short sword. That by-knife is poplar.
This piece was inspired by the short swords shown in the hand of the apostle Peter in German/Austrian depictions of the arrest of Jesus. Those are sometimes messers, sometimes short swords. So, I think this suspension is within historical spec for a short German weapon of the late 15th/early 16th c., although I don't recall seeing a messer suspension done this way.

Messers the size of yours appear to have the narrow belt passing through a channel cut in the back of the scabbard, which suggests to me that those scabbards are two-layers of leather.


 Attachment: 22.95 KB
199815_10151056302109387_587363865_n.jpg


-Sean

Author of the Little Hammer novel

https://www.amazon.com/Little-Hammer-Sean-Flynt/dp/B08XN7HZ82/ref=sr_1_1?dchild=1&keywords=little+hammer+book&qid=1627482034&sr=8-1
View user's profile Send private message Visit poster's website
Radovan Geist


Location: Slovakia
Joined: 19 Aug 2010
Likes: 5 pages

Posts: 399

PostPosted: Wed 24 Jul, 2013 10:31 pm    Post subject:         Reply with quote

thank you Sean, that was really helpful. Images posted in that linked thread by you and others are fantastic, how could I have missed it!
After some hesitation, I have decided to make a by-knife for this one. I have a batch of knife-blades, just need to choose a proper one. I will go for a two-layer leather construction, maybe with some fancier colour for an outer layer.
I will post pictures of the results - unless I completely mess it up:)
thanks again
View user's profile Send private message
Radovan Geist


Location: Slovakia
Joined: 19 Aug 2010
Likes: 5 pages

Posts: 399

PostPosted: Sun 10 Nov, 2013 11:02 pm    Post subject:         Reply with quote

After a long time, I managed to finish the scabbard and the by-knife.
Scabbard is constructed from two layers of leather and hand-stitched with sinew. first layer of leather was hardened in hot water.
For by-knife, I´ve just used a blade that I had at hand. The handle is from elm-wood with hollow rivets from rolled copper plate, to replicate the design of the bauerwehr. Originally, the scabbard was made for a wider blade, but I´ve ruined that one. When I have a little time I might make a new by-knife, but for now this is it.


 Attachment: 100.49 KB
DIY-bauerwehr-6.jpg


 Attachment: 100.88 KB
DIY-bauerwehr-7.jpg

View user's profile Send private message
P Ullrich


Joined: 26 Apr 2013

Posts: 50

PostPosted: Wed 13 Nov, 2013 7:38 am    Post subject:         Reply with quote

Very nice package, well done!

Having recently finished my own (shown in a separate thread) I can appreciate the hard work that went into this.
View user's profile Send private message Send e-mail


Display posts from previous:   
Forum Index > Historical Arms Talk > DIY: BauerwehrDIY Project
Page 1 of 1 Reply to topic
All times are GMT - 8 Hours

View previous topic :: View next topic
Jump to:  
You cannot post new topics in this forum
You cannot reply to topics in this forum
You cannot edit your posts in this forum
You cannot delete your posts in this forum
You cannot vote in polls in this forum
You cannot attach files in this forum
You can download files in this forum


All contents © Copyright 2003-2024 myArmoury.com — All rights reserved
Discussion forums powered by phpBB © The phpBB Group
Switch to the Basic Low-bandwidth Version of the forum