Hi,
one of my next projects is to make a bollockdagger. I got a fine blade from Tod, a really dry piece of walnut and a new carving knife... Has anyone some tips on how to carve it other than "just remove anything, which doesn't look like a grip"? ;o)
Thanks in advance,
Thomas
I use double cut files and sandpaper a lot more than knives for shaping grips, I generally only use knives for relief carving and such.
Walnut has pretty heavily interlocked grain and is fairly curly sometimes so if you do use carving knives you will want to keep them sharp, or you may get some tear-out.
Walnut has pretty heavily interlocked grain and is fairly curly sometimes so if you do use carving knives you will want to keep them sharp, or you may get some tear-out.
The first thing I do......this is just me, now.....is fit the tang to a rough cut block of wood. If you can seat the blade, then the rest is just removal of wood....'carving off anything that doesn't look like a grip'...as you said. :lol: .......Good luck! Send pics!.......McM
Drill a through hole and burn or otherwise fit the tang in as a start point and carve from there. I generally start with a lathe for most styles, but for 16thC in particular saw out the rough form and file from there. I find that farriers files and car body shaping files work great for quick early stage removal.
Tod
Tod
Thanks so far, guys. Your tips are very useful!
Especially the tip, to drill the hole first and go on from there. I had planned to do this in the end. I have some rasps und files... I'll try these first and cut out the "balls" roughly with a saw... I'll post pics, as soon as possible.
Thanks again,
Thomas
Especially the tip, to drill the hole first and go on from there. I had planned to do this in the end. I have some rasps und files... I'll try these first and cut out the "balls" roughly with a saw... I'll post pics, as soon as possible.
Thanks again,
Thomas
I didn't think to mention fitting the block to the tang first, but Tod is right, of course. If you do it the other way around, you may end up with alignment issues.
I have never liked burning grips on but it does simplify this part somewhat, otherwise an improvised tang broach can be made from a few jigsaw blades somehow affixed side by side and an handle stuck on the end. Epoxy might work to laminate the jigsaw blades together, if you don't plan on using it a lot.
I have never liked burning grips on but it does simplify this part somewhat, otherwise an improvised tang broach can be made from a few jigsaw blades somehow affixed side by side and an handle stuck on the end. Epoxy might work to laminate the jigsaw blades together, if you don't plan on using it a lot.
That's what I meant to say, Tod and Justin. I use an extra-long drill bit and drill 3 or 4 pilot holes side by side, then finish it out with fine rasps and files. I make the pilot holes smaller around than the tang is thick so I can end up with a snug fit. Burning in the tang is great also, but I've always been a bit nervous about doing it. :lol: ......McM
That leads to a question I've always had.
When burning in the tang, how exactly do you avoid ruining the heat treat on the blade?
It seems obvious to me that if you heat up the tang, heat will transfer through it into the blade and distemper it... probably not an issue historically as likely they never really had great steel to work with and probably didn't mind sharpening their blades regularly, but nowadays we like our blades to stay hard.
One possibility is drilling a pilot hole and then using very light heat and keeping the blade cold with a wet towel or something, I suppose...
Anyway, any answers you all can provide will be great!
| Jeffrey Faulk wrote: |
| That leads to a question I've always had.
When burning in the tang, how exactly do you avoid ruining the heat treat on the blade? It seems obvious to me that if you heat up the tang, heat will transfer through it into the blade and distemper it... probably not an issue historically as likely they never really had great steel to work with and probably didn't mind sharpening their blades regularly, but nowadays we like our blades to stay hard. One possibility is drilling a pilot hole and then using very light heat and keeping the blade cold with a wet towel or something, I suppose... Anyway, any answers you all can provide will be great! |
Graham Freeden discusses burning out a slot for the tang in this video...
http://www.youtube.com/watch?v=xwwUUmfxDI4&am...mp;index=6
I agree, it does seem scary, but the pros use it quite effectively. I would imagine that it could be done before heat treating to avoid potentially ruining it. Though that might cause fitting problems as the steel will inevitable change shape slightly after heat treating.
soak a heavy cloth and wrap it around the blade. this will keep the blade relatively cool when trying this process. and you won't need the tang to be red hot to do the burning. i did this when soldering a guard and it didn't seem to hurt the HT. however, the base of the blade did discolor and needed to be re polished.
walnut is an advanced carving wood. mostly because it has a grain structure like red oak in that it splits. with walnut it's not as noticeable but can cause you a little bit of trouble when carving. a trick i learned with walnut or any kind of open grained wood was to look at where the grain was running. rarely does a wood grow totally straight so if i noticed the grain was flowing in an <---- direction with a slight curve, i would carve into the wood ----> opposing the curve of the grain. this will help keep the knife from falling into the splits of the grain.
a knife can take a lot of material away if not careful with open grained woods, so if this is your first time at it, use the knife for the roughing out, and turn to files. a farriers file will work, but i prefer actual wood files. i use a farriers file only on very big pieces i'm trying to level. a typical wood file will have 4 sides to it 2 with coarse teeth, and 2 with fine teeth. I've done a lot of final shaping with just this file.
now another question is are you going to do some kind of relief carving or are you just going to be shaping the handle?
Hi Daniel,
I don't want to carve anything complex into the grip. I am troubled most with getting the bollocks right, I guess. I plan to set a piece of brass into the grip, where the tang meets the blade, then the bollocks flare out. The end of the grip will feature an brass disc with the peened tang. I have no experience in carving but in shaping wood with files, rasps and chisels (I did some scabbard cores etc. per hand). Maybe you can hint at an other sort of wood, which would be easier to shape? But I guess all european hardwood will be hard to work with, as it's name suggests...
Thomas
Files, sand paper, rasps and scrapers work great on even the hardest woods I've used including Jatoba, Purpleheart, Grenadillo and various kinds of Ebony.
As far as using knives and tear out it make a difference in having the sharpest edge you can get and cutting the wood and not splitting the wood along the grain which can be rough if done in the wrong direction causing tear outs.
Shallow cuts not too ambitious deep cuts trying to remove too much wood at a time.
The little Seax made by Michael Pikula when honed super sharp ( As received it was this sharp by the way ) works great even on rock hard Ebony in part because of it's sharpness but also due to it's very thin triangular and very flat profile, but it can split the wood very easily if one digs in at too steep an angle and one uses too much pressure: So you want to produce very thin shavings with light pressure and the surface on a very hard wood will look almost polished and glass-like on Ebony.
It may take a little practice and with very hard woods you may have to freshen your edge a lot more often than with a much softer wood.
To do the original shaping from square section to octagonal to round I often use a plane, but again the plane's blade has to be very very sharp and adjusted to taking a very thin shaving.
a wood that i love to carve is maple takes all stains well and finishes to nicely. extremely hard but for some reason its easy to carve with knives, but filing and sanding it will give you a work out. i think walnut is a very nice carving wood, so what you may want to try (i do this with nearly everything these days) make a mock up piece out of lesser wood first, then move on to your choice wood.
what you can find nearly everywhere, is poplar. for carving, i actually don't like it - too soft for my taste. but something that you can practice with before the walnut. i think a few of us might be familiar with Jake Powing's method of carving, but i actually use a method that avoids tear outs almost entirely. this will involve a different carving tool like a vainer ('V" shaped tool) or a very small gouge. the trick is to make a tracing cut with one of these tools before your plunge cut, and what it does is re-leave the pressure that causes tear out if you would start with your plunge cut first.
there are a few ways that i could think of approaching a grip like this. but i would have to see what kind of block of wood your starting out with. chances are if your not doing anything too fancy, you could probably get away with just using a coping saw and file work.
I recently did some amateur hilting, similar to what you are describing. One figthing blunt, and one sharp bollock dagger blade from tod, similar to yours. I had never done this before, but since I did this as an example for an arts and crafts class, I did it quite thuroughly.
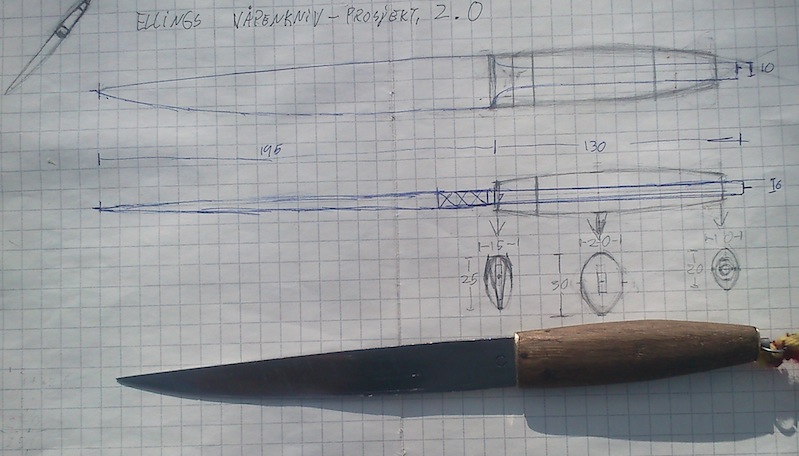
First, I outlined the blade on grid paper in pen.
I then drew the design of the hilt in pencil in side and top view, as well as the cross section of the end pieces.
Having done this, i photocopied the page, cut out the drawings, and glued/outlined them on the piece of wood I was to use.
After this I drilled a hole for the tang, and widened it with a file and carving. (Beeing a newb and a filthy cheater I compensated for my lack of skill by filling the entire thing with epoxy gule rather than making a perfect fit)
One obstacle here is that most drills are not long enough to pass through the entire handle in one go. On the blunt one, i made the "proto-bollocks" from a separate piece of wood.
I then rough cut the piece based on the outlines, and started working with file, knife and other available tools until I reached the cross section I wanted. The finals where outlined on a copper plate, rough cut, and glued in place with epoxy, before the entire thing was smoothed on a wheel grinder.
They are by no means masterpieces, but I think they turned out OK for a first try.
 Attachment: 103.7 KB
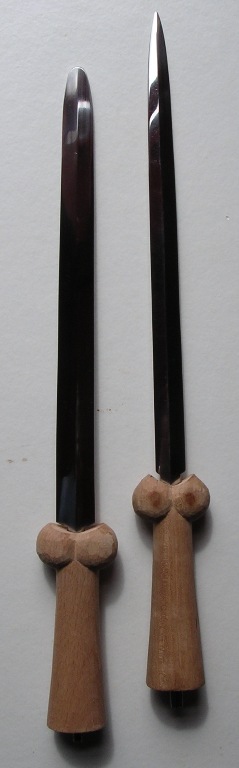
Sharp figthing knife of timeless genericness, with construction drawing.
Attachment: 30.45 KB
Blunt dagger of protobollocery. [ Download ]
First, I outlined the blade on grid paper in pen.
I then drew the design of the hilt in pencil in side and top view, as well as the cross section of the end pieces.
Having done this, i photocopied the page, cut out the drawings, and glued/outlined them on the piece of wood I was to use.
After this I drilled a hole for the tang, and widened it with a file and carving. (Beeing a newb and a filthy cheater I compensated for my lack of skill by filling the entire thing with epoxy gule rather than making a perfect fit)
One obstacle here is that most drills are not long enough to pass through the entire handle in one go. On the blunt one, i made the "proto-bollocks" from a separate piece of wood.
I then rough cut the piece based on the outlines, and started working with file, knife and other available tools until I reached the cross section I wanted. The finals where outlined on a copper plate, rough cut, and glued in place with epoxy, before the entire thing was smoothed on a wheel grinder.
They are by no means masterpieces, but I think they turned out OK for a first try.
Sharp figthing knife of timeless genericness, with construction drawing.
Blunt dagger of protobollocery. [ Download ]
Elling, I LOVE that fighting knife! Pure, simple, functional....but with underlying grace and sleekness. FWIW...You can buy extra long drill bits at most good tool stores. I have a set over 12" long with at least 9" of actual drill. If drilling a thru-tang for a two or more piece grip, just drill from both sides. They also make bits that can be used to drill, then grind from side to side. Don't know exactly what you call them, but they work. Gotta be carefull to not put too much side-to-side pressure, though. You'll end up with a broken bit, probably stuck in your wood, and a possible nasty scar on your hand. I say this from experience and several stitches. ;) :lol: ..........McM
Now you've raised the stakes even higher for me, Elling!
I like your work. The daggers really look like they were used by medieval soldiers: plain and deadly.
I like your work. The daggers really look like they were used by medieval soldiers: plain and deadly.
Thanks, guys :)
A lot of the trick is finding out wht tools to use, and a vice or similar to hold the piece in place when working. A coarse file or knife is great for stock removal, a finer file or sand paper for the finish.
Any belt or wheel grinder that you can get your hands on also helps a lot.
A lot of the trick is finding out wht tools to use, and a vice or similar to hold the piece in place when working. A coarse file or knife is great for stock removal, a finer file or sand paper for the finish.
Any belt or wheel grinder that you can get your hands on also helps a lot.
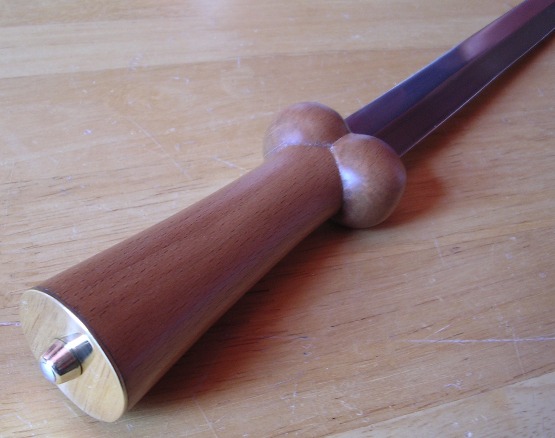
I usually rough out the shape on the bandsaw, drill out the central hole, put some nice music on, settle into my favourite whittling chair, and go at it with a Stanley knife (I think you guys call them boxcutters over in the States). They do a yellow/grey plastic version, extremely tough and lightweight and hand-filling, that makes very light and fast work of most hardwoods except the truly iron-hard ones (for these I turn to rasps!). I usually have a half-dozen of these knives lying around in easy reach, for whittling.
You can get a really fine surface by whittling away at it methodically. Then finish with scrapers (the Stanley knife can also be used for this...) and sandpaper. Below are some very quick and simple ones in beech, prior to surface finishing and fitting of the brassware. For tang fitting, I have a very long, thin, viciously sharp Japanese pad/keyhole saw that is perfect for making the tapered, square hole needed. I never permanently epoxy blades in place - a tight friction fit is sufficient - I just feel that everything I make should be able to be taken apart should the need arise (possibly the engineer and gunmaker in me!).
Julian
Attachment: 37.98 KB
Attachment: 55.09 KB
You can get a really fine surface by whittling away at it methodically. Then finish with scrapers (the Stanley knife can also be used for this...) and sandpaper. Below are some very quick and simple ones in beech, prior to surface finishing and fitting of the brassware. For tang fitting, I have a very long, thin, viciously sharp Japanese pad/keyhole saw that is perfect for making the tapered, square hole needed. I never permanently epoxy blades in place - a tight friction fit is sufficient - I just feel that everything I make should be able to be taken apart should the need arise (possibly the engineer and gunmaker in me!).
Julian
very nice work, actually since you mention it Julian, there is a set of hobby knifes you can buy really cheap (exact o i believe) its a pen like knife with exchangeable blades that you can get the gouges, and vainer blades separate instead of looking or making your own carving set. the only draw back is that these blades are razor thin. personally i prefer carving knifes with a little more meat on them, but they still work just the same.
I'm a big fan of the Stanley SurForm rasps. I use those for grips and scabbards. They'll do everything from roughing out the grip to almost final finish.
Page 1 of 2
You cannot post new topics in this forumYou cannot reply to topics in this forum
You cannot edit your posts in this forum
You cannot delete your posts in this forum
You cannot vote in polls in this forum
You cannot attach files in this forum
You can download files in this forum
All contents © Copyright 2003-2006 myArmoury.com — All rights reserved
Discussion forums powered by phpBB © The phpBB Group
Switch to the Full-featured Version of the forum
Discussion forums powered by phpBB © The phpBB Group
Switch to the Full-featured Version of the forum