| Author |
Message |
Johan Gemvik

|
 Posted: Fri 16 Nov, 2012 5:36 pm Post subject: Posted: Fri 16 Nov, 2012 5:36 pm Post subject: |
 |
|
You can see in the photos the comparison what can be done with the GDFB solids compared to my hand-punched and drop forged solids (the small piece to the left or in the middle on the closeup weave photos).
This is going in the direction I want., the build is much faster with these and I can make them look more attractive than my onw hand made riveted links as well. But it's not quite there yet.
One thing I need to do is to make a tool for the right shape of the rivet head. It needs a cut off cone raising with the rivet dome on top just like in Vegards photos. So this is the next main thing to work on.
"The Dwarf sees farther than the Giant when he has the giant's shoulder to mount on" -Coleridge
|
|
  |
 |
Johan Gemvik
|
| Posted: Sat 17 Nov, 2012 3:17 am Post subject: |
|
|
I'm thinking I need a deeper and conical hole in the pliers to make the rivet shape.
Perhaps a two stage pressing? I usually press twice now anyway so I wouldn't add any work except on the pliers of course.
Notice on this photo how I can't get the back side flush no matter how hard I press. Pressing excessively just eventually breaks the material around the rivet hole, even with chamferred and flattened in the back end it won't
just go into the material of the ring unless material can be pushed away on the other side.

I expect a deeper and wider press hole in the pliers will raise the dome head side and put the rivet deeper into the hole also, making the back side flush like it's supposed to be.
I'l try it first on the GDFB rings, then on some I made myself. But the GDFB roman rings makes the testing process a lot quicker since I can try it out with that first, ring after ring without delays of making new rings all the time to just ruin in the process.
"The Dwarf sees farther than the Giant when he has the giant's shoulder to mount on" -Coleridge
|
|
|
|
|
Johan Gemvik
|
| Posted: Sat 17 Nov, 2012 3:56 am Post subject: |
|
|
Another idea I got is to try to punch the gdfb rings to a raised edge around the hole first, before rivet insertion. I'll see if I can find time for a quick trial with that today.
"The Dwarf sees farther than the Giant when he has the giant's shoulder to mount on" -Coleridge
|
|
|
|
|
Kai Lawson

|
| Posted: Sat 17 Nov, 2012 11:23 am Post subject: |
|
|
Ah. I posted on the other thread with the roman loose rings, and this thread helps to answer my questions. I watch this thread with eager anticipation!
"And they crossed swords."
--William Goldman, alias S. Morgenstern
|
|
|
|
|
Johan Gemvik
|
| Posted: Sun 18 Nov, 2012 8:56 am Post subject: |
|
|
Hi Kai, yes, the work behind this old thread is still alive. I just haven*t been posting here for a while. Too busy with work.
I tried a new apporach yesterday, second pressing the riveted rings with a larger sized riveting hollow.
With some sucess, but not quite there yet. It's starting to get the raised on one side and flat at the back look of the photos from Vegard but my brother shot me down by testing how strong the riveting got after doing this.
Twisting the ring with pliers it just popped loose! Our experience from previous riveting is that you should be able to make a figure 8 of the rings well before that happens.
I'll post some photos later. If I feel up to it maybe tonight. However weak the riveting turned out at least it looks great. It's just some detail it's still missing.
"The Dwarf sees farther than the Giant when he has the giant's shoulder to mount on" -Coleridge
|
|
|
|
|
Felix R.

|
| Posted: Sun 18 Nov, 2012 11:12 am Post subject: |
|
|
I did change from wedge rivets to round ones a while back. As said in the other thread if it is not historical anyway, why bother too much.
But, first I used pliers with a hole on one side only, with the hole being on the side of the round rivets head. The side that was to be rivetted did not have a hole in the pliers, of course this led to the breaking of the ring around the rivet, But when you cut the rivet length to the amount of material needed then you get a nearly flush rivet without the need to shave the head first.
|
|
|
|
|
Johan Gemvik
|
| Posted: Mon 19 Nov, 2012 9:08 am Post subject: |
|
|
Felix, I just tried this. Most certainly a big step in the right direction. Thanks!
"The Dwarf sees farther than the Giant when he has the giant's shoulder to mount on" -Coleridge
|
|
|
|
|
Johan Gemvik
|
| Posted: Thu 22 Nov, 2012 3:59 pm Post subject: |
|
|
I did some second pressing in of the riveting to flatten the back side and raise the front side and got this result.
The raising creates a watershed effect, so yes it can be done on GDFB roman maille rings, if you rivet them yourself the way I did it.


I feel this is a serious breakthrough. It's finally getting there, though not quite yet.
I still need to modify the tools more to get a higher raising and if I want to be picky adjust tools to make the marks on the rings the original ones did. I'm also going to get a small jewelry tumbling machine and use it to try to get the weave worn down and rounded off on the inside of the riveted rings look you see in the museum piece.
I'm also putting a new but this time hardened drop forge tool as well as a heavy duty spider press on my wish list.
The press is for quiet and less demanding drop forging for making larger series of solids, though I still want plausible simple viking age tools for demo use of course.
"The Dwarf sees farther than the Giant when he has the giant's shoulder to mount on" -Coleridge
|
|
|
|
|
Kai Lawson
|
| Posted: Fri 23 Nov, 2012 1:42 am Post subject: |
|
|
What did you do when you pressed the rivets a second time? Pliers (larger, maybe?), a press, or something else?
"And they crossed swords."
--William Goldman, alias S. Morgenstern
|
|
|
|
|
Kai Lawson
|
| Posted: Fri 23 Nov, 2012 1:43 am Post subject: |
|
|
It's really starting to look great, by the way!
"And they crossed swords."
--William Goldman, alias S. Morgenstern
|
|
|
|
|
Johan Gemvik
|
| Posted: Fri 23 Nov, 2012 4:17 am Post subject: |
|
|
| Kai Lawson wrote: | | What did you do when you pressed the rivets a second time? Pliers (larger, maybe?), a press, or something else? |
I used a combination of tools,
First the usual plier I use with a small dome groove for shapng the rivet head. I'd already made most of these that way.
Then I used a plier with a wider and deeper dome (made for riveting larger rings actually) for the rivet and pressed by hand with it. This made the back flat and the front becomig raised. On some I needed to do another round with the first plier but this was because I hadn't completetd the shaping of the rivet head. Most I didn't need to do that.
I also did a third adjustment on most of them, with a striker that has a deep conical hole to add more raising. This finally gave the "hill with a dome on top" look. I'll make another tool that's more narrow to see if I can make it slimmer diameter and even taller.
With a correctly shaped tool I believe this can be reduced to two plier pressings on each rivet head. Making a maille with this weave will be all about shaving as much time off riveting as possible while still getting it both strong and looking right.
| Kai Lawson wrote: | | It's really starting to look great, by the way! |
Thanks! I can finally see it coming together now.
"The Dwarf sees farther than the Giant when he has the giant's shoulder to mount on" -Coleridge
|
|
|
|
|
Johan Gemvik
|
| Posted: Fri 23 Nov, 2012 5:10 am Post subject: |
|
|
An update on production times. Estimated, though, not clocked.
Solid making
Preparing 1,5 mm strips for punching solids
You cut strips, then put them in a forge to soften. Real time 2 hours in a forge or firepit, work time 10 minutes for material for 100 solids.
Note that in Viking age you'd have these trade bars of iron to hammer out to strips. If you don't mind some sections being 1 mm and others 2 this is pretty fast work too. For an experienced blacksmith it would probably take the same 10 minutes to prepare rods into the same amount of material for punching.
If you want perfect thickness on the strips it'll take longer. (Unless you have the technology to roll it.)
Anyway, about S1 = 6 seconds per ring then.
Punching the solids.
Lining up the strip, punching inner hole, lining up again, then punching the outer hole takes about 30 seconds per solid.
S2 = 30 seconds per ring.
Drop forging solids
Placing rough ring on anvil tool, fitting grooves in the face of striker tool ono top of ring, striking 2-3 times with a small sledgehammer.
S3 = 10 seconds per ring.
Riveted ring making
Wire drawing
Hard for me to estimate. I'm guessing that when you work with wire drawing you make large quantities at a time though. Time per ring would be very short.
A second per ring perhaps?
R1 = 1
Making rivetable rings from wire
Twining a spiral, cutting an overlap section with pliers, flatening the ends over each other with pliers or a striker tool and anvil.
This part I never got up to a decent speed I was content with. One coud do better. I know there are other modern day craftsmen being able to do this quite fast though the ones I know and have been able to estimate make flat rings and larger sized than the GJermundbu. A friend of mine can make flat ring overlapping rings of about 10 per minute, 6 seconds per ring.
My time for making a rivetable ring from wire about 2 minutes per ring, so 120 seconds.
R2 = 120
Making holes in the rivetable rings
6 seconds per ring (for Gjermundbu style)
R3 = 6
Making the rivet
grind or hammer a rough cone shape at the end, cut off end with plier.
R4 = 10 seconds per rivet
Weave making
Making a small weave at leasure. 2 hours (the piece seen above). Why I've clumped it together here is because I do have it clocked as a unit.
The tiny formless beginnings of a weave is always the most bothersome. When you have a larger piece to work with this becomes faster and easier. For making a larger weave and working concentrated the time per ring for the weave build is cut in half.
1 hour for making a 25 ring weave. Perhaps the test patch is too small to get accurate overall build times. But from thus you'd get 2,4 minutes per ring, or 144 seconds per ring. This is with the grinding and double rivet pressing I did.
A Gjermundbu style maille made to fit me would consist of about 35. 000 rings. Perhaps a bit more.
35 000 * (S1 + S2 + S3 + R1 + R2 + R3 + R4 + W1) = 35 000 * (6+30+10+1+120+6+10+144) = 35 000 * (317) = 11095000 seconds = 3082 work hours.
3082 work hours spread as an 8 hour work day 5 days a week makes for 77 modern day work weeks.
Removing R times makes for 35 000 * (6+30+10+144) = 35 000 * 190 sec = 1847 hours = 46 work weeks
So, full time it'd take almost a year to make a reproduction as accurate as what I've come up with so far.
Using the GDFB rings I make the overall build about 31 weeks faster, or in other words about 40% faster. This is with my own solids.
Using all pre made solids I'd get 35 000 * 144 = 1400 hours
Using GDFB thinner solids you can assemble the weave more easily, and therefore faster, about halving the time for weave building and riveting combined. That'd mean a GDFB kit maille with the same amount of rings but my style of riveting would take about 700 hours. Or 17-18 full time work weeks.
Unless the process can be speeded up a lot it wouldn't be economically viable for GDFB to make this riveting, at least all by hand like this. Probably the reason why mass produced maille isn't made this way today.
If pressing could be made in one step, if rounding off sharp corners and removing excess material from the riveted rings overlap can effectively be made by just putting the finished weave in a tumbler for a few hours. Then this opens up for other possibilities.
A side note here on maille making time for later era flat ring maille for comparison.
My friend Niclas got as fast as an A4 paper size all riveted flat ring maille weave (from wire to weave) section per day (8 hours of work) at his fastest. This would mean about 10 of these to make a decent sized haubergon, so about 80 hours. With pre made solids this would be even faster but he hasn' gone into that so far more than some basic experimenting.
For a haubergon that would fit me it'd be about 100-120 hours.
I'm nowhere near this speed as I've been working on developing the ring shape as photo accurate as possible rather than full maille garment production. In some ways flat rings are easier to understand how they were made from a modern standpoint, but also I believe they are simply faster to make and that's one of the reasons it became dominant in the later medieval. His chosen ring size is also larger than the Gjermundbu, I've said before that this small weave is really bothersome to work on with man sized hands. If I make even just a little larger rings it becomes much easier to work with when riveting as well as building the weave.
"The Dwarf sees farther than the Giant when he has the giant's shoulder to mount on" -Coleridge
Last edited by Johan Gemvik on Sat 24 Nov, 2012 8:51 am; edited 2 times in total
|
|
|
|
|
Johan Gemvik
|
| Posted: Fri 23 Nov, 2012 10:25 am Post subject: |
|
|
An interesting idea, though not the main goal of this project, is what happens if you try to re-press the rivets on a GDFB finished weave. Would that work?
I'm very curious, though it would still have thinner solids it could mean you can make it more historically accurate yourself after purchasing a complete haubergon.
My brother doesn't believe it's possible but I have to try and see what that would be like, what could be done with it.
It still wouldn't be as accurate as with the solids I made of course, but it could be at least more accurate than with the current modern looking riveting. Worth investigating. If for nothing else than to make a decent maille to wear while working on the more accurate one.
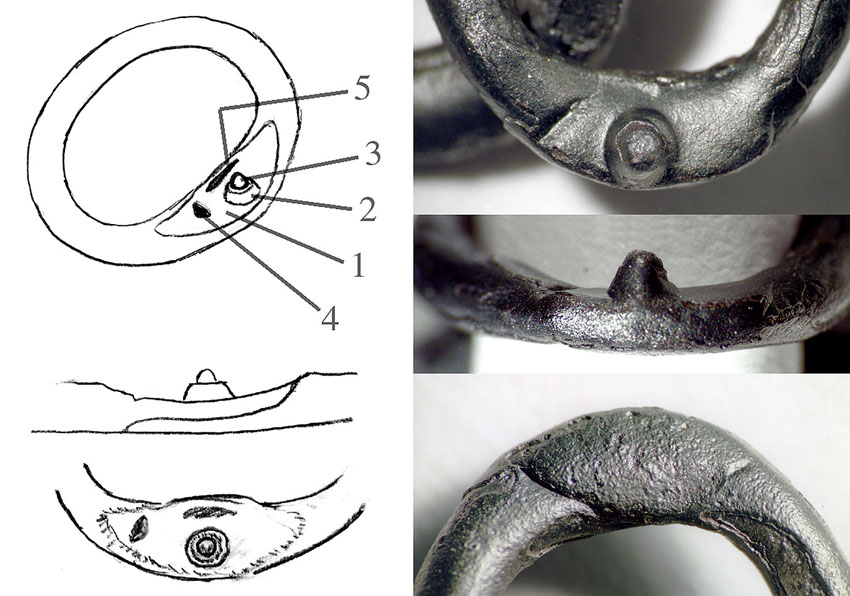
This is what the GDFB roman maille weave looks like when they put it together (modern dual dome riveting, like on ship plating or steel building construction)

If one presses flat from the back while giving it room to expand and shape to a raised cone with the rivet head at the top on the front side it at least theoretically should shape itself similar or ideltical to what I made from my way of riveting. Some rings where the riveting isn't centered that still works with their riveting would have to be replaced, I'd count on having to do that. But it's still a tempting thought.
"The Dwarf sees farther than the Giant when he has the giant's shoulder to mount on" -Coleridge
|
|
|
|
|
Johan Gemvik
|
| Posted: Tue 27 Nov, 2012 5:03 am Post subject: |
|
|
I made a new tool yesterday that presses the rivet taller and narrower.
This gives it the right look and also seems to strengthen the riveting. No photos yet but I'll take some on thursday.
On a sad note my soft steel drop forging tools have become worn out. This shows a high likelyhood of any historical tools for this purpose were tempered steel and not just iron (which can't take a temper), at least in the forging surfaces.
It also means I need to find a good toolsmith to make me better tools that have a fairly high temper in the wearing surfaces.
"The Dwarf sees farther than the Giant when he has the giant's shoulder to mount on" -Coleridge
|
|
|
|
|
Johan Gemvik
|
| Posted: Thu 29 Nov, 2012 4:43 pm Post subject: |
|
|
Here's the latest version 6 of my Gjermundbu maille project.
Enjoy.

Front middle rivet is single pressed here. Note the rough grain and shape of the rings, I try to get the same look as the original.

This shows the simple tool I use for raising the rivet on the second pressing.
I'm making a plier to do this with in the future, but for starters I needed to get the hollow right before I made new pliers.

Weave pic 1. Middle rivet is double pressed to get that raised effect.

Weave pic 2.

Index finger covered in maille. This piece has taken about 6 hours of work to make. Speed increases the more I work with it, but making a full haubergonne this way will take some time...
Still, 100 of these should do it, so 600 hours, not the gruelling 1400 or more I listed earlier. I can probably speed up the weave building more, but there's also the tailoring to consider.

Closeup of inxed finger.
The tool marks around the rivet head aren't there yet. I'll see what I can do about that when I make the new pair of pliers.
"The Dwarf sees farther than the Giant when he has the giant's shoulder to mount on" -Coleridge
|
|
|
|
|
Kai Lawson
|
| Posted: Fri 30 Nov, 2012 7:58 am Post subject: |
|
|
This is becoming more and more impressive, and the time estimate is shrinking down quite a bit. Easily one of my favorite threads right now. Do you anneal your rivets beforehand? Would a single pliers be able to fashion MORE historically accurate (not actually historically accurate, just less crappy looking) rivets from GDFB or Icefalcon mail?
Additionally, what are the ID/OD for your rings, and how thick are they?
"And they crossed swords."
--William Goldman, alias S. Morgenstern
|
|
|
|
|
Johan Gemvik
|
| Posted: Fri 30 Nov, 2012 9:23 am Post subject: |
|
|
Thanks for the kind praise!
When I made my own rivets I annealed them. The current ones are from GDFB and ar quite soft but turns harder the more you press them. They're most likely annealed at the factory.
Yes a single dome plier would likely be able to improve GDFB and Icefalcon maille to some degree. Exaxtly how much I can't say until I get a piece of maille and try it with their way of factory riveting.
My solids are YD 8 and ID 5. Punchd from 1,5 mm plate. This makes the cross section square 1,5.
GDFB pre made for riveting (their roman maille) has an ID of 6 mm and a wire D of about 1.2 mm.
GDFB solids for roman maille is about ID 6 mm, YD 9 and 1 mm plate thickness. They call it square section but it's not an eual side square. A bit thin and a bit flat for roman or viking age maille. But the proportions if used for a slightly larger ring would be suitable for a certain flat ring maille coif from Gotland middle ages.
"The Dwarf sees farther than the Giant when he has the giant's shoulder to mount on" -Coleridge
|
|
|
|
|
|
Bogdan Vasylchenko
Location: Argentina Joined: 24 Oct 2011
Posts: 2
|
| Posted: Mon 24 Jun, 2013 7:49 am Post subject: |
|
|
To do not open another post, I'm searching information about where was the opening on the chainmails in the Viking Age (front/back or the sides)???
I know from the works of Medvedev and Kirpichnikov that the finds of chainmails from the Kievan Rus are without openings (or at least there is not a stated idea that most of chainmails had openings at all).
So, did the finds of the Viking Age in Scandinavia (or at least Ghermundbu) shows openings on the chainmail? I have already check the work in English of Vegard (http://folk.uio.no/vegardav/brynje/Brynjevev_Vegard_Vike_2000.pdf), but at least didn't find any clue.
Bogdan.
|
|
|
|
|
|
Bogdan Vasylchenko
Location: Argentina Joined: 24 Oct 2011
Posts: 2
|
| Posted: Tue 02 Jul, 2013 6:00 pm Post subject: |
|
|
|
Anyone? :/
|
|
|
|
|
Luka Borscak

|
| Posted: Wed 03 Jul, 2013 6:39 am Post subject: |
|
|
|
I think there were no openings as mail in viking age was as far as we know above the knee length so the opening is not needed.
|
|
|
|
|
|
|
You cannot post new topics in this forum
You cannot reply to topics in this forum
You cannot edit your posts in this forum
You cannot delete your posts in this forum
You cannot vote in polls in this forum
You cannot attach files in this forum
You can download files in this forum
|
All contents © Copyright 2003-2026 myArmoury.com — All rights reserved
Discussion forums powered by phpBB © The phpBB Group
Switch to the Basic Low-bandwidth Version of the forum
|

