| Author |
Message |
Thomas R.

|
 Posted: Fri 10 Aug, 2012 3:07 pm Post subject: Making a 15th century scabbard Posted: Fri 10 Aug, 2012 3:07 pm Post subject: Making a 15th century scabbard |
 |
|
Hello fellow forumites,
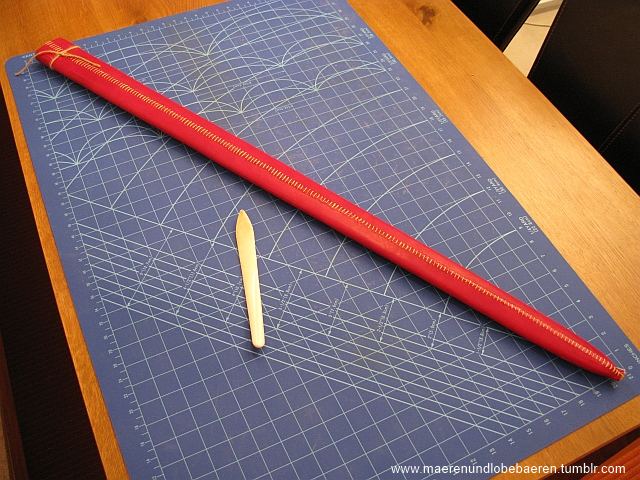
today I finished the first part of my 15th century scabbard project. It took me circa 40 hours to complete it. Now I am waiting for some belt fittings, before I can start to make the proper suspension. But I'd like to show you the scabbard, I made so far.
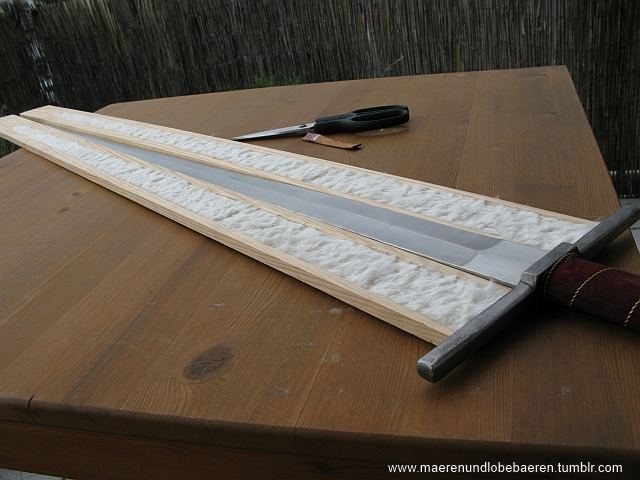
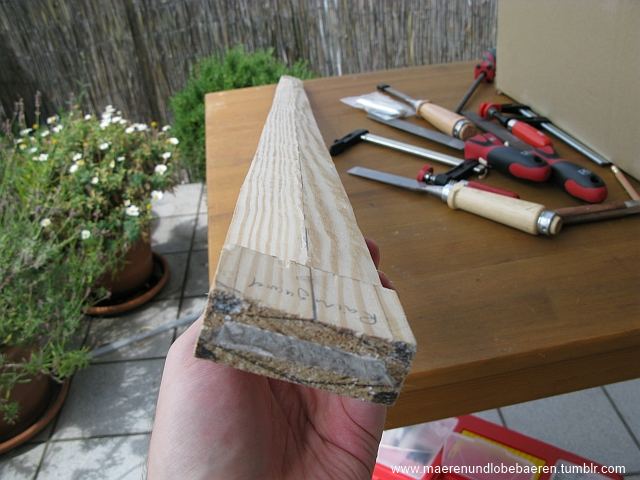
In short, it's made from two wooden slats, lined with trimmed rabbit fur and carved to a diamond shape. I covered it in linnen fabric using bone glue, then dyed the leather cover red and sew it onto the core. The scape is not made by me. I got it from Holger Ratsdorf. A full documentation of the project can be found on my blog http://maerenundlobebaeren.tumblr.com.
I hope you enjoy the pictures. I deliberately chose this plain, geometric look, which can be seen in many period artworks. I am looking forward to rewrap the swords handle and add a matching rainguard. The suspension will consist of a belt with two buckles in the front and and two knotted straps in the back, which can be hooked into a buckle on the mainbelt.
Best regards,
Thomas
Now some pictures:
 Attachment: 36.99 KB Attachment: 36.99 KB
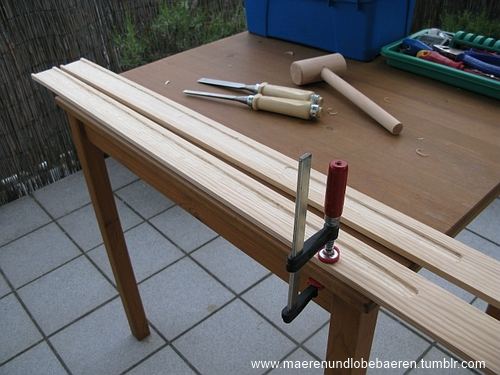
Carving the slats
Attachment: 46.04 KB
Glueing the trimmed fur into the core
Attachment: 49.92 KB
Carving the core into diamond shaped cross section
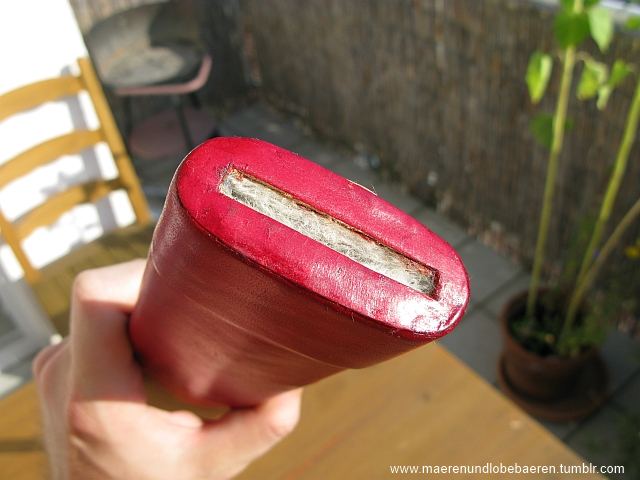
Attachment: 65.98 KB
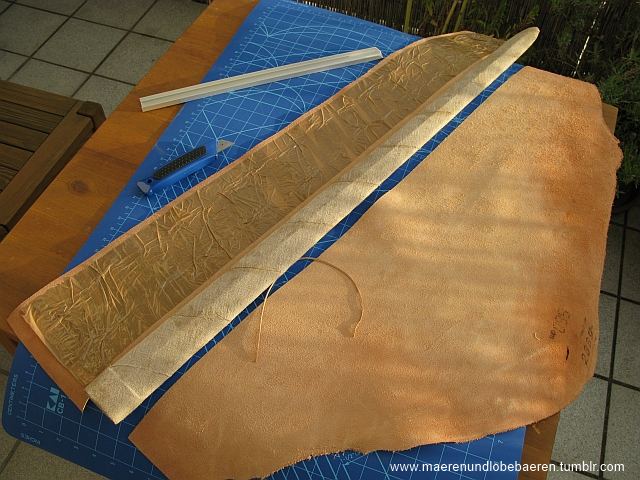
Cutting the leather for the fabric covered core
Attachment: 79.44 KB
Finished the sewing
Attachment: 37.12 KB
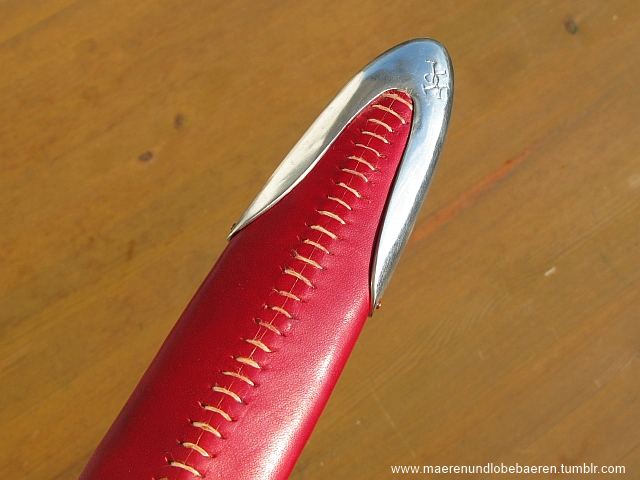
Adding the scape
Attachment: 39.25 KB
The scabbards mouth
http://maerenundlobebaeren.tumblr.com/
|
|
   |
 |
Daniel Wallace

Location: Pennsylvania USA Joined: 07 Aug 2011
Posts: 580
|
| Posted: Sun 12 Aug, 2012 10:13 am Post subject: |
|
|
|
nice work, i've never lined a scabbard, what did you use to glue in the fur lining?
|
|
|
|
|
Thomas R.
|
| Posted: Sun 12 Aug, 2012 1:34 pm Post subject: |
|
|
HI Daniel,
the fur lining was the only part, for which I did chose to use a modern glue instead of bone glue. I used "Tanners Bond" to glue it in, because I knew from my first scabbard project, that it does work, even if Ioil the fur (to keep the blade later nice and clean). If you use trimmed sheep fleece, you won't have to add any oil, because of it's natural lanolin fat. So it should work with hide or bone glue, too, I guess. The bone glue may even work with oiled rabbit fur, but I didn't want to take any risk there.
Best regards,
Thomas
http://maerenundlobebaeren.tumblr.com/
|
|
|
|
|
Daniel Wallace
Location: Pennsylvania USA Joined: 07 Aug 2011
Posts: 580
|
| Posted: Mon 13 Aug, 2012 9:01 am Post subject: |
|
|
i'll have to give that a try. i've been using tight bond II for all my wood work, and with sheaths it does have a little flaw, i noticed that once that glue runs, or touches steel within the sheath, it caused instant oxidation. must be something in the chemical make up of the product. i've only been using the glue on the outer edge of my sheaths since then, and haven't had a problem.
i've heard about sheep fleece and sheeps skin as linings but i've never dealt with them, mostly because when i make my sheaths as long as the wood hugs the steel there doesn't seem to be a problem with rust of oxidation showing up. but i always wanted to give a lining a try to see if the results differ
|
|
|
|
|
Thomas R.
|
| Posted: Mon 13 Aug, 2012 9:25 am Post subject: |
|
|
Hi Daniel,
it's also a matter of securing the blade and avoiding rattle. If you make the scabbard from pure wood and tight enaught, so that the blade sits tight and doesn't rattle, it can get stuck, if the wood expands with air moisture rizing. If you glue the fur in the right way (so that its hairs point down) it'll give the scabbard the right amount of pressure to secure the blade, but letting it be pulled loose very conveniently. Well, that's my experience.
Thomas
http://maerenundlobebaeren.tumblr.com/
|
|
|
|
|
|
Ben Coomer
|
| Posted: Mon 13 Aug, 2012 9:56 am Post subject: |
|
|
I don't suppose we could get an English translation on your site.
If it's not too much trouble of course.
And a pretty awesome scabbard, by the way.
|
|
|
|
|
Thomas R.
|
| Posted: Mon 13 Aug, 2012 10:08 am Post subject: |
|
|
Hi Ben,
If I find the spare time to do a translation, I'll add one for these postings, too. If you click on the fotos and view them in slide show mode, you'll notice, that I did add some explanations in english for the depicted working steps. This was the best compromise I came up with so far. Feel free to ask any questions regarding this or any other project on my blog. And thanks for the kind words! 
Regards,
Thomas
http://maerenundlobebaeren.tumblr.com/
|
|
|
|
|
Nathan Robinson
myArmoury Admin


|
|
 |
|
Ben Anbeek
Industry Professional

|
|
|
|
|
Thomas R.
|
| Posted: Tue 04 Sep, 2012 12:08 pm Post subject: Refurbishing a sword hilt |
|
|
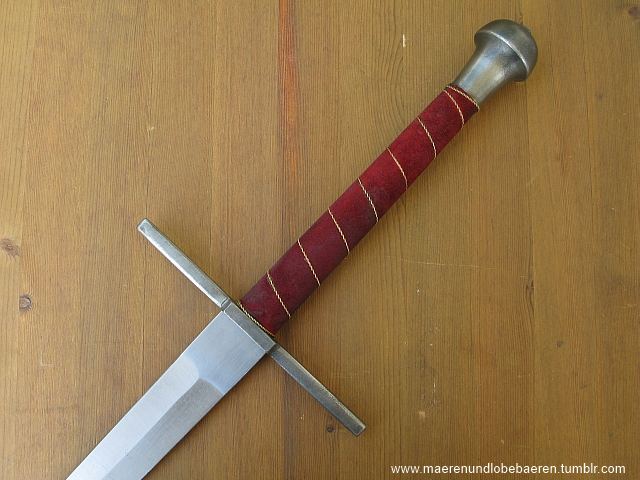
Hi fellow forumites,
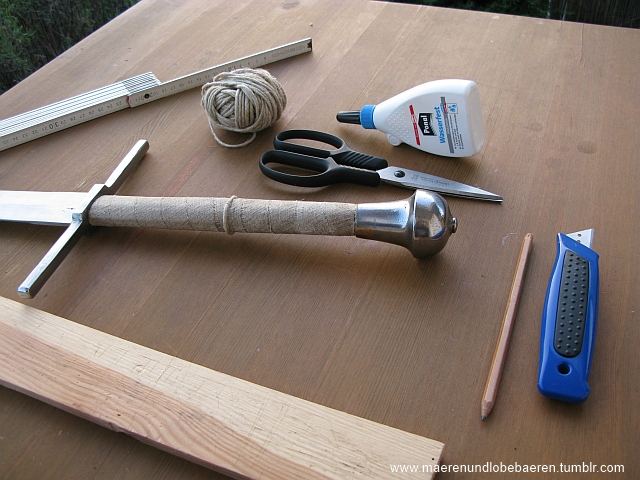
since I had to wait (and do have to further on...) for some belt fitting to complete my scabbard with hanger and belt system, I refurbished the sword, for which the scabbard is meant. When I made the scabbard, I had already in mind, that I wanted to attach a rain guard to the cross guard and renew the grip leather. I think the rainguard is an integral part to this scabbard, so I didn't open a new thread for this project.
So i disassembled the hilt of the sword (a blunt made by Jrii Krondak/Fabri Armorum), polished pommel and guard, cleaned the wooden core and tang up, glued it back in place and, added a linnen cover using bone glue. Then I added a central riser, glued the grip leather in place, which I dyed black before. With some cord I achieved the famous rippling effect on the grip. Later I added a rain guard/chappe, recreating an origina medieval pattern, which was posted by Matthieu Harlaut earlier on this forum. A detailed step by step documentation of the project can be found on my blog: http://maerenundlobebaeren.tumblr.com
Now, that the project is finished, I am very proud of having learned a lot about refurbishing a sword hilt - at some point I wasn't sure, if it even would have a presentable outcome... But now i present it to you:
Have fun,
Thomas
Attachment: 50.88 KB
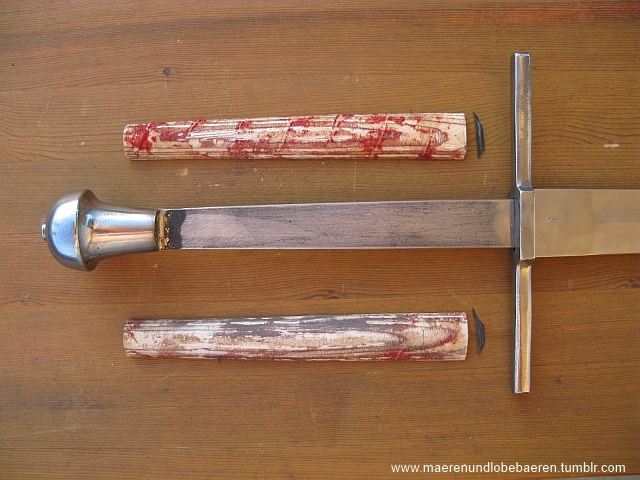
The orignal grip
Attachment: 54.29 KB
was completely disassembled
Attachment: 52.26 KB
covered in linnen and got a riser
Attachment: 78.46 KB

and then covered with black leather and wrapped in cord
Attachment: 50.54 KB
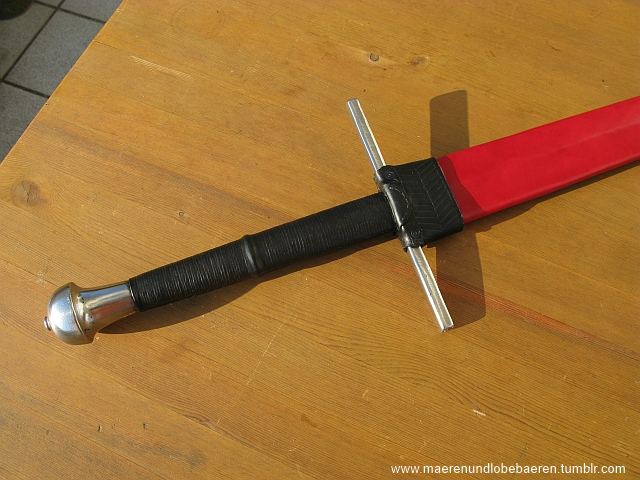
At last it got a rain guard/chappe
Attachment: 43.72 KB
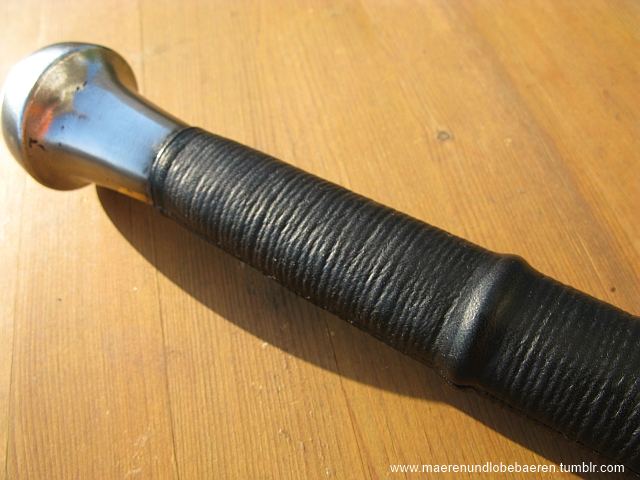
The grip
Attachment: 69.71 KB
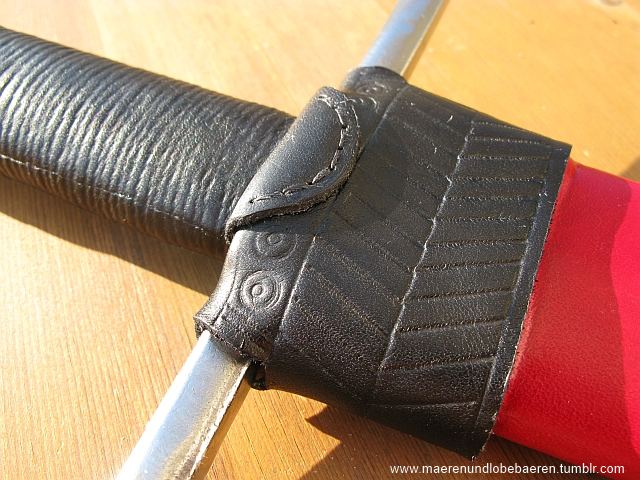
The rain guard fits onto the scabbard
http://maerenundlobebaeren.tumblr.com/
|
|
|
|
|
|
Scott Woodruff
|
| Posted: Tue 04 Sep, 2012 1:38 pm Post subject: |
|
|
|
Nice. I love to see swords with guard leathers or rainguards or chappes or whatever you want to call them. A few years ago they were almost unheard of, but now people have been including this fantastic little detail. I really like the pattern on yours, it is based on the Dordrecht example isn't it?
|
|
|
|
|
Thomas R.
|
| Posted: Tue 04 Sep, 2012 2:58 pm Post subject: |
|
|
Hi Scott,
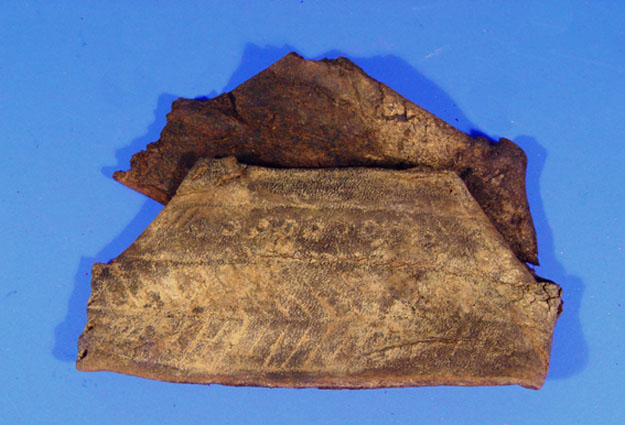
yes indeed, the rain guard is made after one of the Dordrecht finds (see the attachments).The coloring scheme (black grip/red scabbard) is taken from a period illumination, depicting St. George. I think it was a quite common coloring.
Best regards,
Thomas
Attachment: 50.18 KB
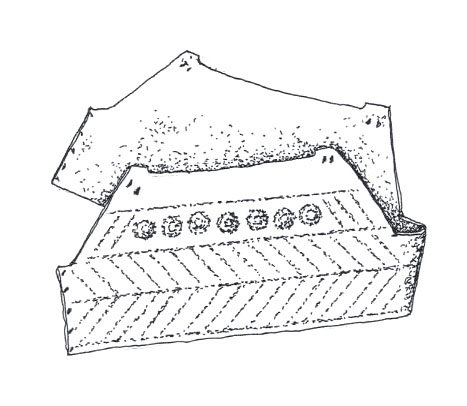
Attachment: 78.91 KB
http://maerenundlobebaeren.tumblr.com/
|
|
|
|
|
|
|

