
| myArmoury.com is now completely member-supported. Please contribute to our efforts with a donation. Your donations will go towards updating our site, modernizing it, and keeping it viable long-term.
Last 10 Donors: Adam James, Piotr H. Feret, Graham Shearlaw, Anonymous, Daniel Sullivan, Chad Arnow, Jonathan Dean, M. Oroszlany, Sam Arwas, Barry C. Hutchins (View All Donors) |
| Author |
Message |
Jesse Belsky
Industry Professional

|
 Posted: Sun 22 Jan, 2012 4:42 pm Post subject: Hollow Ground Leaf Blade Posted: Sun 22 Jan, 2012 4:42 pm Post subject: Hollow Ground Leaf Blade |
 |
|
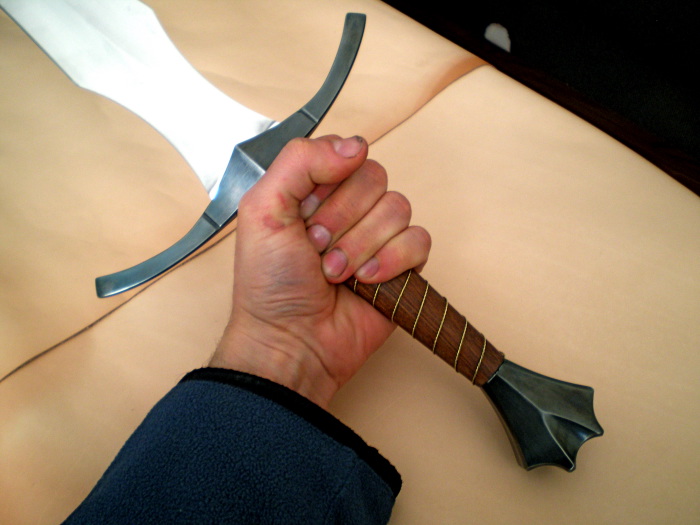
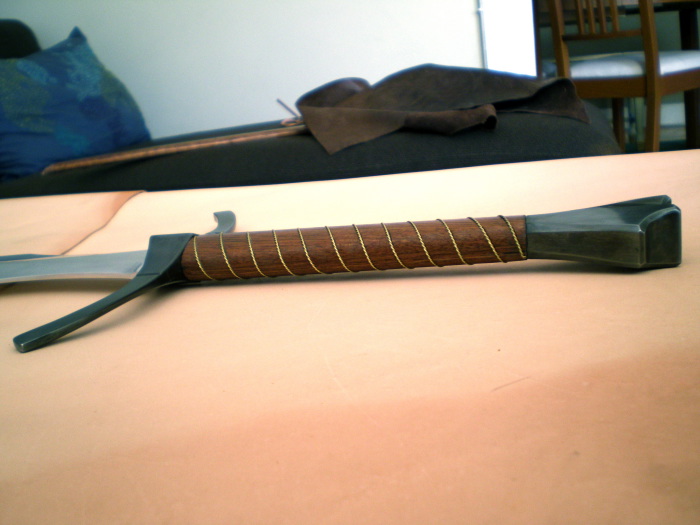
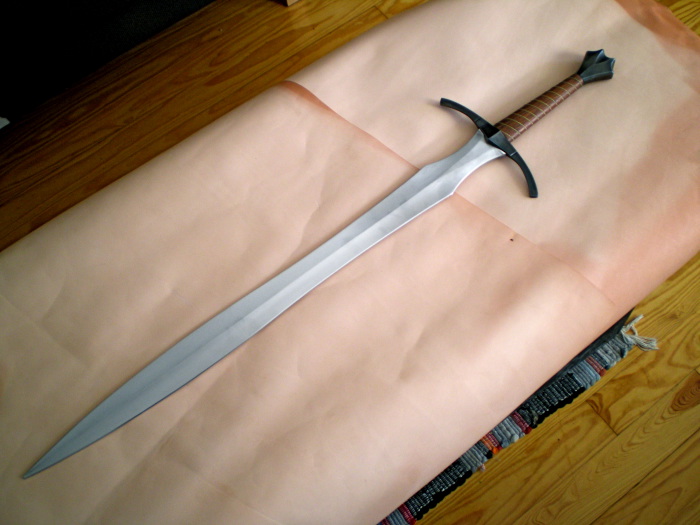
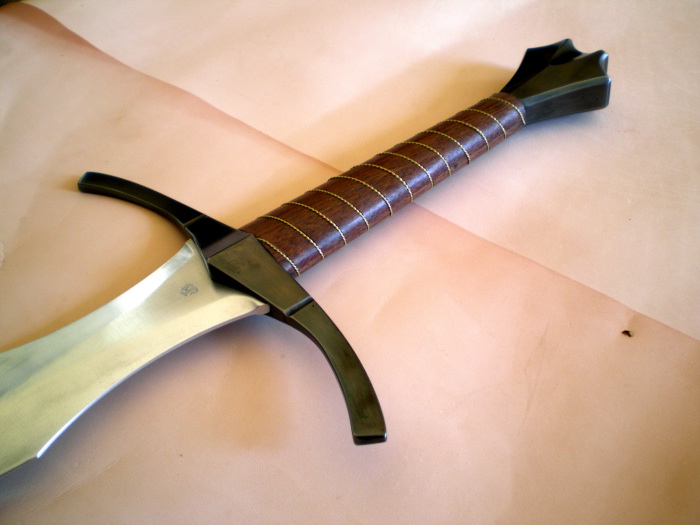
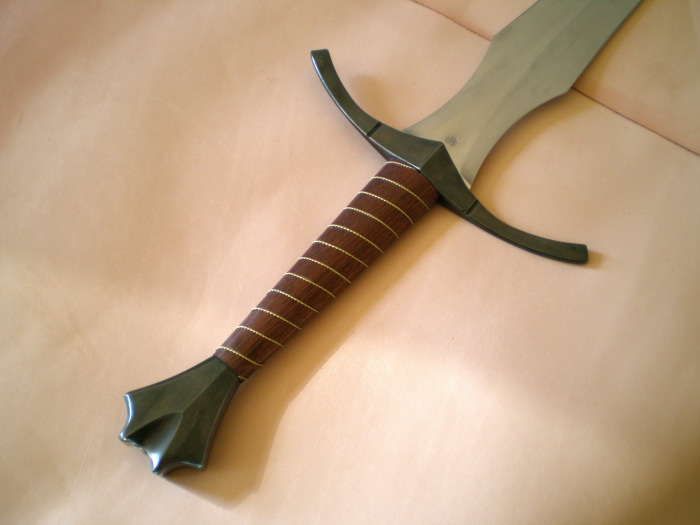
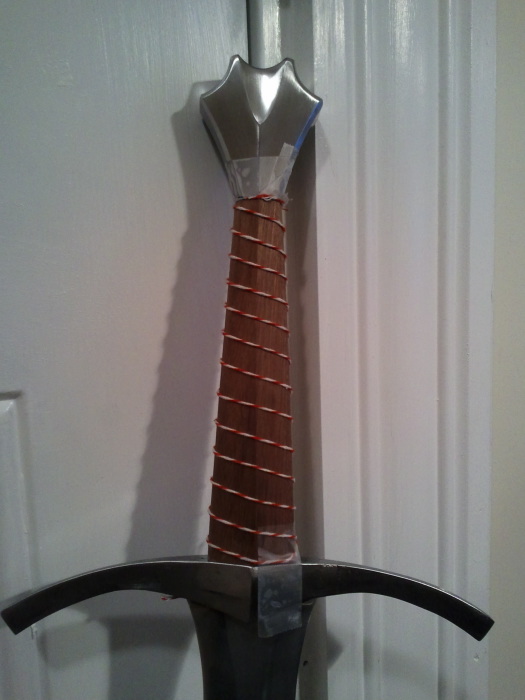
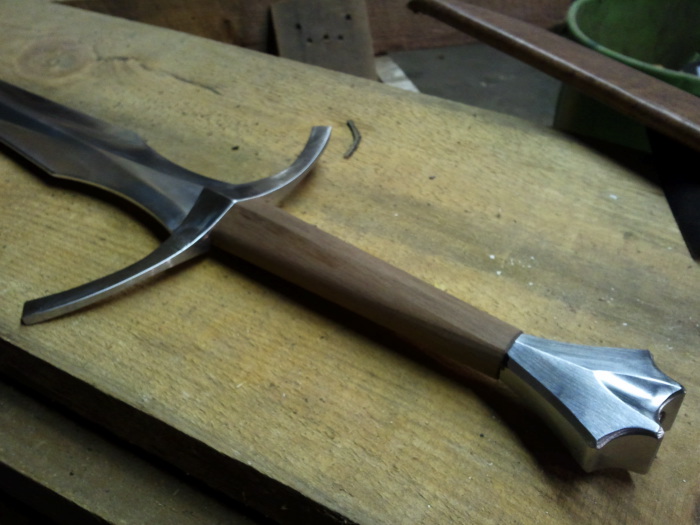
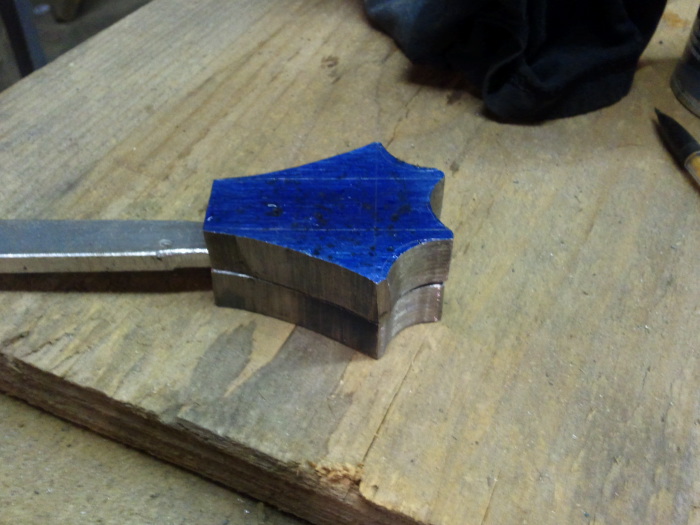
Another project finished! This is my first hollow ground blade, and i'm really pleased with how it turned out. Better than I expected for a first attempt, and the leaf blade shape certainly didn't make it any easier. The hollow is ground on a 10" diameter wheel which leaves a lot of meat behind the edge (important for an aluminum blade) while still forming a nice clean central ridge. I took this blade up to a high polish and then back to a grey scotchbrite finish, but i think it looked more exciting when it was shinier so i guess i'll redo the polish.
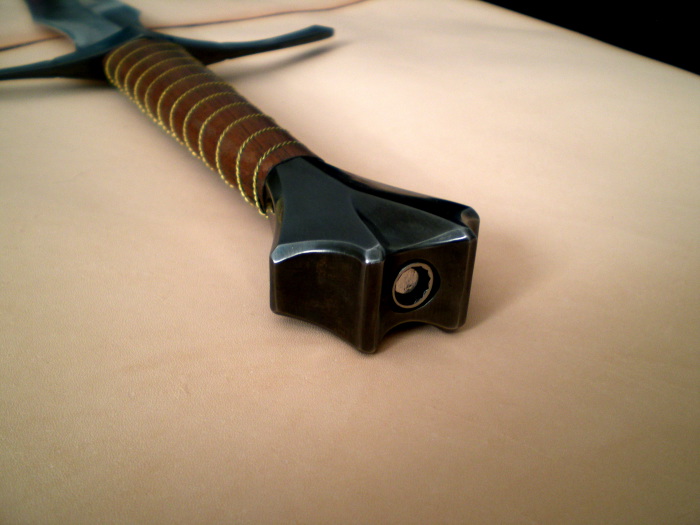
The guard and pommel are mild steel with a blued finish. The grip is mystery hardwood that acquired a big chunk of. The wire sits in a spiral groove, so it offers just a bit of texture without sacrificing comfort. Its amazingly light in the hand (even for aluminum) and feels great. Someone is going to look (and sound) really good performing with this sword....
29" Blade
38" Overall
POB: +2.75"
Weight: ~2.0lbs
 Attachment: 90.91 KB Attachment: 90.91 KB
Attachment: 83.64 KB
Attachment: 86.55 KB
Attachment: 92.91 KB
Attachment: 88.47 KB
Attachment: 75.89 KB
|
|
   |
 |
Jesse Belsky
Industry Professional
|
| Posted: Sun 22 Jan, 2012 4:53 pm Post subject: Process Shots |
|
|
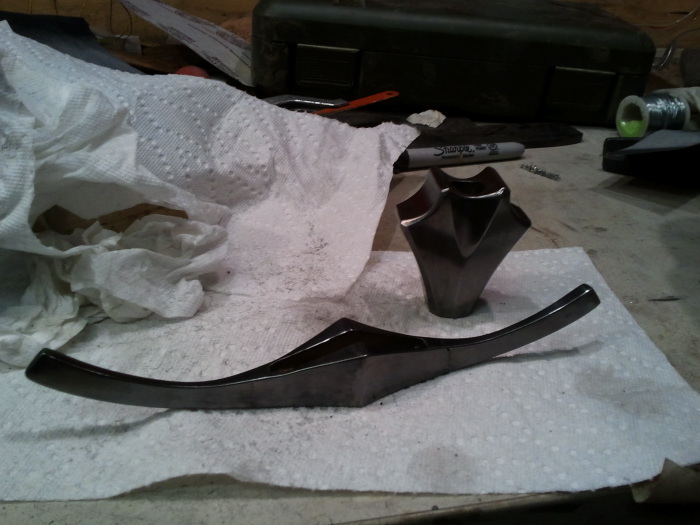
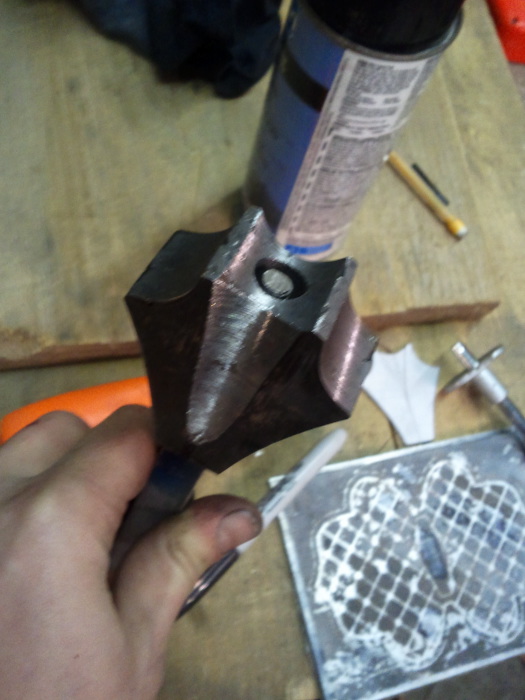
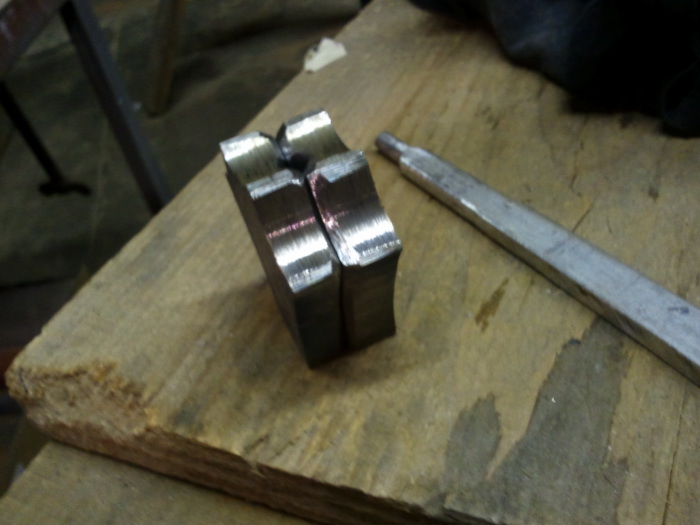
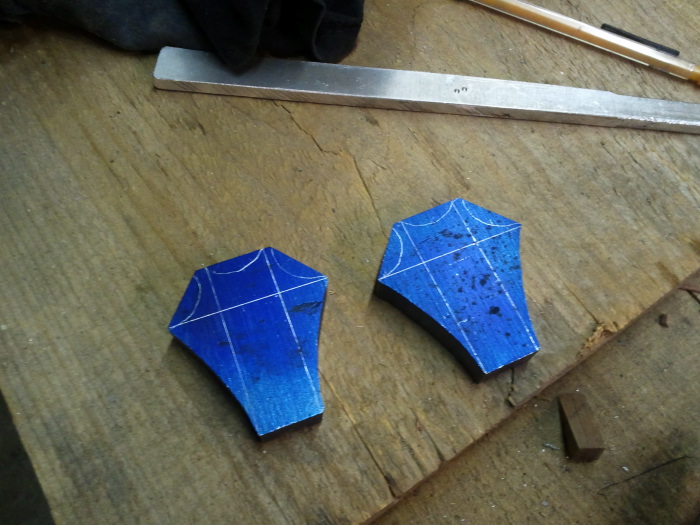
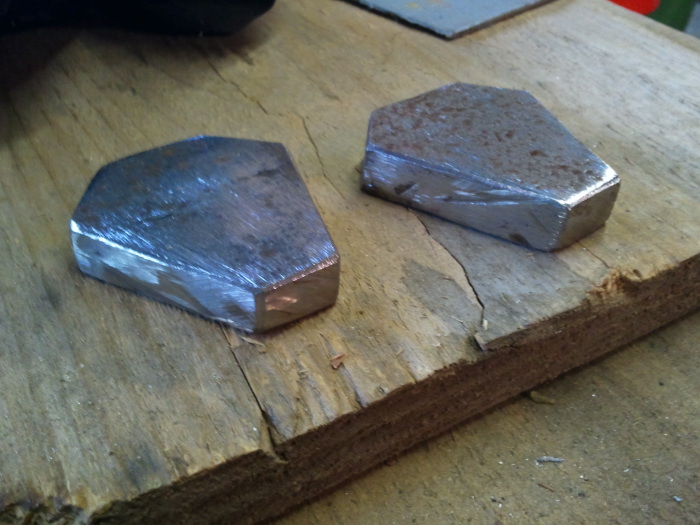
Here are a few process shots I took.....the pommel is made in a sandwich then welded around the outside, so the channel can be made really square and clean (and maximize the width of the tang as it passes through the pommel).
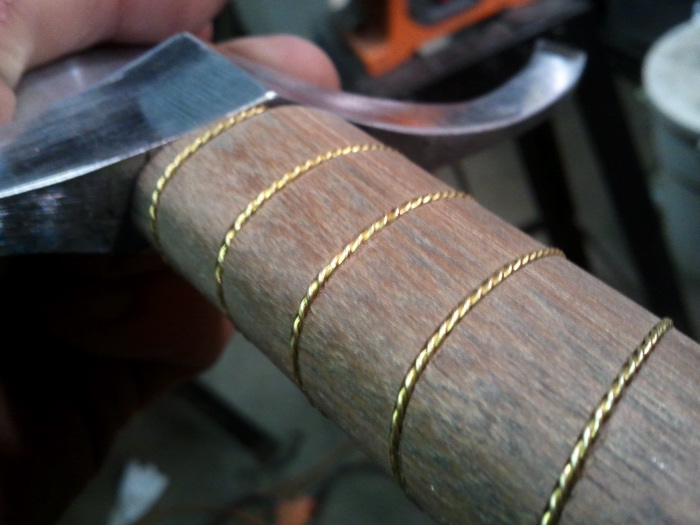
As you can see in the pics, I originally did the grip with a strong central ridge that matched up with the ridge on the guard and pommel, but somehow it looked wrong. I brought the cross section down to an oval shape, but then it really felt slick in the hand. A two strand spiral of twisted wire fixed that problem. I did the spiral wrap in string to get everything just right, then put a light coat of spray paint on the whole thing so i could use the shadows of the string as a guide for filing the channels. I'm sure i saw that on a forum somewhere, although i can't remember where. Worked like a charm.
Attachment: 98.2 KB
Attachment: 90.23 KB
Attachment: 74.21 KB
Attachment: 98.53 KB
Attachment: 95.75 KB
Attachment: 112.57 KB

Attachment: 82.59 KB
Attachment: 105.96 KB
|
|
|
|
|
Jesse Belsky
Industry Professional
|
| Posted: Sun 22 Jan, 2012 5:04 pm Post subject: Process Shots Contd. |
|
|
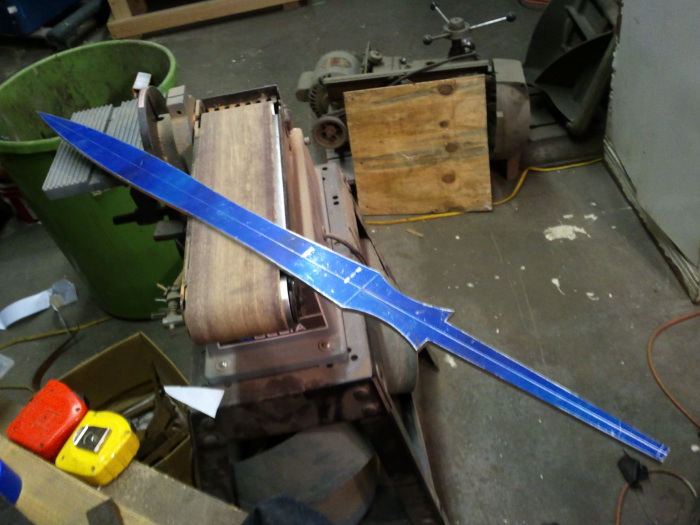
And the rest of the pictures....
Incidentally, I wanted to say thanks to Peter Lyon...I was watching a video on the WETA website about his process in making the LOTR sword handmade replicas, and I saw how he was hollow grinding a "Sting" blade edge down on the flat platen. I don't have the skill to do a long blade (let alone a leaf blade) edge up (the way knifemakers grind) and keep the hollow straight and even on all four sides. By aligning the platen with the exact center of the wheel, and then keeping the blade precisely vertical as the grind is established (with the help of a piece of angle iron as a push stick), I was able to develop even and properly angled hollows. By the time I approached the center ridge, and needed to start shifting the angle across different widths of the leaf shape, I already had a strong hollow to follow when I started grinding edge up. Maybe this is the way everyone hollow grinds sword blades? I don't know....I've seen pictures of Peter Johnsson's setup, and I think maybe he does the same. So, thanks to Peter Lyon for the inspiration.
Attachment: 124.78 KB
Attachment: 115.96 KB
Attachment: 102.97 KB

Attachment: 112.08 KB
|
|
|
|
|
JE Sarge
Industry Professional

|
| Posted: Sun 22 Jan, 2012 6:37 pm Post subject: |
|
|
Looks great, man. That is one sexy leaf blade! Thanks for posting. 
J.E. Sarge
Crusader Monk Sword Scabbards and Customizations
www.crusadermonk.com
"But lack of documentation, especially for such early times, is not to be considered as evidence of non-existance." - Ewart Oakeshott
|
|
|
|
|
|
Peter Lyon
Industry Professional
|
| Posted: Sun 22 Jan, 2012 7:04 pm Post subject: |
|
|
Great looking sword. And glad I could be of help. I have learned a lot about grinding leaf blades over the years, and I have developed my own techniques to deal with it, as will anyone else.
A few things I find useful:
- I get the hollow started in the middle of the face being ground, then adjust the pressure on each pass to push the edge of the hollow towards edge or center, as needed, and this way I can also change the grind along the length of the blade by using muscle memory to adjust the grind fractionally each pass.
- I found the support plate getting in the way when the blade suddenly widens at the shoulders. To keep it on the plate, I had to lift and rotate the blade over the contact wheel, so I couldn't really see what was happening. Now I don't use the plate at all, but it has taken over 25 years practise to get to this point.
- I see a lot of blades being held in a fist grip for security, but this makes it harder to "feel" what the blade is doing for the final grind passes, and where the center of pressure is against the contact wheel. I usually hold the blade between thumb and fingers in both hands, slightly on the underside of center on the contact wheel so I am pushing into the wheel but also upwards. It may not work for everyone, and it is possible for the blade to slip in your fingers, but it works well for me - I probably couldn't change now if I wanted to!
Still hammering away
|
|
|
|
|
|
Peter Lyon
Industry Professional
|
| Posted: Sun 22 Jan, 2012 7:08 pm Post subject: |
|
|
Also, Scotchbrite is your friend for finishing. I will grind P36/120/240/400/worn 400 then change down a contact wheel size (EG 5" if I have been grinding a 6" hollow) and finish with very fine to superfine scotchbrite. If there are tiny ridges where parts of the grind aren't blended cleanly, going back to a fine or even medium scotchbrite then through the finer grades will blend it all out without removing the crisp ridgelines etc that you have spent hours on getting.
Still hammering away
|
|
|
|
|
|
Peter Lyon
Industry Professional
|
| Posted: Sun 22 Jan, 2012 7:11 pm Post subject: |
|
|
Just realised too that I am thinking about heat treated spring steels, which work much harder than any aluminium. With aluminium, I grind to P240 (P400 belts just clog up and are quickly useless) and avoid medium scotchbrite, it leaves harsh scratches.
Still hammering away
|
|
|
|
|
Jesse Belsky
Industry Professional
|
| Posted: Sun 22 Jan, 2012 7:37 pm Post subject: |
|
|
Peter, clearly I have a very long way to go before I being to approach your skill set. Thanks for your comments. Its so interesting to hear the masters talk about their process! I experienced exactly what you described trying to grind the very base of the blade, and I found that up and over rotation quite tricky to keep consistent. I admire your skill at fractionally adjusting all those hollows pass by pass.....basically i'm using a jig to help me establish a consistent edge thickness, then pushing towards the spine at the wider part of the blade. I suspect on a steel leaf blade this wouldn't work very well, because there's very little distal taper developed. For aluminum though, I think keeping the spine almost .25" most of the way down the blade is good for strength and rigidity.
Also, I appreciate the advice on the finishing. It is definitely a bitch working up to higher grits, especially right at the spine. And you can't grind off-angle to reveal your coarser scratch marks either. I ended up doing a similar thing using scotchbrite deburring wheels on my buffer, which work like magic (thanks to Lewis Shaw for turning me on to those). I'll look into getting some belts though, as working horizontal to the deburring wheel on a buffer is really awkward.
Out of curiosity, when you are making aluminum blades, do you make blades that exactly match the steel blades in terms of cross section and relative edge thickness? What kind of construction methods do you use? I've become very fond of the recessed pommel nut because it leaves the tang/pommel junction thick and unthreaded, but no everyone like that look.
|
|
|
|
|
|
Peter Lyon
Industry Professional
|
| Posted: Mon 23 Jan, 2012 12:44 am Post subject: |
|
|
For film work, the idea is for the stunt blades to look as much like the steel as possible, but be much lighter (= faster and safer for actors). Ideally the edges are reasonably thick too (2-3mm) for safety and so the sword will last longer - stunt swords tend to get thrashed.
7075-T651 is the only grade worth using - expensive by aluminium standards, but springy (that is the T6 heat treat) and tough - it is the strongest aluminium out there. Also it etches well, in case you need to match details with the steel "hero" sword, which some aluminiums don't.
So I try to go for a thicker aluminium (EG 6mm if the steel is 5mm, 8mm if the steel is 6mm) and keep ridges full thickness so the blade has more strength.
Usually the hilt will be urethane, cast onto the blade, in moulds made directly from the hero swords, so the details are perfect. Moulded because their might be several stunt swords for one hero sword so they can be rotated through take by take, so one is being used while others are being cleaned up. Hilts are painted to match the hero sword as near as possible, and usually it is only possible to tell if the stunt and hero swords are put side by side. There are technicalities of film and TV work that are hard to explain, but a lot of it comes down to lighting and how cameras perceive things, which is not like the human eye, and the new film quality digital cameras have their own peculiarities.
Still hammering away
|
|
|
|
|
Jesse Belsky
Industry Professional
|
| Posted: Mon 23 Jan, 2012 7:50 pm Post subject: |
|
|
Yeah, I suppose that's not much different in terms of blade dimensions from the pieces I make for theatrical combat. The only major difference is that in stage work they have to "sound" like steel, so hilt compression is key to getting a good ring.
They never sound quite like steel, but they can ring like bells if everything is tight. I think its a tone thing....somehow steel has a deeper ring, but resonates for a shorter period. Aluminum has a slightly "lighter" tone, but it will really sustain a ring for a long time. That might be wildly unscientific, but that's been my casual observation. Do urethane hilted stunt swords ring at all? I've been told that epoxying hilt components solid will help preserve the aluminum's ring, but I haven't experimented with it. Anything loose and you just get an unsatisfying "clack".
7075-T651 is not cheap, that's for sure (although it sure beats buying stainless steel for knives). That's all that gets used here in the states for stage combat weapons, although I had heard in the film industry folks often use the 6000 range given that everything is essentially disposable after a few takes. Never made a lot of sense given the relative price difference. I've also heard that the 6000's are a lot gummier to grind.
One final question for you Peter....what do you etch your aluminum with? Nitric? I just bought myself a battery charger and i've been doing electrochemical etching with salt water. Works amazingly well on steel (fast, clean, controllable) but its less effective on aluminum. It seems to form a protective layer of oxidation after a fairly shallow cut.
|
|
|
|
|
|
Peter Lyon
Industry Professional
|
| Posted: Mon 23 Jan, 2012 8:12 pm Post subject: |
|
|
The ringing thing for stage combat explains the fully built up hilts; every sound gets re-recorded in film so the sound it makes on set doesn't matter. The urethane hilt acts as a bit of a shock absorber and seems to make the sword survive longer, and the "clunk" sounds don't matter.
Unless you don't put any real value on your time, the 6000 series makes little sense - I've tried it, it clogs up belts (= more $), the edges mush much more, and it doesn't have the springiness of 7075-T651 (= swords bending into interesting shapes in front of camera), so the saving on materials is more than offset by the shorter lifespan. I've heard of so many stunt swords breaking or falling apart on set, but that sounds to me like the result of only looking at the direct cost of the prop, not the useful work you get out of each one. But that is props buyers for you - the intial order is a different budget from the replacements, so they often don't care.
Still hammering away
|
|
|
|
|
Jesse Belsky
Industry Professional
|
| Posted: Mon 23 Jan, 2012 9:29 pm Post subject: |
|
|
|
Well, there's one thing that's no different between theater and film.....so much money wasted trying to save money!
|
|
|
|
|
|
|
You cannot post new topics in this forum
You cannot reply to topics in this forum
You cannot edit your posts in this forum
You cannot delete your posts in this forum
You cannot vote in polls in this forum
You cannot attach files in this forum
You can download files in this forum
|
All contents © Copyright 2003-2026 myArmoury.com — All rights reserved
Discussion forums powered by phpBB © The phpBB Group
Switch to the Basic Low-bandwidth Version of the forum
|

