Hello
I would be interested in what you know about iron painting. For example how were the black and white armours painted? Did they use only heat blackening or did they use some type of painting materials? But I'm more interested how did they achieve different colours: red, white, blue... ? If anyone of you knows something about it please write it.
Thanks,
David
Ohh, I have heared about puting pigment to lineseed oil I have made it but seems not to work on iron.
Hello,
There are three steps, sometimes four, to painting metal. These are modern day methods, mind you, and are not very historical, but they will work and endure as long as you do them well.
The first is that smooth metal is not a very good surface for painting as it is too flat and clean; the paint needs a more 'toothy' surface to be able to stay on. To do this, you can use sandpaper to rough the surface slightly; for a more even finish, you may want to use a mild acid to etch the metal. Before painting, ensure your surface is clean; you may want to wipe it with a lint-free rag and rubbing alcohol.
Secondly, you should apply a primer. These can be found at paint stores, although many people have good luck at auto supply stores. They come in various colours-- just use whichever one you think will do best with your final colors. For example, a final colour of white may not look good on top of a black primer as places where the paint is thin will look grey or streaky as the black shows through. A white primer would be ideal for light colours on top, black primer for dark colours, and so forth. I'm not sure if a primer is historically accurate, but it will help the colours in the long run, especially as it creates a second barrier against rust.
Thirdly, apply your final colours. You can do whatever you like with this. Spray it, paint it free-hand with a brush, whatever. If you do a design rather than simple blocks of colour, please try to be neat; a sloppy design will spoil the look you're aiming for (unless that's deliberate, of course!).
Fourth, if you want you can apply a protective coat on top of the paint. A clear-coat is not historical, but works. This will help protect your paint from weather and rust. Even if you don't clear-coat you may want to use something like Renaissance Wax or Militec-1 when displaying or storing your armour.
Not sure what methods were used for painting metal historically but they may have used an egg base instead of oil. I would look up 'egg tempera' method if I were you. With paint, different colours are from different pigments mixed into the medium (oil, water, egg, wax, what have you). The medieval smiths did have ways of heat-colouring armour, but these generally resulted in varieties of blue or black. A russet colour is sometimes seen. It's possible they had some form of cold bluing solutions in the Renaissance era, not sure about medieval. Gilding with different metals and enamel were also used for accents.
Good luck and do post whatever the results are of your work!
Hello Jeffrey,
Thanks for posting this infos I want to paint a breastplate. At first I used heat to paint it and I achieved all the colours that are writen from yellow, purple, blue to black but it's really hard to control it especially if you want to make yellow or purple. But I want to be my breastplate black so I used nitro based car wheel painter because I want it to last long on it comes gold acrylic painig. Protecting my works from rust I have tried wax but I prefer more pig fet it holds out rust from crinkles and although it drys in weeks or month its really thin and has a good touch and its easy to put it on again and peoples hand slide on it if its not dry so it's good for big mass battles :)
I have tried to make a lots of tempera when I was making shield.
It's not ready yet, please help me how to put pictures on this site I tried this img bottom but won't go.
If anyone else from you have some historical infos please post it.
Thanks,
David
I try to attach picture but it writes every time general error empty file?????
| David Gaál wrote: |
| I try to attach picture but it writes every time general error empty file????? |
Have you looked at this: http://www.myArmoury.com/talk/faq.php?mode=attach ? It's from our info section. The img tags only work if the image is already on the internet.
Hello I have made some pictures it is not ready yet I have to make some corrections and apply some kind of protective coating. It's not so good but not bad for the first time.
David
 Attachment: 191.9 KB
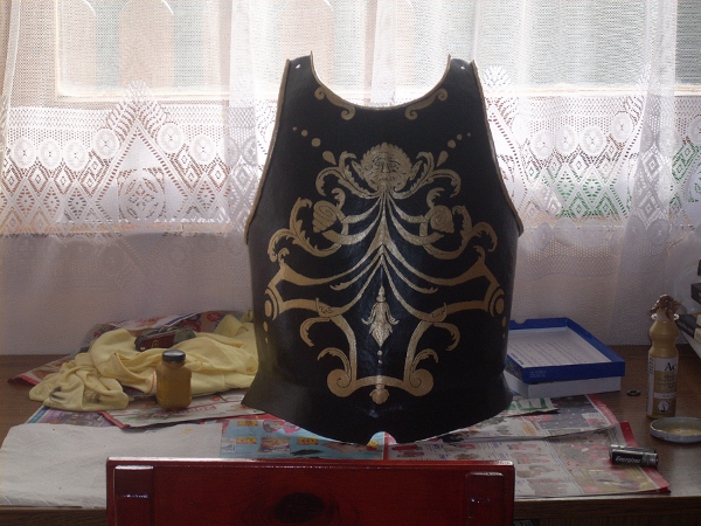
picture 1
Attachment: 216.75 KB
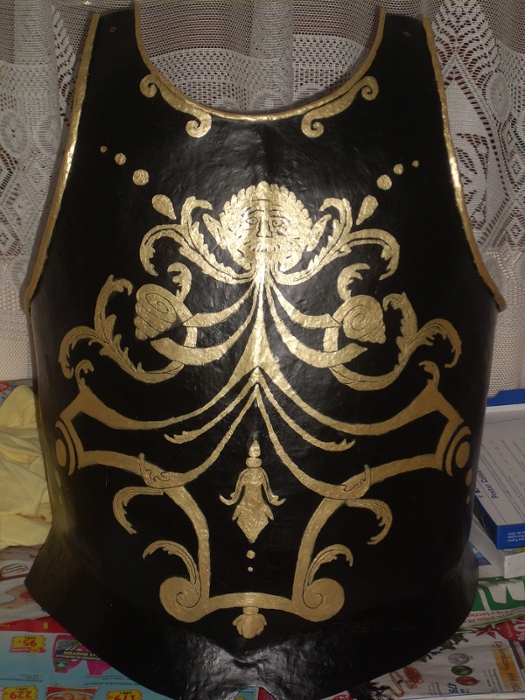
picture 2
David
picture 1
picture 2
on the topic of painting armour would a primer/paint combo hold up better or would using something like cerakote like what they use on rifles that sort of bonds to the mettle be better as far as durability? and then just use a regular paint for any detail work
Hello
I have tried again lineseed oil and pigment and it WORKS it needs only a few days or weeks dependig on temperature. :) It's not to bad you have to care only that it shall be applied thin, because if it is thick you can easily scratch it, so make it thin and in more layers.
David
I have tried again lineseed oil and pigment and it WORKS it needs only a few days or weeks dependig on temperature. :) It's not to bad you have to care only that it shall be applied thin, because if it is thick you can easily scratch it, so make it thin and in more layers.
David
linseed and pigment is basically old fashioned artist oil paint first discovered by Jean Van Ike in the 1400's. it takes a long time to dry. a LONG TIME. i know i've used them on canvas before it took 3 days to dry depending on how thickly you mixed the two together. and after it is fully dry - it still needs a protective sealer. varnish or shellack is best, which if you live in PA is hard to get due to our epa laws - but oil based polyurethane may work just as good. i know from painting canvas that once your done with an oil based paint, you must wait up to 6 months before applying the sealer. the surface of the oil paint will be dry to the touch - but underneath it's going through a curing process (just like concrete)
now i haven't painted on metal with it other than with something more like rust-oleum which is an oil based paint made for metal and drys within a few hours so. i'd just advise that if it's already dry to the touch, don't finger it and leave it off to the side for a week - then come back with a sealer. or by chance some else here has used the same method and can assure us that you don't need to wait a ton of time before applying the sealer.
when painting you can paint an acrylic sealer over oil - but you can't do it the other way around, an oil based sealer will not adhere to the acrylic so it's best to stay with an oil based products if you started with them. i like the way they apply better too.
David, you might try another kind of oil finish that is also used on wood like linseed oil ?
I've just recently started using this:
Try Tung 'N Teak Oil has a brand name of CIRCA 1850
www.circa1850.com
It gives me an oil rubbed finish on wood that dries and hardens very fast compared to linseed oil.
http://www.swingpaints.com/1807us_can.htm
Don't know how durable it would be, but at least as good as linseed oil on steel and may not need a protective coat ?
Also, don't know if you could mix in pigment but maybe worth testing it out on a piece of scrap steel ?
Tung 'N Teak Oil :D i love this stuff it's so easy to apply put it on and leave it, no rubbing or buffing. if you ever used 'real' varnish you use tung oil and look at it like :\ "is this all i need to do?" it's very thin, on wood itpenetratess really deep and really makes wood grain's pop. i used this or danish oil on all my wood work and i can't see any reason why you couldn't use it on painted steel.
i recently engraved 4 steel plates and i attempted to use a coat of this as a preventive sealer. but not enough time has past by for me to tell if it's doing what i hope it does. i just finished that project at x mass.
you can probably add pigment to it, it's basically linseed oil as well with other chemicals, but even the clear tung oil has a hint of a tint in it, so i'd image it will dull the color you'd want to try with it, and multiplel coats my go to a brownish color.
I have done some research on historic use of pigments, and done some initial experiments with it as well. Not on iron (yet) but on gesso-covered canvas on wood. Shields for the layman..
If you want to use historical pigments used from late medieval to rennaisance your palette will be limited for a number of reasons. First, the best choices for yellow, red and white contains toxic and harmful elements such as mercury (vermillion/cinnabar) cadmium sulfide for yellow and lead for white. The limitations on good white and yellow that will mix well with oil causes further trouble since they will in turn limit your ability to produce some shades of green and lighter tints.
I could write a lot on this, but let me first point you to: http://www.webexhibits.org/pigments/
And keep in mind that most stuff you find about paint and pigments in articles and on the net is about artist paint. So application is to make rather small objects of art where they want total control over subtle hues and where it is a major problem if the colour fades and changes over years. For us that paints shields that will not last for more than a limited time, and are not Rembrandts to begin with can have much more tolerance :)
So basically, all earth pigments are excellent, you can get warm browns, reddish tones and ochre-yellow. Lamp-black is also great and these are relativley cheap.
White (without toxic lead or modern titanium or zinc pigments) you are limited to chalk, wich is great in glue paint, but not so good in oil.
Green colours available will be rather cold and bluish. For warm lush greens you would have to mix expensive blue with extremley toxic yellow.
Historic blue would be Ultramarine, azurite or smalt, expensive but available. Ultramarine is synthetisized today. Smalt you can grind yourself from blue glass if you have the patience and means to do it. I have not yet tried to mix these so I do not know what mediums they work best in.
But check that link, it is one of the best I have found so far!
| David Gaál wrote: |
| Hello I have made some pictures it is not ready yet I have to make some corrections and apply some kind of protective coating. It's not so good but not bad for the first time.
David |
That is beautiful. I have always been a sucker for gold filigree on a black back ground. Whatever kind of paint you used, it looks like the breastplate has a nice blackened appearance rather than paint. :D
Hello
Thanks for your massages. I will try this Tung 'N Teak Oil or find something with the same content. Note I live in Hungary so it might be that I can't buy it here.
Thanks for the pigments. I will read through this site. I have read a little about them and made experiments in summer to make egg tempera myself and trying to make pigment. Most of the pigments in the past were made from some kind of crystals so that was not affordable but I have tried everything from milled red paprika through colored chalks to everything which has color, and to tell you the truth the biggest problem is that I cant make it so soft that all could dissolve(pepper was with the paprika :) and what a smell it had!!!! ). But chalks are really good! At the and I have found some kind of house wall painting powder and that was the best but because it's now an outdated method to paint so a house I could find it only in a limited colors but that was the best.
For making green I have read that cooper rust is good to.
Thanks guys for all the ideas,
David
Here is a site from where I have learned a lot: http://web.ceu.hu/medstud/manual/MMM/index.html
II./8. is pigments
David
II./8. is pigments
David
if you felt really sure of yourself and your ability to mix paints, you only really need 3 colors, a red, blue and yellow pigment and you can make all other colors from them. a white would help for tints though i never advise mixing white or black pigments into a mixture because it causes the color to 'tint'
i was trained in painting and drawing when i was in college and always heard of this and though it was nuts until i had a project and i had limited resources. i gave it a try - and i was able to get every color i needed for just those 4. now, that does take a little bit of skill to do, if i tried to that again today, it would take me a while because i haven't painted in so long, but it just something to keep in mind that you don't need to go to the ends of the earth to get every color you need, a few from the color wheel will do
a red, and blue with give you your violets
yellow and red will give you oranges
yellow and blue will give you greens
and that's most of your color wheel. your black can be made from all your dark colors mixed together and i recommend that. artistically a black not mixed from you pallet is lifeless once it's mixed with other other colors - you will see the difference if you take a manufactured black and mix it with a color vs using your mixed black or the colors opposite to darken a color.
| Daniel Wallace wrote: |
|
your black can be made from all your dark colors mixed together and i recommend that. artistically a black not mixed from you pallet is lifeless once it's mixed with other other colors - you will see the difference if you take a manufactured black and mix it with a color vs using your mixed black or the colors opposite to darken a color. |
Totally agree with it.
My question about color mixing is how to make a color brighter or darker? For example red? What I can buy in the store has a dark appearance close to brown how could I make it brighter?
David
to get a brighter red, add just a tiny touch of yellow. this will start to pull the color from the red to orange side, mix the color very sparingly, too much yellow and you'll just get an orange color.
you can also use a little white - very little, like 1 drop per every 20 of yellow (exaggeration of course) white will not brighten a color - it will tint it, giving it a milky look once you've added white to your mixture its never going to be the same.
a little project you could do. make two separate rows of 1in boxes. in the first box of both rows, put the pure red color in them. in the top row of boxes, put a little yellow with your pure red and paint the next box, paint every box with an increasing amount of yellow with your pure red to get an idea of the gradation of colors you can make by mixing these two together. on the bottom row of boxes, do the same by using white - and you'll see something similar - but at the end of this row your going to see a pink evolve instead of a reddish orange color.
doing little test swatchs like that is what i used to understand how to mix colors it will just give you a good understanding of what colors can develop and what you can attempt to use to get a desired color.
o - but if you'd mix red with green, or yellow with violet (if your going to be an artist there is no such thing as purple), or blue with orange, you will get a nasty gray mix of &*^% known as a neutral. this can be used for an underpainting but if your mixing colors it's the color of disaster. once you get a pains gray neutral color, nothing you add to it will save it. its as if you made worlds collide and this is the mess your left with.
look up color theory and get yourself a color wheel handy when your mixing colors, if you don't have one from 1st grade still laying around the net's full of them. they might list the colors differently, but the basics are the same. yellow, red, blue, green, violet, orange. panting takes patience - most of it involves mixing colors to get a desired shade.
Page 1 of 1
You cannot post new topics in this forumYou cannot reply to topics in this forum
You cannot edit your posts in this forum
You cannot delete your posts in this forum
You cannot vote in polls in this forum
You cannot attach files in this forum
You can download files in this forum
All contents © Copyright 2003-2006 myArmoury.com — All rights reserved
Discussion forums powered by phpBB © The phpBB Group
Switch to the Full-featured Version of the forum
Discussion forums powered by phpBB © The phpBB Group
Switch to the Full-featured Version of the forum