I am considering buying a Hanwei/Tinker bare Viking blade and hilting it myself. This would be my first foray into sword assembly, so I was going to go for a simple Petersen type M hilt - just a couple of bars of mild steel (unless there is a better material I should be using?), and a wooden grip.
But having heard quite a lot of Mr. Tinker's expertise on swords, I know that pommel/hilt weight is an important thing to consider, so what weight should I be aiming at for this blade? If I know what to try for I can size the lengths & thickesses of the guard and pommel appropriately.
So, anybody hilted one of these blades?
First, make a crossguard. Choose shape and dimensions appropriate for the style and size of your blade. Then choose what pommel weight seems appropriate. Attach a piece of scrap metal/whatever in place of the pommel and try swinging your sword around. If it feels right-you know the required weight of your pommel. If it does not, change the weight of your "pommel" until it feels OK. After all, balance is a matter of personal taste.
One thing to keep in mind is that viking swords, especially earlier ones, often had point of balance farther from the crossguard than most of us would like.
One thing to keep in mind is that viking swords, especially earlier ones, often had point of balance farther from the crossguard than most of us would like.
That sounds like a good approach, thanks! I'll need to get designing, and then file, file and file some more.
Hi Will! This is a great idea.
I've custom-hilted and scabbarded a few sharp Tinker replacement blades with very satisfying result and the full peen you can do with these makes them very durable for cutting. Let me know if you want some pointers...
Druids Dybeck kit hilt.
[ Linked Image ]
This Gaddhjalt is probably closer to what you had in mind. All hand made from scratch hilt components.
[ Linked Image ]
[ Linked Image ]
[ Linked Image ]
Those are some nice swords Johan! I particularly like the elegance and simplicity of the Gaddhjalt. It is my receipt of a Hanwei-Tinker Norman sword (a gaddhjalt in all but name) that has made me want to assemble a sword myself.
I will happily accept any pointers you would like to tell me, I know very little about this sort of thing, and nothing from personal experience. A large part in choosing a simple type of viking hilt design is to make fabrication as easy as possible, in the expectation that many things will not go right the first time I try. I would particularly like to know what tools are critical, and which are desirable - what is your usual tool kit for sword assembly?
I will happily accept any pointers you would like to tell me, I know very little about this sort of thing, and nothing from personal experience. A large part in choosing a simple type of viking hilt design is to make fabrication as easy as possible, in the expectation that many things will not go right the first time I try. I would particularly like to know what tools are critical, and which are desirable - what is your usual tool kit for sword assembly?
I'm working on a Tinker longsword blade. I am curious how you relieved the cross guard for the blade. I was planning on milling it out, but was not sure how to get a good match for the blade. Any tips are appreciated.
BTW, it was nice to know the Tinker uses a standard 6x1mm fencing pommel nut. I like the idea of being able to disassemble the sword until I get all the fitting and balance right.
BTW, it was nice to know the Tinker uses a standard 6x1mm fencing pommel nut. I like the idea of being able to disassemble the sword until I get all the fitting and balance right.
I forge my crossguards, it is pretty easy (and I am not a professional blacksmith/bladesmith). If you don't have access to a forge-get your tang slot milled. You don't necessarily need it fit very well, there are numerous examples of period crossguards with tang holes larger than the tangs themselves. Some wooden or metal wedges do the trick of making such crossguard fit well. Or you can use the method traditionally used to fit tsubas on Japanese swords (which is center punching metal close to the tang slot so that some metal is driven into the slot thus making it smaller).
When the slot is milled, use needle files and/or dremel tool to round edges of the tang slot on one side of the ceossguard so that shoulders of the blade can fit in (I hope people can understand what I mean, it's pretty difficult for me to explain it without a picture).
Now if you want a depression in your crossguard to accomodate shoulders of the blade... Don't mill it! Use small chisels and/or dremel tool and/or burins (these can be easily made from needle files if you have a dremel tool or some kind of a grinder).
| Tod Glenn wrote: |
| I'm working on a Tinker longsword blade. I am curious how you relieved the cross guard for the blade. I was planning on milling it out, but was not sure how to get a good match for the blade. Any tips are appreciated.. |
I'd cut it with an angle grinder and a thin grinding cutter blade, with a light touch and tape up thick all the areas where it might nick the blade. But that's me with 15 years of skill from working an angle grinder a few hours a week. So if you aren't then practice cutting something else first. Always use a very strong secure grip but light touch with it, always use a protective leather or special tough fabric apron and be very careful, that thing can take off human limbs like a hot knife through butter. Perhaps a hacksaw would be able to remove the pommel by cutting it on one side, and then hammer the rest off with a mallet Plastic or wood if you want to keep the parts, or steel for better effect.
You do know there are replacement blades for all standard tinker line swords readily available though, with no mounted hit parts? Makes everything much easier and they cost less too. I'd buy one of those and leave a complete sword as it is.
Last edited by Johan Gemvik on Fri 16 Sep, 2011 1:57 pm; edited 3 times in total
Tools I use are electric hand drills, a drill press (if I can get access to it, in a friends basement), dremel, a large ball peen hammer (for peening), a plastic or wooden mallet, an aluminium pipe- tool to hammer on the crossgurad, a set of needle files, a n extra long knifemakers tang hole cutting file, carving knife, table belt grinder and an angle grinder.
For some parts a small portable forge, though I can mostly get away with no hot forging since the blade is bought finished and I use modern drills, dremel and grinders. Kind of cheating though. ;)
For scabbard making you need a wood saw, wood chisels (straight and spoon), a mallet, glue, raw materials and a haridryer to shrink fit the leather cover. Helps a lot to have a woodworkers bench too.
Aleksei is right that many hilts don't seem to have been fitted all that perfectly historically, for a first sword at least this isn't all that important. You can fill up with epoxy, hammer in wood or metal wedges and so on. Just as long as it looks decent and is secure even after some cutting or blunt play. If you glue the gavel in place that also helps secure the crossguard.
What I did to secure mine perfectly, as I don't like things moving around when I do cutting, was to do the same thing Albion does. That technique is to make a slightly smaller hole in the crossguard and use a tool to hammer it in the last bit. Basically the same thing Aleksei mentions for Tsubas on japanese swords.
I use an old modified paintball barrel for this as I happened to have a worn out one just lying around, but any aluminium pipe with the right inner diameter would do. Or a copper or brass pipe for that matter. As long as it's softer than the steel pieces you're attaching to the sword it's all good and won't leave marks.
See this video "How it's made -Swords", a documentary from the albion factory. First they show modern milling of blades, which I expect only some very few have access for machines for, but at 3:00 and onward it shows how to attach the parts snugly and it's all pretty straightforward.
http://www.youtube.com/watch?v=ru-0GwYGUzY
Then I always make one-piece gavels that I drill out and file with a thin long special file unil it fits the tang, the same way most knifemakers do hilting so it's described in most knife craft books. But you really don't have to d that unless you're going to have an all wood gavel. 2-piece under cord and leather are just as historical (perhaps more so) and much easier to do. How to do that is also shown in the "How thing are made -Swords" video.
Anyway here's a quick list:
1. Visualize what you want the finished sword to look like and sketch up hilt parts and gavel in full scale on a paper. If you're going from historical originals get good photos to work from, scan, resize them and print. Always good to have a set goal to work towards, and good to have a photo to compare with as you work.
2. Make rough hilt components, drill center of slots if you can' forge them with drifted slots.
3. File tang holes to be just big enough to hammer the parts in place. If you're using the pommel pyramid or a threaded pomel end this become much simpler. I prefer to peen right on the pommel though so I have to be picky with the fit of the end of the slot hole. This takes a lot of patience.
4. If you're using shallow blade slots in the crossgurd, do it like Aleksei says. I prefer cutting them with a thin dremel and cutting disc, but there are several ways to do it. To get a snug fit do the same as with the tang holes, slightly smaller, then put the blade in a vise like in the albion video and hammer the crossguard in place. If it won't go all the way in, take it off and cut a slightly larger bade slot.
More to follow, but it's getting late at night and I'm really tired right now... ;)
I am working with a blade only. I have lots of experience making knives. I've just never had to recess the blade into the guard and since I am working with bar stock for the crossguard I have to use a non-forge method. I think I am going to rough mill undersize and then do the final cuts with a dremel.
Here's where I am at so far:
 Attachment: 116.22 KB
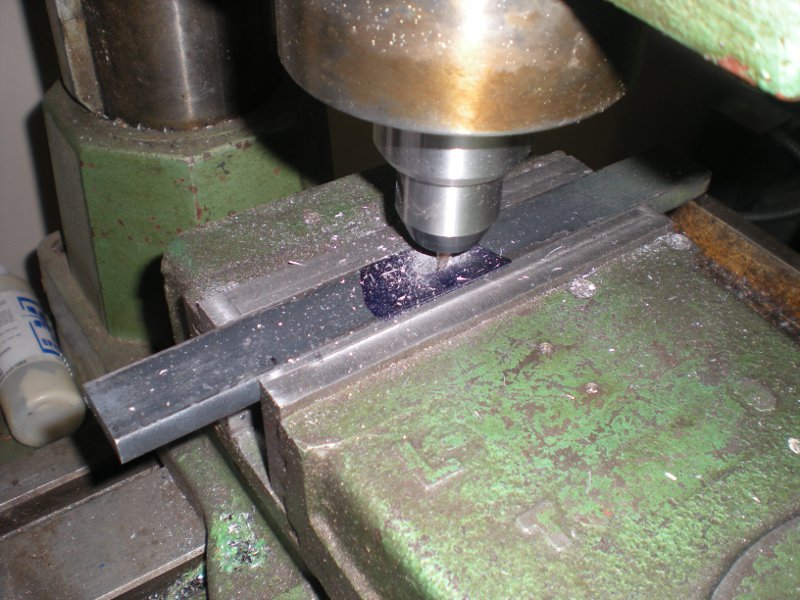
Attachment: 118.94 KB
Here's where I am at so far:
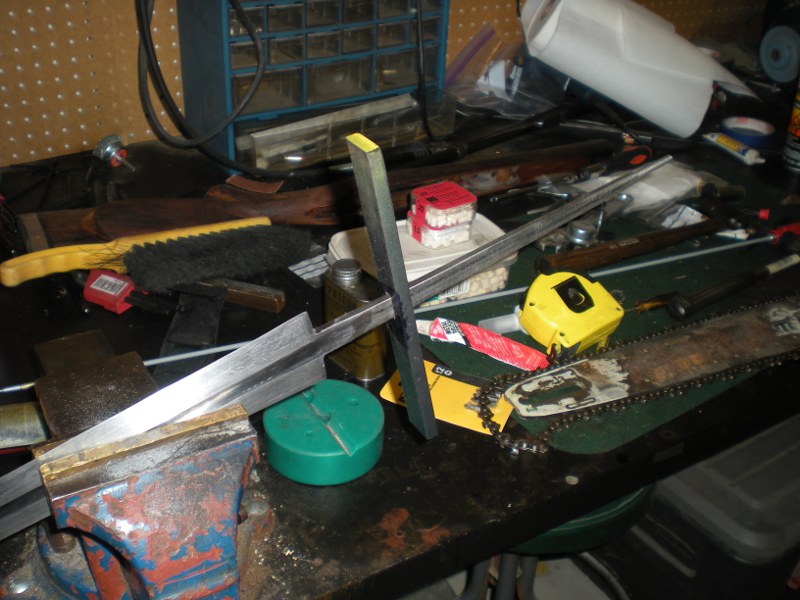
Thanks for all the tips. I got the guard finished and am happy with the result.
Attachment: 50.71 KB
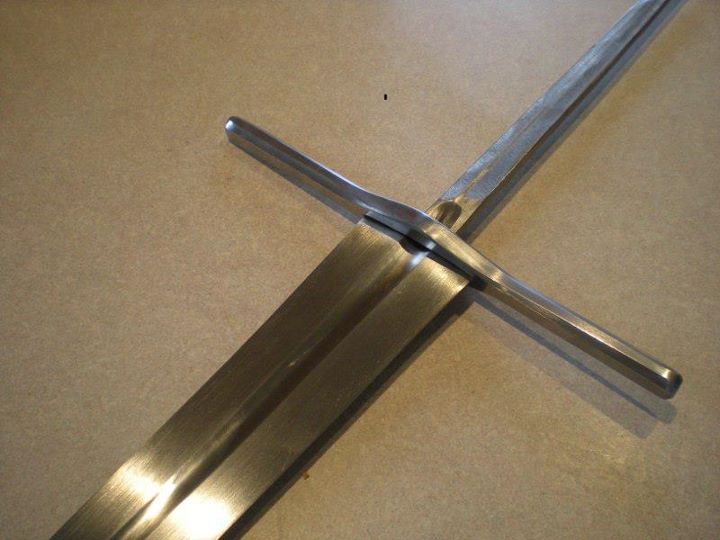
Looks real good!
Excellent thread. May I ask a question ? Would it be possible to post another pic of the BACK of the scabbard of the gaddhilt ? I've been trying to work a similar suspension for one of my swords, but it just doesnt seen to be working. I'm only guessing, but is the upper and lower sections of the belt both cut from one continuous belt ?
| Johan Gemvik wrote: |
| Looks real good! |
I second that. Nice job indeed. Will definitely check your progress here :)
J
| Ralph Grinly wrote: |
| Excellent thread. May I ask a question ? Would it be possible to post another pic of the BACK of the scabbard of the gaddhilt ? I've been trying to work a similar suspension for one of my swords, but it just doesnt seen to be working. I'm only guessing, but is the upper and lower sections of the belt both cut from one continuous belt ? |
I may have posted a thread with this before and was just looking for a link to post and not clutter up or sidetrack this thread to scabbardmaking, but I can't find it right now. Sorry if I'm going OT a bit. Hopefully it's also of interest for the sword project, otherwise let me know and I'll clean it off here and maybe post it as a new thread or something.
[ Linked Image ]
[ Linked Image ]
The belting and loop is 3 pieces, the 2-eye half of the belt, the longer split tounge half of the belt, and the Z-section. The Z has its top and bottom extended , as a sideways drawn out "Z_" at top and bottom and you double it over and sew the end of the legs to where they meet the first angle on it's own leg, with the appropriate belt piece sandwiched between. Note that a special type of stitch is used and that the Z-piece ends widen from half the width of the belt to full width at the ver end. This will make sense when you put it together. Perhaps I should also take a photo of the Z-piece template, as it took some time to get the proportions right.
The Z-loop system is from the surviving and fully intact sword, scabbard, belting and all from Sancho IV:s tomb, king of Castille (Spain) between 1284-1295. It can also be seen in the Chronicle of Ivar the Boneless (a 11th century manuscript, but depicting mid 8th century if I recall correctly). Variants of it can also be seen on the Bayeux tapestry, though these seem backwards, but perhaps it's a leftie version that's been slid over to the off side for some reason during battle, or a skewered perspective as seen fairly often in medieval art. The diagonal band doesn't really need to be diagonal left to right either, it could be made straight on one side or diagonal right to left and still function the same. All it really needs to do is to keep the two loops from sliding apart when you pull the belt tight over the hip. In that case, one should just call it a band connected double loop system instead, and several variants of this type of fastening is seen all over the Bayeux as well as a number of manuscripts from 11th century and onwards.
The Z-system belt fastening is at least late 13th century obviously, but I suspect it could have been used as early as 8th century and very likley in the 11th.
The Gaddhjalt I was first aiming at reproducing is from page 119 in the book Weapons & Armour by C Guillot (ISBN 978-2-8404-8251-2) and is dated to 11th to 12th century.
[ Linked Image ]
The sword on the right in this photo.
But my brother didn't want the crossguard that short, so I found an almost identical sword, but with slightly longer crossguard in the same book (intersection of page 120-121) that had been dated a century later, 12th to 13th, so I changed to using that one as a template instead halfway through making the hilt pieces.
[ Linked Image ]
For that sword the Sanco IV system seemed a fitting scabbard and belting , though there are other just as historical variants of course.
I appear to have just run into a slight problem in that I now want to rescabbard my existing sword more urgently than I want to hilt a blade! That is nice work Johan!
And I want to make a shield and haft a spear, mace and bronze axe. Argh! Too many projects!
And I want to make a shield and haft a spear, mace and bronze axe. Argh! Too many projects!
Johan Gemvik wrote
Thanks for your reply. I'd love to see a seperate topic on this type of sword suspension. along with your template for the z section piece, as I still seem to be suffering from a case of the stupids at the moment, and just can't seem to get it correct :) :\
| Quote: |
| Posted: Fri 23 Sep, 2011 2:32 am Post subject:
-------------------------------------------------------------------------------- I may have posted a thread with this before and was just looking for a link to post and not clutter up or sidetrack this thread to scabbardmaking, but I can't find it right now. Sorry if I'm going OT a bit. Hopefully it's also of interest for the sword project, otherwise let me know and I'll clean it off here and maybe post it as a new thread or something. he belting and loop is 3 pieces, the 2-eye half of the belt, the longer split tounge half of the belt, and the Z-section. The Z has its top and bottom extended , as a sideways drawn out "Z_" at top and bottom and you double it over and sew the end of the legs to where they meet the first angle on it's own leg, with the appropriate belt piece sandwiched between. Note that a special type of stitch is used and that the Z-piece ends widen from half the width of the belt to full width at the ver end. This will make sense when you put it together. Perhaps I should also take a photo of the Z-piece template, as it took some time to get the proportions right. |
Thanks for your reply. I'd love to see a seperate topic on this type of sword suspension. along with your template for the z section piece, as I still seem to be suffering from a case of the stupids at the moment, and just can't seem to get it correct :) :\
Page 1 of 1
You cannot post new topics in this forumYou cannot reply to topics in this forum
You cannot edit your posts in this forum
You cannot delete your posts in this forum
You cannot vote in polls in this forum
You cannot attach files in this forum
You can download files in this forum
All contents © Copyright 2003-2006 myArmoury.com — All rights reserved
Discussion forums powered by phpBB © The phpBB Group
Switch to the Full-featured Version of the forum
Discussion forums powered by phpBB © The phpBB Group
Switch to the Full-featured Version of the forum