| Author |
Message |
|
Robert Rootslane
Location: Estonia Joined: 06 Aug 2007
Posts: 72
|
 Posted: Mon 05 Sep, 2011 5:58 am Post subject: Posted: Mon 05 Sep, 2011 5:58 am Post subject: |
 |
|
| Johan Gemvik wrote: | Hi Robert,
I've used 1,5 mm plate to punch from so far. Inner diameter 5 mm and outer 8, making the ring square section. Of course, I now find they also need to be drop forged to be complete. |
Ok, thank you.
Is the 1,5mm thickness same as the gjermundbu mail originally had? If the inner diameter is 5mm and outer 8mm than it means that the thickness is 3mm? Am i correct if i think that it makes the solid ring a little bit flat? So the cross section is wider that it is thick. (i hope you get what im trying to say here:D)
I have looked at some mail fragment finds from Estonia and they seem to be more like 10mm in outer diameter and ~~8 in inner. Ofcourse these are a bit later than gjermunbu. 11- 12 century.
For example this: https://picasaweb.google.com/117366979389819398139/Kaku#5605241442722285730
So i was thinking that what might be the reason for much bigger rings? Did the rings get bigger at later times, or is it just the lazyness of Estonian mailmakers? 
|
|
  |
 |
|
Vinícius Arruda
Location: Brazil Joined: 02 Aug 2009
Posts: 6
|
| Posted: Mon 05 Sep, 2011 8:10 am Post subject: |
|
|
| Robert Rootslane wrote: |
Is the 1,5mm thickness same as the gjermundbu mail originally had? If the inner diameter is 5mm and outer 8mm than it means that the thickness is 3mm? Am i correct if i think that it makes the solid ring a little bit flat? So the cross section is wider that it is thick. (i hope you get what im trying to say here:D) |
No. The cross section would be round or square, not flat. The internal diameter is 5mm, then, each side of the ring has 1,5mm. Both together, 3mm. The internal diameter is taken from the ring's edge, not from the center of the cross section.
By the way, This is an excelent thread. I am almost convinced to make one mail like this someday hehe
|
|
 |
|
Jared Smith

|
| Posted: Mon 05 Sep, 2011 8:19 am Post subject: |
|
|
| Dan Howard wrote: | | The mail examples that show high slag content are more than likely made from wire that hasn't been drawn. |
Dan,
You have got me curious.. Why wouldn't drawn wire exhibit slag, at least in lines? The heavy iron cables used in Victorian era bridge construction were drawn, and did have "lines" of higher concentration slag zones within the cables. The slag lines did take on an orientation as a result, so if we mean "high slag content" has slag randomly dispersed all throughout a mail ring specimen then I could see why it would make drawing processes seem unlikely.
Jared
Absence of evidence is not necessarily evidence of absence!
|
|
|
|
|
|
Robert Rootslane
Location: Estonia Joined: 06 Aug 2007
Posts: 72
|
| Posted: Mon 05 Sep, 2011 11:57 am Post subject: |
|
|
| Vinícius Arruda wrote: | | Robert Rootslane wrote: |
Is the 1,5mm thickness same as the gjermundbu mail originally had? If the inner diameter is 5mm and outer 8mm than it means that the thickness is 3mm? Am i correct if i think that it makes the solid ring a little bit flat? So the cross section is wider that it is thick. (i hope you get what im trying to say here:D) |
No. The cross section would be round or square, not flat. The internal diameter is 5mm, then, each side of the ring has 1,5mm. Both together, 3mm. The internal diameter is taken from the ring's edge, not from the center of the cross section.
By the way, This is an excelent thread. I am almost convinced to make one mail like this someday hehe |
oh....
ofcourse it is. Sounds logical now that you have said it...
However, any ideas about the larger rings by anyone?
|
|
|
|
|
Dan Howard

|
| Posted: Mon 05 Sep, 2011 2:08 pm Post subject: |
|
|
| Jared Smith wrote: | | You have got me curious.. Why wouldn't drawn wire exhibit slag, at least in lines? The heavy iron cables used in Victorian era bridge construction were drawn, and did have "lines" of higher concentration slag zones within the cables. The slag lines did take on an orientation as a result, so if we mean "high slag content" has slag randomly dispersed all throughout a mail ring specimen then I could see why it would make drawing processes seem unlikely. |
Are there any examples of puddled iron that has been drawn into wire as thin as that used for mail?
|
|
|
|
|
Johan Gemvik

|
| Posted: Wed 07 Sep, 2011 8:29 am Post subject: |
|
|
Robert, there's nothing preventing one from making as large punched rings as one wants really, except for punching force. Just use a bigger hammer. There are physical limits to this of course but then maille rings were never really all that huge. There are also solid links found in surviving mailles that are welded as they have an obvious seam, just like proper chain links. Doing this no doubt becomes easier with larger rings as they retain forge heat longer and have some decent material to work with the hammer. We've discussed this before in the thread.
Jared, the common idea among us maillemakers and maille historians is that high slag content makes wire break when being drawn, so either you get only short lengths free of slag (if you trim the ends off where it breaks) or you have to get the slag out before drawing the wire. Either way riveted links with no slag are the end result if they're drawn, whereas hammered wire could have all the slag you want (or don't as would be the case). This is just theory though. It's quite possible we're wrong about this but it sure seems logical to me. 
On that note, the iron I got now needs to be turned into wire somehow. Simple hand force drawing of steel wire was practially impossible when I tried it, which probably means drawign the iron will also be quite difficult and an improbable way for it to have been done historically.
So I was looking at tools to help drawing and came across these.
http://www.jewelerstoystore.com/Steel_Drawplate_s/416.htm
http://www.jewelerstoystore.com/Draw_Bench_p/d64.htm
http://www.jewelerstoystore.com/Draw_Tongs_p/t50-1.htm
Of course, I'd rather design and build something historically plausible for viking age and also save some $$$ doing that.
I'll figure something out, being a mechanical engineer comes in handy sometimes after all, but do feel free to share your own ideas on this guys. Maybe someone has tried it already and has some leads? Maybe there are some medieval or ingenious renessance age machines illustrated somewhere that could give us a hint. Crossbow pulley systems come to mind and of course a simple mandrel might be sufficient at least for very thin wire.
"The Dwarf sees farther than the Giant when he has the giant's shoulder to mount on" -Coleridge
|
|
|
|
|
Johan Gemvik
|
| Posted: Wed 07 Sep, 2011 10:14 am Post subject: |
|
|
Easier than I first thought perhaps. I just found a swedish historical forum discussion thread regarding wire drawing (Historiska världar).
http://histvarld.historiska.se/histvarld/foru...IC_ID=2817
Here's some images from the links on it. None of these solutions seem to me to requre technology that would have been beyond that of viking culture.


This paper was also quite interesting even though it covers far later age wire production. Note the similarities although somewhat industrialised compared to the images above.
Reproduction of Authentic Historical Soft Iron Wire for Musical Instruments by Stephen Birkett & Paul Poletti
http://real.uwaterloo.ca/~sbirkett/iron%20wire.pdf
Another interesting tidbit I found here (http://www.antracit.se/phpbb3/viewtopic.php?t=2102) is that slag is harder than iron or mild steel, so it damages the tools. That is unless you get a hardened steel draw plate or remove the slag from the iron before drawing. And apparenlty then you can draw wire from iron with slag in it, but it wears on the tools a lot, so you probably won't want to if you can avoid it.
This is yet another aspect to consider when looking at maille today and determining how it was made and why.
"The Dwarf sees farther than the Giant when he has the giant's shoulder to mount on" -Coleridge
|
|
|
|
|
Jared Smith
|
| Posted: Fri 09 Sep, 2011 3:16 pm Post subject: |
|
|
I have not had time to check Dan's question about iron wire from iron puddling processes, but English puddling for iron bar shapes was common in mid 1800's and could have been applicable to iron wire used in early suspension bridges depending upon what they did with those bars.
Along the musical wire idea, I had thought of just buying some of the English "Rose" brand iron piano wire, which is chemically close to that of early medieval iron wire used in mail, specifically in phosphorus content which has a lot to do with allowing generous cold working and progressive hardening from stretching or drawing, and riveting type processes. ( Steel string instrument players should recognize the applicability of this if they have ever used and maintained tuning with phosphor versus non-phosphor alloy strings.) The Rose wire only seems to be available in smaller diameters than I would want though. An possible alternative is farm bailing wire, if you can verify that what you are getting is AISI 1008 alloy wire. It is made in suitable gauges such as 14 gage by several bulk Asian suppliers. Unfortunately, it is really hard to verify what alloy is used in particular commercial brands of bailing wire found at local supply stores.
Absence of evidence is not necessarily evidence of absence!
|
|
|
|
|
|
Robert Rootslane
Location: Estonia Joined: 06 Aug 2007
Posts: 72
|
| Posted: Mon 19 Sep, 2011 12:26 pm Post subject: |
|
|
| Johan Gemvik wrote: | Robert, there's nothing preventing one from making as large punched rings as one wants really, except for punching force. Just use a bigger hammer. There are physical limits to this of course but then maille rings were never really all that huge. There are also solid links found in surviving mailles that are welded as they have an obvious seam, just like proper chain links. Doing this no doubt becomes easier with larger rings as they retain forge heat longer and have some decent material to work with the hammer. We've discussed this before in the thread.
. |
Again, thank you for the information.
Anyway, could you direct me to any good sources where i could read about other mail finds in Europe. Im interested what the ring sizes where and did they change during time.
Also, the forge welded rings, any sources on what mail armour finds have been welded?
I have always figured that all the solids were punched
|
|
|
|
|
Andris Auzins

Location: Riga, Latvia Joined: 29 Nov 2007
Posts: 9
|
| Posted: Mon 19 Sep, 2011 10:14 pm Post subject: |
|
|
| Robert Rootslane wrote: |
Anyway, could you direct me to any good sources where i could read about other mail finds in Europe. Im interested what the ring sizes where and did they change during time.
Also, the forge welded rings, any sources on what mail armour finds have been welded?
I have always figured that all the solids were punched |
Good sources: http://www.themailresearchsociety.erikds.com/...icles.html
|
|
|
|
|
Johan Gemvik
|
| Posted: Tue 20 Sep, 2011 9:31 am Post subject: |
|
|
| Robert Rootslane wrote: | | Anyway, could you direct me to any good sources where i could read about other mail finds in Europe. Im interested what the ring sizes where and did they change during time. |
Yes I do, though I've only memorized the Gjermundbu data in Vegards paper by heart. I'm having to dig into my old files and it'll take a while to assemble any worthwhile data.
Any specific time period of special interest? Vegards paper covers one Viking age maille and several 15-16th century mailles. Link can be found earlier in the thread.
| Robert Rootslane wrote: |
Also, the forge welded rings, any sources on what mail armour finds have been welded?
I have always figured that all the solids were punched |
I to think the most logical way to make these would be punching from plate, and most probably were. You can make solids in other ways though, say if you don't have plate available but have the manpower to make solids in less work effective ways.
One that is clearly welded is a flat ring maille from 13th century found on Gotland (near Tofta), called the Tofta maille. This one is a definite weld flat ring maille.
In swedish, but you can at least see the nice photos: http://www.raa.se/cms/showdocument/documents/...22_gal.pdf
"dess ytterdiameter
varierar mellan 11,2 och 11,8 mm och dess innerdiameter mellan 8,5 och
9,4 mm. Ringens trådbredd varierar från 0,8 till 1,4 mm, men är vanligen
ca 1,1 mm. Dess tjocklek är som mest 1,2 mm, men betydligt tunnare
delar på 0,6–0,8 mm förekommer."
I'll do a quick translation to english:
"its [the mailles] outer diameter varies between 11,2 to 11,8 mm and its inner diameter is between 8,5 and 9,4 mm. The rings wire width is between 0,8 to 1,4 mm, but is generally around 1,1 mm. Its thickness is at most 1,2 mm but considerably thinner sections at around 0,6-0,8 mm also exist."
These stated measures seems a bit odd to me though. The photos show clealy a maille with quite thin but wide section flat rings.
Another interesting tidbit is that it had traces from some sort of liner made from leather.
Another possible welded ring maille is the Coppergate helmet maille, though I for one would really like to see some more modern research on it as the one showing the weld is based on X-rays made in the 50s that may well be unreliable. The rings could still be welded of course. We've discussed this maille earlier in the thread.
"The Dwarf sees farther than the Giant when he has the giant's shoulder to mount on" -Coleridge
|
|
|
|
|
|
Robert Rootslane
Location: Estonia Joined: 06 Aug 2007
Posts: 72
|
| Posted: Fri 23 Sep, 2011 4:59 am Post subject: |
|
|
| Johan Gemvik wrote: | | Robert Rootslane wrote: | | Anyway, could you direct me to any good sources where i could read about other mail finds in Europe. Im interested what the ring sizes where and did they change during time. |
Yes I do, though I've only memorized the Gjermundbu data in Vegards paper by heart. I'm having to dig into my old files and it'll take a while to assemble any worthwhile data.
Any specific time period of special interest? Vegards paper covers one Viking age maille and several 15-16th century mailles. Link can be found earlier in the thread.
. |
I have read Vegards paper and it was very interesting. However as you said it covers only a few mail garments.
Anyway i am mostly interested in late 11 to early 12 century. That is also the time i reenact. The main thing i am interested is the ring sizes and construction methods. Although i would guess that the methods of construction were pretty much the same as the ones in your project.
|
|
|
|
|
Johan Gemvik
|
| Posted: Tue 04 Oct, 2011 8:48 am Post subject: |
|
|
Sorry for leaving you hanging Robert. I'll endeavor to look into the subject once more and get back to you on it. But perhaps it desverves a separate thread.
Anyway, time for an important update!
I've just finished manufacturing and trying out a set of drop forge tools for shaping the solid links. Hopefully this will meet with Vegards approval as well as the rest of you.
The first tests show that the best result to match the originals is to first round the outside with the sand stone, and then drop forge the ring. Alternatively you can do the grinding of the outside afterward but it still leaves a slightly imperfect ring that is for some reason flatter. Why it needs grinding even with drop forging is because I get a lip seam on the outside, but perhaps this is just the tools not being perfect. First time i make drop forge tools, and I used viking age coin stamps as templates.
Photos will be up soon.
"The Dwarf sees farther than the Giant when he has the giant's shoulder to mount on" -Coleridge
|
|
|
|
|
Johan Gemvik
|
| Posted: Tue 04 Oct, 2011 2:07 pm Post subject: |
|
|
I saw a clue in what the tools may have looked like in the off center stamped ring. This would most likely not occur with a hinge as shown in the reconstruction posted earlier, unless it only fit very loosely together and had side to side play which I expect a craftsman would try to avoid with that design, but the offset could easily happen if the tool was made from a separate top and bottom stamp and you simply held it together wrong.
So what could that look like? What did other tools used for similar purposes look like in the viking age?
Here's what I came up with after some brainstorming and rifling through some find catalogue books. Coin stamps!
Here's an example of a viking age coin stamp, I think you'll see where I'm going with this.
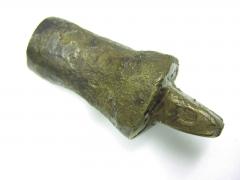
http://www.historyofyork.org.uk/themes/viking/viking-coins
Note the point to hammer it into a wooden block, the same type as on the small hammer-in anvils found all over europe in viking culture sites. Several of these stamps have been recovered from sites and I've been busy studying images and data on them before proceeding with the drop forge solid ring stamp. Finds exist with the lower part alone remaining but also in full sets with both an "anvil" and "striker" stamp if you will. They're usually round section or sort of square but with rounded corners. I'll scan off some books I have and show more examples from finds.
Some have been made from tempered steel, others from plain iron. I made my drop forge tools from cold rolled modern mild steel, which is in somewhere between these in hardness. I may coal the striking surface and temper it later if I feel it's necessary for a lasting tool.
Here's my first attempt, hardly pretty to look at but seems to work decently.
I'll probably make another lower tool, it's not as perfect round as the top stamp, and I'll make another for drop forging the overlapping rings into a slight teardrop in preparation for riveting also, if possible with an indentation mark for the awl for drifting the rivet hole.

I was unable to reproduce the off center ring so far, because the stamp I have now has the same hardness as the rings and it seems like it's slightly damaging the stamps when I try it and not deforming the ring enough even striking considerably harder than when the ring is in the slot and forming nicely. I could experiment with annealing some rings to make them softer and more pliable, or I could try it with iron rings instead of steel.

What I did get was some nicely rounded rings, the best ones to the right are from pre- ground rings, the ones to the left are simply straight from punching, with non-drop-forged comparison rings underneath. To the far right is an overlapping ring drop forged in the same tool. Interesting enough I've seen some rings that look just like that on some other round ring mailles, riveted through a thin overlap with a tiny rivet without any teardrop flattening.
Here are some closeups of the best examples from this first test batch. The system seems to be working nicely and I feel like this is on the right track, but the tools are still a bit rough and need more work. What's hard to make out in these photos is that the very top of the solid actually has a flat area, the rounding doesn't go quite all the way over, just like on the original rings.


The tools are a joy to work with.
First you hammer the lower tool into a block of wood, then you place the ring in the slot. You can easily find the right position since the ring slots securely into both tool surfaces, then you strike it with a slegehammer. You have to strike hard, but not harder than when punching the the ring from plate. Afterwards you grind the outside on the whetstone a little and then it's finished. One might want to oil burn it before assemby in a weave, but you can do it afterwards also.
"The Dwarf sees farther than the Giant when he has the giant's shoulder to mount on" -Coleridge
|
|
|
|
|
Johan Gemvik
|
| Posted: Sat 08 Oct, 2011 12:06 pm Post subject: |
|
|
I've just scanned some photos of coin stamps from the book Viking og Hvidekrist.
This isn't so much a regular book a an exhibit catalogue from the gigantic and practically all encompassing touring Viking exhibit of 1992-1993 called Les Vikings/ Wikinger/ Viking og Hvidekrist, depening on where in europe it was touring at the time. A great source for all things viking, though it obviously is missing any finds more recent than 1992.
The book I have alternates descriptive texts in Norwegian, Danish and Swedish depending on find origin. Possiby it's also available in German and French.
*EDIT - I believe this book is called "From Viking to Crusader" in English, though I haven't been able to find a copy to verify this.*
Anyway, in it I've found two coin stamps of interest for the project. One is from the Coppergate find, the other is from London, showing two possible styles to use for my tools.

Striker piece, from London find, some details can be seen in the bottom of the scan. Of note is that this tool has a temperd steel face.

Anvil piece, from coppergate. This is dated to 925 AD, and the closer of the two in time to the Gjermundbu maille. Perhaps this means that the rounded type tool would be more suitable to reconstruct.
I'll see if I can also host pdf scans of the pages these were from, though they are in Norwegian.
"The Dwarf sees farther than the Giant when he has the giant's shoulder to mount on" -Coleridge
|
|
|
|
|
Kai Lawson

|
| Posted: Wed 16 May, 2012 11:44 am Post subject: |
|
|
Apologies for resurrecting this thread, but...
Would you be able to post pictures of the finish/current mail patch, provided it isn't already gone?
"And they crossed swords."
--William Goldman, alias S. Morgenstern
|
|
|
|
|
Johan Gemvik
|
| Posted: Wed 24 Oct, 2012 9:01 pm Post subject: |
|
|
Actually, I recently started on a new one with drop forged solids. Not much to show yet but I have some photos and a short youtube presentation clip. I'm writing on my phhone and can't copy the links easily with it but I can add those tonight.
"The Dwarf sees farther than the Giant when he has the giant's shoulder to mount on" -Coleridge
|
|
|
|
|
Johan Gemvik
|
| Posted: Wed 24 Oct, 2012 9:09 pm Post subject: |
|
|
Not much of a weave yet, just a 4-in-1. I've been too busy with work.


And here's a quick and dirty smartphone video. Sorry about the rock'n roll music, it's the least bad I could find to cover a poor sound capture.
http://youtu.be/lNx7Hp3WYpU
"The Dwarf sees farther than the Giant when he has the giant's shoulder to mount on" -Coleridge
|
|
|
|
|
Johan Gemvik
|
| Posted: Fri 16 Nov, 2012 5:31 pm Post subject: |
|
|
I got me some bags of pre-made roman maille rings from GDFB uk.
I was stuck in a rut trying to make the riveted rings work and look the way I wanted while still keeping manufacturing time down. Most of the issues is because these links are just so tiny. Hopefully this kit will let me jump ahead with some details and let me put mind and effort where it's most needed.
For one thing I just missed the joy of making weave and seeing it grow at a decent pace, even not perfectly authentic one. The GDFB patch you see ot the right in the photos with my mods for single side dome riveting took a couple of hours to make compared to months for my old patches all my own.
Their solids are thinner than what would be suitable for reconstructing Gjermundbu maille, and the riveting they do is doulble sided dome riveting which wouldn't be suitable for this project. But the riveted links lend themselves beautifully to modification to make them look more auithentic (i.e. single side riveting for starters) and also to combination with my own solids.
This lets me build faster, so I can make a decent patch to see what it looks like. Obviously they're not as accurate with the cut hole rather than an awl-made one but I wanted to experiment and modify and see what results I could get with it.
Here's a set of photos of the trials so far.


"The Dwarf sees farther than the Giant when he has the giant's shoulder to mount on" -Coleridge
Last edited by Johan Gemvik on Sat 17 Nov, 2012 3:34 am; edited 2 times in total
|
|
|
|
|
Johan Gemvik
|
| Posted: Fri 16 Nov, 2012 5:32 pm Post subject: |
|
|


"The Dwarf sees farther than the Giant when he has the giant's shoulder to mount on" -Coleridge
|
|
|
|
|
|
|
You cannot post new topics in this forum
You cannot reply to topics in this forum
You cannot edit your posts in this forum
You cannot delete your posts in this forum
You cannot vote in polls in this forum
You cannot attach files in this forum
You can download files in this forum
|
All contents © Copyright 2003-2026 myArmoury.com — All rights reserved
Discussion forums powered by phpBB © The phpBB Group
Switch to the Basic Low-bandwidth Version of the forum
|

