| Author |
Message |
Sean Flynt

|
 Posted: Fri 13 May, 2011 10:20 am Post subject: GDFB Sallet Transformation Posted: Fri 13 May, 2011 10:20 am Post subject: GDFB Sallet Transformation |
 |
|
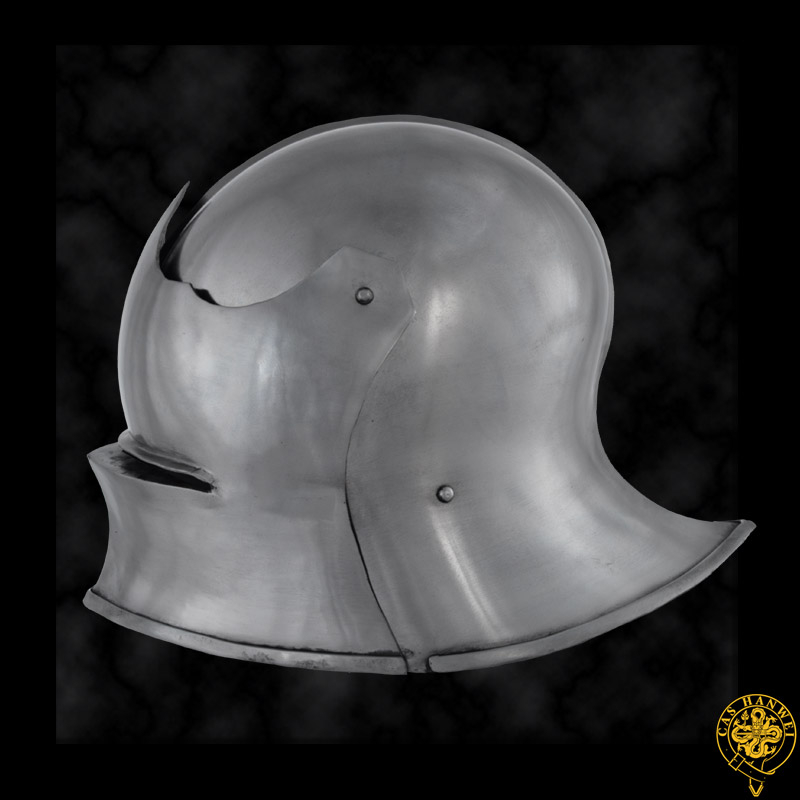
This project is rolling along pretty well now so I wanted to share what I'm doing. This is one of the inexpensive GDFB sallets. There's plenty to complain about on the stock sallet but the price is fair. The challenge is to then add value and utility by transforming it in several ways.
First, although the shape is okay, it's HUGE--much larger than what I typically see in Italian export sallets of the mid-15th c. The size, depth and weight are more in line with later German and Austrian sallets so I've followed that path, trimming the visor to a later style (and shedding weight in the process). I'm adding a German-style spring catch as well, which you can see partially finished here. You can spot lots of other changes, I'm sure, including the beginnings of a new and historically appropriate liner (rivet holes, handmade washers, lining band, etc.)
If GDFB would take this same shape and size but leave the front closed to create one of the more typical German deep one-piece sallets, I'll be delighted. Until then, this one will do.
This is not the final finish. I'll do that just before stitching the liner to the lining band. Although the finish in the catalog shot (first image, below) looks soft, this helmet was actually pretty highly finished off-the-shelf. Very shiny, but in a cheap-looking way. The final finish will be somewhere between that and the very soft current finish.
The new visor pivots are galvanized lag bolts, with the heads reshaped in the style of an example in the Metropolitan Museum of Art. Those still need a small amount of detailing.
 Attachment: 64.31 KB Attachment: 64.31 KB
Attachment: 195.95 KB
Attachment: 189.94 KB
Attachment: 181.23 KB
-Sean
Author of the Little Hammer novel
https://www.amazon.com/Little-Hammer-Sean-Flynt/dp/B08XN7HZ82/ref=sr_1_1?dchild=1&keywords=little+hammer+book&qid=1627482034&sr=8-1
|
|
   |
 |
Scott Hrouda

|
| Posted: Fri 13 May, 2011 11:11 am Post subject: Re: GDFB Sallet Transformation |
|
|
| Sean Flynt wrote: | | ...The new visor pivots are galvanized lag bolts, with the heads reshaped in the style of an example in the Metropolitan Museum of Art. Those still need a small amount of detailing. |
Could you describe the process for transforming regular old lag bolts into those beautiful pivots? I'm very intrigued. 
...and that, my liege, is how we know the Earth to be banana shaped. - Sir Bedevere
|
|
|
|
|
Sean Flynt
|
| Posted: Fri 13 May, 2011 11:41 am Post subject: Re: GDFB Sallet Transformation |
|
|
| Scott Hrouda wrote: | | Sean Flynt wrote: | | ...The new visor pivots are galvanized lag bolts, with the heads reshaped in the style of an example in the Metropolitan Museum of Art. Those still need a small amount of detailing. |
Could you describe the process for transforming regular old lag bolts into those beautiful pivots? I'm very intrigued. |
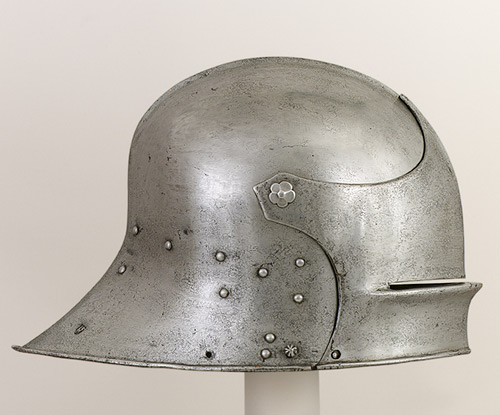
Those pivots are inspired by the example below (1470-1485). It's pretty simple work--all stock removal. You just file down the square bit under the head of the bolt so it'll fit all the way through the holes in pivot and bowl, file or sand off the cast numbers on the top of the bolt, create some shallow facets with a file, cut V shapes out of the edges, round those with a file and use a Dremel cutoff wheel to quickly hollow the "petals". They could use a bit more detail, but the original (replacement?) examples below aren't more complicated than this. In fact, many original pivots are much cruder.
Attachment: 50.42 KB
-Sean
Author of the Little Hammer novel
https://www.amazon.com/Little-Hammer-Sean-Flynt/dp/B08XN7HZ82/ref=sr_1_1?dchild=1&keywords=little+hammer+book&qid=1627482034&sr=8-1
|
|
|
|
|
Sean Flynt
|
|
|
|
|
Sean Flynt
|
|
|
|
|
Sean Flynt
|
| Posted: Tue 14 Jun, 2011 8:27 am Post subject: |
|
|
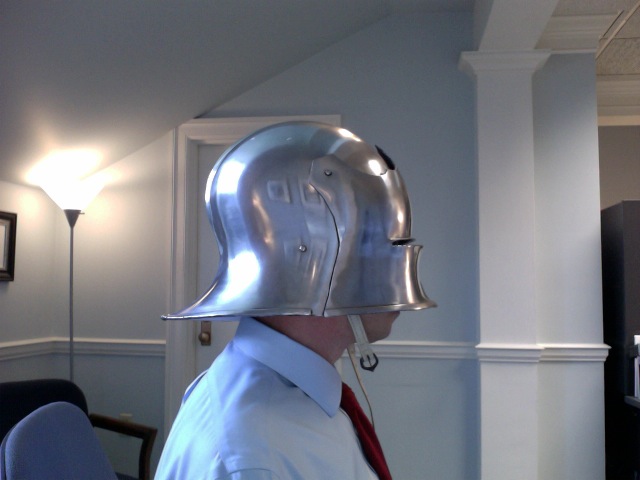
Introducing the new Apple iSallet!
Well...no, actually. I just installed the liner last night and grabbed a quick shot. The size and shape of the bowl is such that I need to add additional side panels to the liner. Even so, there's already a world of difference between the sallet as it is and the sallet as it was. 
As you can see, I haven't yet cut down the visor pivot bolts or installed the straps. I also need to add some subtle filing along the top edge of the visor in imitation of a similar visor from Rhodes. Then I'll do some cleanup work on the finish.
Not far to go, now!
Nobody's yet hit me with an offer of a cheap bevor! Still waiting....
Attachment: 154.79 KB
-Sean
Author of the Little Hammer novel
https://www.amazon.com/Little-Hammer-Sean-Flynt/dp/B08XN7HZ82/ref=sr_1_1?dchild=1&keywords=little+hammer+book&qid=1627482034&sr=8-1
|
|
|
|
|
|
Colt Reeves
|
| Posted: Tue 14 Jun, 2011 8:43 am Post subject: |
|
|
Saved to favorites.
I have been debating as to whether to buy this sallet and modify it similarly or to purchase the GDFB Jaw Bone Visor and try to make it resemble the sallet found at Witton-le-Wear. I'm leaning toward the second option, but can't find any decent pictures of the piece, so I'm still up in the air. Maybe I'll do both. 
Anyway, this thread is interesting and helps me get a feel for the product and what can be done with it, so thanks for that.
"Tears are for the craven, prayers are for the clown.
Halters for the silly neck that cannot keep a crown.
As my loss is grievous, so my hope is small.
For Iron, Cold Iron, must be master of men all..."
-Cold Iron, Rudyard Kipling
|
|
|
|
|
Sean Flynt
|
|
|
|
|
Johan Gemvik

|
| Posted: Fri 17 Jun, 2011 5:17 pm Post subject: |
|
|
Looks good. An often overlooked thing about a kit is details like these, too many just get off the shelf and think that's the be all end all of kitting. But this brings a really decent helmet with some minor issues up to museum quality.
"The Dwarf sees farther than the Giant when he has the giant's shoulder to mount on" -Coleridge
|
|
|
|
|
Sean Flynt
|
| Posted: Thu 23 Jun, 2011 7:45 am Post subject: |
|
|
Here's the finished liner. I'll call it a "duplex" liner If you look closely you can see that there's the usual one-piece liner reinforced by additional triangles at the brow and sides. I'd like to say that this is some rare historical method but it's really just how I'm coping with the very large and round bowl of this helmet. The brow piece covers the gap created by patterning the liner on my head rather than on the large bowl (came up slightly short as a result). The side pieces simply help with the fit because while the bowl is quite round my head is narrow. There's still too much side space, but the fit is much improved. I have no idea if this was ever done, historically, but it's the easiest way to adjust the circumference of a helmet that wasn't made to fit the wearer.
I've cut the straps. Now I just have to dye them, trim, pierce, mount the buckle and install. Final polish and I'm done. Maybe next week!
Attachment: 203.93 KB
-Sean
Author of the Little Hammer novel
https://www.amazon.com/Little-Hammer-Sean-Flynt/dp/B08XN7HZ82/ref=sr_1_1?dchild=1&keywords=little+hammer+book&qid=1627482034&sr=8-1
|
|
|
|
|
Sean Flynt
|
| Posted: Tue 28 Jun, 2011 6:55 am Post subject: |
|
|
DONE! First and third images below are the "before" shots.
I'm calling this a German or Austrian sallet of ca. 1480. My wish--GDFB produces a deep, integral visor sallet of this type. It'd be simpler and better overall, as the visor is the main problem with the model shown here. Some things I didn't want to bother with--creating the step at the ends of the sight, for example. I also didn't fuss over the finish so there are irregularities, file marks, etc. It's not meant to be a fine sallet. I intended to do the buckle in historical style, with the strap end the width of the buckle plate. I liked the look of the wide red strap under the narrow brass buckle plate, though, so I left it like that. The buckle itself is the original from the helmet, with only some filing to round the bar. Tongue is original, too, but modified.
Attachment: 64.19 KB
Attachment: 206.65 KB
Attachment: 70.66 KB
Attachment: 159.82 KB
Attachment: 162.84 KB
Attachment: 199.37 KB
Attachment: 200.65 KB
Attachment: 160.9 KB

-Sean
Author of the Little Hammer novel
https://www.amazon.com/Little-Hammer-Sean-Flynt/dp/B08XN7HZ82/ref=sr_1_1?dchild=1&keywords=little+hammer+book&qid=1627482034&sr=8-1
|
|
|
|
|
|
Robert Hinds
|
| Posted: Tue 28 Jun, 2011 7:28 am Post subject: |
|
|
Really nice Sean! You really did an awesome job with your modifications!
Almost makes me sad to look at my GDFB helm. lol.
Was is difficult to decorate the carriage bolt heads like that? And what did you use? Just sandpaper?
"Young knight, learn to love God and revere women; thus your honor will grow. Practice knighthood and learn the Art that dignifies you, and brings you honor in wars." -Johannes Liechtenauer
"...And he that hath no sword, let him sell his garment, and buy one..." Luke 22:36
|
|
|
|
|
Sean Flynt
|
| Posted: Tue 28 Jun, 2011 8:09 am Post subject: |
|
|
| Robert Hinds wrote: | Really nice Sean! You really did an awesome job with your modifications!
Almost makes me sad to look at my GDFB helm. lol.
Was is difficult to decorate the carriage bolt heads like that? And what did you use? Just sandpaper? |
Thanks! The bolts are very easy to modify. Get galvanized bolts, NOT stainless! File down the square portion under the head so that it's the same diameter as the shaft. File off the raised numbers on the head. Sand the galvanizing off the head (tip: put the bolt in a drill and just "drill" a sanding sponge). Then you can just use small files or a Dremel to shape the head as you like.
I put an octagonal washer below the nut on the inside of the sallet. I also modified the hex nuts by quickly grinding them thinner. The bolt shouldn't protrude past the nut, of course. Your head won't contact the nut, but I figured the lower the profile the better. A square nut would be more historically accurate, but I knew these bolts would be prone to loosening so I wanted an easy way to adjust the tension. A small wrachet and socket is easier than trying to get a crescent wrench past the liner at the proper angle.
Be prepared to comprise on the visor tension, though. It either stays up on its on and is hard to lock down or it's easy to lock but won't stay up on its own. It's just a quirk of the not-great visor design. Either way, don't expect the visor to move far up. The pivots are placed too high and too far forward.
-Sean
Author of the Little Hammer novel
https://www.amazon.com/Little-Hammer-Sean-Flynt/dp/B08XN7HZ82/ref=sr_1_1?dchild=1&keywords=little+hammer+book&qid=1627482034&sr=8-1
|
|
|
|
|
Sean Flynt
|
|
|
|
|
Scott Hrouda
|
| Posted: Tue 28 Jun, 2011 12:16 pm Post subject: |
|
|
Very nice work! You took a stock "ho-hum" sallet and turned it into something that would pass at a living history level. 
I really like your modification to the visor that adds a little more "swoop" on the back curve between the pivot and bottom.
...and that, my liege, is how we know the Earth to be banana shaped. - Sir Bedevere
|
|
|
|
|
Sean Flynt
|
| Posted: Tue 28 Jun, 2011 12:24 pm Post subject: |
|
|
| Scott Hrouda wrote: | | I really like your modification to the visor that adds a little more "swoop" on the back curve between the pivot and bottom. |
Another problem with that visor is that it covers the forward strap rivets. There's just no need for all of that steel in the visor, either on the sides or on the brow. I haven't accurately weighed the finished piece yet, but a bathroom scale reading before adding the straps showed maybe 7.75 pounds. I think this helmet was closer to 9 pounds before modification, so even with the addition of the rivets I probably did some good on the weight. Nine pounds is over-the-top for a field sallet of this period. 7.75 is much more reasonable, though still on the high side.
-Sean
Author of the Little Hammer novel
https://www.amazon.com/Little-Hammer-Sean-Flynt/dp/B08XN7HZ82/ref=sr_1_1?dchild=1&keywords=little+hammer+book&qid=1627482034&sr=8-1
|
|
|
|
|
Thomas R.

|
| Posted: Tue 28 Jun, 2011 1:03 pm Post subject: |
|
|
Hello Sean,
I like your flower shaped bolt best. It's one precious little detail, which no other GDFB helmet has. Too bad you couldn't change the pivot, which is set too high on the dome from the beginning. Keep up the good work.
Thomas
http://maerenundlobebaeren.tumblr.com/
|
|
|
|
|
Justin Lee Hunt

Location: North Baltimore OH Joined: 28 Jun 2011
Posts: 38
|
|
 |
|
Sean Flynt
|
| Posted: Wed 29 Jun, 2011 6:28 am Post subject: |
|
|
| Thomas R. wrote: | Hello Sean,
I like your flower shaped bolt best. It's one precious little detail, which no other GDFB helmet has. Too bad you couldn't change the pivot, which is set too high on the dome from the beginning. Keep up the good work.
Thomas |
Yeah, that's really the major flaw of this sallet, and one of the reasons I wish they would produce a single-piece sallet with integral visor. As for this model: I've patched visor pivot holes before. That's the easy part. The hard part would be radically reshaping the visor. I guess you could cut about 1" off the bottom of the visor and turn the rim, thus lowering the whole visor, but then you'd have a serious alignment problem with the sight, and the pivots still wouldn't be ideally placed. For someone skilled enough to do that work well, it might be better to just make a new visor that fits properly (like this: http://www.ageofarmour.com/education/visor.html ).
-Sean
Author of the Little Hammer novel
https://www.amazon.com/Little-Hammer-Sean-Flynt/dp/B08XN7HZ82/ref=sr_1_1?dchild=1&keywords=little+hammer+book&qid=1627482034&sr=8-1
|
|
|
|
|
|
M van Dongen
|
| Posted: Wed 29 Jun, 2011 9:58 am Post subject: |
|
|
If you are that skilled you might as well make the whole sallet. The visor is the most intricate bit.
Stunning transformation btw.
|
|
|
|
|
|
|