Info Favorites Register Log in
myArmoury.com Discussion Forums

Forum index Memberlist Usergroups Spotlight Topics Search
Forum Index > Historical Arms Talk > My first selfmade scabbardDIY Project Reply to topic
This is a standard topic  
Author Message
Thomas R.


Location: Germany
Joined: 10 May 2010
Likes: 4 pages
Reading list: 17 books

Posts: 396

PostPosted: Sat 05 Feb, 2011 5:33 am    Post subject: My first selfmade scabbard         Reply with quote

Hi fellow forumites,

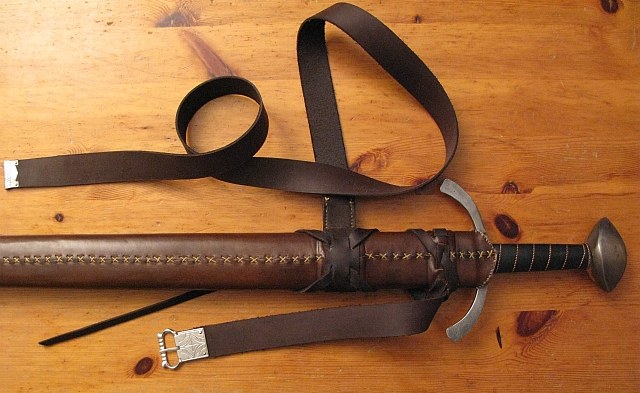
today I proudly present my first selfmade sword scabbard. It took me about a year to finish it (well, I could have done it in a week, I guess, but you know how it is: spare time is rare time.)

I gathered most of the infos on how to do it from this forum, so: thanks a lot to all who contribute to this site. And not to forget yeoldegaffers.com and his fine step-by-step-tutorial. So, how is it build:

- two planks of wood, hollowed after the blade shape (done by hand)
- two strips of cut and shortened rabbitfur glued into it
- both planks glued together and rasped in shape (by hand, 'cause I don't own a belt sander)
- a strip of linen glued with hideglue around the wooden core
- glued the spacers onto the scabbard; made of thin cord
- thin veg. leather dyed brown and cut to size, sewn onto the scabbard while wet (while dyeing, I accidently ruined my carpet with the dye Mad My girlfried got really mad about it, so I had to buy a new carpet)
- sewn the rabbit-skin onto the mouthpiece
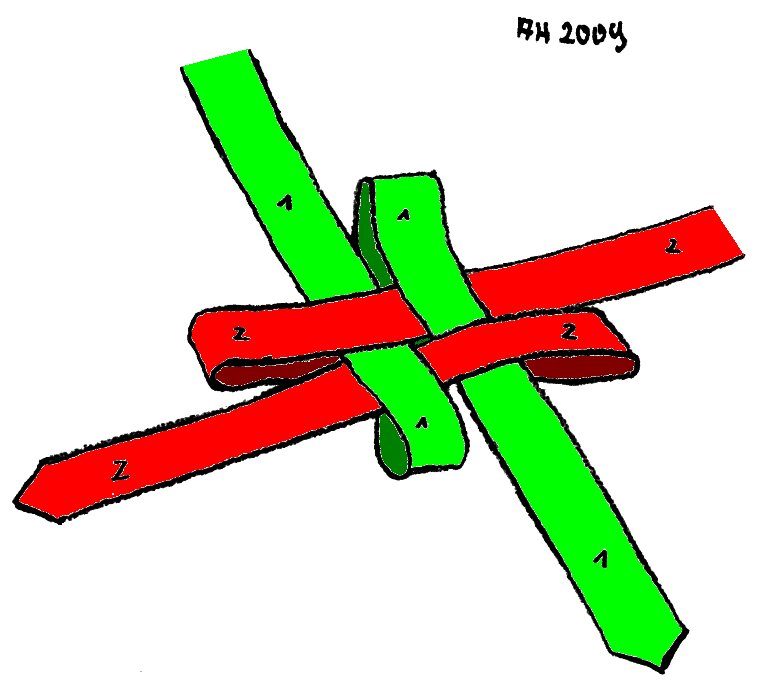
- cut all the strips for the belt to size and made it fit
- riveted the belt fittings in place, nailed the Ortband in place
- finished the leather with beeswax-leathcare

I got all the metal-parts from Holger Ratsdorf (http://www.hr-replikate.de). They are made from tin-plated brass. Mr. Ratsdorf is really good at what he's doing. I appreciate his work very much. Big Grin

So this is it...

Best wishes,
Thomas


 Attachment: 240.28 KB
Scabbard4.jpg
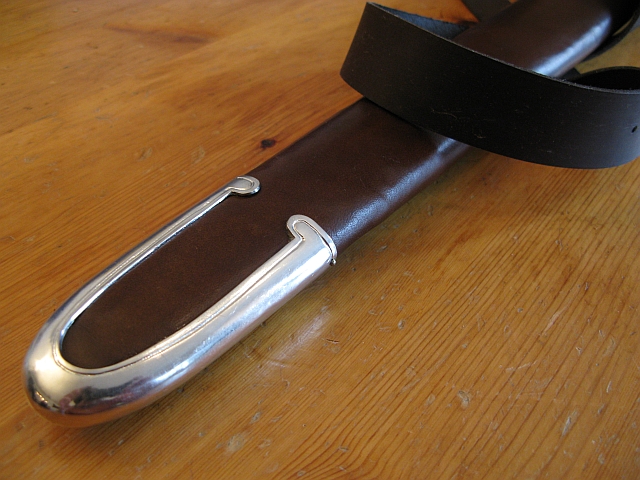
The Ortband was a little bit too wide, but I managed to bend it into shape. It's fastened by two little brass nails.

 Attachment: 225.8 KB
Scabbard3.jpg
The Mouthpiece: There I left the rabbitfur longer and sewn it to the leather.

 Attachment: 245.52 KB
Scabbard2.jpg
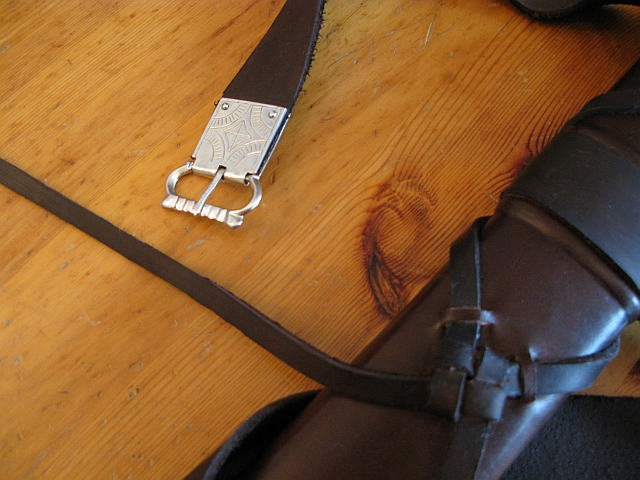
The beltbuckle is made by Holger Ratsdorf, tin-plated brass.

 Attachment: 192.68 KB
Scabbard1.jpg
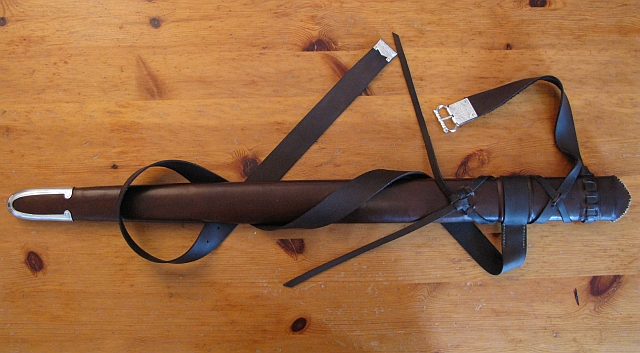
The scabbard is made to fit one of Jiri Krondaks swords for show combat.

http://maerenundlobebaeren.tumblr.com/
View user's profile Send private message Visit poster's website
Sander Marechal


Location: The Netherlands
Joined: 04 Dec 2009
Reading list: 17 books

Spotlight topics: 1
Posts: 671

PostPosted: Sat 05 Feb, 2011 6:13 am    Post subject:         Reply with quote

Ohh, that is stunning. I'm getting myself a H/T Norman and I was thinking about making something like this for it to replace the plastic scabbard it comes with. Can you perhaps link some of the tutorials you used? I remember once seeing a schematic on how to attach that leather belt to the scabbard, but I couldn't find it anymore.
The Knights Hospitaller: http://www.hospitaalridders.nl
View user's profile Send private message Send e-mail Visit poster's website
Tim Jorgensen


Location: Fargo, ND
Joined: 10 Sep 2010
Likes: 1 page

Posts: 40

PostPosted: Sat 05 Feb, 2011 7:30 am    Post subject:         Reply with quote

I love it Thomas! Thanks for the link for the fittings.

No worries about not having a belt sander. I found that a hand plane worked great for rounding the outside of the core on my first scabbard. I'm starting my second one in a week or two.

If you have any more photos from the construction process I'd love to see some.

Tim Jorgensen
Midwest Viking Festival Coordinator
Hjemkomst Center
http://www.hcscconline.org/secondarypages/mid...tival.html
View user's profile Send private message
Thomas R.


Location: Germany
Joined: 10 May 2010
Likes: 4 pages
Reading list: 17 books

Posts: 396

PostPosted: Sat 05 Feb, 2011 7:58 am    Post subject:         Reply with quote

Hi Sander,

here is one of the best tutorials I've found http://www.yeoldegaffers.com/project_scabbard.asp. But I did some steps a bit different. For example, there is no inner lining mentioned (you can use woolen felt, trimmed rabbit fur, some even suggest trimmed goat fur or plain linnen. Make sure the woolen felt has a lot of lanolin left or apply oil _before_ you glue the parts together). Furthermore I used only two slats of pine, which I hollowed out. And thegaffers doesn't mention the linnen wrapping between core and leather. I gathered, that it behaves like a modern compound material - if the wooden core breaks, the glued on linnen will hold the slats together. Make sure, you don't use too much hideglue, so that it doesn't penetrates the linnen. Because if you do, the scabbard will become sticky and if you sew the wet leather on... well, I guess it will glue it to the core and then you can't work the leather anymore. (You need to pull the straps underneath it and through several slits).

How this is done, you can see here: http://www.yeoldegaffers.com/projects/scabbard/instructions.jpg . Be aware, that I didn't stitch the second part of the belt horizontal at the scabbards side, but used two seams alongside the belt. If you stitch horizontal you are weakening the belt by perforating it in the direction where it is pulled most.

Hope I could help you, feel free to ask, if you've got more questions...

Thomas

PS: I am looking for some more pictures. I am sure, I took some while I worked on it... edit: It seems that my girlfriend deleted a set of photos, I took while I glued the linnen. But I can add a picture, which was really useful - for the knot.


 Attachment: 54.74 KB
viereckknotenfarbig.jpg
I dunno remember where I found this picture, but I am glad I found it :).

http://maerenundlobebaeren.tumblr.com/
View user's profile Send private message Visit poster's website
Jeremy V. Krause


Location: Buffalo, NY.
Joined: 20 Oct 2003
Likes: 1 page
Reading list: 1 book

Spotlight topics: 1
Posts: 1,717

PostPosted: Sat 05 Feb, 2011 10:16 am    Post subject:         Reply with quote

That's excellent Thomas!

Your scabbard looks quite professional.
View user's profile Send private message
Thomas R.


Location: Germany
Joined: 10 May 2010
Likes: 4 pages
Reading list: 17 books

Posts: 396

PostPosted: Sat 05 Feb, 2011 10:52 am    Post subject:         Reply with quote

Hi Jeremy,

thanks for that compliment! After all the money I dumped in this project (including a lot of tools, materials, time - I had to throw away my first try on the core, because I tried to bend plywood around the blade, which came out as a mess, and not to forget a new Ikea-carpet for my girlfriend!) I guess I could have bought two of them from a professional. Wink
But it was worth the effort! I just recently mailed Mr. Ratsdorf for some fittings for another scabbard, this time from the late 15th. I have still to decide if it will be for my Albion Liechtenauer or my Krondak (show combat) sword. This time I will try to get bendable furniture veneering(?) to construct the core. Hopefully I will finish this project in under a years span...

Thomas


 Attachment: 67.09 KB
Scabbard_back.jpg
Another pic of the back, with the sword stuck in.

http://maerenundlobebaeren.tumblr.com/
View user's profile Send private message Visit poster's website
Ben Anbeek
Industry Professional


Location: veenendaal netherlands
Joined: 28 May 2007
Reading list: 18 books

Posts: 113

PostPosted: Sun 06 Feb, 2011 5:43 am    Post subject:         Reply with quote

looks great.
keep up the good work

Medieval Goods
http://www.theupperclass.nl
www.facebook.com/TheUpperClass.nl
View user's profile Send private message Visit poster's website


Display posts from previous:   
Forum Index > Historical Arms Talk > My first selfmade scabbardDIY Project
Page 1 of 1 Reply to topic
All times are GMT - 8 Hours

View previous topic :: View next topic
Jump to:  
You cannot post new topics in this forum
You cannot reply to topics in this forum
You cannot edit your posts in this forum
You cannot delete your posts in this forum
You cannot vote in polls in this forum
You cannot attach files in this forum
You can download files in this forum


All contents © Copyright 2003-2024 myArmoury.com — All rights reserved
Discussion forums powered by phpBB © The phpBB Group
Switch to the Basic Low-bandwidth Version of the forum