I've been trying to make my armour recently. I'm very much an amateur and haven't done this before.
I made a breasplate for myself and tried to blue it. I read that you can heat blue steel by covering the steel in flax oil and then heating it in an oven for 12 hours at 200 degrees. I tried this and then when I took the breastplate out at the end, saw that it was mostly a deep brown, but there were some areas of blue. It looked like areas with more oil turned oil and areas with less, such as corners and edges, turned blue. So I thought that I'd used too much oil. However, on the inside of the breastplate where I used less oil, there was no blue finish at all, just brown.
My second is that the finish is very thin. The blueing/browning was removed easily by both light sanding and water and a sponge.
So can sometime tell me what I did wrong? I'd like to know how to turn the entire thing blue and to have a much deeper finish. The closest thing I have to a forge is an oven, I'd rather not using chemical blueing unless I have to. Also, because I've not done this before, I'd be very grateful if I could have step by step instructions.
I used the search function, and I couldn't really find anything to tell me what I did wrong.
200C is too low. Check this: http://www.technique.pl/51/tab1.jpg I think 12 hours is too long. Try with different times starting from 1 hour on some scrap samples and see when you have best results :)
What steel are you using?
You don't need any oils or pastes to give it a nice, blue finish.
Unless you're talking about covering it with a rust proof layer.
You don't need any oils or pastes to give it a nice, blue finish.
Unless you're talking about covering it with a rust proof layer.
I'm using mild steel. And I was hoping to make it rust proof.
Why don't you like chemical blue? It's MUCH easier and neater than what you're describing, and unless your armour is of very authentic material and construction you really aren't sacrificing much in terms of authenticity. Looks great, too!
You know it will not be impervious. Scratches, and chaffing-rub areas will wear off any finish. Some degree of oiling and care, possibly re-finish treatments will still be necessary.
A salt bath for hot bluing can be a pricey and very hazardous investment. I would be careful of heating oil or textiles in an oven as a huge range of oils and textiles can smoke and then flash into flames between 400 to 500 F (204 to 260 C.) Some go much lower than that. Very few oils, not even my high dollar quench oil, can actually make it to 500 F without combusting. Commercial flax oil is supposed to be at that risky smoke point when temperature is roughly near 225 F (107 C.)
I'd try some burned on oil finishes using some small test scraps and either the oven or a clean gas grill to see how you like a finish loosely based on blacksmith tradition old enough that no one knows when it began with certainty. Descale and wire brush to bare shiny metal, heat to 300 to 600 F (148 to 315 C) for a few minutes for thin pieces, longer and trial based for thicker pieces. Remove and very quickly brush or spray a thin film of oil such that it burns on the piece. (WD-40, beeswax-turpentine-oil blends, and all sorts of finish recipes can be found.) Variations in temperature, amount and type of oil, length of application, etc. all produce a lot of results from deep black, to gray, to purple-blue hues. If you don't measure or find some way to systematically control and repeat it, you may end up with a lot of parts that look mismatched.
Try Charcoal Blueing. Anyone can do it and it doesn't require any special equipment. The following instructions are adapted from Mr. Wayne Mc Kay.
Get real pure hardwood charcoal. Not charcoal briquettes like what you get for your BBQ, but real chunks of charcoal. Briquettes like Kingsford brand have slag and binders that can make a mess of things. Crush the large chunks as small as you can around marble size. I would recommend wearing a dust mask to prevent breathing the charcoal dust.
Buy a fireproof container big enough to hold your breastplate or whatever you are blueing and several inches worth of the charcoal on each side. If you can't find one that will work, dig a pit in the backyard deep enough to do the job. if you do this, make sure you clear away anything flammable from the pit (grass, leaves, small children, and pets).
If you can, remove any brass bits and leather from your breastplate and set aside for later. Polish the steel to the finish you want (mirror, satin, whatever) as once you blue it, polishing will destroy the bluing. Completely degrease the steel. Use denatured alcohol or something from the local gun shop for degreasing use. After degreasing, DO NOT TOUCH THE STEEL WITH YOUR BARE HANDS. It will screw up the blueing.
Fill your container/pit with three inches or so of charcoal and set it on fire. Get the coals evenly alight. Once your coals are ready, rake the coals to settle them. Place the breastplate (or whatever) directly onto the coals, then cover it completely with the hot coals so that it is completely covered and add more charcoal , filling to the top of the box. Did I mention that it needs to be completely covered? Oxygen that touches the steel in this process will turn the steel black, not blue, so unless you want a black and blue speckled breastplate, make sure it is completely covered. Make sure you did not smother your bottom layer of coals. If need be, get the fire going again.
Wait three hours. Might as well use the charcoal to grill some steaks or burgers while you wait; just not over top of your breastplate as the grease might find its way down through the charcoal to the piece. Add charcoal as needed to keep the fire going. Some will tell you that you need to pull out the piece and paint it with boiled linseed oil every fifteen minutes, but this only increases the risk of screwing up the blue.
After the three hours are complete, remove your breastplate and dust off the ash. Let it set somewhere to cool for about three days. Not that it takes three days to cool, but that it takes three days for the scale to harden. Use a heat gun on a low setting to warm the breastplate and apply a paste wax to seal the finish. Don't get the metal too hot; you just want to get the wax to spread evenly. Buff with a soft cloth. Reinstall your brass and leather bits and done.
The color should come out somewhere between a peacock blue and a midnight blue. Purple spots will occur where the metal got too hot. This blueing is only skin deep. Polishing with an abrasive of any type will damage it as will excessive wear, but if you keep the steel well protected with Ballistol or Breakfree CLP, you should have no problems.
Last edited by Jonathan Blair on Thu 09 Sep, 2010 3:36 am; edited 1 time in total
One advantage with cold blue is that one can touch it up easily even if it less durable than a heated blue, but them retouching would be a pain removing any leather strapping to be able to re-heat the steel again and again and again at any sign of rust.
I guess one could cold blue a heat blued piece of armour to retouch it but then matching colour becomes challenging.
I find that using scotch-brite pads soaked with cold blue compound one can blue and sand at the same time and depending on how much one dilutes the bluing compound and how hard one sands one can control and blend the blue from a deep black to a very light bluish patination.
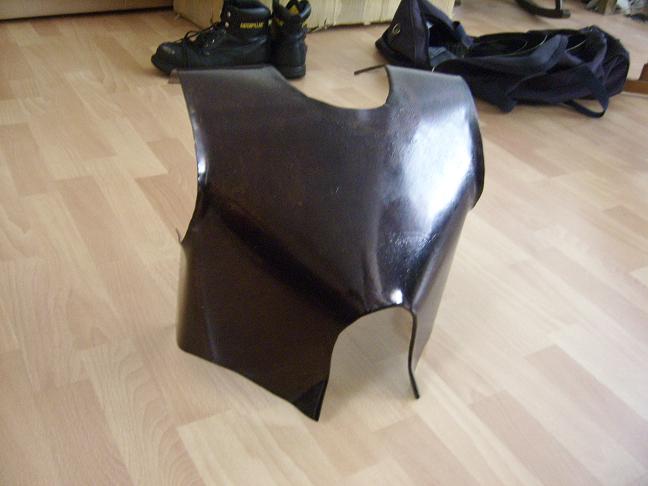
Okay thanks everyone. In the end, I ended up not blueing the breastplate, as it was easier just to burn more oil onto it. So now instead of being a streaky mix of blue and brown, the whole thing is a very deep brown/purple colour, due to several layers of burned on oil. It looks lovely at a distance, close up you can see a lot of the imperfections, as I struggled to get the oil even, so the surface is uneven, but the way it's ended up has actually worked in its favour.
Being my first armour, the shaping of the breasplate was far from perfect, so an imperfect finish adds to the rougher, rustic look. Once I've got more practice, and I've got a bit more skill at armouring, I'll have a second try at making the breastplate, and hopefully I'll be able to blue that with some of the methods you guys have suggested.
Being my first armour, the shaping of the breasplate was far from perfect, so an imperfect finish adds to the rougher, rustic look. Once I've got more practice, and I've got a bit more skill at armouring, I'll have a second try at making the breastplate, and hopefully I'll be able to blue that with some of the methods you guys have suggested.
| Alex Bourdas wrote: |
| Once I've got more practice, and I've got a bit more skill at armouring, I'll have a second try at making the breastplate, and hopefully I'll be able to blue that with some of the methods you guys have suggested. |
Uh, oh! :eek: Alex has been bitten by the "bug". :) :) :) :)
Would you mind sharing photographs of your breastplate? You'll notice subtle improvements with each piece you make. Keep it up!
Do you own, or have access to, Brian Price's Techniques of Medieval Armour Reproduction: The 14th Century? I found this book to be an incredible resource as a novice armourer. BTW, more than a decade into it, I still consider myself a novice. There's so much to learn and do!
No, I don't have that book. Thanks for the recommendation. I might have to wait until Christmas to get it though.
And I will put pictures up soon, but it still needs to be strapped, and besides I've not got a camera at the moment, but I can probably borrow one.
And I will put pictures up soon, but it still needs to be strapped, and besides I've not got a camera at the moment, but I can probably borrow one.
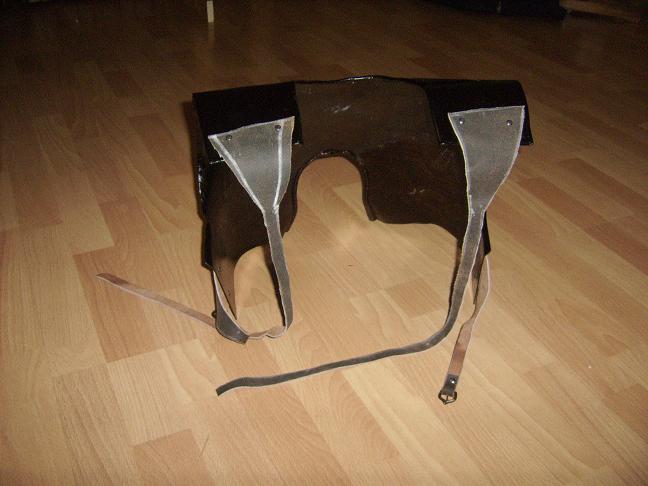
Here's the almost completed breastplate. Literally the only thing I did after taking the photos was wipe off the chalk. It's based off of the St.Maurice painting in the Kelvingrove. Tobias Capwell had a similar (but rather nicer) breastplate a while ago.
I think this isn't bad for a first attempt, but I obviously still have a long way to go.
 Attachment: 71.06 KB
Attachment: 76.34 KB
I think this isn't bad for a first attempt, but I obviously still have a long way to go.
The armorer that made my armor showed to me how to blue it using a propane or acetylene torch. It's easy, doesn't require any special equipment and will hold pretty well.
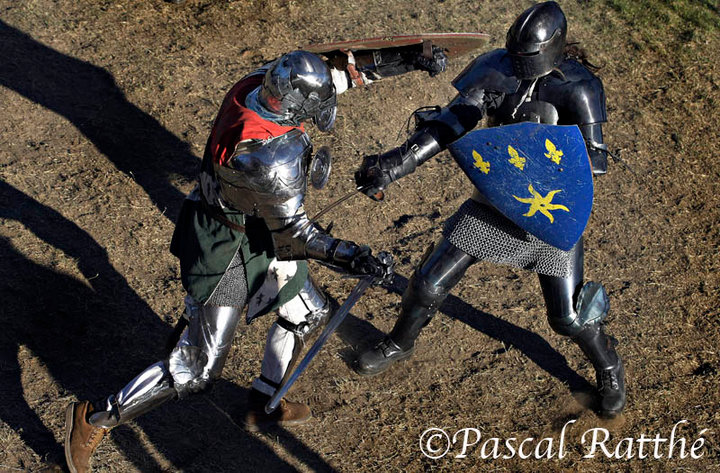
While holding the armor part you want to blue with a clamp, you have to bring it to a light blue/gray color with the torch, starting from one corner of the piece and heating the part evenly to get a uniform color. You want to go slowly but not stay to long in one spot or the color won't be even... When the part is all done, you just coat it in oil, wait for a while and repeat the process one or two times.
Of course, it's a good idea to do it in a well ventilated garage, and to not breathe the fumes. :)
The armor on the right in the attached picture was blued using this process. Please disregard the anachronistic shields, swords and construction boots. :)
Attachment: 154.17 KB
The result
While holding the armor part you want to blue with a clamp, you have to bring it to a light blue/gray color with the torch, starting from one corner of the piece and heating the part evenly to get a uniform color. You want to go slowly but not stay to long in one spot or the color won't be even... When the part is all done, you just coat it in oil, wait for a while and repeat the process one or two times.
Of course, it's a good idea to do it in a well ventilated garage, and to not breathe the fumes. :)
The armor on the right in the attached picture was blued using this process. Please disregard the anachronistic shields, swords and construction boots. :)
The result
| Jean Thibodeau wrote: |
| I find that using scotch-brite pads soaked with cold blue compound one can blue and sand at the same time and depending on how much one dilutes the bluing compound and how hard one sands one can control and blend the blue from a deep black to a very light bluish patination. |
Wow! :idea: Great trick! Jean, I wish I'd seen this before I blued my sallet recently ... would have probably solved some of the 'streakiness' ... hmm: now to just remove the Ren Wax I put over the top for good measure and touch it up.
| Mark T wrote: | ||
Wow! :idea: Great trick! Jean, I wish I'd seen this before I blued my sallet recently ... would have probably solved some of the 'streakiness' ... hmm: now to just remove the Ren Wax I put over the top for good measure and touch it up. |
It may take a little practice to get it right but it doesn make doing touch ups later on easy if one used the same method to originally blue the armour.
If one is trying to blend in on armour blued by another method it might be harder to match the bluing.
Good idea to practice a bit on a scrap or inexpensive piece before doing it on an expensive one. ;)
Let me(us) know what results you get and if my suggestions work well for you I will certainly be very pleased. ;) :D :cool:
Page 1 of 1
You cannot post new topics in this forumYou cannot reply to topics in this forum
You cannot edit your posts in this forum
You cannot delete your posts in this forum
You cannot vote in polls in this forum
You cannot attach files in this forum
You can download files in this forum
All contents © Copyright 2003-2006 myArmoury.com — All rights reserved
Discussion forums powered by phpBB © The phpBB Group
Switch to the Full-featured Version of the forum
Discussion forums powered by phpBB © The phpBB Group
Switch to the Full-featured Version of the forum