| Author |
Message |
|
Dustin R. Reagan
|
 Posted: Mon 23 Aug, 2010 3:34 pm Post subject: "Historically Accurate" small broken back seax - W Posted: Mon 23 Aug, 2010 3:34 pm Post subject: "Historically Accurate" small broken back seax - W |
 |
|
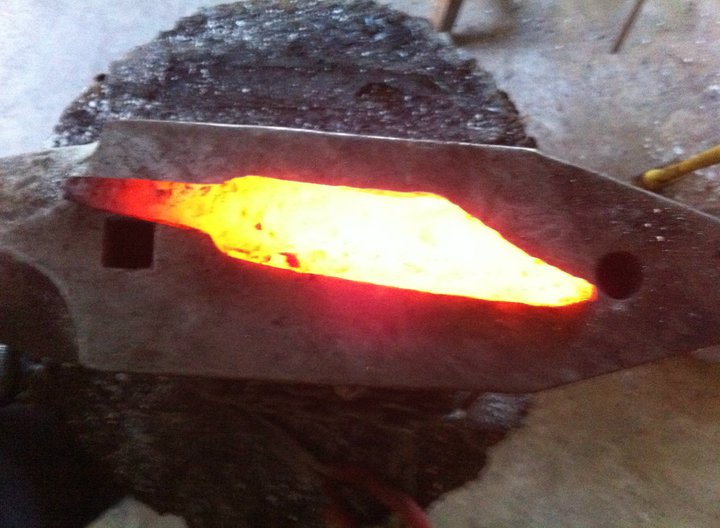
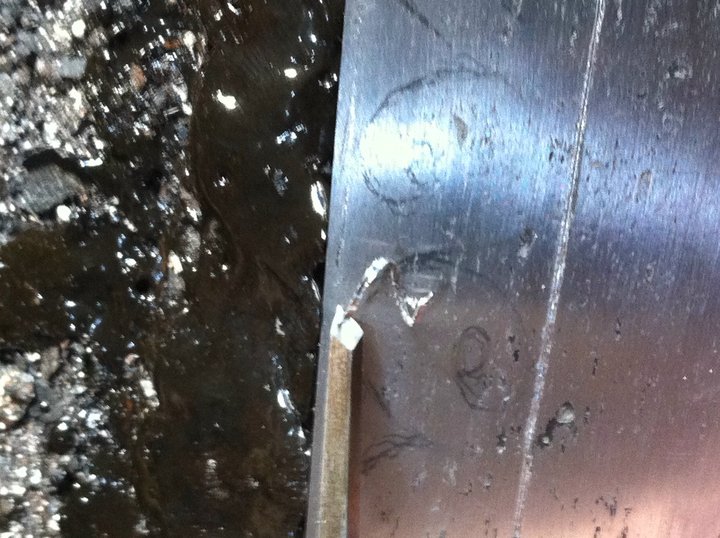
Well, i finally got around to trying out a 'historically accurate' small seax. Normally, I wouldn't post my work at this stage, but I'm excited, this is my first blade involving any form of forge-welding.
The blade is about 6", with a body made with wrought iron from the 1870's and an edge of 1084 steel. It has been welded, forged and heat-treated successfully.
Here are some photos, just for kicks.
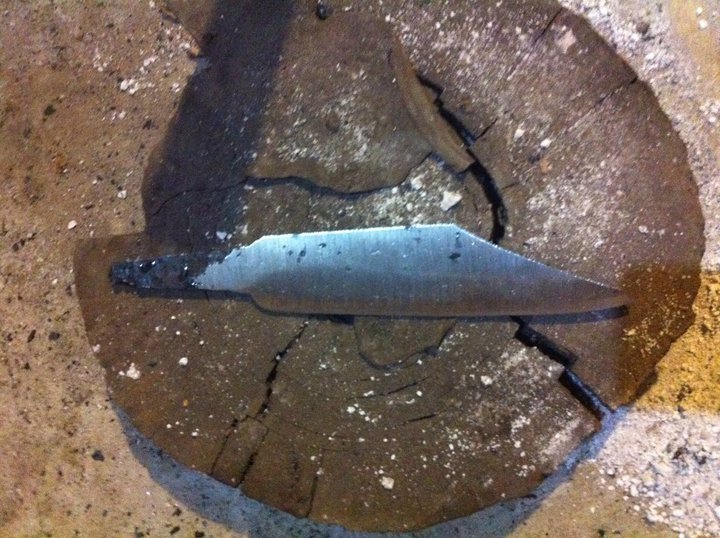
These first two photos are from my first attempt. This first attempt failed, with an incomplete edge weld.

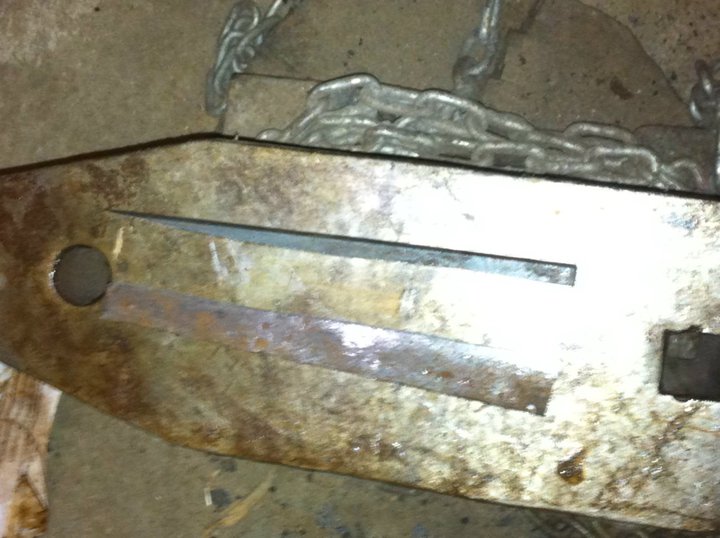
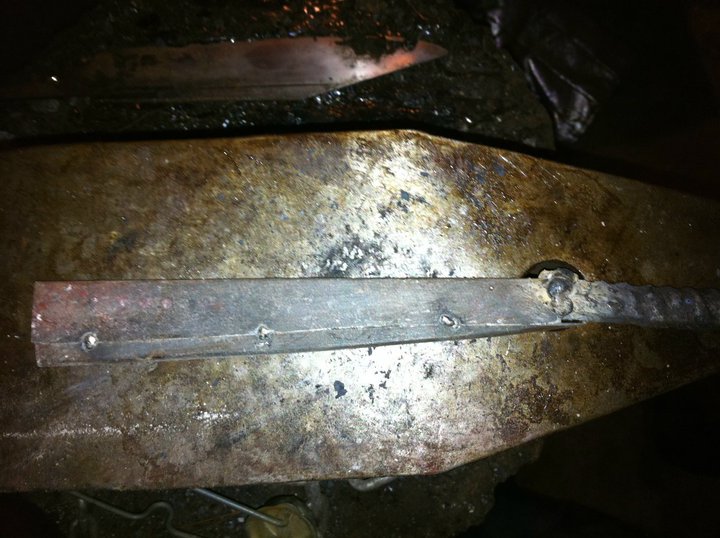
Some minimal surface tack-welds and a rebar handle welded on.

Nearly finished forging, no grinding up to this point. I typically forge more closely to finish, however i was nervous about the wrought (it splits easily) and the welded edge. I left the edge about 3.5mm thick before heat-treat. The spine is just a hair over 5mm at the base of the blade.
After heat-treat and some rough grinding. From this point on, It'll be hand finished, with draw-files, stones and abrasive paper.
I'm planning silver inlay on the blade and a bone or antler handle.
Next up, I'd like to do a similar blade, but with a blister steel (carbuerized wrought iron) edge.
Thanks for looking,
Dustin
 Attachment: 72.98 KB Attachment: 72.98 KB
Attachment: 84.5 KB
Attachment: 66.64 KB

Attachment: 107.52 KB

|
|
  |
 |
Jared Smith

|
| Posted: Mon 23 Aug, 2010 3:48 pm Post subject: |
|
|
It is a treat to see someone try to replicate historically accurate material as best as can practically be done with available antique and modern bar stock. (At least for me, neither the 1084 nor the period wrought iron are easy to obtain in suitable proportion small orders at affordable prices. One has to reforge and reshape some older object to get the desired flat bar material.)
If you don't mind sharing, did you edge weld the 1084 to the iron as a more or less square section, or weld both pieces in flat stock sections closer to final thickness? I am wondering if carbon migration and prolonged forging heat after welding are likely to impact desired hardness that far from the weld. Since you say that heat treat was successful, I am guessing you tested edge region hardness after heat treat.
Absence of evidence is not necessarily evidence of absence!
|
|
|
|
|
|
Dustin R. Reagan
|
| Posted: Mon 23 Aug, 2010 4:01 pm Post subject: |
|
|
| Jared Smith wrote: | It is a treat to see someone try to replicate historically accurate material as best as can practically be done with available antique and modern bar stock. (At least for me, neither the 1084 nor the period wrought iron are easy to obtain in suitable proportion small orders at affordable prices. One has to reforge and reshape some older object to get the desired flat bar material.)
|
Thanks, I'm glad you appreciate it! PM me if you are curious where I source my wrought iron and 1084. I have found sources for these materials that are, in my opinion, affordable in relatively small order sizes.
| Jared Smith wrote: | | If you don't mind sharing, did you edge weld the 1084 to the iron as a more or less square section, or weld both pieces in flat stock sections closer to final thickness? I am wondering if carbon migration and prolonged forging heat after welding are likely to impact desired hardness that far from the weld. Since you say that heat treat was successful, I am guessing you tested edge region hardness after heat treat. |
Both pieces were of the same thickness (1/4") at the weld seam. Barring high phosphorous wrought iron (i'm pretty sure this isn't high in phosphorous, but i can't be certain), I'm sure there is some carbon migration at the seam itself. I don't have an quantitative hardness testing equipment, but based on my experience with heat-treating this steel in non-welded (homogeneous) configurations and how it responds to basic file & brass rod edge stability tests, I'm fully satisfied with the hardenability of the steel edge.
Let me know if you have any more questions, and, as I said, feel free to PM me concerning my material sources.
Dustin
|
|
|
|
|
|
Dustin R. Reagan
|
| Posted: Mon 30 Aug, 2010 3:07 pm Post subject: More pics of the seax in progress |
|
|
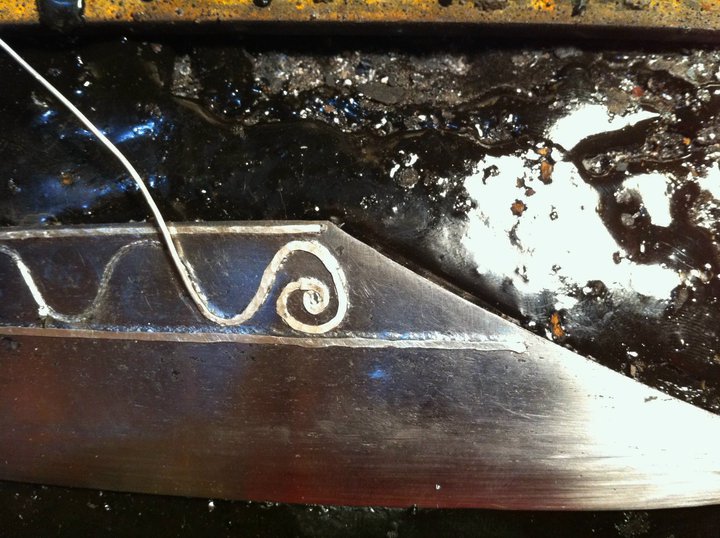
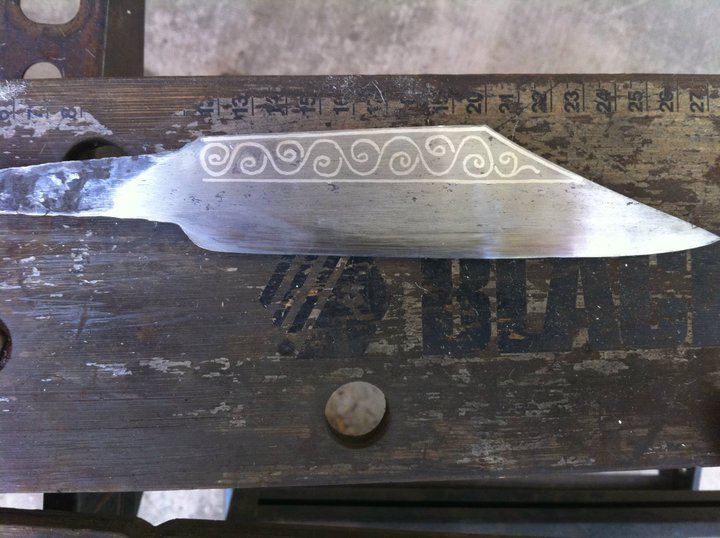
Here are a few in-progress pictures of the inlay process. This is after draw-filing and hand-rubbing the blade to 600 grit finish (I should have just stopped after 400 grit, at least until after the finishing the inlay).
I made (heat-treated, ground & honed) all the engraving points I used in this process. Let me know if you are interested, and I can give more info on my engraving points.
The inlay is 20 gauge pure (0.999) silver wire. I had to periodically soften (anneal) the wire during the inlay process. This is my second non-ferrous inlay attempt. I've only ever done straight line inlay previously, so I'm relatively happy with how this came out, although there are a few things I'll do differently next time.
Here's the wrought iron (same material as the body of the blade) practice plate I did to prepare.

Chiseling the straight inlay channel for the borders (this part was easy!)
Using a brass punch that I made to push the wire into the undercut channel. This part is satisfying, as the wire just kind of pops right into place if you've done everything correctly.
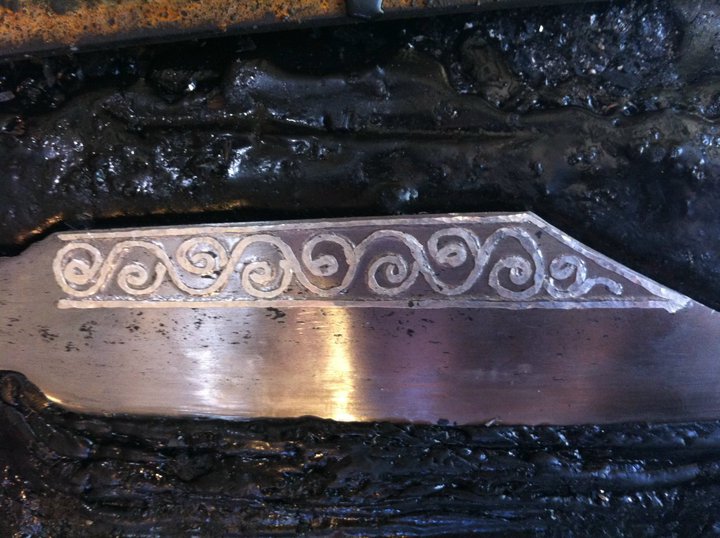
All the inlay is done, it just needs to be leveled.

After filing and sanding the inlay level with the surface of the blade.

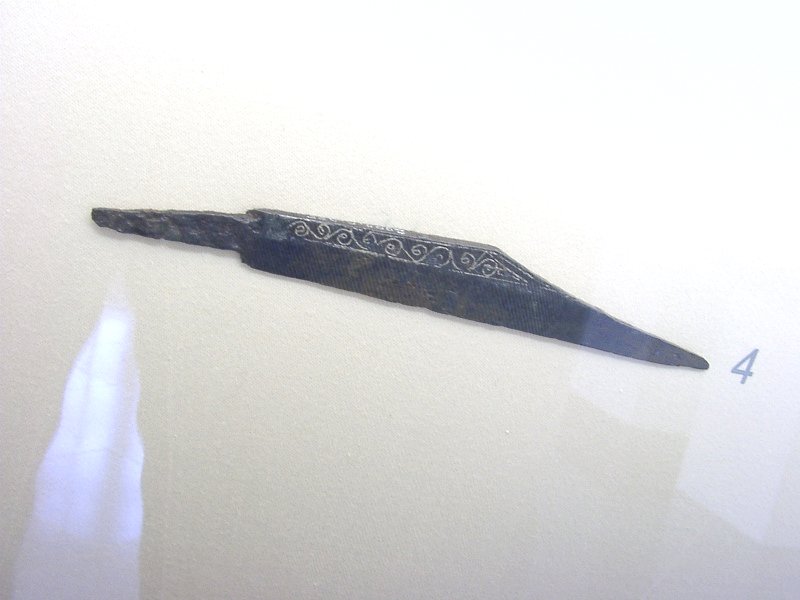
Here's the inspiration for the inlay pattern. The blade proportions of my seax, though, are more in line with the honey lane seax.
Let me know if you have any questions/comments
Dustin
Attachment: 145.7 KB

Attachment: 95.44 KB

Attachment: 98.5 KB

Attachment: 90.24 KB
Attachment: 80.42 KB
|
|
|
|
|
|
Jeremy V. Krause
|
| Posted: Mon 30 Aug, 2010 3:34 pm Post subject: |
|
|
Dustin,
My comment is- that is AWESOME!! Superb execution of the silver inlay! BRAVO! How long is the blade? I understand the historical piece you reference is only about 6 in.
How wide is the spine?
I have one small request, though judging on your skill here I doubt you would do this. . . .
PLEASE don't put any celtic knot designs of any sort on the handle or the sheath!!!
|
|
|
|
|
|
Dustin R. Reagan
|
| Posted: Mon 30 Aug, 2010 4:54 pm Post subject: |
|
|
| Jeremy V. Krause wrote: | Dustin,
My comment is- that is AWESOME!! Superb execution of the silver inlay! BRAVO! How long is the blade? I understand the historical piece you reference is only about 6 in.
How wide is the spine?
I have one small request, though judging on your skill here I doubt you would do this. . . .
PLEASE don't put any celtic knot designs of any sort on the handle or the sheath!!! |
Wow, thanks for the comment! Since I'm just a hobbyist maker, this sort of comment really makes my day. Haha, don't worry, there will be NO celtic knot work incorporated into this piece.
The blade is 6 & 1/16th inches long. The spine is intentionally pretty thick, as most historical pieces tend to be. In this case, the spine is a hair over 6mm thick at the base of the blade and a hair under 5mm at the "broken back" transition to the point. A spine like this will *not* make a good fine slicing blade, however, perhaps it's necessary since wrought iron is not heat-treatable, so to have a nice stiff spine, you have to keep a fair amount of "meat" up there...
Next up, I need to decorate the reverse of the blade and perhaps do some simple inlay on the top of the blade.
I had a brief correspondence with Peter Johnsson and Jeroen Zuiderwijk on Don Fogg's forum about the historical piece i referenced above, and unfortunately they didn't have any other pictures of the blade. I really wish I could get a better picture of the top of this blade. However, Jeroen mentioned that he did *not* believe the reverse side had the same pattern of inlay (and apparently it is not typical for broken back seax to have the same inlay design on both sides). Peter mentioned that he recalled that there was a very shallow fuller (probably scraped?) into the inlaid area of the blade. This is something that i wasn't willing to try at this point, since I can only imagine that inlaying into a concave area must be pretty difficult.
Thanks,
Dustin
|
|
|
|
|
Jared Smith
|
| Posted: Mon 30 Aug, 2010 7:14 pm Post subject: Re: More pics of the seax in progress |
|
|
| Dustin R. Reagan wrote: |
I made (heat-treated, ground & honed) all the engraving points I used in this process. Let me know if you are interested, and I can give more info on my engraving points.
Let me know if you have any questions/comments
Dustin |
That really is impressive! If the patterns had been done with "store bought" tools (some recognized artisans do, and even post the brand and model of tools used) they still would have been worthy of intense compliments. The custom made tools are worthy of a separate post and description.
I'd like to see a saxon axe head done that way. Unfortunately, I like pattern welded materials. The common, present day, nickle-bearing alloys used by most pattern welders are pretty tough, even in the annealed state. At least for now, I have abandoned the idea of inlaying a modern nickle based alloy pattern welded object.
Absence of evidence is not necessarily evidence of absence!
|
|
|
|
|
|
Dustin R. Reagan
|
| Posted: Tue 31 Aug, 2010 11:22 am Post subject: Re: More pics of the seax in progress |
|
|
| Jared Smith wrote: |
That really is impressive! If the patterns had been done with "store bought" tools (some recognized artisans do, and even post the brand and model of tools used) they still would have been worthy of intense compliments. The custom made tools are worthy of a separate post and description. |
Thanks, when I get a chance I'll make a post about the graver points and the basic inlay process. I'm not sure how well the points will photograph, but I'll see what I can do.
| Jared Smith wrote: |
I'd like to see a saxon axe head done that way. Unfortunately, I like pattern welded materials. The common, present day, nickle-bearing alloys used by most pattern welders are pretty tough, even in the annealed state. At least for now, I have abandoned the idea of inlaying a modern nickle based alloy pattern welded object. |
Have you tried engraving any of this annealed nickel alloy? You *may* be surprised at what sorts of materials can be engraved, given the proper tools (carbide gravers may be the way to go here). Furthermore, you might try a body of mild steel + wrought iron pattern weld with forged welded edge steel. I've see photos of this, and it looked surprisingly high-contrast (and is more "period correct" than, say a 1095/15n20 combination)! Personally, i'd love to see an axe like this!
By the way, here are some images of my blade with some patination/finish tests:

Rubbed down with a scotchbrite pad:

What do you guys think? Darker or more subtle? Somewhere in between? I'm not sure if this sort of finish is 'historically correct', but aesthetically speaking, i think it adds a lot.
Dustin
|
|
|
|
|
Thomas R.

|
| Posted: Tue 31 Aug, 2010 1:06 pm Post subject: |
|
|
Hi Dustin,
awesome work, you did there! Could you explain a bit more, how you do such an inlay? Do you just scrape a pit into the steel and fill it up with the silver wire? Or do you heat treat the inlay before grounding etc.? I am no familiar with this craft (but find it really amazing).
Regards,
Thomas
http://maerenundlobebaeren.tumblr.com/
|
|
 |
|
|
Dustin R. Reagan
|
| Posted: Tue 31 Aug, 2010 3:14 pm Post subject: |
|
|
| Thomas R. wrote: | Hi Dustin,
awesome work, you did there! Could you explain a bit more, how you do such an inlay? Do you just scrape a pit into the steel and fill it up with the silver wire? Or do you heat treat the inlay before grounding etc.? I am no familiar with this craft (but find it really amazing).
Regards,
Thomas |
Thanks for the nice comment. Essentially, for thin wire inlay like this, here is my process:
-engrave (with hammer and chisel engraving tools) the design into the steel with a detailing graver.
-go back over the design, this time trying to achieve a deep, evenly cut groove (i'm still working on getting my grooves nice and even in both depth & width!)
-undercut the groove with a small chisel like graver (looks like the head of a tiny screw driver). This undercut allows the inlay wire to "smoosh" down snuggly into the groove.
-fit the wire over the groove and carefully push it into the groove with a brass punch.
-go back over the wire with a small, flat chasing hammer. this helps ensure the wire deforms evenly into the groove, and flattens things up a bit.
-file everything down so it's nice and flush with the surface of the blade.
Here's a great tutorial by a great craftsman, Ben Potter, that describes the process better than i can. He does things very slightly differently than i do (he uses slightly different engraving tools, for instance)...it ends up the same: http://www.seekyee.com/Bladesmithing/the%20pr...torial.htm
|
|
|
|
|
Jean Thibodeau

|
| Posted: Tue 31 Aug, 2010 11:48 pm Post subject: Re: More pics of the seax in progress |
|
|
| Dustin R. Reagan wrote: |
What do you guys think? Darker or more subtle? Somewhere in between? I'm not sure if this sort of finish is 'historically correct', but aesthetically speaking, i think it adds a lot.
Dustin |
I sort of like a dark or medium dark finish if it's supposed to be a knife that has seen some daily work but lightly cleaned and polished back a bit i.e. a bit like the natural staining one gets with slicing tomatoes with a carbon steel knife.
A little darkness does make the silver stand out.
In period I don't know if the staining would bother the owner so that he would polish the blade back to bright or just casually clean and oil it so that the staining would remain but be periodically cleaned more or less: The same knife might be dark for a while and cleaned up periodically.
A nice dark patination in period might be tolerated but if some real rust set in it would then probably be polished back to bright
or in period the pride of ownership might mean that it would always be polished bright as in period they might not like the patina 's esthetics the way we would and see it as a sign of neglect or being sloppy with one's tools or weapons. 
You can easily give up your freedom. You have to fight hard to get it back!
|
|
|
|
|
Thomas R.
|
| Posted: Tue 31 Aug, 2010 11:55 pm Post subject: |
|
|
| Dustin R. Reagan wrote: |
Thanks for the nice comment. Essentially, for thin wire inlay like this, here is my process:
-engrave (with hammer and chisel engraving tools) the design into the steel with a detailing graver.
-go back over the design, this time trying to achieve a deep, evenly cut groove (i'm still working on getting my grooves nice and even in both depth & width!)
-undercut the groove with a small chisel like graver (looks like the head of a tiny screw driver). This undercut allows the inlay wire to "smoosh" down snuggly into the groove.
-fit the wire over the groove and carefully push it into the groove with a brass punch.
-go back over the wire with a small, flat chasing hammer. this helps ensure the wire deforms evenly into the groove, and flattens things up a bit.
-file everything down so it's nice and flush with the surface of the blade.
Here's a great tutorial by a great craftsman, Ben Potter, that describes the process better than i can. He does things very slightly differently than i do (he uses slightly different engraving tools, for instance)...it ends up the same: http://www.seekyee.com/Bladesmithing/the%20pr...torial.htm |
Hi Dustin,
thank a lot for your description! And the link provides a really helpful tutorial. One last question: Do you harden the blade after or before the inlay process? I think the blade should be hardened after the inlay is made, but does this affect the inlay? If it is silver, it should not be affected, 'cause of the higher melting point, am I right?
Thomas
http://maerenundlobebaeren.tumblr.com/
|
|
|
|
|
Nathan Beal

|
| Posted: Wed 01 Sep, 2010 6:55 am Post subject: |
|
|
Dustin
My hat is off to you sir, that piece is amazing, a marvellous piece of work.
N.
Beware of dragons, for you are crunchy and good with ketchup.
|
|
|
|
|
|
Ted Bouck
Location: Northe East Ohio Joined: 04 Jul 2007
Posts: 20
|
| Posted: Wed 01 Sep, 2010 8:47 am Post subject: |
|
|
| Dustin R. Reagan wrote: | | Thomas R. wrote: | Hi Dustin,
awesome work, you did there! Could you explain a bit more, how you do such an inlay? Do you just scrape a pit into the steel and fill it up with the silver wire? Or do you heat treat the inlay before grounding etc.? I am no familiar with this craft (but find it really amazing).
Regards,
Thomas |
Thanks for the nice comment. Essentially, for thin wire inlay like this, here is my process:
-engrave (with hammer and chisel engraving tools) the design into the steel with a detailing graver.
-go back over the design, this time trying to achieve a deep, evenly cut groove (i'm still working on getting my grooves nice and even in both depth & width!)
-undercut the groove with a small chisel like graver (looks like the head of a tiny screw driver). This undercut allows the inlay wire to "smoosh" down snuggly into the groove.
-fit the wire over the groove and carefully push it into the groove with a brass punch.
-go back over the wire with a small, flat chasing hammer. this helps ensure the wire deforms evenly into the groove, and flattens things up a bit.
-file everything down so it's nice and flush with the surface of the blade.
Here's a great tutorial by a great craftsman, Ben Potter, that describes the process better than i can. He does things very slightly differently than i do (he uses slightly different engraving tools, for instance)...it ends up the same: http://www.seekyee.com/Bladesmithing/the%20pr...torial.htm |
Totally awesome work Dustin! Thanks for the written procedure. I have done some simple inlay with copper wire, all straight, using chisels that are not the best. In your earlier post you mentioned you could advise on the making / shape of the tools. I would appreciate your advice in this regard as well.
Oh and check out my Flickr account for some pics of my work. www.flickr.com/photos/eldesar
And a final question, do you think this inly would have been 10% harder, 25% harder , etc. if it were done in an annealed or normalized 1084 blade?
Most of the early period inlay was done in the wrought iron. I know it is softer and thus easier to work. Right?
Best Regards,
Ted Bouck
|
|
 |
|
|
Dustin R. Reagan
|
| Posted: Wed 01 Sep, 2010 9:59 am Post subject: |
|
|
| Thomas R. wrote: |
One last question: Do you harden the blade after or before the inlay process? I think the blade should be hardened after the inlay is made, but does this affect the inlay? If it is silver, it should not be affected, 'cause of the higher melting point, am I right?
Thomas |
In this case, since the body of the blade is wrought iron (and is not hardenable), I did the engraving/inlay after heat-treating the edge steel. If you are working with modern homogeneous steels, then yes, typically you would perform the engraving and inlay (as long as the melting point of the inlay is above that of the austentizing temperature of the particular steel) before heat-treatment. Alternatively, you could do a differential quench (clay coated spine, or just an edge quench) which hardens only the edge but keeps the spine/body of the blade soft. This is what Ben Potter did in the tutorial i linked to. You might even be able to get away with doing a full quench, then differentially tempering the part of the blade you are going to engrave. It all depends on the hardness of the quenched steel vs. the hardness of your engraving tools + your skill. It is apparently possible to engrave even fully hardened steels with carbide gravers.
Dustin
Last edited by Dustin R. Reagan on Wed 01 Sep, 2010 10:13 am; edited 1 time in total
|
|
|
|
|
|
Dustin R. Reagan
|
| Posted: Wed 01 Sep, 2010 10:13 am Post subject: Re: More pics of the seax in progress |
|
|
| Jean Thibodeau wrote: |
I sort of like a dark or medium dark finish if it's supposed to be a knife that has seen some daily work but lightly cleaned and polished back a bit i.e. a bit like the natural staining one gets with slicing tomatoes with a carbon steel knife.
A little darkness does make the silver stand out.
In period I don't know if the staining would bother the owner so that he would polish the blade back to bright or just casually clean and oil it so that the staining would remain but be periodically cleaned more or less: The same knife might be dark for a while and cleaned up periodically.
A nice dark patination in period might be tolerated but if some real rust set in it would then probably be polished back to bright
or in period the pride of ownership might mean that it would always be polished bright as in period they might not like the patina 's esthetics the way we would and see it as a sign of neglect or being sloppy with one's tools or weapons. |
You're right, in that we can't really know definitively one way or the other whether this was done, and that it's impossible (or at least very difficult) to impose our modern sense of aesthetics on our ancestors (or even on other modern people living today in different cultures).
One point of clarification, though, it seems as though you are speaking of patination that will naturally develop through the day-to-day use of non-stainless irons/steels? I am speaking purely in the sense of "forced", controlled, or purposeful patination. With the above caveats, I think it's reasonable to allow that this *might* have been done, both for aesthetic as well as practical reasons. Forced patinas actually help protect steel from "bad" rust, as the layer of passive oxides protect the blade from the elements. Additionally, high-phosphorous wrought irons (which have been archeologically shown to have been favored and selected for the production of weapons in some periods/locales) naturally resist rust by developing a passive patina (http://en.wikipedia.org/wiki/Iron_pillar_of_Delhi#Scientific_analysis, for example).
Dustin
|
|
|
|
|
|
Dustin R. Reagan
|
| Posted: Wed 01 Sep, 2010 10:34 am Post subject: |
|
|
| Ted Bouck wrote: | ]
Totally awesome work Dustin! Thanks for the written procedure. I have done some simple inlay with copper wire, all straight, using chisels that are not the best. In your earlier post you mentioned you could advise on the making / shape of the tools. I would appreciate your advice in this regard as well.
Oh and check out my Flickr account for some pics of my work. www.flickr.com/photos/eldesar
And a final question, do you think this inly would have been 10% harder, 25% harder , etc. if it were done in an annealed or normalized 1084 blade?
Most of the early period inlay was done in the wrought iron. I know it is softer and thus easier to work. Right?
Best Regards,
Ted Bouck |
Woah, that's some really nice armoring work! I really like the helms and lamellar...that's about the first time i've seen lamellar made with plates of the proper size (most of it seems to be made with plates that are a bit too large, in my opinion). Your lamellar looks just how I'd imagine it.
Tonight, when I get home from work, I'll try to take some photos of my engraving points. Then, tomorrow I can try to write up something about them. Essentially, though, it's not rocket science, it just took a little reading and a lot of experimentation with a diamond hone to get a tip that i like. The part that makes the biggest difference, though, seems to be to get a good "heel" on your graver tip. This keeps the tip from wanting to dig in deeper and deeper (biggest cause of point breakage, in my experience). Also, keep your graver sharp (should be written in all caps, but that just looks rude)!
Regarding wrought vs. 1084: Hmm, it's hard to put a number on it....engraving in this wrought iron is quite different than engraving annealed 1084. The 1084 has quite a bit "firmer" feel to it, but this firmness can be a good thing, in that it allows for a potentially crisper execution. The wrought iron is nice and soft, however, it's not homogenous at all, and you can literally feel changes in hardness (slag inclusions?) as you engrave. In some respects it's like working with wood, as the feel of it changes whether you are engraving with or against the grain of the wrought iron. Furthermore, since this particular wrought iron is so "dirty", occasionally on tighter turns, you get some "tear-out", where you hit a slag inclusion or something, and the edge of the cut kind of crumbles away.
Dustin
|
|
|
|
|
Thomas R.
|
| Posted: Wed 01 Sep, 2010 10:39 am Post subject: |
|
|
Thank you again, for the information provided, Dustin!
I am more and more interested in making my own knives. I find the information given in this thread really usefull, perhaps we should nominate it for a spotlight thread? Don't know, if it's fit enaught for that?
Regards,
Thomas
http://maerenundlobebaeren.tumblr.com/
|
|
|
|
|
|
Jeremy V. Krause
|
| Posted: Wed 01 Sep, 2010 4:37 pm Post subject: |
|
|
Dustin,
It might be a long shot but perhaps you could contact the museum of London and try to find out what design is inlayed on the other side of the blade.
I know you said you are a hobbyist but you have a real gift that some folks who appreciate historical accuracy may be willing to pay for. Just sayin. . . . . 
|
|
|
|
|
|
Dustin R. Reagan
|
| Posted: Wed 01 Sep, 2010 5:03 pm Post subject: |
|
|
| Jeremy V. Krause wrote: | Dustin,
It might be a long shot but perhaps you could contact the museum of London and try to find out what design is inlayed on the other side of the blade.
I know you said you are a hobbyist but you have a real gift that some folks who appreciate historical accuracy may be willing to pay for. Just sayin. . . . . |
According to Jeroen Zuiderwijk (who took the picture), it's actually located in the Klingenmuseum in Solingen, Germany. I don't speak German, so I'm not sure how to establish communication with someone there who might be able to help me...I guess it couldn't hurt to just send an email asking if anyone could help me?
|
|
|
|
|
|
|
You cannot post new topics in this forum
You cannot reply to topics in this forum
You cannot edit your posts in this forum
You cannot delete your posts in this forum
You cannot vote in polls in this forum
You cannot attach files in this forum
You can download files in this forum
|
All contents © Copyright 2003-2026 myArmoury.com — All rights reserved
Discussion forums powered by phpBB © The phpBB Group
Switch to the Basic Low-bandwidth Version of the forum
|

