| Author |
Message |
Julien M

|
 Posted: Wed 11 Aug, 2010 7:11 am Post subject: Making my first sword with Owen Bush Posted: Wed 11 Aug, 2010 7:11 am Post subject: Making my first sword with Owen Bush |
 |
|
Hi all,
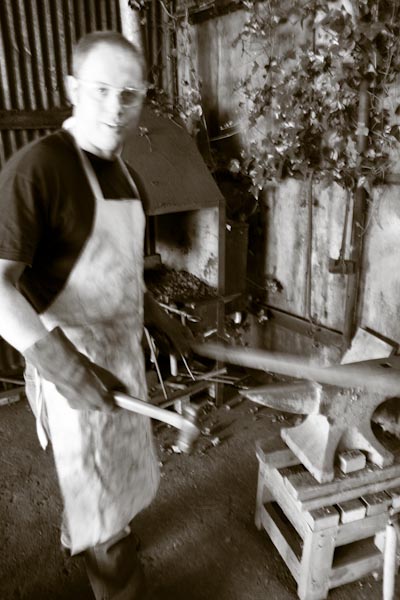
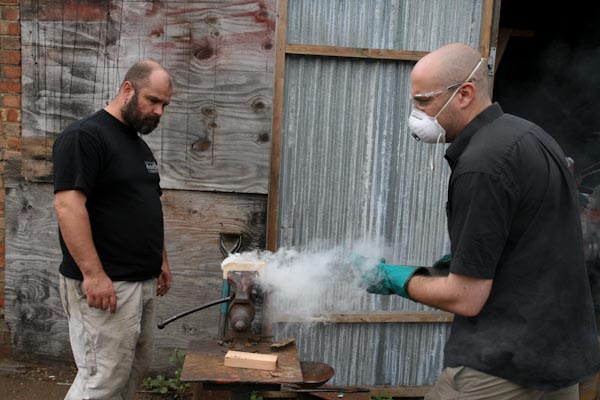
I signed up a while ago for the 7 days sword course lead by Owen Bush. Owen is a British blade smith who specializes in pattern welding blades (his website: http://www.owenbush.co.uk ). Most of you have probably seen some of his work without being aware of it as he often teams up with Tod from Tod's Stuff for projects involving larger blades. He is based in welling, Kent, not far from London by train (25 min or so...and as a matter of fact, 20 minutes away from my place by car). This year was the third edition of this course, and beside me 5 other student from various backgrounds came to tackle the anvil.
Where to begin...I learned so much during these 7 days (Saturday and Sunday included) that I don't even know where to start. I had looked at ways to try on smithing before, but this training course definitely caught my attention as it is (as far as I know) unique since it offers the opportunity to give a go at forging a sword without previous experience in blade smithing (some might find it unrealistic...well the course kept all its promises nonetheless as all 6 of us left with a sword in their hands (not a sword like object, but a genuine sword, with distal taper and correct weight distribution and balance).
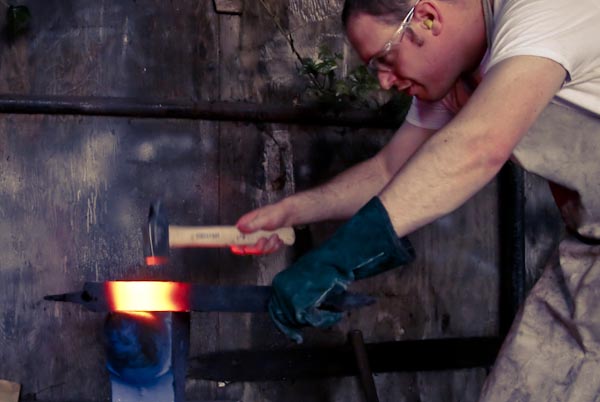
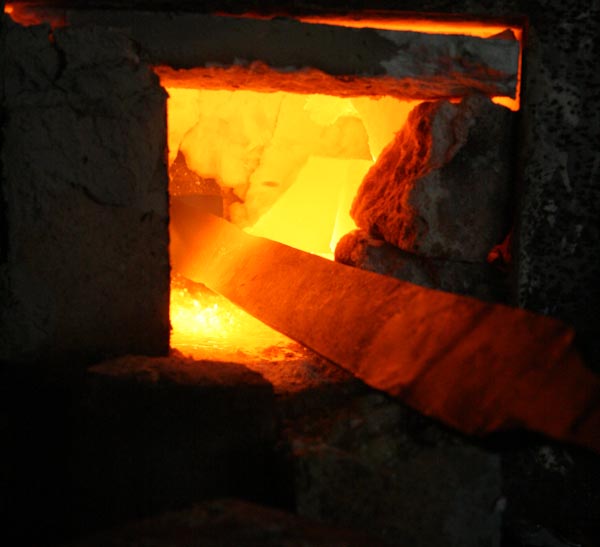
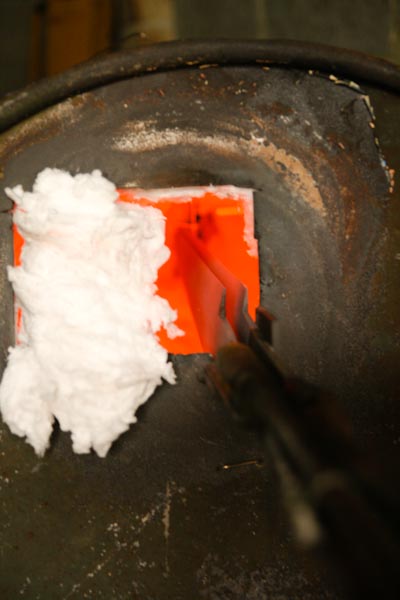
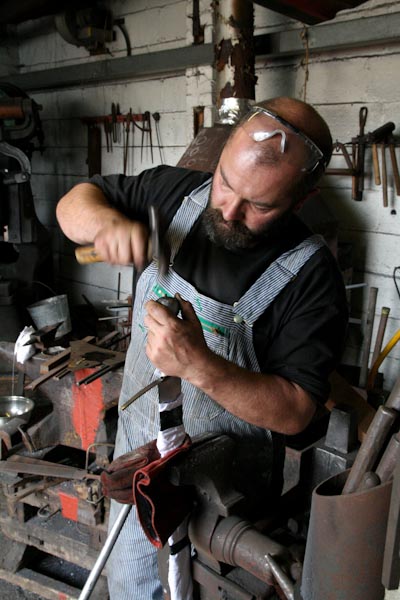
The course itself is very well planned and prepared, and all is made so that one will gradually gain the skills needed to achieve the forging and assembly of a sword along the week. Owen's workshop contains all that is needed for 6 student to work at full pace without having to wait for a tool to become available (3 coal forges, 3 gaz forges, many belt grinders, power hammers, polishing shop, heat treatment room etc etc).
Much relies on the students perseverance (for we all lacked any experience, save for two who made knives before), The course is fast paced and physically quiet exhausting (at least for an office worker such as myself...the hammering of the blade took me 3 days, and my right wrist could not take anymore). Owen's way of teaching practical skills such has forging/grinding etc is very efficient, and the fact that he is very mature and confident in his craft makes all the difference here. His method mixes explanations, demonstrations, you give it a go, you mess things up (or not), Owen fixes your mess, or gives your pointers to sort things out and you're and your way again. I find that Owen has found the right balance, as he will help you or fix things for you if you are in danger of completely ruining your project (a hammer blow here, re setting the right angle at the grinder there, and you will be back on track in no time), but he will most likely explain to you how to solve your issue on your own and let you deal with it...and by overcoming it you gain in confidence and skill.
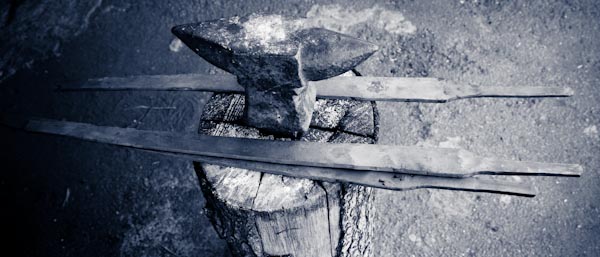
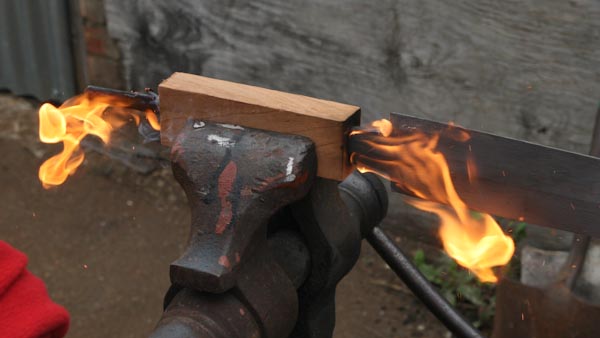
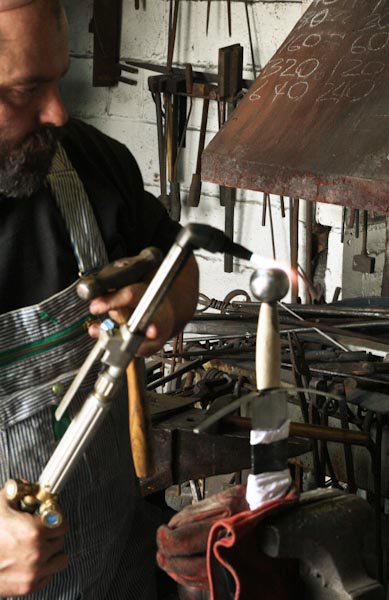
So we started the week by forging a dagger as a training piece out of a rectangular thick piece of steel, in order to understand how to form and bevel a blade profile, how to draw steel and shape the tang etc... then to make the story short we moved on to grinding those dagger on the belt sander. Then we moved on to the real thing and started shaping our sword blades out of an even thicker piece of steel, which had been prepared for us before (the tang had been roughly shaped with a power hammer). After that, back to the grinders, then on to the forging of the guards, cutting pommels (those had been drilled and punched for us before), burning the tang into the woodblock for the handle, and then the final assembly. No time to linger along really, and Owen will make sure you move forward according to schedule as the week progresses.
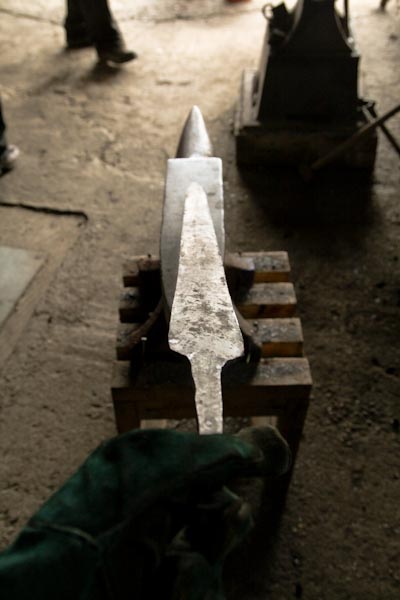
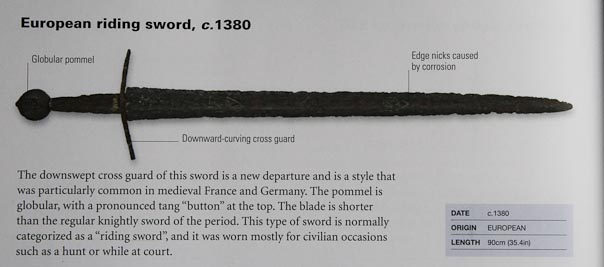
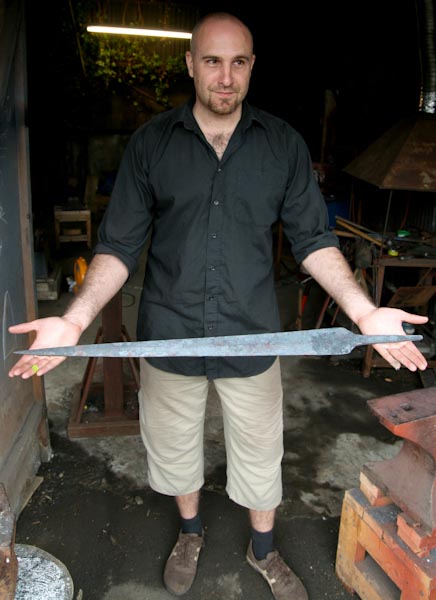
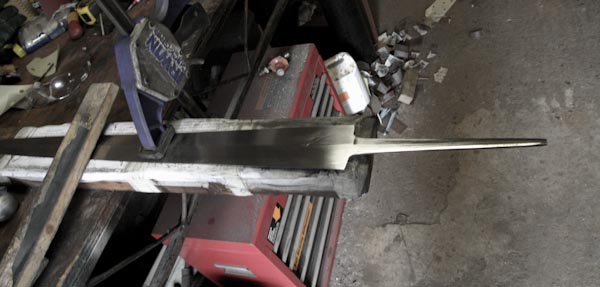
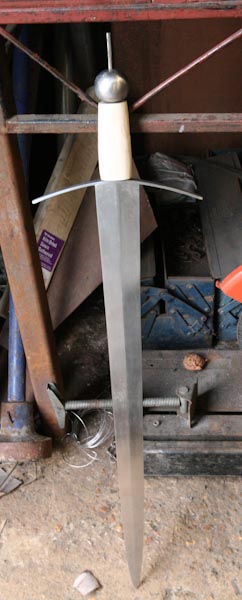
A few words about my project. Things were a bit tougher for me as I aimed at reproducing an historical design, a type XV sword (I chose this type because these blades are of flat diamond section, with no fueller (no time to complicate things too much during the course and though Owen agreed to grind a fueller for me (I initially wanted to make a type XVi) I decided to go for something that would not involve a composite blade geometry..
So I came along with a picture that I previously printed at work. a life size reproduction of the sword below on paper, that I carried around and taped all around the different workshops during the week.
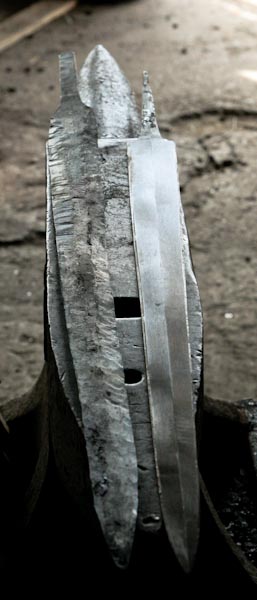
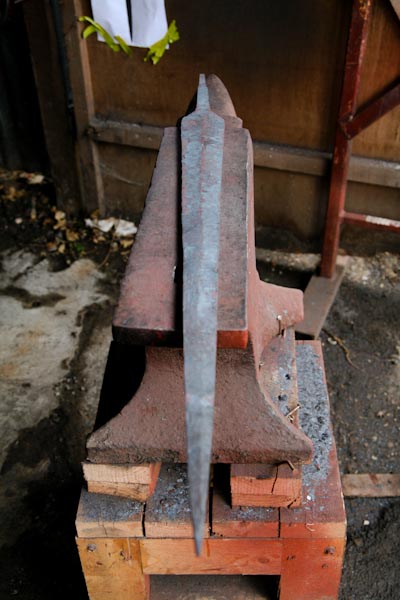
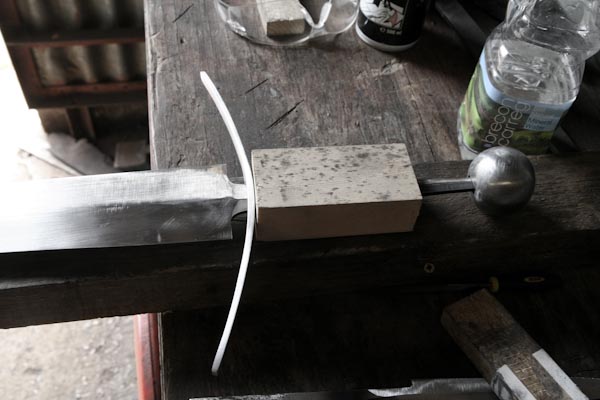
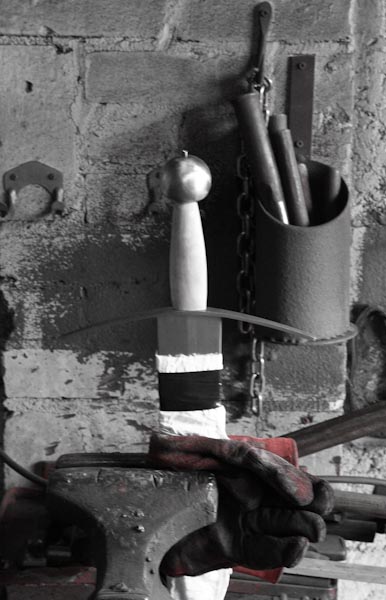
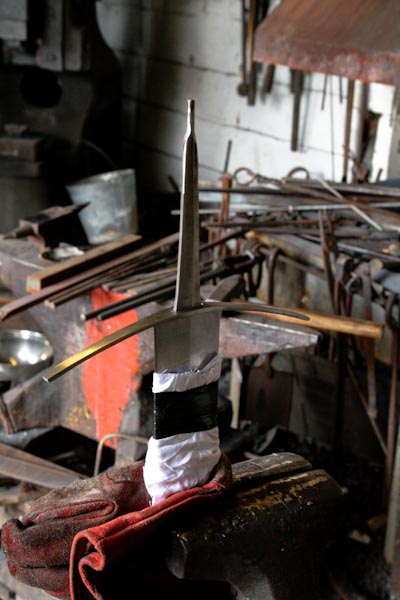
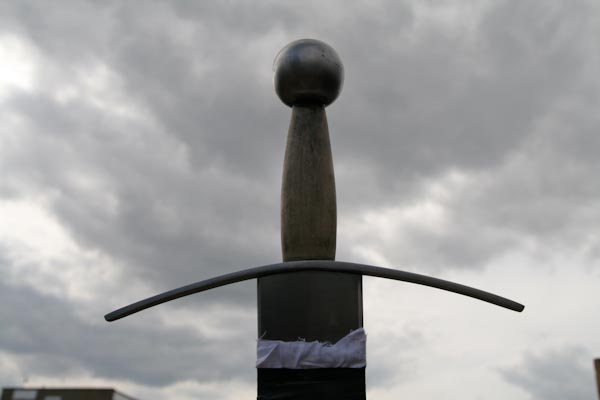
The other students created their design as they went along (for the most part type XVIIIish shaped swords) which was quicker than having to check the progress design constantly. Nevertheless, I could not have imagined to do it otherwise. I did not find any indication of weight on this particular sword, so I used the stats of the Albion Poitier, which is of the same type and dimensions. One of the challenges of this design was the sharp tapering profile (which implies to reinforce the tip by changing the angle of the flat diamond as you approach the tip of the sword). Another feature that kept me on my toes is the flaring of the blade shoulders. Now this is a feature displayed on the original sword as it is now, after much wear and honing. In it's prime, the blade would have been straight from guard to tip, like most type XV. But I found this feature to be so visually striking on the present sword that I decided to go for it. Anyway, extending the blade width on the anvil was bloody painful, ad I was very close to a tendinitis when it was finally done...I am very pleased with the result. When I lay the sword on the paper, the outer lines are spot on, save for the tip (the sword is two inches shorter, because my grinding was still uneven at the heat treatment stage and the tip bended sideway, "sabering" the blade...so I had to make up for that with the grinder and straightening the edges again cost me those two inches at the tip (Owen re-centered the diamond spine for me, that's a good example of when you can expect him to jump in and save the day for you). The pictures below show the sword at an unfinished state. It still needs polishing, sharpening, grip work, leatherwork (the guard branch will be shortened too, for the quillons are too thin for my taste). In the end, the all sword weights a little less than 2 pounds, has a strong distal taper, and feels very light and well balanced (POB 10 cm before the guard). I will give more precise stats once the assembly is completed.
To sum this very long post up...I enjoyed this week immensely as (without sounding too cheesy I hope) forging my own sword is an dream of mine since I was a kid. This was a fantastic learning experience...that answered many question I asked myself when studying the sword on books or during the home improvements/projects done in the past. I now fell able to tackle more ambitious stuff (such as re grinding and hilting these Albion moat blades I got a few weeks ago).
Money wise you will pay approx the price of an high end sword (Albion or A&A), but you will not only leave with a complete sword (and most likely with a nice dagger blade too  , but also with skills hard to gain otherwise and a deeper understanding of the sword. I think it is well worth it, and more. , but also with skills hard to gain otherwise and a deeper understanding of the sword. I think it is well worth it, and more.
Cheers,
Julien
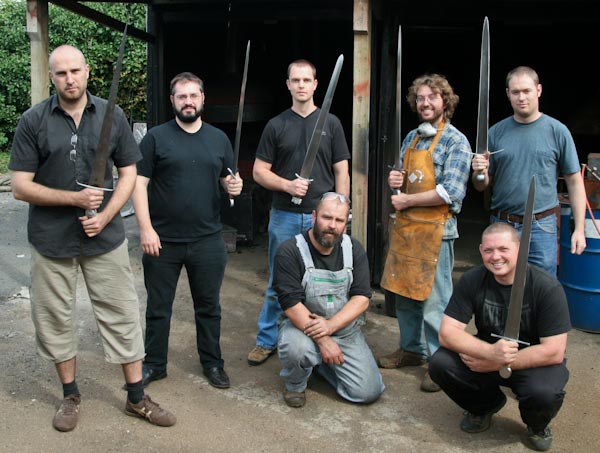
PS: Beside picts of my own sword, I also have a crappy picture of all the swords that were made during the course, but I'd rather wait for fellow myArmoury member Ryan Renfro, who also attended (and who documented the all thing with a good camera), to post his here.


Last edited by Julien M on Fri 13 Aug, 2010 5:37 am; edited 5 times in total
|
|
  |
 |
|
Luke Zechman
Location: Lock Haven Pennsylvania Joined: 18 Jan 2009
Posts: 278
|
| Posted: Wed 11 Aug, 2010 8:21 am Post subject: |
|
|
|
WOW!!!! Way to go! I would be lying if I said I wasn't envious. I would say my own personal goals include making shorter blades some day, but the idea of a sword is daunting. I will have to keep Owen's course in mind, once I am out of school and have my feet on the ground. That looks like a very fine blade for being your first. Now that you have done some forging, do you intend to continue the quest in smiting? Once again... great job and can't wait to see some other pictures!
|
|
|
|
|
Julien M
|
| Posted: Wed 11 Aug, 2010 10:13 pm Post subject: |
|
|
Hi Luke,
Thanks for your encouraging comments! I realise that those pictures don't show much save for the overall sword profile, I will post more once the blade and hilt components are fully polished and peened.
Yes I will continue to forge or most likely grind from stock if I can't have access to a forge.Owen is also running a pattern welding course that I will most certainly do at some point. Also I can take advantage of books on the subjects now, such as the Jim Hrisoulas complete blade smith, while before the course such literature was as clear as mandarin to me
Cheers,
Julien
|
|
|
|
|
|
Peter Johnsson
Industry Professional
|
| Posted: Wed 11 Aug, 2010 11:06 pm Post subject: |
|
|
Julien,
Good work!
You did choose a very nice sword as your starting point, but that does not necessarily makes things any easier.
A very handsome type XV!
|
|
 |
|
Jean Thibodeau

|
| Posted: Thu 12 Aug, 2010 4:13 am Post subject: |
|
|
Congratulations and it looks like the final sword will be really good looking when it's finished. 
Even if the first effort had been not as good but the course plus a bit more practice would have given you a good chance at becoming good at forging. The fact that the first effort is so close to " mature " work rather than a first scrapped piece is really a credit to your potential future skills and the very real skills of your teacher to impart the essentials of the skills so quickly and efficiently.
Clean and strait grind lines where you intend them to be is really not easy with a sword length blade and I'm very impressed.  Maybe in a year or two you may be able to take commissions or just make stock and offer them for sale here. Maybe in a year or two you may be able to take commissions or just make stock and offer them for sale here.  
At the very least you can make your own toys.
You can easily give up your freedom. You have to fight hard to get it back!
|
|
|
|
|
Julien M
|
| Posted: Thu 12 Aug, 2010 7:37 am Post subject: |
|
|
Hi Peter, Hi Jean,
Thank you both for your positive comments, much appreciated.
Peter, like many (if not all!) sword enthusiats, I greatly admire your work so your positive feedback certainly means a lot to me!
Jean, I will indeed make my own toys from now on (at least some), to hone whatever skills I may have gained from this experience. All I know is that I took great pleasure in doing it, from the research of a suitable historical design to the making...and that I can't wait to do more. I have a lot on my plate: at least half a dozen albion blades from the moat to tweak and hilt, a dismounted windlass sword of auray, a rondel dagger kit from tod, a ballock with the blade I made during the course...scabbards for everyone and shapes too!...this should keep me busy for a while before I return near an anvil to start another sword (mind you a baselard might not count... )
Cheers,
Julien
|
|
|
|
|
Sean Flynt

|
|
|
|
|
|
JG Elmslie
Industry Professional
|
| Posted: Thu 12 Aug, 2010 10:15 am Post subject: |
|
|
you jammy, jammy git.
a fascinating review. I wish I were able to do such a thing. (stock removal's fine, but I've pretty much destroyed my hands with RSI damage, and cannot do hot forging for long durations  ) )
the end result is rather pretty. I'm assuming that the heat discolouration will be polished away, and certainly looking forward to seeing the finished result. I expect you're already planning the hilt furniture and scabbard?
|
|
|
|
|
Julien M
|
| Posted: Thu 12 Aug, 2010 2:32 pm Post subject: |
|
|
Hey Sean, Thanks! I'm pretty sure you would enjoy this I much as I did, and I would look forward to see what you come up with.
JG, yes, the heat showing at the base was from the torch used to remove the hardness from the tang. It is easy to wipe away with fine grit sandpaper....nothing like those sideways grinding marks that require a lot of elbow grease...
I will probably wrap the grip "albion style" as usual, and I have yet to research a scabbard design...because the use of the type XV lasted for more than two centuries which tends to complicate things a bit.
Cheers,
J
|
|
|
|
|
Ryan Renfro

|
| Posted: Sat 14 Aug, 2010 2:50 am Post subject: |
|
|
Julien,
Your sword is looking great. You will need to post some pictures of the final product.
My main interest is the 11th to 13th centuries, so I struggled a bit to come up with a sword that I wanted to reproduce with a diamond blade of 30” or less. I was ultimately inspired by this riding sword, with the omission the fuller.
Julien’s review of the course is spot on and I would highly recommend it. Although many of the details of the course are covered by works such as Hrisoulas’, there is no substitute for having someone physically show you how to do things – and sometimes how not to! During the forging process my blade started to corkscrew and Owen twisted it back straight again in a vise. I also had difficulties grinding well above 40 grit, so he gave my blade a quick pass with 150 which made the final sanding much quicker.
I left the course with the confidence that this is the kind of project that I could tackle on my own. I hope to start collecting tools as soon as we get out of our flat!
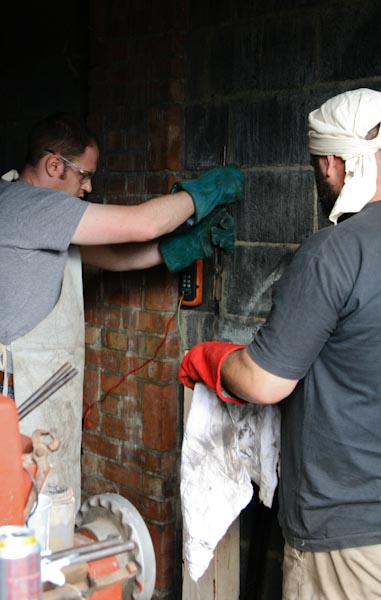
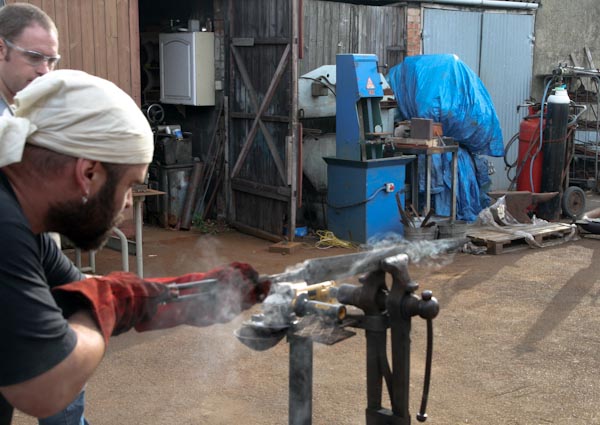
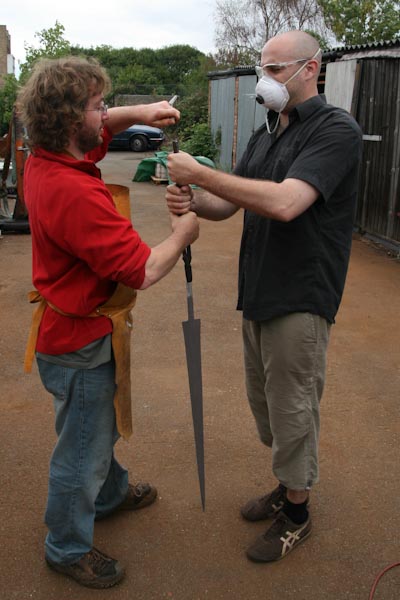
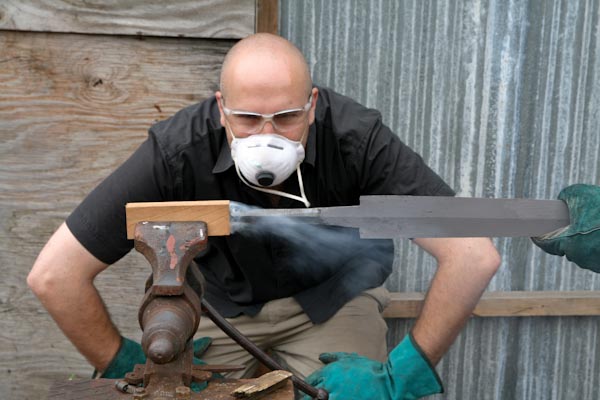
Here are some pictures I managed to take during the course.
 Attachment: 52.49 KB Attachment: 52.49 KB
Attachment: 58.11 KB
Attachment: 47.7 KB
Attachment: 56.69 KB
Attachment: 76.32 KB
Attachment: 59.46 KB
Attachment: 37.74 KB
|
|
|
|
|
Ryan Renfro
|
| Posted: Sat 14 Aug, 2010 2:55 am Post subject: |
|
|
Some more pics:
Attachment: 78.11 KB
Attachment: 67.47 KB
Attachment: 68.85 KB
Attachment: 66.06 KB
Attachment: 51.04 KB
Attachment: 79.27 KB

Attachment: 63.27 KB
Attachment: 81.1 KB
|
|
|
|
|
Ryan Renfro
|
| Posted: Sat 14 Aug, 2010 2:59 am Post subject: |
|
|
and more:
Attachment: 67.36 KB
Attachment: 67.22 KB
Attachment: 70.46 KB
Attachment: 49.62 KB
Attachment: 59.63 KB
Attachment: 54.43 KB
Attachment: 51.35 KB
Attachment: 68.01 KB
|
|
|
|
|
Ryan Renfro
|
| Posted: Sat 14 Aug, 2010 3:08 am Post subject: |
|
|
and the last:
Attachment: 68.12 KB
Attachment: 78.21 KB
Attachment: 76.67 KB
Attachment: 57.81 KB

Attachment: 34.75 KB
Attachment: 90.06 KB
|
|
|
|
|
Jean Thibodeau
|
| Posted: Sat 14 Aug, 2010 3:40 am Post subject: |
|
|
Ryan thanks for all the in progress pics, it does look as you all made impressive work and it's a credit to your efforts and the teaching skills of M. Owen Bush.
You can easily give up your freedom. You have to fight hard to get it back!
|
|
|
|
|
|
David Sutton
|
| Posted: Sat 14 Aug, 2010 8:44 am Post subject: |
|
|
Julien & Ryan,
Your swords look excellent, can't wait to see them finished.
The course looks like great fun; plus you come away with a sword!
I'd love to have a go at this in the future.
'Reserve your right to think, for even to think wrongly is better than not to think at all'
'To teach superstitions as truth is a most terrible thing'
Hypatia of Alexandria, c400AD
|
|
|
|
|
Julien M
|
| Posted: Sat 14 Aug, 2010 11:03 am Post subject: |
|
|
Hey Ryan,
Thanks for uploading those pictures!
Your sword turned great as well mate, too bad you didn't have the time to make a round pin block to dress that pommel (I'll make a peen block for mine before assembling the sword, because for one there is one on the original sword, plus if I ever want to dismount the sword, I won't have to sacrifice that pommel who cost me a few hours of grinding..(and 4 to polish the damn thing!).
Cheers David! Being in the uk, I bet this must be very tempting for you
I finished polishing and fixing minor details on the guard and pommel, and took a few shots below. I also included the only and crappy picture of the all bunch of sword I had.
Cheers,
Julien


|
|
|
|
|
Scott Hrouda

|
| Posted: Sun 15 Aug, 2010 3:55 pm Post subject: |
|
|
Guys, I don't know what to say... I am at a complete loss of appropriate words for the highest level of "coolness" that I've seen on this thread. I am in complete awe at your abilities and the final products from a bunch of forging "newbys". WELL DONE!
A high compliment must also be paid to the instructor. To take a handful of new students and crank out these beautiful swords in such a short amount of time is just incredible.
...and that, my liege, is how we know the Earth to be banana shaped. - Sir Bedevere
|
|
|
|
|
|
Hadrian Coffin
Industry Professional
Location: Oxford, England Joined: 03 Apr 2008
Posts: 404
|
| Posted: Sun 15 Aug, 2010 9:19 pm Post subject: |
|
|
Lovely!
My first (forged) sword looked lovely... until heat-treatment, it warped horribly. Part of the problem was that I started by trying to make an extremely thin type X with a very wide shallow fuller. Probobally not an ideal blade shape for a first try. My first stock-removal blade came out better.
The difficulty I have found with making sword blades now, is that I currently do not have the means to properly heat-treat anything over about half a meter (circa 20 inches) and that's pushing it. It forces you into trying to figure out elaborate work arounds. I hope to rectify this eventually... but that's quite a way down the road.
The only other thing I would advise doing (if you haven't already) would be to procure a small forge, anvil, and belt sander. It can all be found rather cheaply. A two burner propane forge on ebay will run about £30. An anvil can be found different ways, look for ones sitting in farmers barns, I got a 100lbs anvil for about £10... the bloke was just happy to see it go. Or go to antique/junk stores... that's how I got my first anvil ~50lbs which cost me about £15-20. Basic belt sanders are only about £50... so we're only talking a final price of about £100. I find that forging dagger blades helps tremendously, especially working on varying blade geometries, etc. As well as practicing making stock removal sword blades out of cheap mild steel. Practicing the long passes and such, helps me prevent mistakes when working on an actual piece.
Best
Hadrian
Historia magistra vitae est
|
|
 |
|
Julien M
|
| Posted: Sun 22 Aug, 2010 5:06 am Post subject: |
|
|
Hi all,
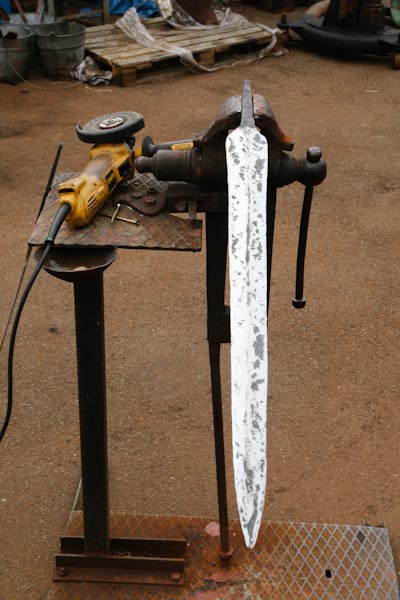
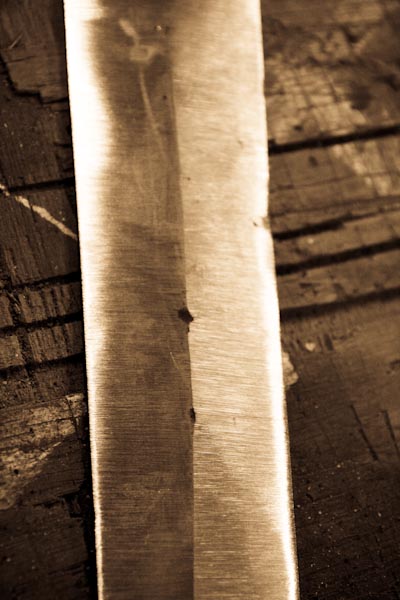
I was back at Owen's yesterday to do a bit of work on my type XV project. I finished the grinding of the blade at 250 grit and then moved on to the polishing tables up to 400ish. After a bit of practice on a kukri knife, I started to put an edge using a belt grinder. This is a tricky process, that managed to make me nervous, as at that stage you would hate to ruin your blade because of a grinding mistake...I did manage to set an edge, and then moved on to blend it as I dislike visible bevels on historical blades.It is now sharp without being mad sharp, and I will probably try stones at some point. I also finished the wood grip. I still have to finish the polish to get rid of superficial marks that happened during the handling of the sword.
The pictures below show the sword with all it's components, but none are permanently fixed so there is a mm or so between the blade shoulder and guard and grip and pommel (the fit of the blade in the tang shoulder is tight but it appears to be wide on these shots). All will be epoxied and hammered into place. The pommel has been prepared (countersink) for the peening. I intend to flush the peen invisible.
I love that sword already, as it is spot on what I wanted it to be (save for these 2 inches at the tip I lost post heat treatment). I find it elegant, light and fast, but stiff considering his overall mass (as these type XV should be I think). the all sword weights 933g (2lb) while the blade is 654g.
Next steps include a cord wrap soaked in glue, then covering the grip with leather, and of course, the assembly (at last!)
This was quiet a ride and my fingers still remember the pains of the hammering...Hope you like it!
Cheers,
Julien


|
|
|
|
|
|
David Sutton
|
| Posted: Sun 22 Aug, 2010 5:47 am Post subject: |
|
|
Its looking very good Julien.
I had wondered about the join of the blade to the guard. The fact that some tang was visible yet the guard was recessed puzzelled me a bit. It never occurred to me that it was because the sword was just test fitted together!
The guard is very nicely done BTW, very elegant and even looking.
For a first attempt at sword smithing you really have done a brilliant job.
'Reserve your right to think, for even to think wrongly is better than not to think at all'
'To teach superstitions as truth is a most terrible thing'
Hypatia of Alexandria, c400AD
|
|
|
|
|
|
|
You cannot post new topics in this forum
You cannot reply to topics in this forum
You cannot edit your posts in this forum
You cannot delete your posts in this forum
You cannot vote in polls in this forum
You cannot attach files in this forum
You can download files in this forum
|
All contents © Copyright 2003-2026 myArmoury.com — All rights reserved
Discussion forums powered by phpBB © The phpBB Group
Switch to the Basic Low-bandwidth Version of the forum
|

