Philip,
Thank you very much for your kind words. I just hope that this thread can aid you in your project. I had a lot of fun doing this sword, and I intend to do more. Don't get discouraged, as you might run into problem. In the making of this hilt i had done the cross guard twice and the brass cross plate twice until I got it right. Times like that can be very frustrating. On another project that I am working on I have riveted scales onto the handle of a single blade three times now, and I will have to do it at least once more to finish the sword.
Thank you for bringing those Maintz and Fulham blanks to my attention. I would like to do one of those in the future. Good luck and feel free to post any additional information in this thread that would aid someone else in hilting a Roman sword.
| Luke Zechman wrote: |
|
Thank you for bringing those Maintz and Fulham blanks to my attention. I would like to do one of those in the future. Good luck and feel free to post any additional information in this thread that would aid someone else in hilting a Roman sword. |
Last night I came home to find the Albion Mainz bare blade on my doorstep. I am very surprised at how hefty this blade is. I bought this one heat treated, so I need to fit the handle and polish it. I have never seen or handled a gladius before, and it is a fearsome looking thing. Now, I am going to follow your steps and very slowly begin creating the handle.
I laid this blade along side my Albion Knight and marveled at the difference. This will be an interesting project. Thanks for showing me the way.
Phillip,
Congratulations on that Albion blade, they look very nice in the photos. I know what you mean about gladii blades seeming hefty, they are stout with just a little distal taper. I really want to get one of those Albion blanks, and do another gladii of a different style. I would never have been able to do that project without the help of this forum community. Have fun, and if you run into any problems feel free to PM me. I also wouldn't mind a picture of the end product. :D
Congratulations on that Albion blade, they look very nice in the photos. I know what you mean about gladii blades seeming hefty, they are stout with just a little distal taper. I really want to get one of those Albion blanks, and do another gladii of a different style. I would never have been able to do that project without the help of this forum community. Have fun, and if you run into any problems feel free to PM me. I also wouldn't mind a picture of the end product. :D
Ugggghhhhh! I couldn't resist. I just ordered the Albion Fulham Gladius blank blade. I think I am just going to base my hilt design around the Tiberius Gladius that they offer. Now I just need to get them to offer a Pompei blank and do another one of those.
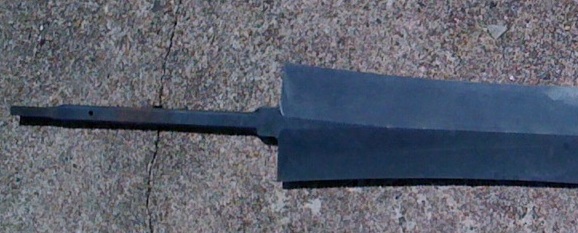
Hey Luke, I am finally starting my handle project for a Mainz gladius. Thought I would tag onto your post. I have attached a picture of the Albion Mainz sword blank. On the tang there is a small hole. I have no clue why that hole is there. What is the purpose?
I have also been looking at Mainz handles to determine how make mine, and it seem as the Mainz handles are more oblong in cross guard and the pommel than the Pompeii gladius you made. Is that an accurate assessment on my part or am I just misinterpreting the photos.
A friend gave me lots of chunks of hard wood including cherry, maple, red oak and others. I am thinking about making this handle from cherry. I am not so concerned about historical accuracy on the type of wood, but I am concerned about making a handle that is historically close to accurate....or at least as accurate as a few thousand years allows me to be.
 Attachment: 61.61 KB
I have also been looking at Mainz handles to determine how make mine, and it seem as the Mainz handles are more oblong in cross guard and the pommel than the Pompeii gladius you made. Is that an accurate assessment on my part or am I just misinterpreting the photos.
A friend gave me lots of chunks of hard wood including cherry, maple, red oak and others. I am thinking about making this handle from cherry. I am not so concerned about historical accuracy on the type of wood, but I am concerned about making a handle that is historically close to accurate....or at least as accurate as a few thousand years allows me to be.
Phillip,
I have no idea why there is a hole in the tang. Perhaps if you send an email to Albion, they could enlighten us. I do not think it will make the tang any weaker.
I used black walnut to do my cross and pommel, and that is not an accurate wood for such a blade. Cherry is very nice when finished, but I have no idea how it is to work. I would avoid the oak as it has large ducts in it that allow for water to move in the live wood, and is prone to splintering. From what I understand the maple would be historical for construction, and would look very nice once finished.
One thing that I will say that wasn't mentioned in my post about my Pompei is positioning the cross and pommel within the grain as to minimize potential splitting. This is hard to describe with words, but take a look direction of the wood grain, and look at sword examples to see what I mean. I think I did this right when I did mine, and no splitting so far... Oh and once you have the finished shape in the wood, I would stabilize it before assembly. This can be done by soaking it is linseed oil that is cut with some turpentine. After that finishing just involves wiping with linseed oil occasionally. Wipe off extra and allow to dry. once you have the sheen you want, i would rub in a little beeswax to seal up the whole deal.
I am not an expert on how these things might have been shaped. There are a few gentlemen on this forum that have helped my figure out all this stuff. Matthew Amt should be able to help with historical shape. I personally would use Albion's Maintz blades to model a handle if I was to do one of these. I plan to model the Fulham I will do after their Tiberius.
I am glad you will post your progress for this into this thread, perhaps it is possible to change the thread name to just Gladius Modification, or Gladius Hilting DIY. I hope this is helpful, and I look forward to seeing progress.
I believe the hole is there because it is used to hang/suspend the blade during parts of the heat-treating process.
This pic of the Gaddhjalt is from Albion's site:
[ Linked Image ]
Note the same kind of hole.
This pic of the Gaddhjalt is from Albion's site:
[ Linked Image ]
Note the same kind of hole.
Last edited by Chad Arnow on Tue 06 Jul, 2010 5:37 am; edited 1 time in total
Ahhh yes and that makes sense since Albion heat treats in a salt bath... Good call Chad!
| Chad Arnow wrote: |
| I believe the hole is there because it is used to hang/suspend the blade during parts of the heat-treating process. |
Thanks Chad. I assumed there was a good reason for the hole in the tang and what you say makes perfect sense. Seeing another Albion sword with the hole is helpful.
According to this thread i have finished my Pompei months ago, however it has been a work in progress. I have made several changes to it recently. Others recent interest in this thread have inspired me to try and make my Gladius better.
I have recently done the following...
1. Refined the shape of the cross and pommel. I removed a lot of material from the cross, which made it a lot less bulky, and made the pommel more spherical. Followed by re application of linseed oil to finish. The amount of wood I removed from the cross made a huge difference in the handling of the sword. The wide shoulders previously pushed into the ahnd when the blade was brought to a halt at the end of a swing.
2. Tweaked the tip shape... the previous tip leaned toward the one side. Still does a little, but not as apparent as before. Let me just say that the tip remains beefy, but dang its pointy.
3. I had recently sanded the bone handle, and knocked off the angular edges and Matthew Amt had suggested previously. He was right! The grip feels better and looks more elegant.
4. I had majorly refined the peen block and peen. I used a file to smooth everything out, and finished it up with a sanding disc on the old dremel (which by the way has been a great tool for finishing work). I also took down the edge of the washer to a bevel that gives the washer a thinner appearance.
I have included a before and after of the peen for comparison. I think it looks much nicer now. I believe I will be moving on. I am anxious to see how long the Albion Fulham blank I have ordered takes now that I have some experience, and I know the level of finish I am satisfied with... I have a feeling that the polishing of the Albion blade will be a new hurdle for me... we shall see. Anyone near Lock Haven Pa have a belt sander??? :eek:
Attachment: 31.25 KB

I have recently done the following...
1. Refined the shape of the cross and pommel. I removed a lot of material from the cross, which made it a lot less bulky, and made the pommel more spherical. Followed by re application of linseed oil to finish. The amount of wood I removed from the cross made a huge difference in the handling of the sword. The wide shoulders previously pushed into the ahnd when the blade was brought to a halt at the end of a swing.
2. Tweaked the tip shape... the previous tip leaned toward the one side. Still does a little, but not as apparent as before. Let me just say that the tip remains beefy, but dang its pointy.
3. I had recently sanded the bone handle, and knocked off the angular edges and Matthew Amt had suggested previously. He was right! The grip feels better and looks more elegant.
4. I had majorly refined the peen block and peen. I used a file to smooth everything out, and finished it up with a sanding disc on the old dremel (which by the way has been a great tool for finishing work). I also took down the edge of the washer to a bevel that gives the washer a thinner appearance.
I have included a before and after of the peen for comparison. I think it looks much nicer now. I believe I will be moving on. I am anxious to see how long the Albion Fulham blank I have ordered takes now that I have some experience, and I know the level of finish I am satisfied with... I have a feeling that the polishing of the Albion blade will be a new hurdle for me... we shall see. Anyone near Lock Haven Pa have a belt sander??? :eek:
Very nice (re)work Luke! I'm amazed how tweaking the peen block, peen and washer really put the weapon in a much higher finish level.
| Luke Zechman wrote: |
| According to this thread i have finished my Pompei months ago, however it has been a work in progress. I have made several changes to it recently. Others recent interest in this thread have inspired me to try and make my Gladius better. |
Nice finish work, Luke. It adds a nice touch. I have a dremel and love it. I bought a belt grinder last year, and I am happy with it too. Here is the link to the one I bought. http://grizzly.com/products/Knife-Belt-Sander-Buffer/G1015. It is great for sanding wood too. I recently used it to sand down an ash pole to accommodate a Windlass butt spike. The belt sander has given me the freedom to make seax blades through stock removal. I am working on the third knife using 1095 steel. The first was an experiment, which I still use around the shop, the second was an experiment with the broken-back seax shape, and this one I hope is a seax worthy of actually posting on the forum. I have done some forging, and I have a good anvil, but that is a skill I struggle with. Last winter I almost killed my Corgi with a flying piece of smoking hot steel that flew inches over her head in a flat trajectory smack into a honeysuckle vine. Now she lays behind a tree when I hammer. She needs a sallet around me. Wish I could offer you my sander.
Thanks guys... At this point I am almost positive that the original gladius this thread was started for is DONE.
Now onto the next gladius. As mentioned earlier I have ordered a Fulham blade blank from Albion. I had a few ideas for this next piece and I need to start gathering information again. I have a question concerning some of the materials used in hilt construction. Did any original examples have ferrous metal componants for the plate in / on the cross guard, or for the peen block / nut? I had taken notice to an Albion Spatha that features ferrous metal hilt parts, and I really like the look. For this Fulham Gladius I was thinking about doing a hilt similar in form to the Albion Tiberius. I think I may try to get a wood that is very dark (almost black) even if it is not historical. I think it would look very slick if the hilt was all dark with ferrous metal accents.
Now onto the next gladius. As mentioned earlier I have ordered a Fulham blade blank from Albion. I had a few ideas for this next piece and I need to start gathering information again. I have a question concerning some of the materials used in hilt construction. Did any original examples have ferrous metal componants for the plate in / on the cross guard, or for the peen block / nut? I had taken notice to an Albion Spatha that features ferrous metal hilt parts, and I really like the look. For this Fulham Gladius I was thinking about doing a hilt similar in form to the Albion Tiberius. I think I may try to get a wood that is very dark (almost black) even if it is not historical. I think it would look very slick if the hilt was all dark with ferrous metal accents.
I don't know if any iron guard plates have turned up, though I believe the equivalent part of a Celtic sword could be iron, so it's not an impossible concept. Certainly the pommel nut or washer can be iron--I've seen a couple surviving blades with the nut still in place. At least one of them is just a little square, like a regular square nut (though not threaded, of course!).
Apparently the recent book on Roman swords by a fellow named Miks shows that surviving wooden hilt parts are almost always a pale wood, like birch or maple. That goes along with the preference for bone and ivory. So unfortunately the use of dark woods is mostly a reenactorism--which sucks, cuz it IS a nice look! But I will certainly be watching your progress with interest.
Vale,
Matthew
Does anyone know a safe way to whiten bone? I would like to whiten the grip of my gladius, but I don't want to put any harsh chemicals on it. Would bleach be too harsh?
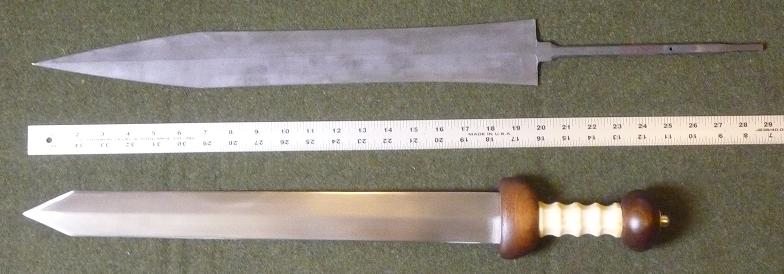
Just received my first Albion today.... blade that is! :lol: Here is a shot for comparison with the Pompei. Scale paper hilt design will be up in a little bit. The tang seems very long on the Fulham.
Attachment: 48.89 KB
I need some advice. The blade that I received is not polished, and I was wondering what would be suitable for finishing the blade. I know I could do it by hand sanding, but I know this would take forever. The second option is to buy a hand sander. I think this would be quicker then hand sanding by a long shot. I could easily afford a hand sander. The third option is a belt sander. I don't have any experience with belt sanders, and I don't want to mess up the geometry of the blade. Plus I will admit that a belt sander might be a little to expensive for me right now. I feel the hand sander would work well because it will offer me a flat surface, and the blade geometry is diamond ( all flat surfaces.)
Basically... would a hand sander work? Any other advice would be awesome. Tips and tricks.... hit me with um.
Thanks fellow forumites!
Basically... would a hand sander work? Any other advice would be awesome. Tips and tricks.... hit me with um.
Thanks fellow forumites!
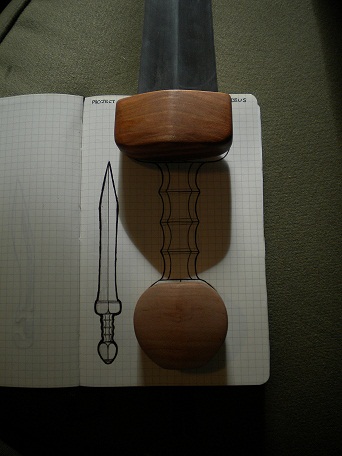
Here is the work in progress on the Fulham. I have carved the cross and pommel out of cherry pieces from me mums wood pile. My Step Father had cut me about four 3X3X 10 in. each (thanks pops). The one checked pretty badly, but i should have cherry for a couple projects to come. The wood works very well. The cross has been recessed to receive a brass plate. I still need to drill out the pieces to receive the tang, which is always a nervous time for me. The cross has been soaked in linseed oil, and the pommel was just finished ten minutes ago. :lol: I still need to find a bone to make the grip.
Attachment: 58.28 KB
Attachment: 67.49 KB
Hey Luke,
Looks like you are off to a great start! Cool design, seems that you are as handy with a pen than with woodworking.
I too got a handful of blades from the moat and so did others...I'm sure this will spawn a lot of interesting projects to follow. I'll stay tuned!
Cheers,
Julien
Looks like you are off to a great start! Cool design, seems that you are as handy with a pen than with woodworking.
I too got a handful of blades from the moat and so did others...I'm sure this will spawn a lot of interesting projects to follow. I'll stay tuned!
Cheers,
Julien
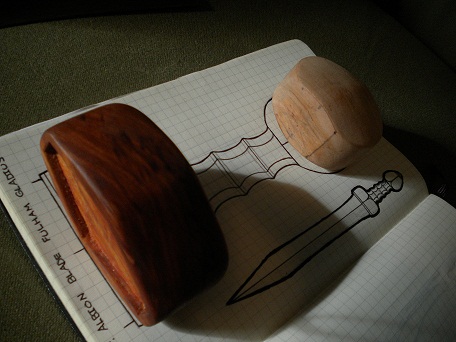
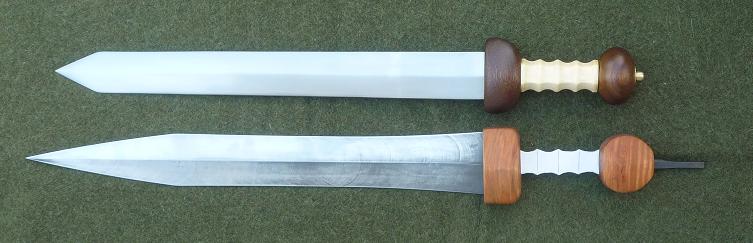
Things are moving along on the Fulham project. I have refined the shapes of the cross and pommel, which consisted of tweaking the symmetry. Soaked both pieces for 2 or 3 days to stabilize (linseed oil). Did a lot of fine tuning on the cross plate recess, which now will receive the brass plate that i have shaped. I still need to drill out the pieces to receive the tang. The last time I did that by hand, and this time I am waiting to use a drill press. I was thinking about doing the grip out of wood, since a bone does not seem to be turning up.
The pictures show a scale version of what the sword will look like, when compared to the Pompei, and a picture showing the brass cross plate inserted.
Attachment: 46.69 KB
Attachment: 42.69 KB
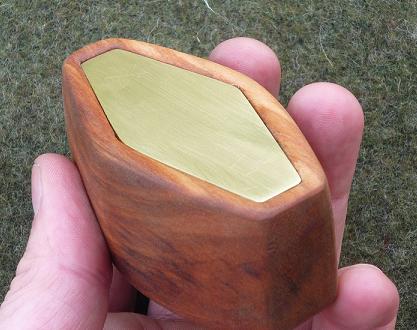
The pictures show a scale version of what the sword will look like, when compared to the Pompei, and a picture showing the brass cross plate inserted.
Page 5 of 6
You cannot post new topics in this forumYou cannot reply to topics in this forum
You cannot edit your posts in this forum
You cannot delete your posts in this forum
You cannot vote in polls in this forum
You cannot attach files in this forum
You can download files in this forum
All contents © Copyright 2003-2006 myArmoury.com — All rights reserved
Discussion forums powered by phpBB © The phpBB Group
Switch to the Full-featured Version of the forum
Discussion forums powered by phpBB © The phpBB Group
Switch to the Full-featured Version of the forum