| Author |
Message |
Felix R.

|
 Posted: Mon 04 Jan, 2010 10:45 am Post subject: Started DIY Chape-ing Posted: Mon 04 Jan, 2010 10:45 am Post subject: Started DIY Chape-ing |
 |
|
Hello, many of you know the problems you get once you have two or more swords in your home. One thing is you need a nice stand to store and show your nice collection. Second, you need something to carry your sword around, a scabbard. And this is where the first problems arise. go custom and pay alot for a nice scabbard, definitely for one or two, but for more...?
So you start about thinking to learn scabbard making. There you have to have or to learn skills about wood and leather working. Most people use the hollowing technique, I never tried for myself. But at least the shaping of very thin slats of would as the core did work for me, this is covered in cloth and glue and is finally covered in leather. So I end up with an inexpensive plain looking scabbard. This has to be dyed, some people also do some decoration. Maybe I will try this sometime, but I do not mind plain looking scabbards as long as they are well shaped to the blade.
But one thing that really bothered me, is how to find chapes and other scabbard fittings. There are a few cast chapes on the production market, but those are much too bulky for my thin scabbards. So I tried to do my own chapes. I never had an experience in metalworking, which is easy to see in my first attempt. So I also hope to get some recommendations from knowledgeable and skilled people here.
I started with some simple tool. A block of wood (as an anvil like thing), a 200g hammer, and two simple stakes I made myself from standard tools. For the material I had left 1mm thick sheets of stainless steel and ordered a piece of 1mm brass. I got to know that 1mm thick sheets might be too much for a chape and fittings, maybe .5mm are enough?
I started with marking the scabbard tip contour on the sheet and added 5mm around. I intended to make it from two halves. I shaped both pieces over the wood and stake, then ground away most of the excess with the coarse grinding wheel I have.
The two halves where then soldered together with silver solder. I started with a too small torch, so I nearly did mess up the piece. Bought me a bigger torch and managed to get the pieces together. They looked veeery rough then. Needed and still need to file down the marks and irregularities. Maybe 1mm thick steel is good, so no worries to file through. A belt sander or a finer grinding wheel would be great here. With a file I needed about half an hour just to smooth it out a bit. Next would be the sanding. Last picture is the fit as is at the moment.
I am already happy for the first attempt.
I will have to do some decoration though. This is for my Albion Crecy, I would like to put in some file work in the upper section and maybe add a tear-drop to the tip. Maybe someone has a few ideas what to file into the upper edge, I already thought about putting on a gothic arch. This straight line looks really terrible.
Next would be a scabbard fitting to the mouth off the scabbard, with two rings attached, made from one piece with simple decoration.
Thanks for your patience...
 Attachment: 76.02 KB Attachment: 76.02 KB
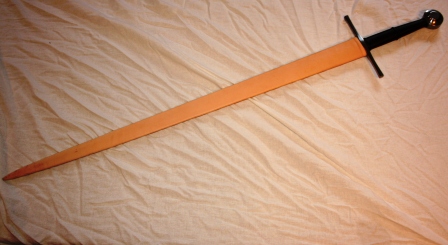
Plain Crecy sccabbard before dyeing
 Attachment: 145.96 KB Attachment: 145.96 KB
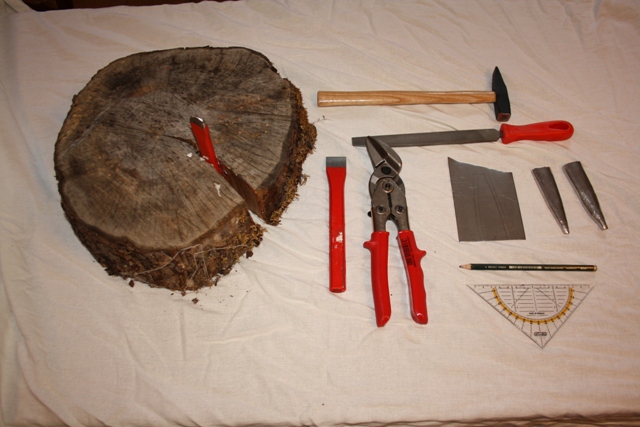
Tools, material and first shaped halves
 Attachment: 141.23 KB Attachment: 141.23 KB
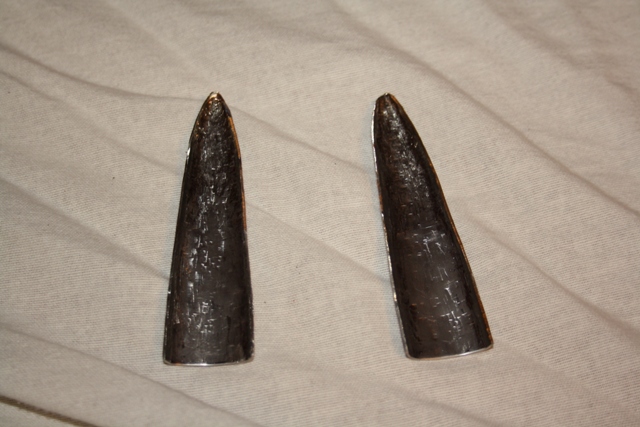
Shapeing on the inside
 Attachment: 105.35 KB Attachment: 105.35 KB
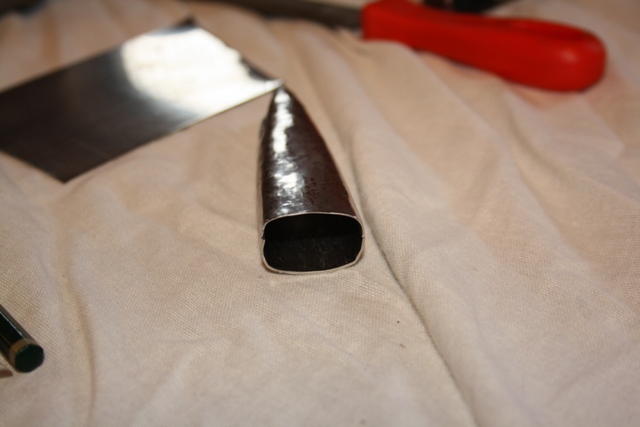
First fit before grinding down the sides.
 Attachment: 128.68 KB Attachment: 128.68 KB
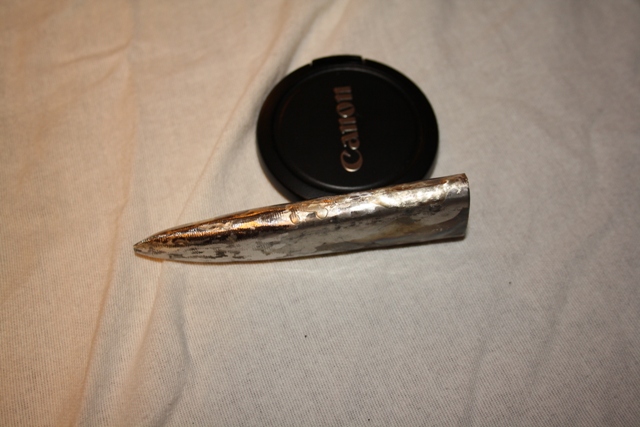
After soldering
 Attachment: 100.2 KB Attachment: 100.2 KB
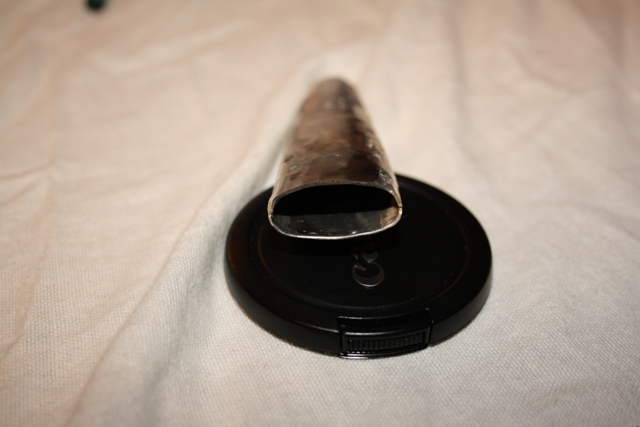
After soldering 2
 Attachment: 134.26 KB Attachment: 134.26 KB
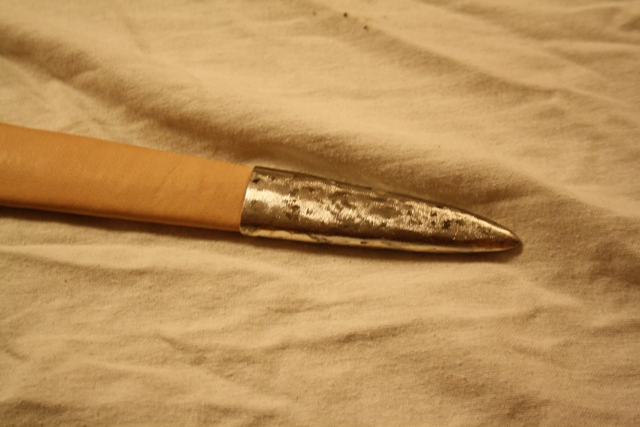
Fit on the tip
 Attachment: 133.6 KB Attachment: 133.6 KB
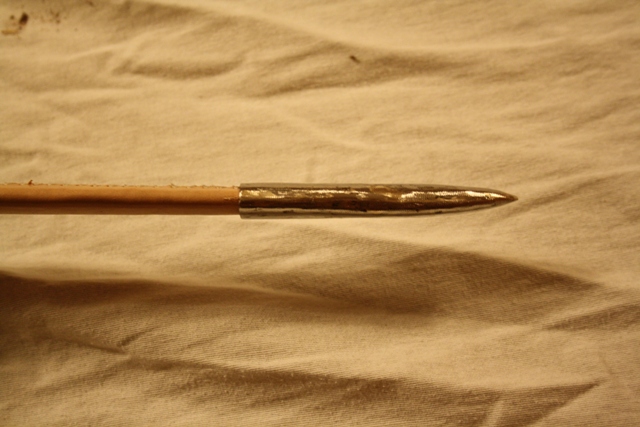
Side view
Last edited by Felix R. on Mon 04 Jan, 2010 12:17 pm; edited 1 time in total
|
|
  |
 |
Sean Flynt

|
 Posted: Mon 04 Jan, 2010 11:51 am Post subject: Posted: Mon 04 Jan, 2010 11:51 am Post subject: |
 |
|
I'm in the same boat. My only technical suggestion would be to make a simple cone, flatten it at the edges, solder the back seam and solder on a small finial to close the cone. I did that for my last scabbard project, minus the soldering, and although it worked fine and looked better than most of the other stuff I've seen, the quality didn't match the rest of the project. With your obvious metalworking skill, that method should give you no problem at all.
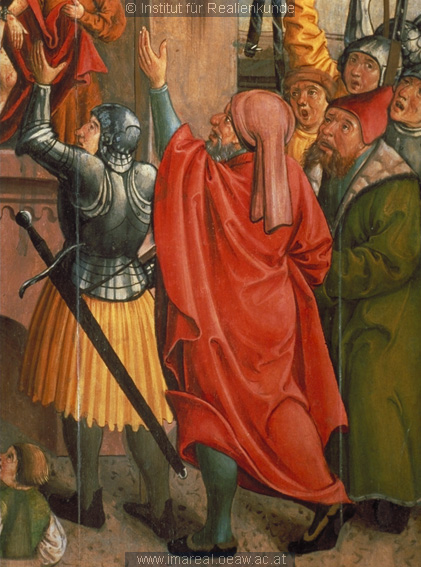
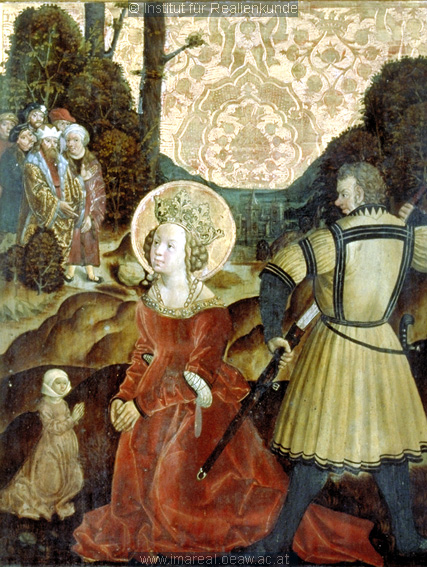
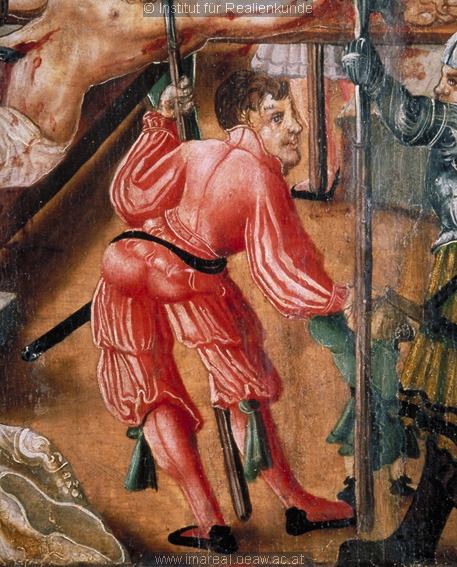
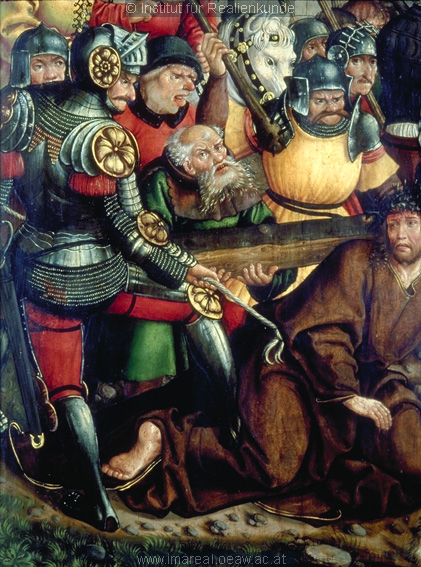
You probably already know this, but some other readers might not realize that some later scabbards (1500+) had the much simpler "U" shape chape we tend to think of as confined to anearlier period. Also, German/Austrian scabbards post 1500 often had a tiny little chape that appears to be just a variation of the "U" type, with a swelling or scroll at each end that creates an open circular area of bare scabbard in the middle of the chape. We tend to associate these with the Katzbalger, but the type was used on all kinds of swords.
I've seen a few detailed paintings that depict scabbards without any visible chape, even for high-status weapons. My current feeling is that it's more historically accurate to have no chape at all than have one that doesn't look right. Still, I plan to try the modified "U" type mentioned above for my next two projects, both of which are N. European 1500-1525.
 Attachment: 150.05 KB Attachment: 150.05 KB
 Attachment: 191.42 KB Attachment: 191.42 KB
 Attachment: 211.35 KB Attachment: 211.35 KB

 Attachment: 48.34 KB Attachment: 48.34 KB
 Attachment: 193.96 KB Attachment: 193.96 KB
 Attachment: 181.11 KB Attachment: 181.11 KB
 Attachment: 136.7 KB Attachment: 136.7 KB
[ Download ]
-Sean
Author of the Little Hammer novel
https://www.amazon.com/Little-Hammer-Sean-Flynt/dp/B08XN7HZ82/ref=sr_1_1?dchild=1&keywords=little+hammer+book&qid=1627482034&sr=8-1
|
|
   |
 |
Sean Flynt

|
|
   |
 |
Felix R.

|
 Posted: Mon 04 Jan, 2010 12:25 pm Post subject: Posted: Mon 04 Jan, 2010 12:25 pm Post subject: |
 |
|
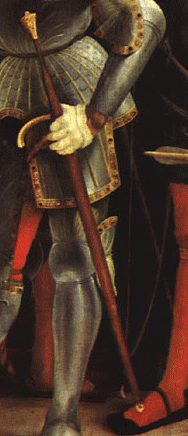
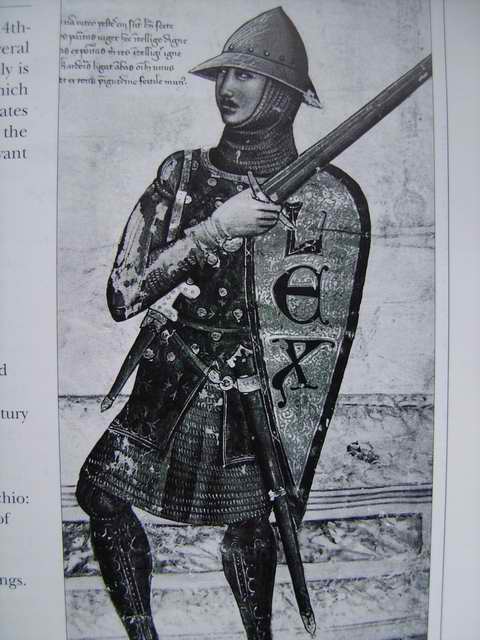
Thanks for your advice. I thought about the U-shaped chape too. I tried the cone method before with my 1mm stainless steel, but unfortuately I didn´t manage to get the sharp point ready. But I first thought about was the set of fittings I would like to have some time in the future is from the Italian painting below. It is kind of a U-shaped one with much more elaborate features. My steel does seem too hard for such fine shaping and working.
For this project I might look at the style of cutout you have on yours.
 Attachment: 76.29 KB Attachment: 76.29 KB
|
|
  |
 |
|
Johan S. Moen
Location: Kristiansand, Norway Joined: 26 Jan 2004
Posts: 259
|
 Posted: Tue 05 Jan, 2010 3:09 am Post subject: Posted: Tue 05 Jan, 2010 3:09 am Post subject: |
 |
|
Drop the stainless and get some 0,7 mm mild steel (which is usually not that hard to come by. I can even get it here in Norway...). It's easier to work with, and since it is softer it also makes hammering out dents easier. You can use 1 mm, but it does make fine shaping more tricky. 1 mm brass works great though, as long as you anneal it often enough, and if you prefer the steel look you can always tin it afterwards.
Johan Schubert Moen
|
|
  |
 |
Felix R.

|
 Posted: Sat 09 Jan, 2010 12:10 pm Post subject: Posted: Sat 09 Jan, 2010 12:10 pm Post subject: |
 |
|
I will definitely try to get the mild steel for the next scabbard. I will also be using the brass on one.
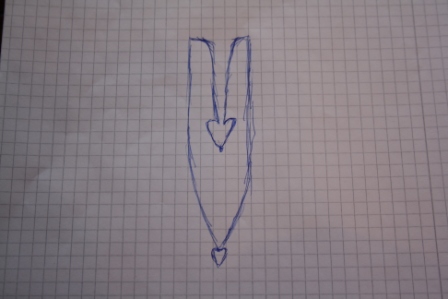
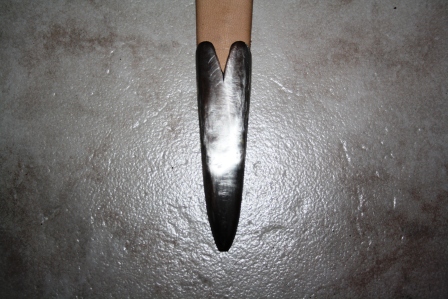
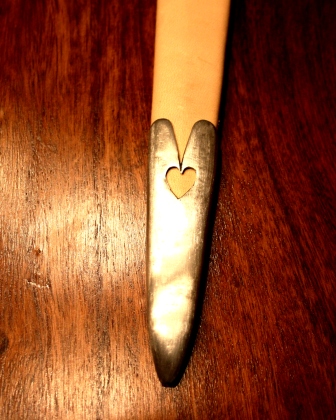
Now I have started to smooth out the surface, not so easy, grinding down hammermarks is not a good idea, better is the planishing before that. At the current state I have decided for a "heart" theme in the cut outs and started with the surface treatment. I have a hard time to get out the grinding/file marks. I started with 40, then 150, 240 and finally 600 grit paper. But there are still lots of grind marks.
Heres the drawing and the current state. Maybe it is bettter to form the cutout while the pice is still in halves?
 Attachment: 63.6 KB Attachment: 63.6 KB
 Attachment: 103.34 KB Attachment: 103.34 KB
|
|
  |
 |
Felix R.

|
 Posted: Sun 10 Jan, 2010 7:18 am Post subject: Posted: Sun 10 Jan, 2010 7:18 am Post subject: |
 |
|
|
Arrgh, it is really hard filing in the heart shaped cutout into the chape by hand. I started with drilling holes into the chape then tried widening them with a round handfile. It will take weeks to get the heart in. Are there any electric tools, dremel, etc. that can take this?
|
|
  |
 |
R D Moore

|
|
   |
 |
Felix R.

|
 Posted: Sun 10 Jan, 2010 12:43 pm Post subject: Posted: Sun 10 Jan, 2010 12:43 pm Post subject: |
 |
|
|
IThank you for the recommendation. I just had a look at my tool box and found some diamond points similar to the smaller ones in your linked set. Unfortunately they didn´t take of much materal. Are there any differences?
|
|
  |
 |
Leo Todeschini
Industry Professional

|
|
   |
 |
R D Moore

|
 Posted: Sun 10 Jan, 2010 2:27 pm Post subject: Posted: Sun 10 Jan, 2010 2:27 pm Post subject: |
 |
|
| Felix R. wrote: | | IThank you for the recommendation. I just had a look at my tool box and found some diamond points similar to the smaller ones in your linked set. Unfortunately they didn´t take of much materal. Are there any differences? |
I prefer the diamond cutters over the high speed cutters because they cut faster. And both are faster than a file, but I have no experience with carbide cutters. However, if Tod recommends them, then I'm going to get some for myself. I'm ready to be amazed.
"No man is entitled to the blessings of freedom unless he be vigilant in its preservation" ...Gen. Douglas Macarthur
|
|
   |
 |
Addison C. de Lisle

|
 Posted: Sun 10 Jan, 2010 3:32 pm Post subject: Posted: Sun 10 Jan, 2010 3:32 pm Post subject: |
 |
|
If you felt like getting some tools, I've found needle files to be excellent tools for detailing. They run from $11.00 a set to $10 each, depending on quality. Most jewelry supply companies (either Rio Grande or Otto Frei) carry them. If you want to invest in a quality tool, I recommend Grobet files.
www.addisondelisle.com
|
|
   |
 |
|
Johan S. Moen
Location: Kristiansand, Norway Joined: 26 Jan 2004
Posts: 259
|
 Posted: Mon 11 Jan, 2010 1:36 am Post subject: Posted: Mon 11 Jan, 2010 1:36 am Post subject: |
 |
|
I'll second the needle files, I use them for fine shaping, detailing, etc. Just be sure to get one set for brass/bronze/copper, and one set for steel. The ones used for steel tend to dull faster, naturally, and you do want nice and sharp ones for filing brass since it takes tool marks more easily(which requires some fiddly cleanup afterwards). Brass dust also tends to stick on steel, especially when worked in with a file, and avoiding this does again save some finishing work.
Also, having a few coarser ones for roughing out shapes, especially on steel, is quite handy. A round one, a flat one, and a half-oval usually go a long way; having a triangular one in addition to those can also be useful.
Johan Schubert Moen
|
|
  |
 |
Felix R.

|
 Posted: Mon 11 Jan, 2010 1:23 pm Post subject: Posted: Mon 11 Jan, 2010 1:23 pm Post subject: |
 |
|
Thank you for all the helpful comments. I bought a Dremel starter kit today. And in combination with the high speed I made it work with my diamond points. Athough I didn´t havve access to the carbide bits, the standard cutting bits were able to grind away some of the steel too. But I fear they will wear out quickly that way. I am now quite happy with my first chape attempt. And it does look good at the tip of my Crecy scabbard. I will now have to start working on the locket and the think abbout the appropriate colour for th scabbard leather.
Those needle files will definitely be on my list when I will proceed with metal working. Next will also be some leather tools, to make some decorations. But I have to admit, that those plain leather scabbards already look nice as soon as some metal bits are added.
I hope some of those who liked to start to do scabbard fittings themselves and never had the guts to start such a project - as myself before the attempt - will lose any hesitation and get their tools out!
 Attachment: 115.81 KB Attachment: 115.81 KB
|
|
  |
 |
|
GG Osborne
|
 Posted: Mon 11 Jan, 2010 4:46 pm Post subject: Posted: Mon 11 Jan, 2010 4:46 pm Post subject: |
 |
|
I know all of you guys are more technically sophisticated than myself, but for whatever it's worth, here is how I make a chape and throats. I have used both mild steel and brass, by the way.
I make a cardboard pattern out of the type of material used in manilla file folders (stiff but very flexible.) The pattern is made by actually folding the paper around the scabbard and adjusting as I go until it's symmetrical. I transfer the pattern to the metal and cut it out usually using a Dremel tool. Then bend the metal around the scabbard until it slight overlaps and when pressure is released the two edges are straight and together (and will stay that way without pressure...like overextending a spring.
I then use surgical clamps to hold the chape and then chuck the surgical clamp in a vice. Using a propane torch, I heat the chape, apply a good paste flux and run a bead of solder down the inside of the chape. It doesn't take much.
Once that cools, then comes the tricky part.
I set the truncated (small end) of the chape on a flat piece of steel or brass and apply a very gently heat to the flat plate. Once it gets to the right temperature, I flux it and solder the chape to the plate. I then cut-off the excess flat plate, grind it smooth and polish.
It takes a little experimenting, but the results are good. You can then grind, drill and file away on the large end to your heart's content.
"Those who live by the sword...will usually die with a huge, unpaid credit card balance!"
|
|
  |
 |
Felix R.

|
 Posted: Tue 12 Jan, 2010 12:38 am Post subject: Posted: Tue 12 Jan, 2010 12:38 am Post subject: |
 |
|
|
What is this plate for, to close the tip of the chape?
|
|
  |
 |
|
Hadrian Coffin
Industry Professional
Location: Oxford, England Joined: 03 Apr 2008
Posts: 404
|
 Posted: Tue 12 Jan, 2010 11:04 am Post subject: Posted: Tue 12 Jan, 2010 11:04 am Post subject: |
 |
|
Hello,
I use a "Jeweler's Saw" (http://www.widgetsupply.com/page/WS/PROD/jeweler-saw/BES03) for cut outs, and finish with files. I find that by hand it may take longer but there are far fewer...mishaps. Whenever I have used a dremel I end up rushing. It took me a long time to figure out a decent way to make chappes, I use different techniques based on the end result I want. Generally an easy way is to make a cone and then flatten the cone, depending on the size the cone can be made by raising or rolling. Here is an article on raising http://chestofbooks.com/crafts/art/Art-Metalw...aming.html, and a forum discussing cone making http://www.artmetal.com/blog/sdeloof/2007/05/...heet_metal (I would second the suggestion to look at any books by Tim McCreight)
Another idea, that is much easier, is to use leather instead of metal. There are a number of archeological examples of leather chappes. Some have tooling and cut out design, others are just plain. I would presume some of the artistic examples of chappes may thus be leather instead of metal as is assumed. One example is in the National Museum of Ireland, Belfast. It is a complete scabbard, in wonderful condition. The scabbard is wood, covered in a light colour linen, with a dark linen design at the throat. The belt has been removed but its imprint remains. There is a chappe made of leather, the edges have been skived and butted together seamlessly, the chappe is glued to the end of the scabbard.
Cheers,
Hadrian 
Historia magistra vitae est
|
|
   |
 |
|
K J Seago
|
 Posted: Wed 13 Jan, 2010 6:34 am Post subject: Posted: Wed 13 Jan, 2010 6:34 am Post subject: |
 |
|
| Hadrian Coffin wrote: | One example is in the National Museum of Ireland, Belfast. It is a complete scabbard, in wonderful condition. The scabbard is wood, covered in a light colour linen, with a dark linen design at the throat. The belt has been removed but its imprint remains. There is a chappe made of leather, the edges have been skived and butted together seamlessly, the chappe is glued to the end of the scabbard.
Cheers,
Hadrian  |
i'd love to see pictures of that if anyone can get hold of any, that seems right up my alley!
just another student of an interesting subject, 
|
|
  |
 |
Felix R.

|
 Posted: Sat 16 Jan, 2010 9:40 am Post subject: Posted: Sat 16 Jan, 2010 9:40 am Post subject: |
 |
|
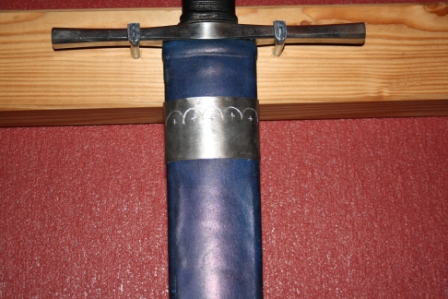
I have now made the locket for the upper part of the scabbard, I tried it in one piece, but I don´t like the back side too much. I still have to attach hangers for the ring attachment to the upper part. While it was really easy to get the curvature right on the front and the sides with a tight fit, I couldn´t shape the back side properly, because I don´t have tools to form/shape a tubular piece of steel. Maybe I will try a two piece construction for the scabbard of my Yeoman.
I had a look at the other knight picture of the riding knight of the Prato manuscript, where the chape is decorated with cut outs, while the locket is just square, there might be an engraving, but in my copy it is not good to see. So in this one I tried engraving the pattern from the picture shown farther up in this thread. I used diamond points. Unfortunately those were dulled too easy, maybe I was applying too much pressure? In the process I found it easer to go with medium speed, not too much pressure, but going through the pattern several times and consequently to cut little deeper into the steel on each pass.
The material I had was really hard to work with and I hope it will be easier with brass and with other types of steel when I can get a hand on it. At least I don´t have to worry about rust.
 Attachment: 59.52 KB Attachment: 59.52 KB

 Attachment: 98.19 KB Attachment: 98.19 KB
|
|
  |
 |
Felix R.

|
 Posted: Tue 19 Jan, 2010 7:20 am Post subject: Posted: Tue 19 Jan, 2010 7:20 am Post subject: |
 |
|
|
I would like to learn more about decoration in metal to apply to future scabbard fitting projects. What would be a good start? While Dremel diamond poits did indeed cut into the metal, the appearance is more like writing with a felt pen on paper, it is not so well defined. And the overall appearance of the detailwork is quite rough, how can I apply more sophisticated details to such metal fittings?
|
|
  |
 |
|
|
You cannot post new topics in this forum
You cannot reply to topics in this forum
You cannot edit your posts in this forum
You cannot delete your posts in this forum
You cannot vote in polls in this forum
You cannot attach files in this forum
You can download files in this forum
|
All contents © Copyright 2003-2026 myArmoury.com — All rights reserved
Discussion forums powered by phpBB © The phpBB Group
Switch to the Basic Low-bandwidth Version of the forum
|

