| Author |
Message |
|
Luke Zechman
Location: Lock Haven Pennsylvania Joined: 18 Jan 2009
Posts: 278
|
 Posted: Mon 17 Aug, 2009 12:12 pm Post subject: MRL "English Warhammer" Posted: Mon 17 Aug, 2009 12:12 pm Post subject: MRL "English Warhammer" |
 |
|
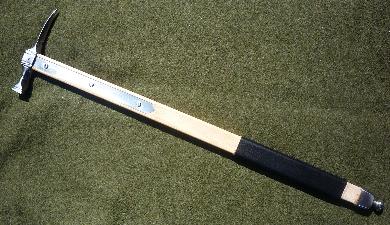
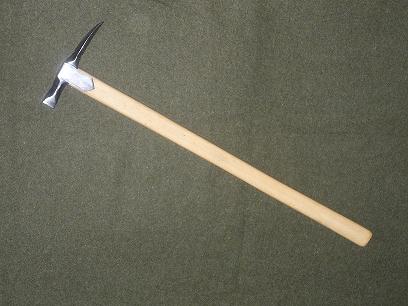
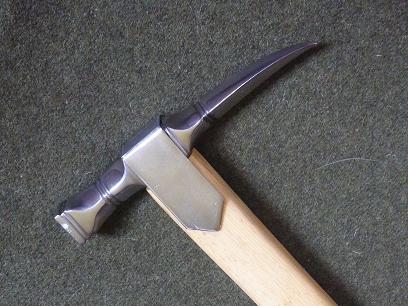
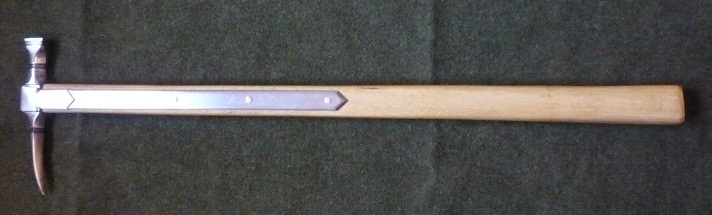
Today I received the M.R.L. "English Warhammer". I for one love the idea of a sword. I appreciate the skill needed to produce one, and wield one. However there is just something about hammers, axes and maces that just really make my heart beat a little bit faster. This is my first production "impact" weapon and at 50 bucks (MRL deal of the day) I will not be complaining about anything. I own two swords. A scary sharp katana from Cheness (nothing fancy, and a great value) and the Generation 2 pompei gladius which some of you might have seen that I am modifying. I respect the safe handling of both these weapons, but i must admit that holding them doesn't make me shutter at the thought of what they could do. As soon as I unwrapped this hammer, and held it a little shutter went through my body at the realization of its potential. (especially the spike side... yikes)
Here is a quick review of the quality, and the specifications
Length: 25" Which to me seems very versatile. Not too long to be cumbersome. Not too short to inhibit reach.
Head Length: 6.5" with 3.5" of spike for ample penetration.
Head Width: 7/8th" which seems good to focus energy into small area.
Length of Metal Slats: 10" of protected shaft.
Weight: 1.75lbs Rather light in the hand. Not hard to change direction.
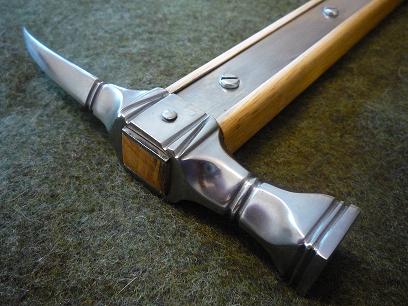
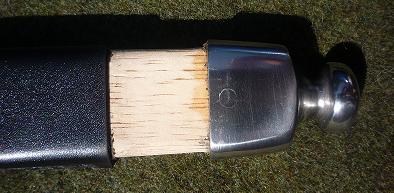
This weapon feels very sturdy and secure. The peen on the head rivet is beefy and will hold everything in place well. The finish on the head and spike is somewhere between mirror and 600grit sandpaper satin The metal slats are attached with screws. The handle is wrapped in a nice piece of leather. At either end of the wrap there was a section of handle wrapped in leather lace which was just glued on. I removed the leather lace section as it was already showing signs of unraveling. The but cap is sturdy and riveted in place. The wood used in the handle seems to be a good combination between hard and lightweight. Overall i am very satisfied with the piece as a usable weapon, and if the zombie apocalypse rears its ugly head I will be grabbing this thing over either of my swords for sure. 
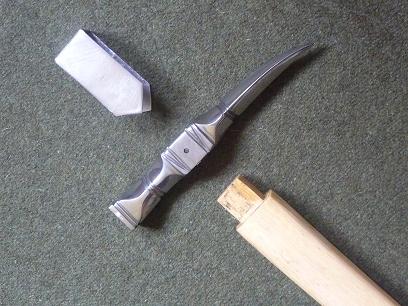
This hammer will be a future modification project. I will be sanding the finish off the handle and giving it a good linseed oil soak. I will be re wrapping the handle with brown leather (with a wrist thong), and possibly be adding small brass nails to the front side of the handle for added grip and weapon orientation. I would like to replace the metal slat screws with rivets (brass, steel?). I also wouldn't mind adding a design to the portion of the shaft that is just wood. If anyone knows of something appropriate for this design then lat me know. Any modifications that I apply should be historically accurate so if I mentioned something above that is historically lame, then let me know. Oh yeah and I will be making a nice belt loop for this weapon. The weapon is supposed to be from around 1430's... can anyone confirm this.
Thanks for looking and enjoy the mediocre photos.
 Attachment: 42.38 KB Attachment: 42.38 KB
Attachment: 46.36 KB

Attachment: 43.66 KB
Attachment: 35.04 KB
|
|
  |
 |
|
Joel Chesser
|
| Posted: Mon 17 Aug, 2009 1:07 pm Post subject: |
|
|
Congrats, i hope you like it! I bought this piece at the beginning of the year and absolutely love it. My only complaint is that the head on mine is a little loose, nothing I can't fix when i get the time though. I'll be interested to see how your mods go I have been planning on doing some very similar things with mine. Have fun with it!
..." The person who dosen't have a sword should sell his coat and buy one."
- Luke 22:36
|
|
|
|
|
|
Josh MacNeil
Location: Massachusetts, USA Joined: 23 Jul 2008
Posts: 197
|
| Posted: Mon 17 Aug, 2009 6:58 pm Post subject: |
|
|
I would recommend replacing the shaft with an ash or hickory. I recently got two of MRL's short pole arms (Late War Axe and spiked warhammer) and I can say that the wood that they use is definitely a safety issue. I was able to break the late war axe's 1 1/4 inch thick handle over my knee like it was a toothpick. I'd just skip the linseed oil treatment and go with a hardwood you know will be structurally sound. That way it will definitely hold up in the imminent zombie apocalypse.  As for replacing the screws, you could go with brass or steel rivets with equal ease. You pick up some round stock or cut the heads off some long nails and peen them. There are a lot of options there and either metal works fine. It's really more of an aesthetic choice on your part. In regards to some designs on the wood, I suppose it's historically plausible. I've never seen their like on period originals. Most polearms made for battlefield use had plain hafts without decoration; while the ones made for court or royal guard tended to be more elaborate. But then again, this is YOUR weapon. So if you feel the need to add some carvings then I say go for it. I'm in the process of modifying the two pieces I got myself. The MRL pole weapons are great as they are easily modified and their simplicity lets you have a lot of fun making it your own. Congrats on your purchase and good luck with your modifications. As for replacing the screws, you could go with brass or steel rivets with equal ease. You pick up some round stock or cut the heads off some long nails and peen them. There are a lot of options there and either metal works fine. It's really more of an aesthetic choice on your part. In regards to some designs on the wood, I suppose it's historically plausible. I've never seen their like on period originals. Most polearms made for battlefield use had plain hafts without decoration; while the ones made for court or royal guard tended to be more elaborate. But then again, this is YOUR weapon. So if you feel the need to add some carvings then I say go for it. I'm in the process of modifying the two pieces I got myself. The MRL pole weapons are great as they are easily modified and their simplicity lets you have a lot of fun making it your own. Congrats on your purchase and good luck with your modifications.
|
|
 |
|
|
Luke Zechman
Location: Lock Haven Pennsylvania Joined: 18 Jan 2009
Posts: 278
|
| Posted: Mon 17 Aug, 2009 10:02 pm Post subject: |
|
|
Thanks for the advice and the heads up about the shaft. I wasn't certain what wood the shaft was constructed from, but it did feel a little light. Now I just need to get my hands on some hickory, or ash. Could I rip the right amount off the side of a board and use it to "re shaft" the hammer? Is there somewhere online to get shafts blanks?
Thanks again.
Luke
|
|
|
|
|
|
Adam S.
|
| Posted: Mon 17 Aug, 2009 10:44 pm Post subject: |
|
|
Luke,
I don't know where you are, but your local hardware store should have hickory axe/hammer handles that are already seasoned can be shaped. There's also the lumber section at some of the Big-Box stores that'll sell you smaller sections of whatever wood you need.
~Adam
|
|
|
|
|
|
Josh MacNeil
Location: Massachusetts, USA Joined: 23 Jul 2008
Posts: 197
|
| Posted: Tue 18 Aug, 2009 3:20 pm Post subject: |
|
|
|
Luke - Adam pretty much nailed it. Lowes or Home Depot should have replacement handles for axes, shovels, and various other hafted yard tools; most of which are ash or hickory. It's just a matter or finding one with the right size and dimensions to work with. I used a shovel handle for one of mine and just reworked it a little with a draw knife. You can also get ash poles from KoA or A&A. A bit more expensive, but maybe easier to work since they already meet the rough size requirements. I always thought that the English warhammer would look cool with a faceted shaft of octagonal or hexagonal cross section.
|
|
|
|
|
|
Luke Zechman
Location: Lock Haven Pennsylvania Joined: 18 Jan 2009
Posts: 278
|
| Posted: Tue 18 Aug, 2009 6:04 pm Post subject: |
|
|
Thanks for the advice guys. I went to the local hardware store today and bought a pick handle. Removed the wide end and used a shurform to flatten the sides. I will be able to use the fat end for another project. This took me a substantial amount of time. Dismantled the war hammer by filing off one side of the end rivet, and then drove it through. All was going fine until I tried to make a nice inset area for the metal slats to fit in. Then the headache began. I had to make a million fine tune adjustments. Finally got it all together. Going to soak the handle in oil over night and try and peen the rivets tomorrow.
Any advice on peening? Do I need heat to peen a brass rivet? i was going to try and find some brass nails that would fit the hole and cut them to size.
Also does anyone know an easy way to tell if leather is oil tanned or chromium tanned? I have a random piece i was going to use to wrap the handle and didn't want to use it if it isn't veg oil tanned.
Lastly does anyone know if any historical hammers had cord wrapped leather handles with risers? I have been itching to try a cord wrapped handle and this would be a good first try.
I will post pics when it is all done.
Thanks all
Luke
|
|
|
|
|
|
JG Elmslie
Industry Professional
|
| Posted: Wed 19 Aug, 2009 6:29 am Post subject: |
|
|
| Luke Zechman wrote: |
Any advice on peening? Do I need heat to peen a brass rivet? i was going to try and find some brass nails that would fit the hole and cut them to size |
personally, I'd go to a model shop, buy some thin brass shim sheet, and then get a suitable former (I have a doming former in bronze for all manner of sizes from about 3mm up to 20mm diameter). then just anneal the brass to red hot (only needs a gas cooking ring for such small thin bits) quench, and then while soft, hammer the peices into the former, to create domed caps. File or cut the excess metal away, polish to a sheen, then rivet the hammer's parts in steel, and solder the caps into place over the rivet-heads.
it's the historic method of making such caps for armour
(edits for typos. damn RSI and fingers) [/i]
|
|
|
|
|
|
Luke Zechman
Location: Lock Haven Pennsylvania Joined: 18 Jan 2009
Posts: 278
|
| Posted: Wed 19 Aug, 2009 9:55 am Post subject: |
|
|
attempt to re handle the war hammer was a failure. On top of spending about 6 hours yesterday shaping the handle to fit the hardware, today I basically ruined the slats and the but cap. I cracked the butt cap driving the pin back in that would have held it in place. I experimented with brass nails for the rivets on the tang and ended up bending them in the very tight pre drilled holes.
This a huge set back for me and a real blow to my confidence. My impatient nature has gotten the best of me once again. On the flip side of things, I have learned from my mistakes and will give it a go in the future. The only thing I have left from my original war hammer that isn't scrap is the head and spike themselves.
Seriously bummed,
Luke
|
|
|
|
|
Sean Flynt

|
| Posted: Wed 19 Aug, 2009 11:25 am Post subject: |
|
|
| Luke Zechman wrote: | attempt to re handle the war hammer was a failure. On top of spending about 6 hours yesterday shaping the handle to fit the hardware, today I basically ruined the slats and the but cap. I cracked the butt cap driving the pin back in that would have held it in place. I experimented with brass nails for the rivets on the tang and ended up bending them in the very tight pre drilled holes.
This a huge set back for me and a real blow to my confidence. My impatient nature has gotten the best of me once again. On the flip side of things, I have learned from my mistakes and will give it a go in the future. The only thing I have left from my original war hammer that isn't scrap is the head and spike themselves.
Seriously bummed,
Luke |
No worries. It sucks, I know. I had a day like that yesterday with my Type XIV project. Sometimes you just have to back up a few steps or chart a new course. In fact, I rarely have a project that doesn't present some significant obstacle.
Butt cap: That's optional anyway. If you still want a short hammer, just drill a hole in the end (or use the existing pin hole) and insert a leather thong or decorative fabric lanyard.
Langets: I assume that's what you mean by "slats". Again, there are other ways to deal with this. Narrow flat stock is cheap. If the langets can't be saved, just grab some cheap steel from Lowes, a box of bright steel nails and a cobalt drill bit the same size as your nails. Mark and drill your new langets, fit them and mark the haft through the new holes, drill the haft and insert nails through the langets and hafts. Mark nails on pointy side about 1/8" above the surface of the langet. Cut nails at that mark. Rest the head side of the nail on an anvil or sledge hammer head and peen. "Peen" the factory head side of the nails so both sides will match. If you want decoration, file a simple star (asterisk) pattern in them.
This is a good opportunity to rethink your project. You can leave it short or you can go longer, as in the cases below.
Attachment: 24.12 KB

Attachment: 46.64 KB

Attachment: 25.04 KB

-Sean
Author of the Little Hammer novel
https://www.amazon.com/Little-Hammer-Sean-Flynt/dp/B08XN7HZ82/ref=sr_1_1?dchild=1&keywords=little+hammer+book&qid=1627482034&sr=8-1
|
|
|
|
|
|
Luke Zechman
Location: Lock Haven Pennsylvania Joined: 18 Jan 2009
Posts: 278
|
| Posted: Wed 19 Aug, 2009 12:05 pm Post subject: |
|
|
Thanks for the words of encouragement. I was really pissed/ bummed when things went wrong initially, but now I am just reflecting and thinking positive. What i tried to do with the rivets through the langets and the haft was as follows. I bought some brass nails that would fit through my predrilled holes. Placed them in the hole and nipped of the ends. Turned the whole thing over placing the factory nail head against a rail tie i have and slowly tapped the nipped off end cold. The nails just bent on me. I don't have any torch yet so it was all I could do. The real bummer about the whole thing was that the piece of hickory I used was a pick handle reshaped and it cost my 16 buck. 
If i wanted to make the piece longer. Where would i get a but cap? Does anyone sell them online?
I hope the issues with the Type XIV project isn't to much of a set back.
Thanks again Sean
Luke
|
|
|
|
|
|
Josh MacNeil
Location: Massachusetts, USA Joined: 23 Jul 2008
Posts: 197
|
| Posted: Wed 19 Aug, 2009 1:01 pm Post subject: |
|
|
From the sound of things, your langets may be salvageable unless I'm misunderstanding. How about posting pictures of the state of things so we can see what's what and maybe give more advice...? The thing with brass is that it's easy to bend and, if work hardened, break. The trick when using them for rivets is to make sure they're just a tiny bit longer than what you need so they create a small mushroom when you peen them. If they're too long then they're likely to bend which is what it sounds like may have happened. If the langets are unsalvageable, then that's ok too. You can easily make yourself some new ones. If you're feeling adventurous, them maybe you could fashion a new butt cap too. But if not, then MRL sells them for spears. You could try modifying one of those. 
|
|
|
|
|
|
Luke Zechman
Location: Lock Haven Pennsylvania Joined: 18 Jan 2009
Posts: 278
|
| Posted: Wed 19 Aug, 2009 7:00 pm Post subject: |
|
|
Mark,
That is just the sort of lesson I needed to get things right the next time. Also a lot of the things you mentioned in the private email, that i might have done wrong proved to be true. The rivets did not fit the hole perfectly, i snipped them and didn't cut them, and i cut them too long. I typically have a mechanical inclination, and everything you said made so much sense. I guess you have to try it sometimes to learn.
Josh,
The langets might have been salvageable but i threw them on the scrap pile. I had dented the one pretty bad and didn't want to mess with it anymore for fear of throwing something across the room. I plant to make my own langets from thin stock and I will be keeping my eyes open for a simple piece of steel to drill out fit to the end.
Thanks gentlemen
|
|
|
|
|
Sean Flynt
|
| Posted: Thu 20 Aug, 2009 7:38 am Post subject: |
|
|
You don't need a butt cap. See the images above--those light axes are often shown used almost as canes, and they don't have caps. One possible problem with your rivets is if the shaft is of relatively small diameter. It can be very difficult to peen something the diameter of a finishing nail or tack shaft. I think the nails I use for rivets are 3/16". The other potential problem is if you leave too much shaft above the surface. The more you leave, the easier it is to bend, especially if working with small diameter rivets. I find that I don't need more than about 1/8 inch to work with--longer than that will tend to crack at the edges before you get it completely peened (cold) and also will be easier to bend. Following some advice I found online years ago, I start the peen with the flat of the hammer, striking straight down on the center of the rivet. This gives a more even mushrooming and also immediately swells the shaft in its hole, creating a very tight fit. I move on to the ball end of the hammer after the peen is approximately 3/4 finished.
To protect a finish when peening, you can cut a small hole in a piece of cardboard and hold that over the place where you're working. Stray strikes won't damage the areas around the peen.
-Sean
Author of the Little Hammer novel
https://www.amazon.com/Little-Hammer-Sean-Flynt/dp/B08XN7HZ82/ref=sr_1_1?dchild=1&keywords=little+hammer+book&qid=1627482034&sr=8-1
|
|
|
|
|
|
Luke Zechman
Location: Lock Haven Pennsylvania Joined: 18 Jan 2009
Posts: 278
|
| Posted: Sun 06 Sep, 2009 10:25 am Post subject: |
|
|
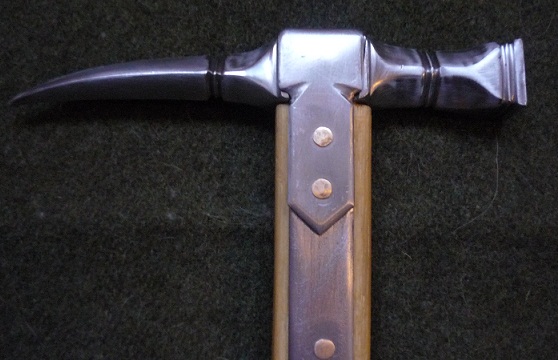
Here is an update on my MRL 'English Warhammer". I have been really busy with school and I recently moved so I have not had much time for my projects. I had learned some important lessons before with this project when i had a catastrophic failure with some rivets. I am taking things slower now and hope to make this a nice piece that above all is sturdy and usable.
I bought an axe handle this time and didn't have to remove as much wood to get the right shape. I selected a handle that was very dense, had layers that ran the entire length of the shaft and just looked even and consistent overall. The end result is about 2.3cm wide from the front and 3.3cm wide from the side. From the front of the shaft (hammer side) to the back of the shaft (spike side) there is 28 layers (growth rings) of Hickory! I have soaked this handle in boiled linseed oil and then allowed to dry. Applied a thick layer of bees wax and allowed it to dry, wiped it to a satin finish and the result is bone hard.
I decided to have a piece of metal wrap over the top of the hammer to both make it more secure and to cover some decorative groves that had been ground into the hammer that i was not a big fan of. The resulting look is more stream lined and sturdier, plus it adds a little more weight to the business end of the weapon.
Today I plan to make the langets by cutting them from a sheet of structural steel I bought at Lowes. This is the same material I used to fashion the piece that wraps over the top. The langets will be between 12 and 13 inches long, and will terminate into a point similar to the top wrap piece.
Here are some pictures.
Attachment: 33.88 KB
Attachment: 44.49 KB
Attachment: 46.32 KB
Attachment: 26.79 KB

|
|
|
|
|
|
Luke Zechman
Location: Lock Haven Pennsylvania Joined: 18 Jan 2009
Posts: 278
|
| Posted: Wed 30 Sep, 2009 3:57 pm Post subject: |
|
|
Ok gentlemen here is another question concerning historical accuracy. I am working on the languets (sp) for this war hammer finally (school is cutting into my fun time). Did originals have the languets recessed to be flush with the shaft of the hammer, or where they simply riveted right to the side? I am sure they where made in many different ways but what was common? The way I designed the reconstruction of this one will include make a recess. In the end I just want this thing to be sturdy and functional so I guess historical accuracy will take a back seat. I was just curious that's all.
Thanks in advance for any knowledge!
|
|
|
|
|
|
Luke Zechman
Location: Lock Haven Pennsylvania Joined: 18 Jan 2009
Posts: 278
|
| Posted: Wed 29 Dec, 2010 2:11 pm Post subject: |
|
|
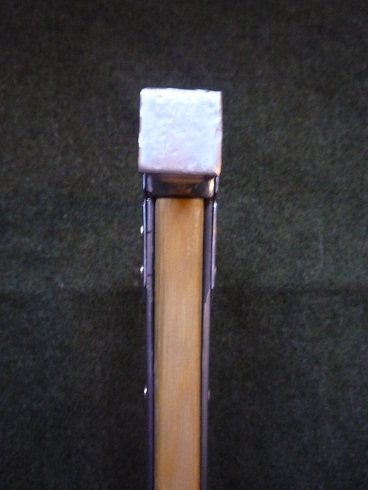
Warhammer finished. The only part of this hammer that is of MRL make is the head. The haft is linseed oil soaked hickory, langets and top bracket of mild steel, and the rivets are bronze boat nails. This hammer has good heft with all the furniture, and is significantly heavier then the MRL original. Lining up all the rivet holes was a little tricky.
Attachment: 83.53 KB
Attachment: 61.36 KB
Attachment: 70.96 KB
|
|
|
|
|
Scott Hrouda

|
| Posted: Wed 29 Dec, 2010 3:04 pm Post subject: |
|
|
Great work Luke!  The bronze boat nails add a very nice contrast. I enjoyed seeing the end result of your DIY project, especially after the setbacks you encountered. The bronze boat nails add a very nice contrast. I enjoyed seeing the end result of your DIY project, especially after the setbacks you encountered.
Have you had any fun whacking (inanimate) objects with it? If so, how did it handle? Do you have the final statistics (length, weight, etc.)?
Thank you for sharing
...and that, my liege, is how we know the Earth to be banana shaped. - Sir Bedevere
|
|
|
|
|
|
Luke Zechman
Location: Lock Haven Pennsylvania Joined: 18 Jan 2009
Posts: 278
|
| Posted: Thu 30 Dec, 2010 1:28 pm Post subject: |
|
|
Scott,
Thank you very much. I have not played around with it much yet. I do not have a scale at home, but there is one at work, that I will use tonight. I wonder if anyone at the bar I work at will mind a warhammer? I will post some specifics on it tomorrow, and go out and smack some objects with it as well.
|
|
|
|
|
|
Luke Zechman
Location: Lock Haven Pennsylvania Joined: 18 Jan 2009
Posts: 278
|
| Posted: Thu 30 Dec, 2010 8:01 pm Post subject: |
|
|
Here are some stats...
Overall Length: 25 in or 63.5 cm
Langet Length: 13.25 in or 33.6cm (53% total length)
Head Length: 6.5 in or 16.5cm
Weight: 30 oz or 850.5 grams
POB: 7.5 in from head or 19cm from head
I have not yet had a chance to bash anything with this hammer, but it feel very handy. Getting this hammer moving is easy, but slowing it down is another story. Everything feel very solid, and there is not movement of the head even when it is really cranked. The langets are about 3mm thick.
I was thinking about doing something for the handle. Any suggestions would be appreciated. I think I definitely would like to add a thong to secure around the wrist. Also i was wondering if 25 in seemed to be too long. This hammer really begs to be used with two hands
|
|
|
|
|
|
|

