It's also a good idea to mark your line slightly broad of where you want the final edge to be so you can easily refine with files in case you get an irregular cut.
Sean,
I actually made my cut parallel to the line I drew about an 8th of an inch on the scrap side. I did this for the reason you mentioned and it gave me some room for error. Using the Dremel was really just a way to minimize my file work.
Ok here is the next course of action gentlemen. I need to gather material for the hilt. Any wood suggestions for the cross guard and pommel that might have been used in Roman times. I want to order a hardwood ball from Hobby Lobby (Sean suggestion if I remember correctly) and then shape it from there. I don't want it to be a perfect sphere. I want to use the same type of wood to do the cross guard as well. My plans for the handle involve bone, but I am having trouble finding a piece big enough. Got some cow shin bones from the butcher shop and they just won't produces a solid piece big enough. Looked at camel leg bones online and wasn't sure if they would produce a piece big enough. Not interested in walrus ivory since I have an idea that it might be expensive. I think in the end I will need a piece that is 4" long X between 1 and 1.5" square. If the bone never happens then wood will have to do.
In the mean time I will be wrestling with getting this hilt apart, and I am sure that will involve some cussing!
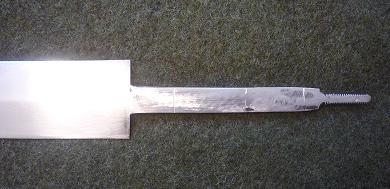
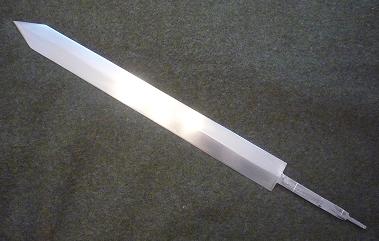
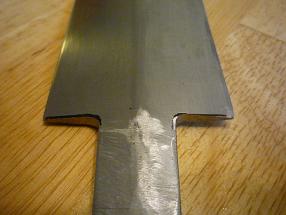
I have successfully exposed the tang of this sword and found some interesting things, all while avoiding any serious swearing bouts. Turns out that only the pommel was epoxied onto the screw end. I had to destroy it to get it apart, but was able to salvage small pieces of the Black Macasar (spelling?) it was made from. I may be be able to use it for some inlay work down the road. The rest of the pieces came off with a few taps from a wooden mallet.
You will notice that the shoulder of the blade is at a right angle which I have learned is bad for structural integrity. The corners are rounded however which I have learned is good. All aside this is fine with me since I plan to rework this whole area to give me enough tang to peen the sword properly.
Now I just have to wait until I have collected some materials for the hilt. This the the hardest part for me. I am inpatient. In my experience my impatient usually leads to me messing something up and I don't want that to happen. Going to take a little break from this and really digest what I have done and where I need to go next. This part will require some serious planning and drawing to get everything right. I need to lay out what each piece of the hilt will be and figure out how much more tang I will need. I will be posting the drawing in a few days.
Here are some picks of the tang.
 Attachment: 35.88 KB
Attachment: 34.78 KB
You will notice that the shoulder of the blade is at a right angle which I have learned is bad for structural integrity. The corners are rounded however which I have learned is good. All aside this is fine with me since I plan to rework this whole area to give me enough tang to peen the sword properly.
Now I just have to wait until I have collected some materials for the hilt. This the the hardest part for me. I am inpatient. In my experience my impatient usually leads to me messing something up and I don't want that to happen. Going to take a little break from this and really digest what I have done and where I need to go next. This part will require some serious planning and drawing to get everything right. I need to lay out what each piece of the hilt will be and figure out how much more tang I will need. I will be posting the drawing in a few days.
Here are some picks of the tang.
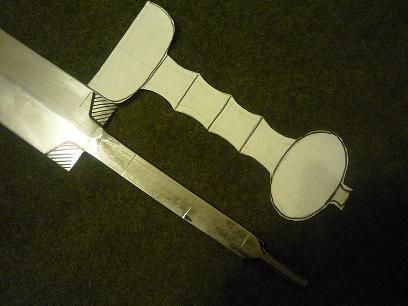
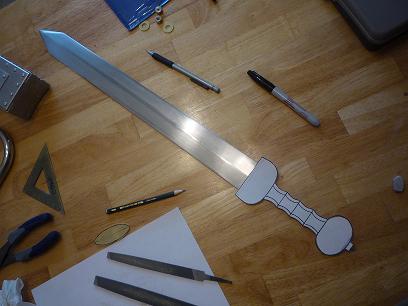
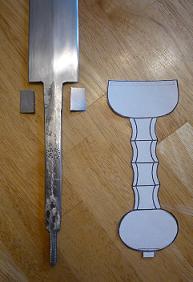
Here are the plans for the hilt. I drew it to scale so I could use it to figure out how much of the sword blade must be removed to achieve enough tang for a peen. Also this will allow me to see the hilt/sword profile. Blade length under this configuration is 18.75", which should be within historical allowances. The (hypothetical) grip length is 3.75" which fits my hand perfectly, and will be hexagonal.
Was looking for some feed back on the shape and size of the hilt.
How much of the tang should protrude for a good solid peen?
Questions for Matthew Amt regrading the grip material... types of wood used, or the possibility of horn while staying within historical examples. I also was trying to find some pictures of originals that might include some embellishment, like things carved into the pommel or cross guard. Fullers on Pompei???
Three pictures.
The sword plan with a club (barkeeps little buddy) I made last month (wooden weapons thread)
The sword plan in hand.
The tang plan showing area of blade to be removed.
Attachment: 26.58 KB

Attachment: 31.49 KB

Attachment: 33.08 KB
Was looking for some feed back on the shape and size of the hilt.
How much of the tang should protrude for a good solid peen?
Questions for Matthew Amt regrading the grip material... types of wood used, or the possibility of horn while staying within historical examples. I also was trying to find some pictures of originals that might include some embellishment, like things carved into the pommel or cross guard. Fullers on Pompei???
Three pictures.
The sword plan with a club (barkeeps little buddy) I made last month (wooden weapons thread)
The sword plan in hand.
The tang plan showing area of blade to be removed.
| Luke Zechman wrote: |
| Here are the plans for the hilt. I drew it to scale so I could use it to figure out how much of the sword blade must be removed to achieve enough tang for a peen. Also this will allow me to see the hilt/sword profile. Blade length under this configuration is 18.75", which should be within historical allowances. The (hypothetical) grip length is 3.75" which fits my hand perfectly, and will be hexagonal.
Was looking for some feed back on the shape and size of the hilt. How much of the tang should protrude for a good solid peen? Questions for Matthew Amt regrading the grip material... types of wood used, or the possibility of horn while staying within historical examples. I also was trying to find some pictures of originals that might include some embellishment, like things carved into the pommel or cross guard. Fullers on Pompei??? |
Ave!
There are some hilt pieces shown here:
http://romanmilitaryequipment.co.uk/figures.htm
Photos of those and others here:
http://www.romancoins.info/MilitaryEquipment-Attack.html
But be careful, in the photo of 3 hilts from Nijmegen, the one that is shown at left in the group photo and by itself in the right-hand photo, with the vertical crack in the fine-spiral grip, has a modern pommel and guard. Perfectly good repros, mind you, just don't take them for originals. (Huh, there's also a grip that looks like bone and really seems to be turned on a lathe! Forgot about that one.) But you can get a good idea of the range of shapes, and see that a lot of hilt parts were just plain. Looks like the most common decoration was a couple simple grooves (or ridges) around the middle of the pommel or the base of the guard. The snazzy fluted guard from Nijmegen is everyone's favorite, of course! A little overused, really. You asked about "fullers"--not on the blade! Grooved hilts and grips, yes, but not grooved blades.
The only hard data I've seen on types of wood used was a couple pieces analyzed as maple. Hmm, and maybe a grip of boxwood? Something like that. The books usually just say "wood", so I don't know if most of them have been analyzed or not. People like to use walnut, and it's certainly nice to work with, but I've heard that American walnut is significantly darker than the European variety. And we really don't have a lot of evidence for the Romans prefering the dark pommel and guard contrasting with the bone grip, that's probably over-emphasized by modern reenactors. A paler wood like maple will darken some over time if you treat it with neatsfoot oil. Never heard of horn being used on a Roman sword. They liked bone and ivory if they weren't using wood.
The shapes and sizes in your pattern look good to me. Making them too big is a common error, so I like your hilt. The pommel does not have to be as wide as the hilt, but you're probably still well in the ballpark.
Do the blade shoulders really need to be sloped? That was common on the earlier gladius hispaniensis, but Mainz and Pompeii blades all have straight shoulders. The face of the guard rests flat against them. With sloped shoulders, you'll have to carve a groove into the face of the guard--not a crime, just seems to be unnecessary work. And you wouldn't be able to have a brass plate on the guard, either. If the base of the tang has its little radius, I wouldn't think the angle of the shoulders really makes any structural difference.
You won't need much tang projecting to peen, an eighth-inch should be plenty.
I'm surprised you haven't been able to find a suitable bone! I just get them at pet shops. Cow foot bones, I believe they are, maybe an inch in diameter at the middle (a little more at the ends).
Patience is the most important tool in your toolbox--and I've never had any! Just playing with patterns and laying pieces out and puttering with shapes and sizes for a while is a very good thing to do.
Keep at it! Vale,
Matthew
Dear Mr. Zechman,
You're looking, in fact, at bones that are too big. The bone you want to find is a calf's cannon bone, which is one of the foot bones; the rear ones are better than the front ones, as their shape tends to be more regular. It's number 18 in this image. It's very close to exactly the right length and width (a full-grown cow's will naturally be larger than a calf's, but you can probably adjust for that if you have trouble finding one from a young animal), and comes complete with a convenient hole lengthwise through its center--with one, you don't need a very thick piece of bone that requires drilling. The walls are thick enough to shape into a grip, and the marrow space accommodates the tang. See the thread entitled Sources for hilt materials on the Roman Army Talk forum. Discussion of calf cannon bones begins in the second post on page two of the thread.
I'm afraid that the idea that the blade's shoulders should not lie at a right angle to the tang is a misunderstanding of the fact that a curved transition from shoulders to tang is stronger than a sharp one. You'll be perfectly all right with square shoulders as long as the tang's root curves away from them rather than being cut at an angle. Also, as Mr. Amt points out, having sloped shoulders will make it more difficult--although by no means impossible--to properly fit the blade to the guard and the guard-plate.
I hope that this information proves helpful.
Best,
Mark Millman
| On Monday 10 August, you wrote: |
| My plans for the handle involve bone, but I am having trouble finding a piece big enough. Got some cow shin bones from the butcher shop and they just won't produces a solid piece big enough. Looked at camel leg bones online and wasn't sure if they would produce a piece big enough. Not interested in walrus ivory since I have an idea that it might be expensive. I think in the end I will need a piece that is 4" long X between 1 and 1.5" square. If the bone never happens then wood will have to do. |
You're looking, in fact, at bones that are too big. The bone you want to find is a calf's cannon bone, which is one of the foot bones; the rear ones are better than the front ones, as their shape tends to be more regular. It's number 18 in this image. It's very close to exactly the right length and width (a full-grown cow's will naturally be larger than a calf's, but you can probably adjust for that if you have trouble finding one from a young animal), and comes complete with a convenient hole lengthwise through its center--with one, you don't need a very thick piece of bone that requires drilling. The walls are thick enough to shape into a grip, and the marrow space accommodates the tang. See the thread entitled Sources for hilt materials on the Roman Army Talk forum. Discussion of calf cannon bones begins in the second post on page two of the thread.
| And later, you also wrote: |
| You will notice that the shoulder of the blade is at a right angle which I have learned is bad for structural integrity. The corners are rounded however which I have learned is good. |
I'm afraid that the idea that the blade's shoulders should not lie at a right angle to the tang is a misunderstanding of the fact that a curved transition from shoulders to tang is stronger than a sharp one. You'll be perfectly all right with square shoulders as long as the tang's root curves away from them rather than being cut at an angle. Also, as Mr. Amt points out, having sloped shoulders will make it more difficult--although by no means impossible--to properly fit the blade to the guard and the guard-plate.
I hope that this information proves helpful.
Best,
Mark Millman
Last edited by Mark Millman on Tue 11 Aug, 2009 8:52 am; edited 2 times in total
| Luke Zechman wrote: |
|
...Was looking for some feed back on the shape and size of the hilt... |
Hi Luke...
Great work so far!
Thanks for taking time to let us in own your project...
Here are some things to think about.
It appears to me that the grip on your template cutout may be just a little to long. Keep in mind that the curvature of the guard and pommel, as it connects to the grip, will fit into the hollows at either end of your fist. So to get a really tight fit you will need to take out another half inch or so from a simple measure ment of the width of your palm. One of the things that rally impressed me about my gladius hilt is that as I tighten my grip on the grip, the pressure caused my hand to expand and locks into the pommel and guard making the hilt feel like an extension of my arm. If you don't take this extra expansion into account you will make the grip too long and you will miss this effect.
I haven't tried this, but here's and idea... Take an apple cut it in two pieces then take a thick dowel rod and run it through the apple, with the curved outer part duplicating the curved portions of pommel and guard near the grip. Then duct tape the apple to the dowel really well with the dowel between the apple parts the length you have on the template. Take hold of this "fruit grip" and squeeze. If it does not lock-in as I said, then take the tape off and move the apple pieces closer together and tape it down again. Do this until you feel your hand lock into place. This will give you the correct grip length IMHO. Once you get the the guard, grip and pommel finished, but before you peen it all together you might tape it together tight and see if your hand still locks in. If not then get a file and take off a little off from each end of the grip until you feel it lock into place. As to the girth of the grip, I think that the when your hand closes on the grip your finger tips should be just about to touch your palm. If your finger tips touch the palm it is too thin, if there is more than a 1/4 inch gap the grip is prbablay too thick. Once you get the grip shaped you can take your files and work the facets down until you get the correct girth. A large rat tail file works well for this. If you use dremel grinding drums to shape the bone, be sure and wear a mask, and good ventelation (the ventelation because burning bone has a strange smell that my wife found objectionable though I kind of like it). I prefer to do the hand work with files, it gives me more control and less dust (and smell). After it rough out with files, sand paper can be used to polish the facets of the grip. Leave the edges as sharp as possilbe to get good definition. Later you can take very fine sand paper and knock of the edges.
I agree with Matt that you don't need the sloping shoulders, just radius the corner between the shoulders and the tang. This also will give you a little more blade length. As a matter of fact, all your really need to do is take a small rat tail milling file (something you should have in your toolbox anyway if you like this stuff) and extent the tang into the shoulder about 1/8th inch and then take a flat mill file and even out the shoulder toward the blade edge on each side. It would only take a few minuets and it would give you another half inch of blade length.
Also I think I would make the guard just a little thicker and the pommel a little rounder.
Hope this helps...
Keep up the good work!
ks
Wonderful information gentlemen. This has made me rethink my whole plan, and in a good way. I am glad I didn't just go to it with the materials I picked up at Lowes today. I am going to hit the drawing board and post what i come up with later. Thanks again!!!
Luke
Luke
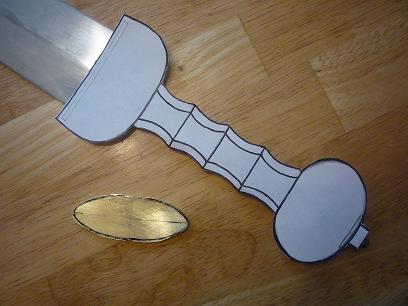
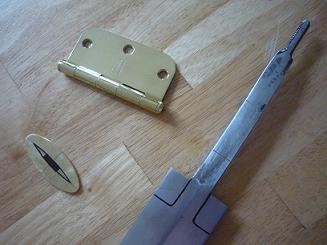
Here is the new hilt design drawn to scale. The blade length is just shy of 18.5" with this configuration. I have also relaid my tang extension plans to compensate for this slightly longer hilt. The material removed from the blade to extend the hilt will leave a right angle where the blade meets the tang and will have rounded corners. This hilt design features a shorter grip, that will lock my hand between the cross and pommel. Also the cross and pommel are a little bigger, but not much, and the pommel is a little rounder.
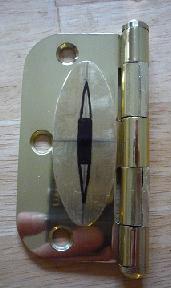
The other picture shows the brass cross guard in the works, which was cut away from a solid brass hinge I bought at Lowes this afternoon.
Attachment: 34.82 KB
Attachment: 34.3 KB
The other picture shows the brass cross guard in the works, which was cut away from a solid brass hinge I bought at Lowes this afternoon.
This is looking great! I want to take on an Illerup spatha project this year, so I'm eager to see your progress on this.
Thank a lot Sean. The great part is that I am enjoying myself. Now i hope this doesn't distract me from school too much this Fall. I saw the hilt plan for you Erbachs... much nicer then my 2d models. I am excited to see where you go with that sword. I plan to continue to document this whole process so I hope the things I learn will in return help you when you do that spatha.
Update
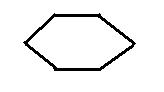
After a little searching and some reading (advice from Mark M. and Matthew A.) I discovered the right bone to use. The good news is that I have seen those types of bone in a cow pastor I small game hunt near. Once that is obtained i will be working on it with vigor. Was thinking of a Hexagonal grip that has a oval like cross section. I like oval grips because they help you feel where the edges are and better facilitate more accurate cutting. Not to mention i feel this shape will fit nicely into the existing bone to be used. Is there any experience of seeing a grip with this shape? See following illustration
Also just finished the rough shape of the brass cross guard insert. Still need to drill out the tang hole and recess an area for the blade though. I cut this from a solid brass door hinge obtained at Lowes. It was a little expensive but the cheap ones where not solid brass. I am proud of this part because I remember that as an art student always hearing about and experiencing how hard ellipses are to draw. Cut a rectangle. Then knocked the corners off. Then went to some file work. Going to drill press out the tang hole and shape with a file. What would be an easy way to do the recess for the blade to fit into?
Pictures:
-Brass cross guard with new tang lengthening plan (square shoulders with rounded corners)
-Brass cross guard shown with hinge
- Possible grip cross section??????
Attachment: 2.28 KB
Attachment: 24.11 KB
Attachment: 28.67 KB
After a little searching and some reading (advice from Mark M. and Matthew A.) I discovered the right bone to use. The good news is that I have seen those types of bone in a cow pastor I small game hunt near. Once that is obtained i will be working on it with vigor. Was thinking of a Hexagonal grip that has a oval like cross section. I like oval grips because they help you feel where the edges are and better facilitate more accurate cutting. Not to mention i feel this shape will fit nicely into the existing bone to be used. Is there any experience of seeing a grip with this shape? See following illustration
Also just finished the rough shape of the brass cross guard insert. Still need to drill out the tang hole and recess an area for the blade though. I cut this from a solid brass door hinge obtained at Lowes. It was a little expensive but the cheap ones where not solid brass. I am proud of this part because I remember that as an art student always hearing about and experiencing how hard ellipses are to draw. Cut a rectangle. Then knocked the corners off. Then went to some file work. Going to drill press out the tang hole and shape with a file. What would be an easy way to do the recess for the blade to fit into?
Pictures:
-Brass cross guard with new tang lengthening plan (square shoulders with rounded corners)
-Brass cross guard shown with hinge
- Possible grip cross section??????
Here is the lengthened tang, shown with to scale hilt design. Placed sword in vise and cut out pieces with a hack saw. rounded corners with rat tail file. Fine fitting work will be done when I have the hilt pieces to fit.
Attachment: 23.73 KB
Attachment: 24.72 KB
| Luke Zechman wrote: |
| What would be an easy way to do the recess for the blade to fit into? |
Looks good Luke, keep up the good work.
The good news is (correct me if I'm wrong Matthew) that unlike most medieval sword guards, you don't have to inlet the shoulders into the plate......I believe that the plate simply sits on the shoulders and helps prevent them sinking into the wood (though the plate is inlet into the wood). I hope this helps,
Dan
Well I hope that is true. of all the things involved in the sword portion of this project, that is the one thing I was dreading. Knocking out the hole for the tang would be pretty easy.
Yup, all you need in the brass guard plate is the slot for the tang. You may want to do a little fiddly file work on the shoulders of the blade so that the plate fits nicely against them, but I doubt the Romans ever got that fussy! Be sure to mark the plate so that you put it on the tang the same way every time--I generally mark one side of the tang with an X and one side with an O, and mark all the hilt pieces correspondingly, to be sure I don't get something reversed and cockeyed.
The guard plates I make are usually quite thin, c. .015" or .020". When the hilt is tightened onto the tang, the blade shoulders sink into that without much effort, making a nice snug fit. I think most originals were thinner than yours, but don't worry, the thickness won't show once it's set into the wood. It'll work!
Grip cross-sections varied, so yours is fine. They could even be more ovalish overall like yours in the middle, but more equilateral at the ends. Partly depends on the bone. Oh, once you pick a bone, cut it to length and try it on the tang right away. The shape of the hole may affect how it fits on the tang, so that you'll need to mark its relation to the blade so that your plan aligns properly with the edges. It would be a bummer to get the whole thing done and THEN find out that it's going to be twisted out of alignment unless you ream out the hole! Of course, sometimes the hole is larger than you need, so you may want to pack it with shims when you assemble the hilt.
Looking good!
Matthew
Woa, that is so weird, I'm about to be doing the exact same thing, except with a windlass gladius! Does the shoulder plate need to be brass or can it be copper or bronze or something? When was brass introduced, I always thought it was kinda modern? Guess I must of misread somthing somwhere...
Looks really great! I'll be happy if mine ends up looking half as good when it's finished, hehe! :lol:
Z
p.s. Is there any hard evidence for squarish pommels like this one? I read the article but it didn't show any actual evidence...
http://www.myArmoury.com/view.html?features/pic_ironempire4.jpg
Looks really great! I'll be happy if mine ends up looking half as good when it's finished, hehe! :lol:
Z
p.s. Is there any hard evidence for squarish pommels like this one? I read the article but it didn't show any actual evidence...
http://www.myArmoury.com/view.html?features/pic_ironempire4.jpg
| Zach Gordon wrote: |
| Woa, that is so weird, I'm about to be doing the exact same thing, except with a windlass gladius! Does the shoulder plate need to be brass or can it be copper or bronze or something? When was brass introduced, I always thought it was kinda modern? |
The Romans definitely were using brass, called orichalcum, from at least the time of Augustus. It seems to have been a government monopoly, since it was used for coinage and military equipment but apparently not for general domestic use (pots and pans, furniture parts, etc.). Now, Roman brass generally had a lower zinc content than modern brass, c. 10 to 15 percent as opposed to about 30 percent, so it may not have been quite so yellowish. You can get red brass or "low brass" for a closer look, and in fact "commercial bronze" is basically just a low zinc brass. Most modern bronzes have little or no tin, except for phosphor bronze. There are only a few Roman artifacts that I know of that are basically straight copper, so brass or some kind of bronze are a better option. Mind you, many artifacts have not actually been analyzed! Most books just use "brass" or "bronze" indiscriminately, though there is a growing trend to say "copper alloy" which covers all the bases without committing oneself.
Note that not all Roman swords had a metal guard plate. It was common, but not required.
| Quote: |
| p.s. Is there any hard evidence for squarish pommels like this one? I read the article but it didn't show any actual evidence...
http://www.myArmoury.com/view.html?features/pic_ironempire4.jpg |
There are a couple that are kind of angular, but I don't think there is solid evidence for the faceted face. At least I *think* that's the conclusion we reached last time we discussed this hilt!
I always try to warn folks away from the Windlass "Roman" pieces when I can, because they simply have too many inaccuracies. (Not a problem if you aren't worried about authenticity, of course!) Deepeeka, Daniyal, and a couple other companies make stuff which is much more accurate right out of the box. But sing out if you need more advice!
Vale,
Matthew
A friend of mine sold it to me for $35 I figured at that price I could experiment. :) thanks for the info on the brass!!!
Thanx
Z
Thanx
Z
My project has come to a halt, due to lack of materials. Still need that certain bone which I have leads on. Looking for a good piece of maple to do the pommel and cross which shouldn't be to hard since I live in PA. I have a good piece of seasoned hickory, but realize it wouldn't be historical. This part is killing me. I am so impatient.
In the mean time I need to gather information on making the scabbard. I have read all the info on the Legio XX Page which was very helpful (thanks again Matthew). I have a good idea about what makes a scabbard Roman but i am still a lot shaky on the brass fittings. I looked at the Roman scabbards on the Christian Fletcher page and would like something similar. I just have no idea how to work with brass. Where can I get sheets of brass, how do i cut it to shape and then how do i connect it together. If anyone knows of a good resource page, or book that deals with this subject, let me know.
In the mean time I need to gather information on making the scabbard. I have read all the info on the Legio XX Page which was very helpful (thanks again Matthew). I have a good idea about what makes a scabbard Roman but i am still a lot shaky on the brass fittings. I looked at the Roman scabbards on the Christian Fletcher page and would like something similar. I just have no idea how to work with brass. Where can I get sheets of brass, how do i cut it to shape and then how do i connect it together. If anyone knows of a good resource page, or book that deals with this subject, let me know.
Page 2 of 6
You cannot post new topics in this forumYou cannot reply to topics in this forum
You cannot edit your posts in this forum
You cannot delete your posts in this forum
You cannot vote in polls in this forum
You cannot attach files in this forum
You can download files in this forum
All contents © Copyright 2003-2006 myArmoury.com — All rights reserved
Discussion forums powered by phpBB © The phpBB Group
Switch to the Full-featured Version of the forum
Discussion forums powered by phpBB © The phpBB Group
Switch to the Full-featured Version of the forum