| myArmoury.com is now completely member-supported. Please contribute to our efforts with a donation. Your donations will go towards updating our site, modernizing it, and keeping it viable long-term.
Last 10 Donors: Piotr H. Feret, Graham Shearlaw, Anonymous, Daniel Sullivan, Chad Arnow, Jonathan Dean, M. Oroszlany, Sam Arwas, Barry C. Hutchins, Dan Kary (View All Donors) |
| Author |
Message |
|
Keen Mark
|
 Posted: Wed 05 Aug, 2009 3:28 pm Post subject: Reshaping a sidesword tip Posted: Wed 05 Aug, 2009 3:28 pm Post subject: Reshaping a sidesword tip |
 |
|
|
So... I have received my AT sidesword and, in addition to cleaning/polishing it up, I would like to reshape its tip and make it more even and pointed. Is there any particular sharpening stone I should buy and any techniques I could use to make my life easier? I was going to buy a cheap synthetic sharpening stone (the ones made in China that are coarse on one side and less-rough on the other), put some water and start carefully grinding away. Is there a better way to do this?
|
|
  |
 |
G Ezell
Industry Professional

Location: North Alabama Joined: 22 Dec 2003
Posts: 235
|
 Posted: Thu 06 Aug, 2009 9:05 pm Post subject: Posted: Thu 06 Aug, 2009 9:05 pm Post subject: |
 |
|
There is a faster way, but not necessarily better, that being a belt grinder. I'm assuming you may not have access to one... In that case, stones might be the best way to go. Start with something very coarse, then work your way up in fineness, being sure to get out coarser scratches as you go. Sandpaper on a stiff backing may be more versatile, and less expensive for one project than buying a full set of stones. 400 grit sandpaper leaves a nice satin finish, 2000 grit will be close to a mirror polish. Do as much of the rough shaping as possible with 50 grit or less, then jump to 80, 120, 220, 320, 400, etc... until you arrive at the level of finish you desire. You can use the paper wet or dry, wet cuts a little faster but cuts rougher than dry in my experience. As you are working just the point, it shouldn't take too terribly long. Good music helps... 
" I have found that it is very often the case that if you state some absolute rule of history, there will be an example, however extremely unusual, to break it."
Gabriel Lebec
https://www.facebook.com/relicforge
|
|
   |
 |
|
Luke Zechman
Location: Lock Haven Pennsylvania Joined: 18 Jan 2009
Posts: 278
|
 Posted: Fri 07 Aug, 2009 9:09 am Post subject: Posted: Fri 07 Aug, 2009 9:09 am Post subject: |
 |
|
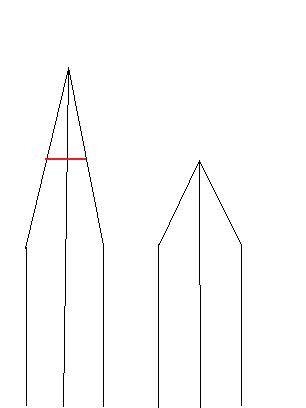
If I were going to change the tip of a sword drastically, say from a mainz pattern pointedness to a pompei pattern... would it hurt to remove the three inches of metal I don't need with a hack saw? Then once to that point i could remove the rest carefully with a file. I figure as long as i don't get the metal too hot I should be fine right?
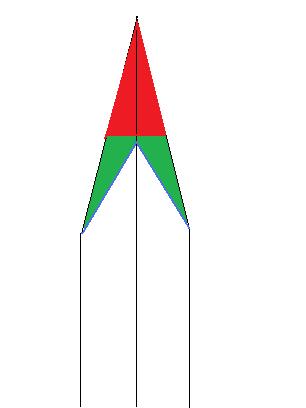
The following diagram show what i have on the left and what i want on the right. the red line indicates what i would like to hack off. would this hurt? So just to clarify... red part is the area I would remove with a hack saw. green part is what i would remove with a file. see second diagram.
 Attachment: 7.88 KB Attachment: 7.88 KB

 Attachment: 7.26 KB Attachment: 7.26 KB

Last edited by Luke Zechman on Fri 07 Aug, 2009 2:42 pm; edited 1 time in total
|
|
  |
 |
|
Josh Maxwell
|
 Posted: Fri 07 Aug, 2009 11:01 am Post subject: Posted: Fri 07 Aug, 2009 11:01 am Post subject: |
 |
|
| G Ezell wrote: | | There is a faster way, but not necessarily better, that being a belt grinder. |
For the love of god don't use power tools, unless you want to screw up the heat treat on the blade.
|
|
  |
 |
|
Luke Zechman
Location: Lock Haven Pennsylvania Joined: 18 Jan 2009
Posts: 278
|
 Posted: Fri 07 Aug, 2009 4:03 pm Post subject: Posted: Fri 07 Aug, 2009 4:03 pm Post subject: |
 |
|
|
I would use a file to get the shape you want, then i would use 600 grit sandpaper to smooth it out. save the sharpening stone for... sharpening the edge. go slow! you can always take more off, but you can't put it back on. Also use something to clean any oils off the blade before shaping so you don't clog up you file/sandpaper with oily metal dust. and remember that files only cut on the push so save the wear on the file by only pushing it away from you, lift and push.
|
|
  |
 |
|
Justin King
Industry Professional
|
 Posted: Fri 07 Aug, 2009 4:26 pm Post subject: Posted: Fri 07 Aug, 2009 4:26 pm Post subject: |
 |
|
Hacksaws and files can only be used effectively if the steel is soft enough. Some current production blades are harder than others and may dull these types of tools fairly quickly. A hard enough blade will reject the file completely, but you will encounter blades of this hardness fairly rarely in the production sword world. To simplify, there is no reason why you cant use these types of tools on blades, just that some blades are easier than others to use them on.
There is also no reason you can't use a belt grinder or even other types of grinders on heat treated steel, but in doing so you do need to work in such a manner that the blade does not get over-heated. Belt grinders which use industrial-grade metal grinding belts are ideal, removing lots of material for minimal heat buildup, but other kinds of grinders can be used if one knows what one is doing. Using a fresh, sharp, and relatively coarse abrasive with light to moderate pressure is usually best for removing lots of material without creating lots of heat.
|
|
  |
 |
Jean Thibodeau

|
 Posted: Fri 07 Aug, 2009 9:30 pm Post subject: Posted: Fri 07 Aug, 2009 9:30 pm Post subject: |
 |
|
A dremel with a cutting wheel will cut hardened steel like butter but one almost must cut in a strait line as the cutting wheels are fragile and cutting in a curve is very difficult to do ! But the point of a Gladius is very strait so it should work fine.
Oh once the cut is initiated staying in the cut become easy but the initial cutting pass has to be perfectly strait and where you want it and needs a very steady hand.
You don't cut deep, you cut a shallow groove the whole length of the cut and then go over and over again in the same groove until the whole piece falls off. It's also easy to make one or two passes at a time and let the steel cool or wet it with a towel to not affect the heat treat.
Once you have your desired profile you still have to re-establish a primary bevel before adding a secondary bevel or apple seed edge.
Hope this helps. ( Oh, one can stack multiple cutting wheels together and cut in fullers also, but one needs a VERY steady hand or some sort of mechanical guide to avoid the cutting wheels from skipping out of the groove/fuller and cutting the surface of the blade where one doesn't want to mar the finish ).
You can easily give up your freedom. You have to fight hard to get it back!
|
|
  |
 |
|
Luke Zechman
Location: Lock Haven Pennsylvania Joined: 18 Jan 2009
Posts: 278
|
 Posted: Fri 07 Aug, 2009 11:12 pm Post subject: Posted: Fri 07 Aug, 2009 11:12 pm Post subject: |
 |
|
|
Thanks a lot gentlemen. This information is great, and I really appreciate it. I will be posting progress on this project eventually.
|
|
  |
 |
G Ezell
Industry Professional

Location: North Alabama Joined: 22 Dec 2003
Posts: 235
|
 Posted: Sat 08 Aug, 2009 12:12 am Post subject: Posted: Sat 08 Aug, 2009 12:12 am Post subject: |
 |
|
| Justin King wrote: |
There is also no reason you can't use a belt grinder or even other types of grinders on heat treated steel, but in doing so you do need to work in such a manner that the blade does not get over-heated. Belt grinders which use industrial-grade metal grinding belts are ideal, removing lots of material for minimal heat buildup, but other kinds of grinders can be used if one knows what one is doing. Using a fresh, sharp, and relatively coarse abrasive with light to moderate pressure is usually best for removing lots of material without creating lots of heat. |
Yes, while grinding the blade must be kept cool. Grind without gloves, and quench frequently. Pay careful attention to the edge and point, they heat quickly.
" I have found that it is very often the case that if you state some absolute rule of history, there will be an example, however extremely unusual, to break it."
Gabriel Lebec
https://www.facebook.com/relicforge
|
|
   |
 |
|
Luke Zechman
Location: Lock Haven Pennsylvania Joined: 18 Jan 2009
Posts: 278
|
 Posted: Sat 08 Aug, 2009 11:02 am Post subject: Posted: Sat 08 Aug, 2009 11:02 am Post subject: |
 |
|
|
Bought a Dremel 300 today with the tips I made at the pub last night and started the cuts. Found it easier to make a straight cut but first perforating the surface. I have been making 3 or 4 passes and then wetting with a paper towel. This is working great, and the metal never even gets warm. Taking a break, and about half way through.
|
|
  |
 |
|
Keen Mark
|
 Posted: Sat 08 Aug, 2009 6:03 pm Post subject: Posted: Sat 08 Aug, 2009 6:03 pm Post subject: |
 |
|
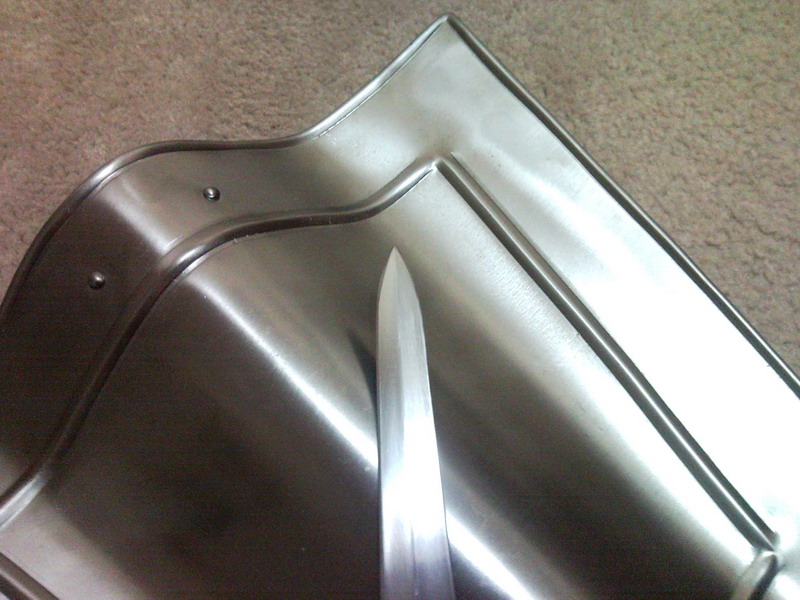
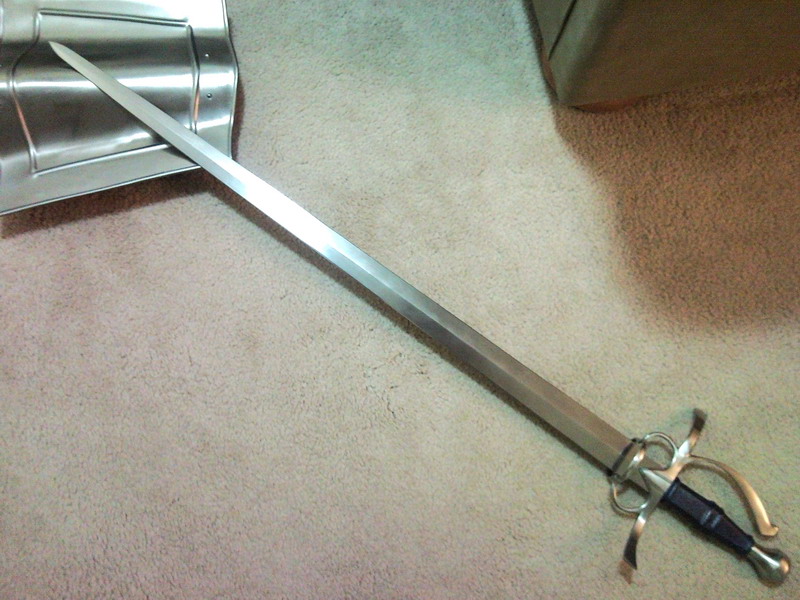
I'm happy to report success. Reshaping a tip with a waterstone is not a piece of cake, it requires at least an hour or two of careful grinding by hand, washing the stone frequently to remove the gunk that builds up. Afterwards, the edge needs to be re-aligned, then all the grind marks must be polished out by progressively finer grits of stones, followed by a cleanup with 1000 grit sandpaper to help remove burrs. And all the time you have to be careful of the edge and especially the tip. Fortunately this was an AT sidesword, so my life was made easier by the fact that I could remove the hilt, grip and pommel to help me handle the blade much easier. Here is the finished work, I may go back over it again with more 1000 grit sandpaper to further refine it. The buckler it's resting on is an Arms and Armor italian buckler.
 Attachment: 131.57 KB Attachment: 131.57 KB

 Attachment: 146.43 KB Attachment: 146.43 KB

|
|
  |
 |
|
|
You cannot post new topics in this forum
You cannot reply to topics in this forum
You cannot edit your posts in this forum
You cannot delete your posts in this forum
You cannot vote in polls in this forum
You cannot attach files in this forum
You can download files in this forum
|
All contents © Copyright 2003-2026 myArmoury.com — All rights reserved
Discussion forums powered by phpBB © The phpBB Group
Switch to the Basic Low-bandwidth Version of the forum
|

