| Author |
Message |
Julien M

|
 Posted: Tue 07 Apr, 2009 8:44 am Post subject: Sharpening/ Repolishing an MRL blade Posted: Tue 07 Apr, 2009 8:44 am Post subject: Sharpening/ Repolishing an MRL blade |
 |
|
I'm currently working on redoing an MRL coustille for a friend that came with the usual blunt edge. I'm planning to rewrap it etc but first I need to sharpen it. I've never done such a thing before and I fear I could ruin the blade.
I am aiming at the so called appleseed edge, and I have crawled the forum back and forth for infos already but I'm still unsure of what to do next.
So far I have done the following:
1- I have created a bevel using a file, keeping a 30 degree angle. It is even and cut well enough as it is (I can cut a papersheet with it). But it is rough and scratchy and I don't like the look of it (I had a towton that came sharp with an accusharp looking edge from MRL and I hated the look of that all too obvious bevel).
2 - I have ruined the blade polish (don't like mirror polish anyway), leaving worrying and impossible to remove so far sand paper marks all over the blade (I've tried sandpaper and dremel+wire brush with no luck, sanding sponge gives a satin finish but leaves the marks underneath).
What can I use to refine the bevel? (get rid of the scratchy file finish). Sand paper doesn't seem to do anything so far. Should I purchase one of these tri hone Arkansas stones?
What can I do to then efficiently blend the bevel to get an appleseed edge? Again it doesn't look as sandpaper will work here. If someone could post a picture of a well (homemade) appleseed edge that would be great, as a visual reference would help a lot I'm sure.
Finally how can I remove those many scratch marks I did with the sanding sponge (not to mention with the dremel...)
Can't post pictures this week but will soon.
Thanks in advance for your advice,
J
|
|
  |
 |
Sean Flynt

|
| Posted: Tue 07 Apr, 2009 10:12 am Post subject: |
|
|
I feel your pain. With Windlass, I usually start with a big file, pushing toward the edge (wearing gloves). If this creates a "shoulder" I just blend that with the file, too. Scratches are almost inevitable. I go up and down the affected area with the very soft side of an old two-sided stone. Pumice would probably accomplish the same thing. If there are lots of deep scratches, I use a coarse grit paper, followed by the stone or sanding sponge. Did I mention that I wear gloves?
Lately, I'm getting lots of use out of a power drill with brass and steel brush bits. These are very useful in giving a uniform finish to hilt furniture, but I've used them on large surfaces, too, including a blade.
-Sean
Author of the Little Hammer novel
https://www.amazon.com/Little-Hammer-Sean-Flynt/dp/B08XN7HZ82/ref=sr_1_1?dchild=1&keywords=little+hammer+book&qid=1627482034&sr=8-1
|
|
 |
|
Pietari Jaakkola

Location: Finland Joined: 11 Nov 2007
Posts: 7
|
| Posted: Tue 07 Apr, 2009 11:06 am Post subject: |
|
|
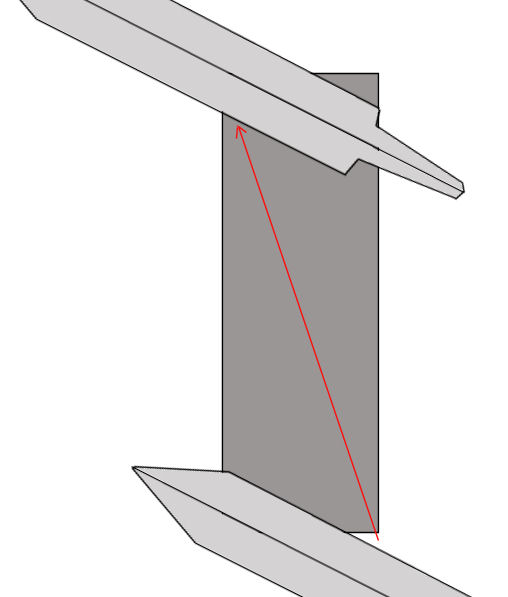
First I have to say, forgive the crudeness of my picture... I cant do better right now 
Ok, so. This is the way I use and some people could disagree with my method, but hey, it works for me 
I usually improvise a sanding block just using 2by2, and I usually start with a REALLY coarse sanding paper, to get rid of the scrathces and making new ones uniform. Just go up with higher and higher repeatedly.
1. Line the beveled edge of your sword / knife with your sanding block / whetstone thusly
2. Then carefully start to move your blade forward, GENTLY rotating the blade downwards, so that the edge would take a round shape
3. You should use the whole lenght of the whetstone / block, and in the end, it should be in this position.
And as for the second picture, you should move the blade diagonally as such.
When done corrcetly, doing this repeatedly should get you a nice, appleseed edge!

I hope this helps even a little.
 Attachment: 22.43 KB Attachment: 22.43 KB
Attachment: 20.5 KB
[ Download ]
A man wields his sword to die with a smile on his face. On a distant day beyond his dreams.
|
|
|
|
|
Pietari Jaakkola
Location: Finland Joined: 11 Nov 2007
Posts: 7
|
| Posted: Tue 07 Apr, 2009 11:12 am Post subject: |
|
|
Hmm, the pictures went the wrong way around. Oh well, I hope they still are of any use
A man wields his sword to die with a smile on his face. On a distant day beyond his dreams.
|
|
|
|
|
Julien M
|
| Posted: Wed 08 Apr, 2009 1:04 am Post subject: |
|
|
Hi guys,
Thanks for taking the time to answer (and to make diagrams Pietari! much appreciated). I will definitely invest in a wire brush Sean, it looks convenient...I remember I liked the finish of the estoc you remade. I have a miniature version of it that came with my Dremel, but it too small and weak and is useless for that purpose.
I've worked on the blade until late at night yesterday, and got around it. I just used a sand block laying flat on the table, and moved the blade back and forth at different angles until the rounded bevel practically disappeared (I decreased the angle from 30 degrees until I the blade was almost laying flat on the block). The edge retained it's sharpness though. I might get a fine grit stone to finish it up.
Next step is the re polishing of the all thing. I'll use coarse grit to do so. Just one question: what do you consider as coarse?
I had a set of grit paper of 400,280 and 180. Even the coarsest (180) failed to remove the deepest scratches. What number should I get?
Finally if you have picture of a finished Appleseed edge, that would be most useful.
J
|
|
|
|
|
Pietari Jaakkola
Location: Finland Joined: 11 Nov 2007
Posts: 7
|
| Posted: Wed 08 Apr, 2009 2:43 am Post subject: |
|
|
It seems that the scrathces are really deep... The coarsest thing I have got is just 240. 
A Finnish website called Rautaportti (Iron gate) has a polishing tutorial. its in finnish, but I think the pictures can be quite interesting and useful.
http://rautaportti.fi/Artikkelit/Tuotteiden%2...loitus.htm
I can translate it, or parts of it if you want 
A man wields his sword to die with a smile on his face. On a distant day beyond his dreams.
|
|
|
|
|
Julien M
|
| Posted: Wed 08 Apr, 2009 3:07 am Post subject: |
|
|
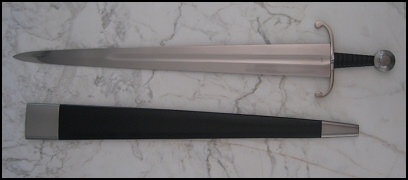
Nice website mate, thanks.
Funny, the guy is actually working on the former version of the MLR coustille while I am working on the new. The final polish is very nice indeed, same technique I always use, but on the other hand that kind of visible beveled edge is exaclty what I am trying to avoid (can see it very clearly on the last pict, a strong bevel showing filemarks).
What puzzle me is that their shop offers windlass swords I have never seen before...Are those older and discontinued models?? That type XIV looks would look damn good with a few light modifications!
Attachment: 22.09 KB
|
|
|
|
|
Pietari Jaakkola
Location: Finland Joined: 11 Nov 2007
Posts: 7
|
| Posted: Wed 08 Apr, 2009 3:24 am Post subject: |
|
|
Yes, Rautaportti offers products that are already discontinued everywhere else. If I recall right, they made a deal with Windlass steelcrafts so that they make some discontinued weapons exclusively for Rautaportti.
As for the bevel in the pictures, I dont know the guy personally so I cant say anything about that. Maybe he just likes it that way. 
A man wields his sword to die with a smile on his face. On a distant day beyond his dreams.
|
|
|
|
|
Jean Thibodeau

|
| Posted: Wed 08 Apr, 2009 5:33 am Post subject: |
|
|
Part of the problem is getting rid of scratches made using a file that although does the job quickly of putting in a secondary bevel seems to have left deep marks that are hard to get rid of.
When I have used a file I have tried to use a very fine toothed one and files along the edge rather than across the edge and then gone over it with a diamond hone.
Now, I don't mind a small secondary bevel too much but turning it into an appleseed edge can be done by making passes that cut the ridge of the primary bevel where it meets the secondary bevel: This if done geometrically perfectly would create tertiary bevel. Now repeating loosely with an abrasive wrapped over a stick ( numerous layers of emery paper taped around a stick or round rod one can go over these bevels and blend them into an appleseed curve ).
If one uses the same abrasive grit over the primary bevel for the final finish one should get the same finish on the rounded edge and the surface of the blade.
Anyway, this is the way I would do it, although with a long sword blade it would take a lot of patience and time to do.
Once very deep scratches are in the blade it becomes very hard to get rid of them but if all the work of sharpening and polishing in done in the same lengthways direction as the blade any slightly deeper scratches will be hard to see, but any scratches at an other angle will stand out as a sore thumb !
Mostly I avoided the issue by not using files at all and using much finer to start with diamond hones.
Hope this helps a bit with future projects as I may not have been as helpful with a solution to the present problem.
You can easily give up your freedom. You have to fight hard to get it back!
|
|
|
|
|
Julien M
|
| Posted: Wed 08 Apr, 2009 5:41 am Post subject: |
|
|
Hi Jean,
Took advantage of my lunch break and got myself 60 and 80 grade grit paper. It should be enough to solve the problem!
My question might sound stupid, but what is a diamond hone and what does it look like? (google images retrieves a lot of different stuff on that query, what kind should be used to sharpen a sword?), and I haven't got a clue how it looks like to start with
cheers,
J
edit: do ou get better results with that than with a set of stones (I was thinking of buying a tri stone sharpening kit)
|
|
|
|
|
|
Justin King
Industry Professional
|
| Posted: Wed 08 Apr, 2009 5:46 am Post subject: |
|
|
Coarse file marks are a real bear to polish out of a hardened steel surface. I ususally use 120 or 150 grit for removing deep scratches, but if necessary I will start with 80. Using a wood backing block to wrap the sandpaper around usually helps, but to get rid of the file marks, lots of elbow grease is a given. Using good quality abrasives helps speed things up.
Using a fine-toothed file with file chalk will help keep the file scratches more managable in the future.
|
|
|
|
|
Jean Thibodeau
|
| Posted: Wed 08 Apr, 2009 5:59 am Post subject: |
|
|
| Julien M wrote: | Hi Jean,
Took advantage of my lunch break and got myself 60 and 80 grade grit paper. It should be enough to solve the problem!
My question might sound stupid, but what is a diamond hone and what does it look like? (google images retrieves a lot of different stuff on that query, what kind should be used to sharpen a sword?), and I haven't got a clue how it looks like to start with
cheers,
J
edit: do ou get better results with that than with a set of stones (I was thinking of buying a tri stone sharpening kit) |
Ah, diamond hone: Basically it's a block of steel or a sharpening rod that has diamond dust in the surface. I have one that I have used for years and although it has gotten a bit smoother it still wears away steel.
Normally one would use use as a sharpening tool for an already bevelled blade and it can be very slow work to create a bevel.
Here is one type of diamond hone although the actual tool would be hard to use for a very long blade the abrasive " units " can be hand held: http://www.crocblades.com/sharpeners/lansky-d...-ldhfn.cfm
Here is a whole bunch made by DMT
DMT : http://www.knivesplus.com/DMT.HTML
I have one sold by Buck Knives and made by DMT with is like a 6" X 2" bench stone.
Hope this helps. 
You can easily give up your freedom. You have to fight hard to get it back!
|
|
|
|
|
Julien M
|
| Posted: Thu 09 Apr, 2009 1:19 am Post subject: |
|
|
Cheers Jean,
Might get one of those too someday.
I tried the coarses grit paper I had bought yesterday to tackle those file scratches.
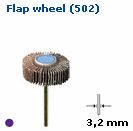
After 40 minutes or so of rubbing on one quarter of the blade , I had removed all scratches from that tiny section only. Efficient in the end but exhausting. I then took my dremel out of the box, and tried a 80 grade flapweel on the blade (pic below)...AMAZING! I cleaned the all blade of all scratches in less than 5 minutes. A few light passes over the deepest ones was enough...So that's a solution a would definitely recommand!
I did the entire blade surface, from there to even that very factory looking rough polish: coarse sandpaper again, then decrease the grade, finish with Scotch-Brite and metalgloo. Total workbenchtime: barely 25 minutes, for a blade looking like new and a very nice satin finish.
Cheers,
J
Attachment: 3.49 KB
|
|
|
|
|
Jean Thibodeau
|
| Posted: Thu 09 Apr, 2009 7:14 am Post subject: |
|
|
Sounds good to me.
The diamond hones that look like a kitchen sharpening steel as good also for refreshing a slightly dulled edge after use or after you have dulled it a bit when polishing the blade. ( Hard to not slightly dull the edges by accident ).
Once you have the kind of appleseed cutting edge you want using the diamond hone lightly won't create a noticeable secondary edge unless one overdoes it or unless one is very fussy and checks the edge with an 8X loupe or something.
In period a sword may have started out with a perfect appleseed edge but I think that " in the field sharpening " might add a secondary bevel until the sword was maybe taken to a professional sharpener to restore the right kind of edge. ( Assuming that there was an universal standard of what a sharpened edge should look like by the " sword sharpeners guild " ? I also assume that sword sharpeners of the professional kind would have had standards of quality work that might have varied by time and place and expectations and had professional guilds ? ).
You can easily give up your freedom. You have to fight hard to get it back!
|
|
|
|
|
|
Rusty Thomas
Location: San Antonio, Texas Joined: 30 Oct 2007
Posts: 31
|
| Posted: Thu 09 Apr, 2009 5:51 pm Post subject: |
|
|
One thing i use when i need to get that nice blended appleseed edge is to use a mouse pad with wet/dry sandpaper on top. The wet/dry paper is more durable and the mouse pad will deform under light pressure and give you the edge that you desire and a very smooth transition into the body of the sword. I use the smallest grit necessary for efficient metal removal and then move all the way up to 2000. the first shaping with the rough paper takes the longest but once you establish the new profile the rest of the process goes very quick. Then you just apply your desired finish satin/mirror to the blade and it's perfectly blended. This is all after rough edge establishment with a file/diamond hone.
Rusty
|
|
|
|
|
Sean Flynt
|
|
|
|
|
|
|

