| Author |
Message |
|
C. Gadda
|
 Posted: Wed 03 Dec, 2008 8:15 am Post subject: Posted: Wed 03 Dec, 2008 8:15 am Post subject: |
 |
|
| Julien M wrote: | Hi guys,
Where would you buy affordable buckles and fittings for belts and suspensions? Also any thoughts on what to use to finish the scabbard after dye has been applied? I hear Lexol cleaner/conditionner is the best choice (and of course it is not easily available in the uk..same old story  ). ).
ps: A lot a viewing but no feedback at all since I posted these last pictures! Any comments/advice would be greatly appreciated (especially since I can still modify/correct a few stuff before dying the all thing).
Cheers,
J |
Your work is outstanding! In fact, you're inspiring me to bestir myself and make a similar scabbard for my own Crecy.
As for buckles, try Historic Enterprises. I believe they keep them in stock. For finishing after dye application, you could try Neetsfoot oil (if you can find it in the UK)
|
|
 |
 |
Felix R.

|
| Posted: Wed 03 Dec, 2008 8:28 am Post subject: |
|
|
In my opionion it looks great too, due to the nice looking leather tooling, one cant´s see those not so good looking parts of the wood core you pointed us to above.
By the way, what kind of tools do I need for such a project, I am really tempted to start on trying it myself. Don´t have any wood or leather working experience though.
|
|
 |
|
Julien M

|
| Posted: Wed 03 Dec, 2008 10:45 am Post subject: |
|
|
Hi Guys,
Thanks a lot for your comments and also for the tip C. Gadda, I'll check Historic Enterprises website out. You should definitely go for it yourselves as making a scabbard isn't that hard (I don't have a clue nor the space to take on metalworking, but wood and leather is managable, even in a city flat like mine). The blade profile of the crecy, being a type XVI, is maybe a little bit more tricky than other because of the transition from a fuellered blade to flat diamond. But with a chisel and some sweat, it can be done.
Felix, I did fixed the "not so good" parts of the scabbard with milliput. Once sanded and covered with 1.5 millemeter thick leather, there is no way of telling where those are As for the tools, I mentionned earlier that I had the bare minimum: you'll need some sort of wood saw (a jigsaw will spare you a lot of efforts) a chisel to hollow the inside, something to shape the outercore (wood rasp, or microplane rasp as I have heard they make short work of wood). That's it for the wood working part. For the leather, It depends on what you want to achieve. You'll need a cutter, and If you plan a lot of details, you can buy a basic leather toolkit, but in many cases a single swivel knife will do, but even that is expandable since you can use a old pen or an unsharped knife to do the job. I spend some time experimenting the imprint of various tool on the leather before starting ont he actual scabbard. In the end I used a swivel knife.
Cheers,
J
Last edited by Julien M on Fri 05 Dec, 2008 11:31 am; edited 1 time in total
|
|
|
|
|
D. Austin
Industry Professional

Location: Melbourne, Australia Joined: 20 Sep 2007
Posts: 208
|
| Posted: Wed 03 Dec, 2008 4:40 pm Post subject: |
|
|
Hi Julien,
Your scabbard is looking great. I can't wait to see it dyed, with the chape attached. Personally, I can't see anything there that I think needs fixing. I love it. What colour are you going for?
For finishing leather, I use neatsfoot oil on belts etc. which need to be supple, but on my scabbard I used liquid beeswax. I'm not sure what it was diluted with, but I just rubbed it in, buffed it with a rag, and it dried pretty quickly. I'm sure there are others here with better knowledge of what to do but this seemed to work fine.
Cheers,
Darren.
|
|
|
|
|
JE Sarge
Industry Professional

|
| Posted: Fri 05 Dec, 2008 2:04 am Post subject: |
|
|
Great work on the scabbard. It kind of inspires me to try it myself on one of my scabbardless swords.
J.E. Sarge
Crusader Monk Sword Scabbards and Customizations
www.crusadermonk.com
"But lack of documentation, especially for such early times, is not to be considered as evidence of non-existance." - Ewart Oakeshott
|
|
|
|
|
Julien M
|
| Posted: Fri 05 Dec, 2008 2:33 am Post subject: |
|
|
Hi guys,
Thanks for your kind words, much appreciated...there comes a time in projects like that when you need to hear that your heading in the right direction
I'm going for the exact same color than the original D : oxblood with shades of Dark brown (quiet the same base color as yours really). I have no clue how to use leather dye and as always, I am going to experiement thoroughfully before starting on the scabbard.
It's friday and I'm waiting for dye and conditionners to be delivered in my office (I went for lexol in the end...that contains Neatsfoot Oil). If I get the stuff today, the scabbard will be done by this week end (save for the shape for which I'm relying on lazlo and the suspensions but that can wait).
Cheers,
J
Last edited by Julien M on Fri 05 Dec, 2008 11:37 am; edited 1 time in total
|
|
|
|
|
Sean Flynt

|
|
 |
|
Julien M
|
| Posted: Sat 13 Dec, 2008 7:18 am Post subject: leather dying is done! |
|
|
Hi everyone,
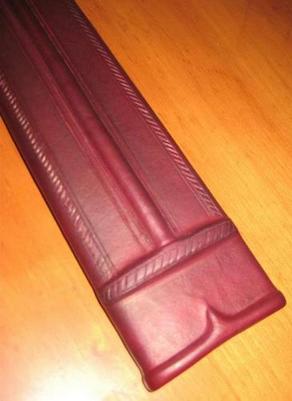
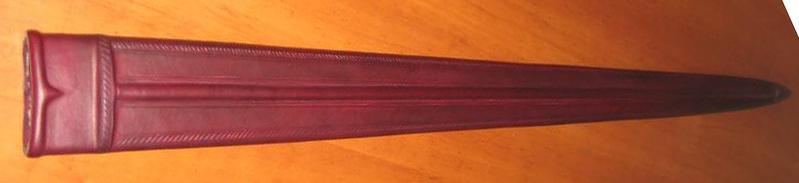
After having to wait for two weeks for the leather dye and lexol to be delivered at my place, I was finally able to dye the scabbard this morning. I had previously tried to apply dye on a small piece of leather as a test with poor results: the colour was not evenly spread. With some apprehensions I took on the scabbard itself. I have to say this is not rocket science and I am very pleased with the results! The colour is rich and evenly spread and it brings out the leather tooling nicely. The oxblood is slightly darker than expected (even if the camera flash makes it look much clearer than it really is) but my crecy handle being black it all fits far better in the end.
First, I prepared the leather with lexol cleaner. Then I followed the advice on the dye box, and I did wet the all scabbard with a sponge so that the leather would be damp before receiving any dye (now that's crucial, and made all the difference with my previous attempt on the test leather). I did not stop moving the cotton applicator until the dye was absorbed, to avoid having some liquid running and marking the scabbard sideways (Especially on the side opposite to the one you are working on). I used long strokes along the all length of the core. I left the scabbard for 20 minutes and then applied a second layer, while making sure I didn't leave any details uncovered (especially along the sewing edge in the back). I left it to rest for half an hour, then applied some conditioner on it...done!
Suspensions today or tommorow!
pics are below (and a short youtube video as well (I'll make another one with the sword inside in a while: http://fr.youtube.com/watch?v=Nj-o3Vzpeu0 )
All the best,
J
Ps: Thanks for your comment Sean. To be honnest I'm surprised you haven't tried this yet, given that you took on far more demanding projects in the past (like re hilting blades for instance)
 Attachment: 20.34 KB Attachment: 20.34 KB
Attachment: 19.05 KB
Attachment: 9.25 KB
Attachment: 34.83 KB

|
|
|
|
|
Felix R.
|
| Posted: Sat 13 Dec, 2008 11:57 am Post subject: |
|
|
|
This one looks really nice.
|
|
|
|
|
|
C. Gadda
|
| Posted: Sat 13 Dec, 2008 12:06 pm Post subject: |
|
|
WOW!!! That looks really beautiful!
I need to get cracking on a scabbard for my Crecy (along with other swords, too). If mine can look even half as good as yours, I shall have done exceedingly well indeed!
I especially like the roping on the "ribs"
Very nice work.
|
|
|
|
|
|
Nathan Gilleland
|
| Posted: Sat 13 Dec, 2008 8:19 pm Post subject: |
|
|
Beautiful work!
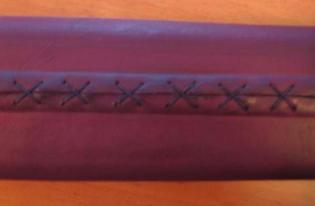
How is the stitching up the back done? I see that it ends up being a series of X's, but what is the secret to sewing it? I'm thinking about doing some scabbards, but can't figure out how the stitching is done.
Thanks in advance!
Seek Honor before Wealth,
Truth before Honor,
God Before all
|
|
|
|
|
D. Austin
Industry Professional
Location: Melbourne, Australia Joined: 20 Sep 2007
Posts: 208
|
| Posted: Sat 13 Dec, 2008 10:34 pm Post subject: |
|
|
Looking good Julien. I'd have to say, looking much better than mine. Wetting the leather before dying it could be the trick. I didn't do this (nor did I clean it) and the finish is nowhere near as even as yours.
Regarding the stitching, I have been informed by someone much more knowledgeable than myself on this topic, that a simple whip stitch may have been more appropriate for mine, but still, he was not dissatisfied with my result. Next time... next time...
Looking forward to seeing the suspension.
Cheers,
Darren.
|
|
|
|
|
Julien M
|
| Posted: Thu 18 Dec, 2008 1:25 am Post subject: |
|
|
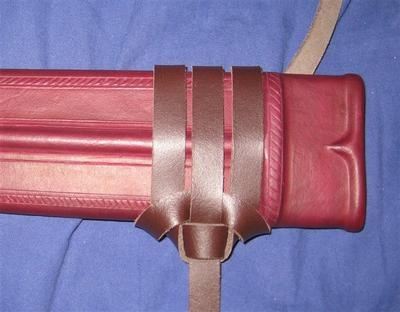
Glad you like it! I am quiet impatient to fit the shape on it. Meanwhile, I gave a shot at the suspension knots and thanks to Mathieu Harlaut's amazing tutorial I got around it in a couple of minutes. Unfortunately, I got cheap leather on ebay...it's dyed through leather...stiff probably chrome tanned that won't shape at all like veg tan leather...so much for trying to cut cost down I will get some good quality leather asap and redo the all thing.
J
ps: Regarding the stitching Nathan - I couldn't find any infos or pictural sources related to that...so I just improvised. To be honnest it made sense when I did it but I already forgot how to and would find it hard to explain. But if you want I will try to make a sketch for you.
Attachment: 19.97 KB
|
|
|
|
|
Nathan Spence

Location: Virginia Joined: 11 Mar 2007
Posts: 66
|
| Posted: Thu 18 Dec, 2008 1:21 pm Post subject: |
|
|
Great scabbard and wonderful job. What oz. of leather did you use? I would like to do this as well. I was considering trying to find some upolstery leather and use that.
Spence
|
|
|
|
|
Julien M
|
| Posted: Sat 20 Dec, 2008 3:44 am Post subject: |
|
|
Hi Nathan,
I used vegetable tanned leather of 1.5mm thickness, following Tod's advice. Now in a project like this, leather is the thing you don't want to make compromises on. I looked for the right piece for quiet a while, trying to get a cheaper deal on ebay, since veg tanned leather doesn't come cheap. I didn't find any and in the end I bought half a cowhide at leprevo.co.uk for £30 or so. It's fairly expensive but I still have enough to make at least two more scabbards.
Good luck with yours and make sure to post picts of your work!
Julien
|
|
|
|
|
Julien M
|
| Posted: Sun 25 Oct, 2009 6:20 am Post subject: |
|
|
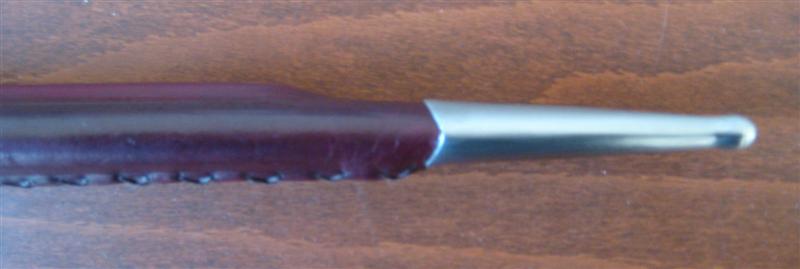
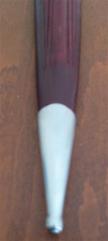
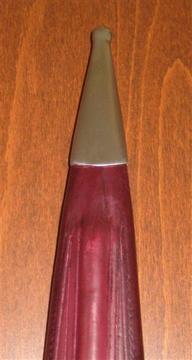
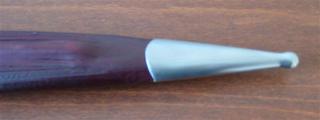
I've recently purchased very cheap steel chapes for my henry V project. I tried one of those on the crecy and I got lucky, as it fits well. Now it's not what I initially planned for this scabbard, as I designed it with a much longer metal shape in mind, covering the tip of the scabbard over the mid raiser...but it's not so bad either, depending on the angle you chose to look at the scabbard.
Pictures are below and I'd love you feedback as I can't seem to make up my mind. Is it ugly and out of place?
let me know,
Cheers,
J
Attachment: 24.74 KB
Attachment: 6.49 KB
Attachment: 18.36 KB

Attachment: 14.73 KB
Attachment: 8.48 KB
|
|
|
|
|
|
JG Elmslie
Industry Professional
|
| Posted: Sun 25 Oct, 2009 8:23 am Post subject: |
|
|
| Julien M wrote: |
Pictures are below and I'd love you feedback as I can't seem to make up my mind. Is it ugly and out of place?
let me know,
Cheers,
J |
I'm assuming the full-scabbard shot of those pics is a bit foreshortened in perspective... if not, I'd say it's already long enough, and anything longer would be rather disproportionate.
all in all, I'd say that it's just about ideal, from what I can see there.
inspiring work, though.
in all, I'd also just like to say, rather impressive to see, particularly given the list of tools to hand - I'm rather spoilt for choice in my workshop in contrast... reading the original posts you made with your comments, however, I'm having a sense of deja vu, as while I wait for bronzes to be delivered for hilt furniture, I'm working on the wool-lined scabbards for my own armourclass blades (reenactment blunts) just now - chose to go for carved rather than steamed thin wood - and having carved the channels on friday, today I've been planing the wood thinner and thinner, and it rather feels like woodworking roulette, daring to make another pass, fearing it'll be the one where it will go "crunch" through...
(do excuse any typos, I have a cat trying to use my lap as a trampoline just now)
|
|
|
|
|
Alan Schiff
Industry Professional

|
| Posted: Mon 26 Oct, 2009 10:00 pm Post subject: |
|
|
Wow! I think that the scabbard looks very nice. The color of the leather really catches the eye. And I'm really impressed with the stitching/lacing. Very well done overall.
As an aside, where did you get the chape from? I've made a couple scabbards myself, but haven't been able to find cheap chapes anywhere.
Thanks,
-Alan
|
|
|
|
|
|
Johan S. Moen
Location: Kristiansand, Norway Joined: 26 Jan 2004
Posts: 259
|
| Posted: Tue 27 Oct, 2009 1:08 am Post subject: |
|
|
The chapes look a bit like the ones from "Two J's"; look at the bottom of this page www.twojs.me.uk/Polearms.htm
If they're not from there, I too would like to know where they're from, as I am always on the lookout for new suppliers.
Johan Schubert Moen
|
|
|
|
|
Julien M
|
| Posted: Thu 31 Dec, 2009 10:00 am Post subject: |
|
|
Hi all,
I've left this project aside for a while and I'm now determined to finish it soon.
I've discarded the tip shape, it was not good enough (Joan, Alan: they did came from "Two J's" ...at 5£, they are a bargain, and great to use if you built your scabbard wood core to fit their size, which is not the case here).
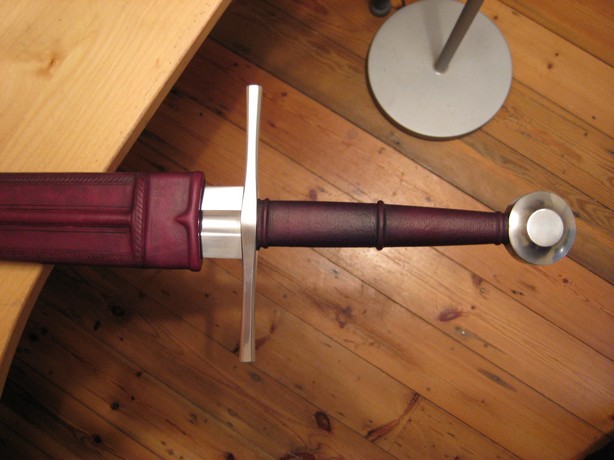
Also I thought I had succeeded to change to color of the albion grip from back to oxblood, not listening to more savy advices that you can't go from a darker color to a brighter one. That was picture 1 below...and I was happy with the result (a LOT of rubbing with alcool, turning the grip greyish, then oxlood dye was generously applied). But the color was not stable, and month after, the darker pigments gradually took over, and the grip was almost black again when I took the sword out of its box a couple of weeks ago.
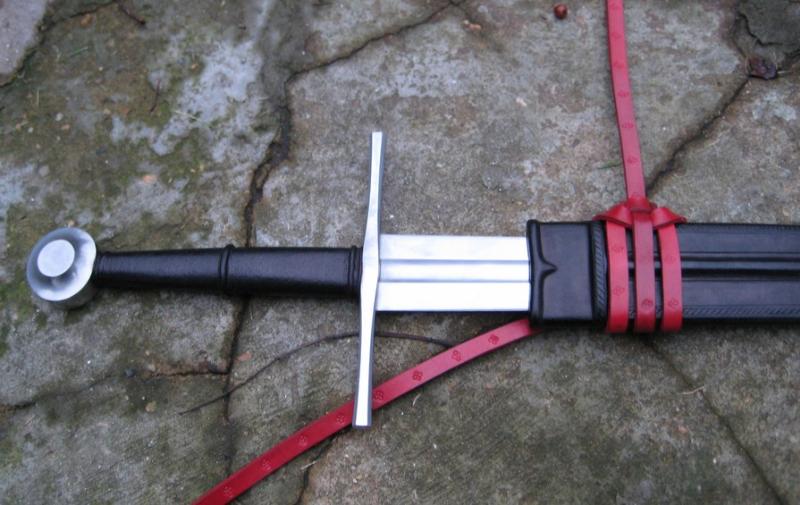
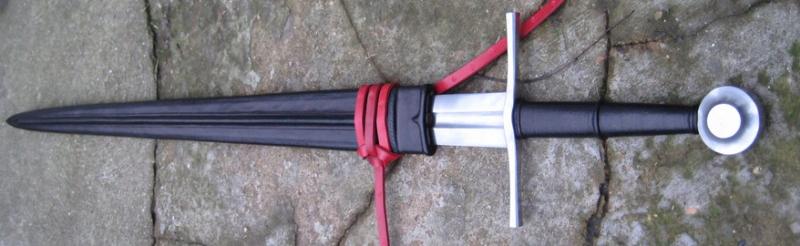
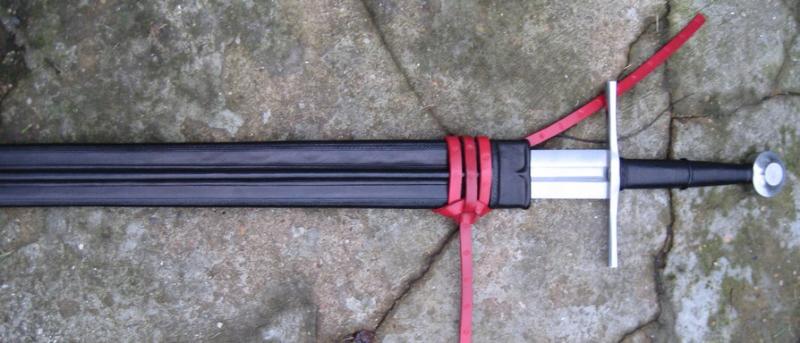
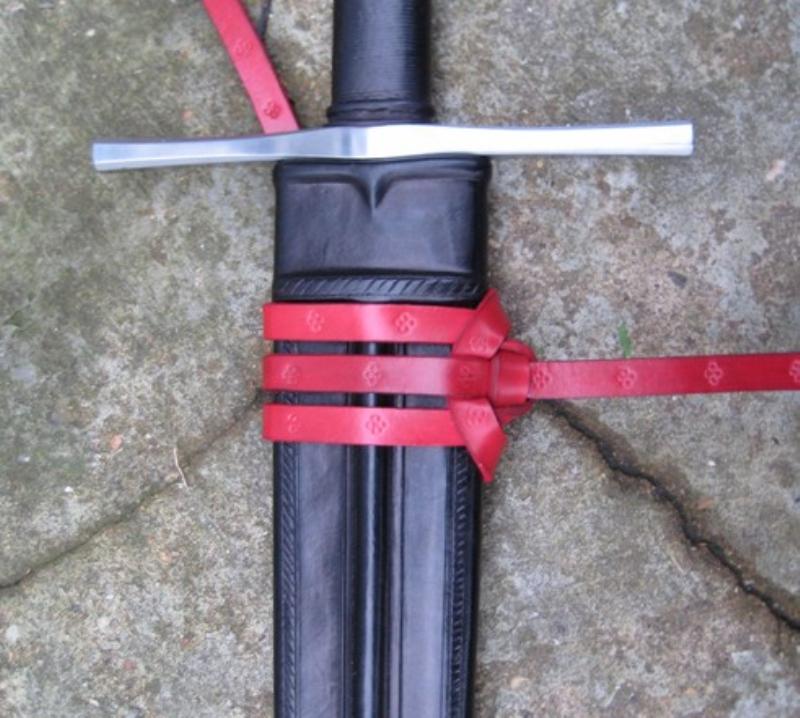
In short, It was back to black time for both grip and scabbard, with a bright red belt and suspensions to contrast. Here are a few pictures of the work in progress.
The scabbard will be sent to Tod from tod stuff for a custom shape in January.
Cheers,
J
Attachment: 66.15 KB
Attachment: 71.63 KB
Attachment: 42.98 KB
Attachment: 57.37 KB
Attachment: 88.85 KB
|
|
|
|
|
|
|
You cannot post new topics in this forum
You cannot reply to topics in this forum
You cannot edit your posts in this forum
You cannot delete your posts in this forum
You cannot vote in polls in this forum
You cannot attach files in this forum
You can download files in this forum
|
All contents © Copyright 2003-2024 myArmoury.com — All rights reserved
Discussion forums powered by phpBB © The phpBB Group
Switch to the Basic Low-bandwidth Version of the forum
|

