| Author |
Message |
Greyson Brown

|
 Posted: Thu 26 Oct, 2006 5:21 pm Post subject: Posted: Thu 26 Oct, 2006 5:21 pm Post subject: |
 |
|
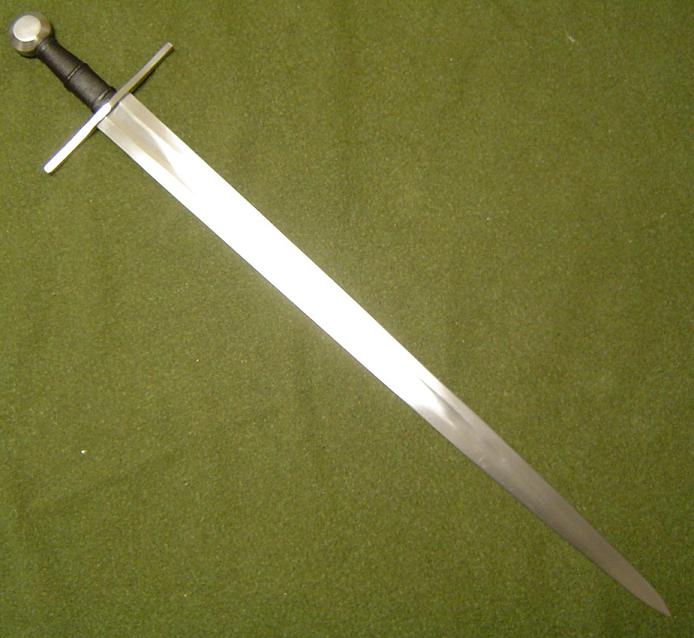
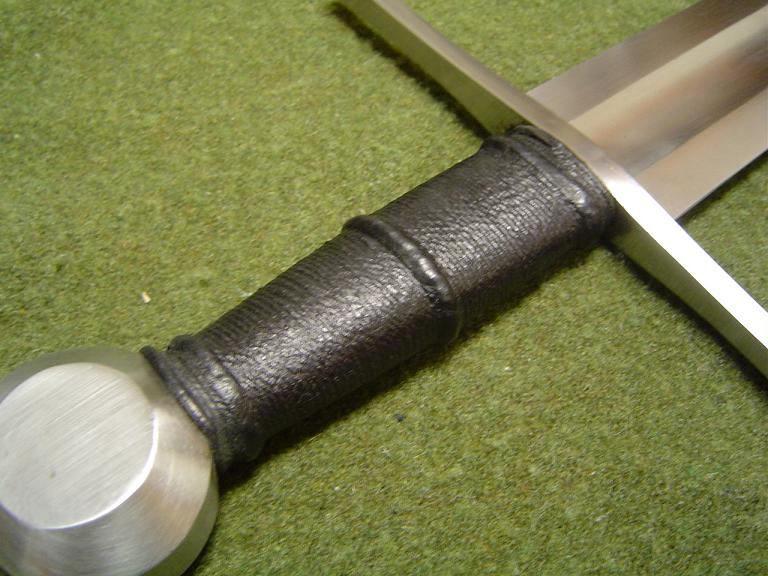
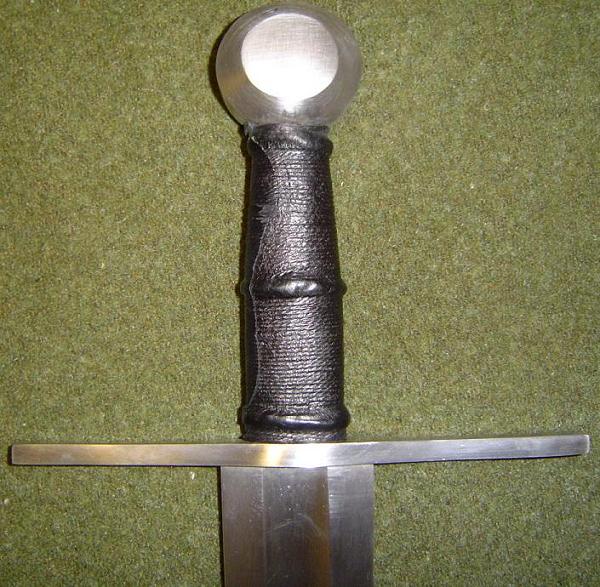
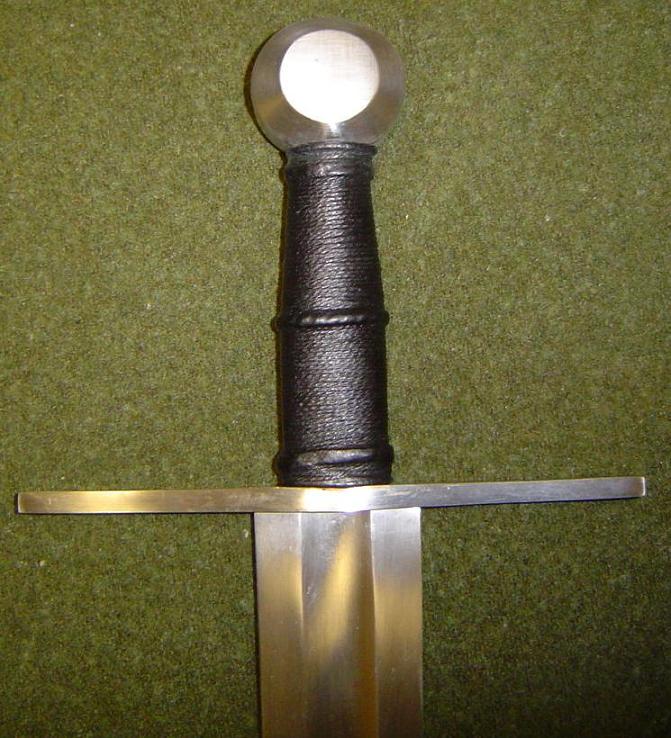
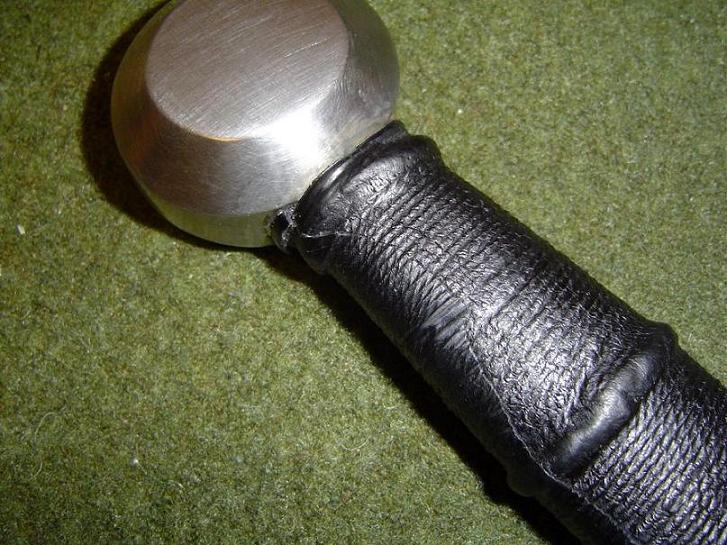
Well, it was a little painful to do, but I rewrapped the grip on my SL Knightly sword yesterday. I am fairly happy with the result, but it is not perfect. I had a slight bulge in the leather right at the seem which resulted in a bump which I ended up cutting off with a razor after the fact. I should have trimmed it before doing the external cord wrap. The seem is also highly visible because I did not thin down the edge of the leather enough. I also had one riser partially "collapse" on me where the twisted hemp cord I used for the risers decided it did not want to be twisted any longer. I might also have put just a touch too much beeswax on the leather. Still, it is very comfortable, and the pictures actually make it look a bit uglier than it truly is.
I think the argument could be made that, even when viewing the ugly side, this grip is still aesthetically on par with the original one. The stock grip on this sword was just fine, but a friend of mine noted that it certainly won't be flying out of ones hand with this new grip on it. I have some practicing to do if I intend to rewrap the grip on my NG Sherriff (I'm seriously considering it, but I am still very hesitant), but this was a satisfactory effort.
One interesting discovery; when I took off the original leather, I discovered the word "Knight" written on the grip core. I'm not sure why I've found this surprising. I have draw lines and notes on nearly every grip core that I have done, and I have wondered what one might find under the leather on other swords. I am curious, though, whether this indicates that the SL Knightly sword and the NG Knight use the same grip core (entirely plausible), or if it was simply an abbreviation for Knightly. It doesn't really make a difference, it is just one of those interesting little side notes.
Anyhow, the pictures are below.
-Grey
 Attachment: 60.29 KB Attachment: 60.29 KB
Attachment: 78.1 KB
Attachment: 86.45 KB
The ugly side
Attachment: 95.18 KB
"So long as I can keep the path of honor I am well content."
-Sir Arthur Conan Doyle, The White Company
|
|
  |
 |
|
Joe Fults
|
| Posted: Thu 26 Oct, 2006 9:09 pm Post subject: |
|
|
Changes the character of the piece, much to my suprise.
Nicely done! 
"The goal shouldnt be to avoid being evil; it should be to actively do good." - Danah Boyd
|
|
|
|
|
Pamela Muir

|
| Posted: Fri 27 Oct, 2006 3:21 am Post subject: |
|
|
Hi Grey,
Very nice, as usual.
What type of leather do you use? Where do you get it? You mentioned thinning the edge of the leather, how do you do that?
Thank you for the help and inspiration!
Pamela Muir
Founder/Lead Instructor
Academy of Chivalric Martial Arts
"I need a hero. I'm holding out for a hero 'til the end of the night. He's gotta be strong, And he's gotta be fast, And he's gotta be fresh from the fight." ~Steinman/Pitchford
|
|
|
|
|
Greyson Brown
|
| Posted: Fri 27 Oct, 2006 7:34 am Post subject: |
|
|
| Joe Fults wrote: | Changes the character of the piece, much to my suprise.
Nicely done! |
Thanks. I think it looks just a little nicer, and it also changes handling a touch. The original grip was not at all insecure, but now my hand feels "locked in" just a little more. I think it now handles just a tick quicker. Of course, it could just be my imagination.
| Pamela Muir wrote: | Hi Grey,
Very nice, as usual.
What type of leather do you use? Where do you get it? You mentioned thinning the edge of the leather, how do you do that?
Thank you for the help and inspiration! |
I used some 1-1.5 oz pigskin from Tandy Leather (I think it was listed under the lining leather section). They have it in several colors or undyed. I went with the undyed stuff, so that I can do other grips as well. Since Tandy sells stuff mostly by the hide, I have enough leather to do a good number of grips. This stuff has a distinctive texture that kind of shows through the cord texture, though.
I thinned the edge slightly by scraping the back side with a razor blade. It is probably possible to cut it carefully, but scraping, while less effective, is easier to do without making mistakes.
I wasn't content with the results of this grip so, after I posted my pictures last night, I used my wooden leather compression tool (read: a bit of scrap wood from my first scabbard project), and worked on the "bald" spot where I had trimmed off the leather. I was able to continue the cord grooves through that patch so that the general texture was not interupted. While I was at it, I also worked down the spot where the seem didn't meet well by the pommel. I am now about 92% happy with this grip.
-Grey
Attachment: 91.35 KB
My improvements to the ugly side
"So long as I can keep the path of honor I am well content."
-Sir Arthur Conan Doyle, The White Company
|
|
|
|
|
|
Aaron Schnatterly
|
| Posted: Fri 27 Oct, 2006 4:10 pm Post subject: |
|
|
| Greyson Brown wrote: | | Pamela Muir wrote: | | You mentioned thinning the edge of the leather, how do you do that? |
I thinned the edge slightly by scraping the back side with a razor blade. It is probably possible to cut it carefully, but scraping, while less effective, is easier to do without making mistakes. |
Technical term: skiving. There is a half-moon-shaped knife that is excellent for this, but they are quite spendy. Tandy has them in their catalog.
| Greyson Brown wrote: | | I wasn't content with the results of this grip so, after I posted my pictures last night, I used my wooden leather compression tool (read: a bit of scrap wood from my first scabbard project), and worked on the "bald" spot where I had trimmed off the leather. I was able to continue the cord grooves through that patch so that the general texture was not interupted. While I was at it, I also worked down the spot where the seem didn't meet well by the pommel. I am now about 92% happy with this grip. |
... and it looks pretty nice, brother! I'm not at all surprised about the change in feel and look of the sword - dressed it up a bit.
The wood tool worked, obviously. Bone and hard plastic (like cutting board material) also make great tools for applications such as this...  Bone can be shaped with sandpaper, but stinks like the deepest pits of hell, and is toxic, so be careful (and seriously consider a dust mask - outside). Bone can be shaped with sandpaper, but stinks like the deepest pits of hell, and is toxic, so be careful (and seriously consider a dust mask - outside).
|
|
 |
|
|
Al Muckart
|
|
|
|
|
Nathan Robinson
myArmoury Admin


|
| Posted: Fri 27 Oct, 2006 6:18 pm Post subject: |
|
|
Thanks for the links, Al. I think I'll pick up a "saftey beveller" from Tandy and see how it works for narrow, long edges. I've been using a knife very similear to the "French" knife shown in your last link. They work very, very well.
I also like the half-round skiving knives but the ones Tandy sells are too thick, in my person experience. You can spend time grinding and sharpening the heck out of it and it will work better.
.:. Visit my Collection Gallery :: View my Reading List :: View my Wish List :: See Pages I Like :: Find me on Facebook .:.
|
|
 |
|
|
Al Muckart
|
| Posted: Fri 27 Oct, 2006 7:56 pm Post subject: |
|
|
| Nathan Robinson wrote: | Thanks for the links, Al. I think I'll pick up a "saftey beveller" from Tandy and see how it works for narrow, long edges. I've been using a knife very similear to the "French" knife shown in your last link. They work very, very well.
I also like the half-round skiving knives but the ones Tandy sells are too thick, in my person experience. You can spend time grinding and sharpening the heck out of it and it will work better. |
You're welcome. I imagine the French knife does a great job well sharpened, I doubt you'll get better service out of the safety beveller, but hey, they're cheap :-)
I find the round knives are great for cutting things out but not so good for things like skiving, but I've never been properly taught how, so that may well be my technique.
--
Al.
http://wherearetheelves.net
|
|
|
|
|
Jean Thibodeau

|
| Posted: Fri 27 Oct, 2006 8:27 pm Post subject: |
|
|
Not a specialized leather working knife but the new Spyderco Captain might be a good knife to use for this as the point shape looks as if it could do the job.
http://www.knifecenter.com/knifecenter/spyderc/images/111n.jpg
I've already sent an e-mail to a Canadian Knife dealer I've been buying from for more than 10 years to find out about price and availability. srknives@rogers.com
Just mentioning them as they have given me good service and prices. ( A little bit of haggling or being a repeat customer can mean a better price. But their customer service is good and they will order stuff for you: I purchased my first Albion though them " Gaddhjalt " in 2002 or 2003. )
Sorry for the semi off THE topic post: But it's a really cute knife and I also have a collection of Spydercos and other Quality brands of folders. Hopefully the fact that it might be a useful knife for leather work makes it semi ON topic. 
You can easily give up your freedom. You have to fight hard to get it back!
|
|
|
|
|
|
Al Muckart
|
| Posted: Fri 27 Oct, 2006 8:36 pm Post subject: |
|
|
| Jean Thibodeau wrote: | | Not a specialized leather working knife but the new Spyderco Captain might be a good knife to use for this as the point shape looks as if it could do the job. |

It's an interesting looking knife, I must say.
The thing about those skiving knives is that they are chisel-ground so they're completely flat on one side, which means you have to be sure to buy the right shaped one for the hand you'll be using it with.
You can skive with a double-bevelled knife but it's harder because the body of the knife gets in the way.
--
Al.
http://wherearetheelves.net
|
|
|
|
|
Nathan Robinson
myArmoury Admin
|
| Posted: Fri 27 Oct, 2006 9:10 pm Post subject: |
|
|
| Al Muckart wrote: | | I find the round knives are great for cutting things out but not so good for things like skiving, but I've never been properly taught how, so that may well be my technique. |
I was never very good at it, either, which is why I use the squared off type like the "French" example above. But then I visited Albion a few years back while Peter Johnsson was there and he gave a good demo. The knive he was using was one from Albion, I believe, and was part of a few that Eric McHugh had made in-shop. It really showed how important it was to have them be thin and sharp. Technique is important, too, but can be learned when not fighting against the tool. My Tandy-issue knife was just too thick and I had put it away long ago. After my visit with Albion, I went home and ground it down and sharpened it. Now I'm not very good with a grinder, but even my messed up skills were able to get a half-round skiving knife that worked well when all was said and done.
cheers!
.:. Visit my Collection Gallery :: View my Reading List :: View my Wish List :: See Pages I Like :: Find me on Facebook .:.
|
|
|
|
|
Greyson Brown
|
| Posted: Mon 06 Nov, 2006 6:42 am Post subject: |
|
|
I spent this weekend working on scabbards. I finished up one for my Albion Steward. Well, mostly finished; it still needs a chape and a buckle. I intend to forge both of those when I get a chance, but that may not be until this summer. I have to run, but I'll post some more thoughts/ info on this scabbard when I get a chance.
-Grey
P.S. sorry for the bad picture quality. I haven't had the chance to do better shots yet.
Attachment: 85.05 KB
Attachment: 55.61 KB
Attachment: 58.91 KB
"So long as I can keep the path of honor I am well content."
-Sir Arthur Conan Doyle, The White Company
|
|
|
|
|
Greyson Brown
|
| Posted: Mon 06 Nov, 2006 9:26 am Post subject: |
|
|
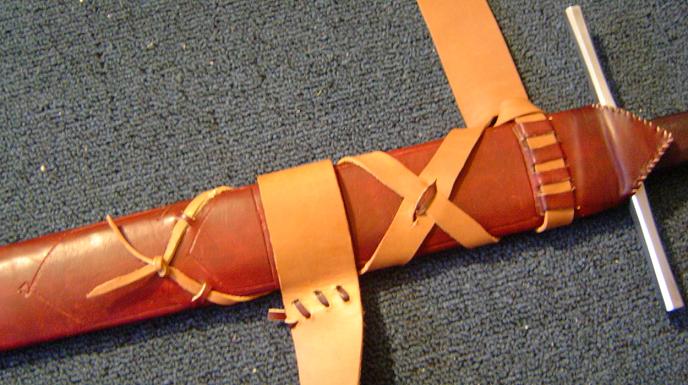
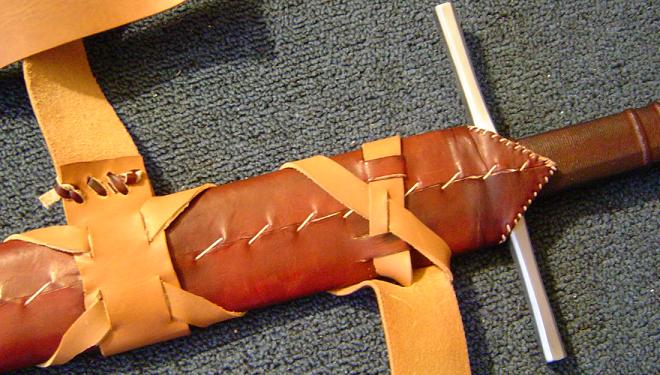
This scabbard differed from my previous ones in that it was constructed with a single needle stitch, the inside of the triangular flap is lined with a seperate piece of leather rather than folding over the the edge, and the use of an integral belt. I also did some very basic incising on this scabbard. I'm pretty happy with the way this piece turned out. I've met with some mixed reactions on the color scheme, and it isn't exactly what I had envisioned (the body of the scabbard is noticably more red in person), but it works. The only thing I'm dissatisfied with on this one is that the lower belt could have fit tighter around the scabbard. I'll blame some of that on uncertainty because of the lacing that holds the belt closed, but mostly it was just me being sloppy. It functions, and I'm not going to re-do it now, but it is something to look out for on future projects.
-Grey
"So long as I can keep the path of honor I am well content."
-Sir Arthur Conan Doyle, The White Company
|
|
|
|
|
Greyson Brown
|
| Posted: Fri 17 Nov, 2006 5:58 pm Post subject: Big Ugly |
|
|
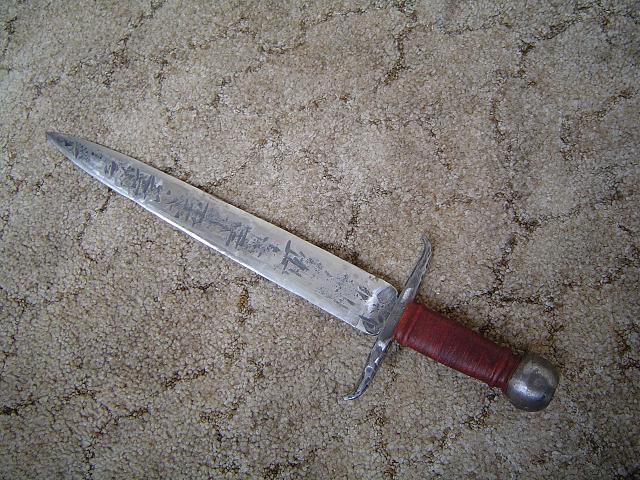
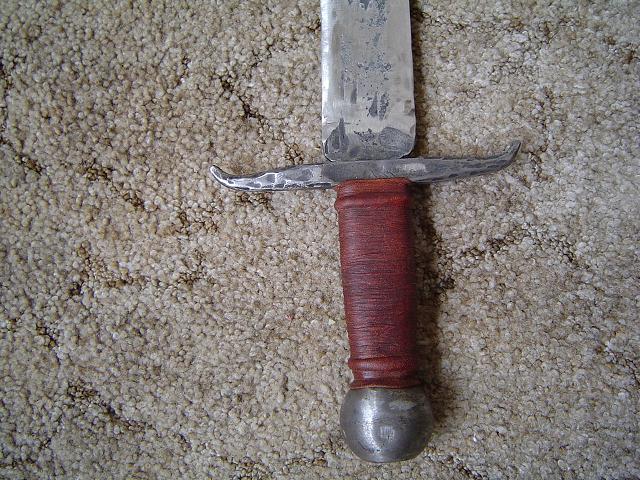
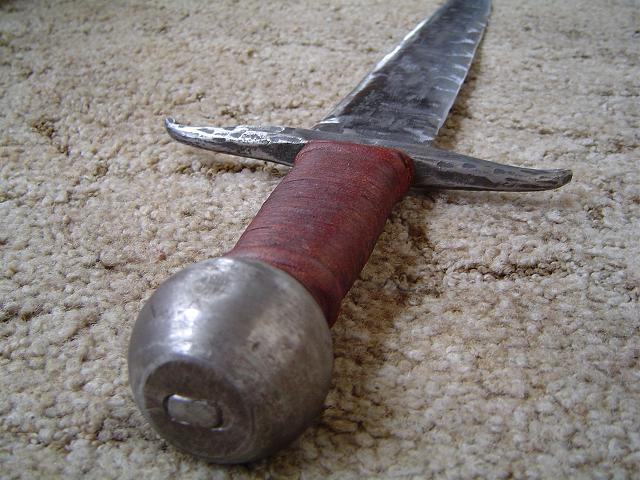
Caveat: I am not proud of this piece. It is ugly, but I wanted to share it anyway as it might be of interest.
I actually made this dagger almost four years ago, but I did some more work on it this last weekend. The blade is forged from an automobile leafspring and the pommel is a 1 3/4 inch trailer hitch ball. It was inspired by MRL's Coustile, which I could not afford at the time (college was expensive). The blade and guard were forged during the 2002 Fort D.A. Russel Days at Warren Airforce Base (a part of the Cheyenne Frontier Days), and the piece was assembled in my father's shop when I got home.
In order to get the length I wanted in the blade, I used the cross peen on my hammer quite a bit. This is what caused the deep linear hammer marks running across the blade. The more triangular shaped marks are just proof that I have no hammer control (I do have the excuse that after two 10 hour days of hammering, I expect to have less than stellar hammer control), and demonstrate what happens when one allows the hammer to roll a bit (or comes down at an angle), thus striking with the corner of the hammer face. Because this piece was hardened and tempered in the field (literally the parade field at Warren AFB), the heat treating could be a bit uneven, but it should not be anything that would have a tangable effect. It is quite stiff but will still flex a bit. The blade was originally ground to a hexagonal cross-section, and at that point I gave up on it. The leafspring material is rather stout stuff and didn't much like being hammered or ground and I didn't have a lot of patience, so I chose to assemble the dagger and go do my homework instead.
The guard was pretty straight forward. I tapered and bent the ends and then used the tang of the dagger as my drift for making the hole in the guard. The guard was not inletted (though it really needed to be to hide the hideous shoulders on the blade). It does fit fairy tight, though, as I pinched in the sides of the guard while the metal was still hot.
To make the pommel, I cut the threaded portion off of a trailer hitch ball (the threads had been bent anyway) and drilled a couple of holes for the tang. Filing away the extra material so that I could get the tang into the pommel ate up the little bit of motivation I had not devoted to grinding the blade. The happy upside to this is that, purely by accident, the pommel fit tightly enough that it is wedged into place. Since the grip was made from a single block of wood, the whole assembly was cold peened. And that is how it stayed until last weekend...
When I was home, I tried to correct some of the grinding that I had done previously. I gave the blade a much more lenticular cross-section, and tried to reduce the obviousness of the ricasso that laziness had originally inspired. This was a bit tricky because the piece was assembled, and I did not want to take it apart. In the end, I fixed the problem a little, but not to the extent I wanted. I considered trying to put a fuller in the blade to hide some of the hammer marks, but I chose not to. I could not have had the fuller end inside the guard as I would want, and anything I could do to make the fuller terminate at the guard would just look tacky. Also, the fuller would have to be inordinately wide in order to hide those marks. Ultimately, I just had to accept the fact that this piece will never look the way I really want. It was a good learning experience, and I think I could make something a lot nicer now (especially since I have friends who will let me use their trip hammers). I didn't bother with sharpening this dagger. The edges are thin enough that it could be easily sharpened, so I may do so in the future. We'll see.
While I was at it, I went ahead and wrapped the grip. I used chamois on this one, as I had it (the pig skin I used on my SL Knightly sword was still in Kansas), and this piece really isn't worthy of nicer leather anyhow.
So that is Big Ugly as it stands now, and it is likely to stay that way unless I really decide I simply cannot live with it looking the way it does. I didn't think to do a lot of measurements, but here are some estimated stats:
Blade length: 14 inches (almost exactly, this was the only defined dimension at the start of the project)
Blade width: about 2 inches
Overall Length: really close to 20 inches
Weight: heavy; that pommel is no joke. I would guess 2 3/4 pounds
Point of Balance: 1/4 inch from guard
Blade thickness at guard: 5mm (I actually measured this)
Blade thickness 1/2 inch from tip: 2mm
So, now that you have been subjected to the whole story (or hopefully just read the interesting parts), here are the pictures:
-Grey
Attachment: 92.92 KB
Attachment: 94.03 KB
Attachment: 61.45 KB
"So long as I can keep the path of honor I am well content."
-Sir Arthur Conan Doyle, The White Company
Last edited by Greyson Brown on Sat 18 Nov, 2006 6:51 am; edited 2 times in total
|
|
|
|
|
Greyson Brown
|
| Posted: Fri 17 Nov, 2006 6:08 pm Post subject: |
|
|
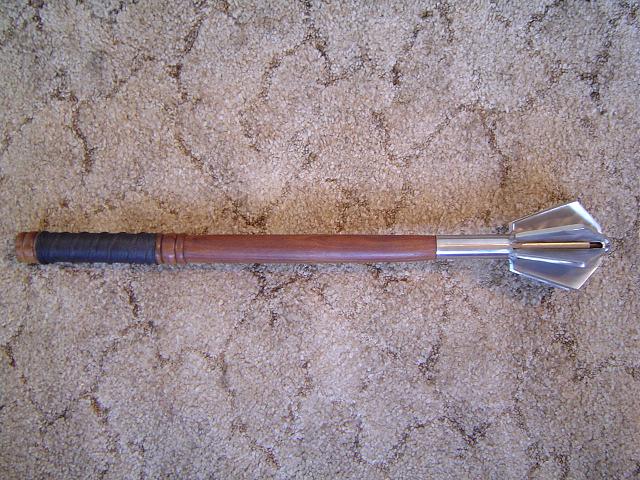
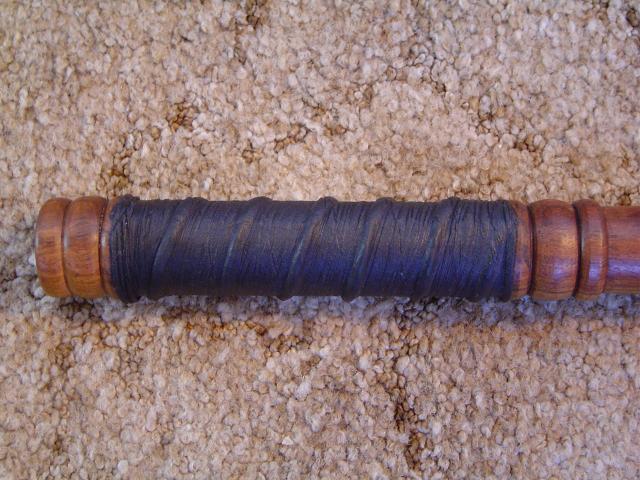
My other project this weekend was to take pictures of the MRL River Tames Mace that I rewrapped the grip on. This work was actually done last Christmas, but I never got the pictures taken. The original leather can be seen in the hands-on review, as this is the reviewed piece.
-Grey
Attachment: 84.75 KB
Attachment: 66.21 KB
"So long as I can keep the path of honor I am well content."
-Sir Arthur Conan Doyle, The White Company
|
|
|
|
|
Merv Cannon

|
| Posted: Fri 17 Nov, 2006 6:41 pm Post subject: Re: Greyson Brown's Projects |
|
|
| Greyson Brown wrote: |
As I mentioned in the Poitiers scabbard thread, I have to have a safety class before I can use the on-post wood shop, and that class is not offered again for a couple of weeks, so the outside of this piece was shaped entirely with hand tools. I used my 1 inch chisel, a bastard cut file, and some sandpaper in order to do all of the shaping. The scabbard ended up a little thicker than it really needs to be (the scabbard walls are .1 - .125 inches thick), but not too terrible.
-Grey |
Hi Greyson.........Howz the Army been treating you ? Hope you've neen doing well in all things ! Nice scabbard, mabye when you get out you can go work for Albion ! So you used a chisel and file to shape the outside ? gee....you got a lot of patience....should have tried a Beaver on a stick ! So...how did you shape the 'V' groove in the inside ? Same way ?
BTW...did you see that photo I found on the web... http://www.myArmoury.com/talk/viewtopic.php?t=8336
Cheers !
Merv ....... KOLR
http://www.lionrampant.com.au/
"Then let slip the dogs of war ! "......Woof !
|
|
 |
|
Richard Fay

|
| Posted: Fri 17 Nov, 2006 9:40 pm Post subject: |
|
|
Hello all!
Greyson,
Nice job on the MRL mace!
Having another look at it has made me consider getting it some time. I wasn't sure about this piece because of some of the less-than-perfect attributes, but there aren't that many affordable maces out there, and still fewer appropriate for the 13th or 14th century. Your work on the grip has made me rethink the possibilities of putting this back on my wish-list!
Don't worry about your dagger! I once bought one of those dagger blades from Atlanta Cutlery, a brass cross, a pommel, and a block of wood in an attempt to construct my own dagger. Should have been easy, right? I managed to cut the threads in the end of the tang, but my drill bit would not make it through the pommel. I know I did something terribly wrong, and probably hardened the brass as I tried to work on it. I managed to get the cross on, but the shoulders didn't quite fit right; I had filed them too much, and there was a curved gap. I did manage to get a fairly decent grip core on the thing, and them screwed and epoxied on some sort of spare knob for a make-shift pommel (the original pommel ended up in the garbage). I don't remember what I next did to the abomination, but I ended up ruining it when I tried to rework it a while after I had completed it. The whole thing ended up in the trash! 
I'm a lot of things, but I'm no metal worker! I guess I should just stick to writing and drawing!
Maybe I am a fool after all!
Stay safe!
"I'm going to do what the warriors of old did! I'm going to recite poetry!"
Prince Andrew of Armar
|
|
|
|
|
Bruno Giordan

|
| Posted: Sat 18 Nov, 2006 2:34 am Post subject: |
|
|
Greyson, you are a pretty good cordwainer, and I envy you for that.
As for the coustille, ita takes time to complete handmade pieces.
You could still smooth it with a couple of weekends before a grinder.
It is fun, after all.
The shape of the cross is nice, yoou just need grinding.
My coustille is a bit more than halfway now, i have spent a lot of my precious spare time grinding and polishing.
My blademaking teacher told me that I could be lucky if I could do three pieces per year.
Obviously this happens also because I don't have a shop, I live in a flat.
I guess this is your case, so working leather is possibly a more productive choice.
|
|
|
|
|
Greyson Brown
|
| Posted: Sat 18 Nov, 2006 6:28 am Post subject: Re: Greyson Brown's Projects |
|
|
| Merv Cannon wrote: | | Greyson Brown wrote: |
As I mentioned in the Poitiers scabbard thread, I have to have a safety class before I can use the on-post wood shop, and that class is not offered again for a couple of weeks, so the outside of this piece was shaped entirely with hand tools. I used my 1 inch chisel, a bastard cut file, and some sandpaper in order to do all of the shaping. The scabbard ended up a little thicker than it really needs to be (the scabbard walls are .1 - .125 inches thick), but not too terrible.
-Grey |
Hi Greyson.........Howz the Army been treating you ? Hope you've neen doing well in all things ! Nice scabbard, mabye when you get out you can go work for Albion ! So you used a chisel and file to shape the outside ? gee....you got a lot of patience....should have tried a Beaver on a stick ! So...how did you shape the 'V' groove in the inside ? Same way ?
BTW...did you see that photo I found on the web... http://www.myArmoury.com/talk/viewtopic.php?t=8336
Cheers ! |
That entire project was done with a folding limb saw, 4 chisels, a file, some sand paper, and my Swiss Army knife (I was using the saw on that before I borrowed the limb saw). The inside was done with the chisels and then sanded smooth. It takes me right around an hour to shape the outside of a scabbard when I can use the wood shop (I have since made it to the safety class, so that is possible). Shaping the outside of this one took about 2 1/2 hours. Yes, the beaver on a stick might have been faster, but I didn't want the hassel of trying to explain my way around the no pets in the barracks rule.
-Grey
"So long as I can keep the path of honor I am well content."
-Sir Arthur Conan Doyle, The White Company
|
|
|
|
|
Greyson Brown
|
| Posted: Sat 18 Nov, 2006 6:45 am Post subject: |
|
|
Richard:
The new grip does definately help the mace, but it is still a heavy piece. I won't try to dissuade anyone from getting it, but I am not inclined to give it my full endorsement, either.
Sounds like your dagger project was similarly frustrating. Brass does work harden, and heating it might have helped a bit, but I really haven't worked with brass enough to offer good advice. I can tell you that one does get better with more practice, and if you try again you will have the benefits of your previous mistakes to give you some insight on the next project. Your not a fool; you were brave enough to try something outside of your comfort zone and it didn't work. That happens. Most people just have more sense than I do, and don't share those mistakes publicly. I have been reminded several times in the last week that one of the most important parts of these projects is being willing to take some risks. Some times it doesn't work, but when it does, it can often be a very important breakthrough. The greater the risk, the greater the benefit.
Bruno:
Thank you. Wrapping grips really isn't that hard, and if you give it a try, I suspect you will be surprised with the results.
You are right that hand made things take a lot of time (I think I have 12-15 hours just in forging the blade; possibly triple that on the rest of the project). The real problem with this piece is that I didn't take that time, and assembled it before it was finished. That makes it harder to go back and fix it later.
I could probably grind it to the point where this blade is smooth, but the hammer marks are so deep that it would be about 1mm thick along its entire length. There isn't a real happy solution, and I think I will end up with a lot nicer product if I just put this one in the "humble pile" and use the knowledge gained on another piece. I would like to do something more historically based, anyway.
-Grey
"So long as I can keep the path of honor I am well content."
-Sir Arthur Conan Doyle, The White Company
|
|
|
|
|
|
|
You cannot post new topics in this forum
You cannot reply to topics in this forum
You cannot edit your posts in this forum
You cannot delete your posts in this forum
You cannot vote in polls in this forum
You cannot attach files in this forum
You can download files in this forum
|
All contents © Copyright 2003-2024 myArmoury.com — All rights reserved
Discussion forums powered by phpBB © The phpBB Group
Switch to the Basic Low-bandwidth Version of the forum
|

