| Author |
Message |
|
Patrick Kelly
|
 Posted: Sat 05 Nov, 2005 8:42 am Post subject: Posted: Sat 05 Nov, 2005 8:42 am Post subject: |
 |
|
Jeff,
I highly recommend purchasing The Anglo-Saxon Shield by I.P. Stephenson.
http://www.myArmoury.com/books/list.php
This is an excellent work with a huge amount of information on the "viking" style of shield. There's no historical basis for a plywood type of construction and the planks seem to have been butted together, and perhaps glued, with a leather covering.(although other covering materials may have been used as well) There is also no historical evidence for a metal reinforcement on the back of the shield. Several excavated shields that are well featured in most books (particularly one from the Gokstag find) have been reassembled using the modern addition of a circular metal band on the back of the shield to hold everything together. They have also used wooden dowels or slats for this purpose(on the same shield). These modern additions are often mis-interpreted as a period detail of construction.
A few shields of this type have metal rims, most notably the Sutton Hoo shield. However, this is not the heavy metal rim that you see on most cheap repro-shields. Some have a rim consisting of metal clips spaced around the circumference although the vast majority of found shield have no reinforcement on their rim. However, some do have holes bored evenly through the planks around the rim. This leads us to believe that some natural material was used as a rim binding, perhaps leather or even rawhide.
|
|
   |
 |
Chuck Russell

|
| Posted: Sat 05 Nov, 2005 10:07 am Post subject: |
|
|
dont have that one yet patrick. its on my wish list though.
now i was reading somewheres that the iron semicircle was part of the shield. prob a museum screw up.. it tends to happen.
now as to the plywood thing. the romans had ply shields. but its not as our modern plywood. strips of wood all glued together. there have been some shields discovered. its really kinda neat.
|
|
  |
|
|
Felix Wang
|
| Posted: Sat 05 Nov, 2005 10:11 am Post subject: |
|
|
|
Plywood type construction was known to the Romans, and there is some evidence it was known in medieval Norway, and was used in the Renaissance. As Patrick mentioned, Viking shields were planks with butt-joints between them, likely merely glued. I am aware of one medieval shield with dowels crossing the butt-joints, and Dickinson and Haerke cite one report of a bog-deposit shield (presumably Migration period, probably on the Continent) with dowels. The structure could be reinforced by covering the front and/or back with leather, or a non-metallic rim (held with clips, sewn in, or maybe with nails). In a small fraction of cases, the (metal) grip was extended at either end, which could result in an iron strip which spanned several planks. One English grave-find suggests a wooden bar across the back of a shield. These details come from Dickinson and Haerke's Early Anglo-Saxon Shields; a great monograph if you can find it.
|
|
|
|
|
|
Jeremy Borho
|
| Posted: Sat 16 Jun, 2007 11:28 pm Post subject: /bump |
|
|
Wow thanks so much for the information in the above posts guys, I couldn't get my head around how to make a shield press, and all my searchs till this point have been fruitless.
Good job 
|
|
|
|
|
|
Dakao Do
Location: Houston, TX Joined: 19 Feb 2007
Posts: 4
|
| Posted: Sun 25 Nov, 2007 5:37 am Post subject: Shield strapping |
|
|
So what about steaming / soaking the plywood in water beforehand to make it more pliable? Someone asked about it, but no one responded. I'd like to know too. Does it weaken the plywood unduly, which doesn't fully firm up after drying out? Would basting the whole thing in oodles of epoxy / glue help?
Boatbuilders use some 2-phase epoxies that seem like they'd fit the bill. Can be a bit expensive, but apparently, they're used as a wash over the entire surface. Once they soak in, they help with strength and waterproofing. I know this much <pinches fingers together> about formal woodworking, so what do I know?
| Jonathan Blair wrote: | | What about strapping? What's the best/most historically accurate means to attach arm straps and guige to the shield? My MRL heater shield uses something like a carriage bolt, but I doubt the historical veracity of carriage bolts to mount straps to the back. |
[People more knowledgeable than me, please forgive and correct any truly offensive errors I make below.]
Hi, Jonathan.
Two years later, I chime in with some help.
Consult Osprey's book, German Medieval Armies 1000 - 1300, p. 20. That gives 3 alternative possibilities of heater strapping as described by a 1958 PhD thesis from the University of Berlin. Accurate / reliable? Don't know. Sounds good? Sure!
Also, check out Osprey's book The Normans, 2006, by Gravett and Nicolle. This is a compilation of earlier books on the Normans, so if you can find any of the half-dozen books that were incorporated, you'll probably do nearly as well. In any case, pp. 75 and 86 give example illustrations of how to strap 1000 AD (round) and 1190 AD (flat-topped kite?) shields.
I regret I don't have a scanner, or else I'd crop out the relevant images and post 'em up. (Does that violate copyright law?)
I recommend looking at the German Armies book. Two of the solutions have 3 straps arranged in a neat-o canted zig-zag or near-zig-zag pattern, with a grip strap nearby. The straps look like an N-shape, with the grip strap above-right, parallel to the slash in the N.
Plus there's a guige strap.
It seems that the N arrangement permits putting the arm through at 15 degrees above horizontal (i.e. nearly level with the ground), or at 60+ degrees above horizontal (i.e. nearly vertically).
Not being a huge researcher into medieval artwork, I wildly and enthusiastically speculate that the arm itself may have been held vertically in any case, and that the top and bottom corners of the shield were angled in different configurations for different purposes due to the strap arrangement. Alternatively (and definitely not my first choice), the shield may have been held in a standard position, and the arm held in more horizontal or vertical positions (using one of the two strap choices) depending on how tired the user was. Maybe a horizontal hold actually conferred some shield-maneuvering advantage?
I've seen the upright Norman arrangement much more often, and don't have to speculate at all: One horizontal strap to rest on the elbow crook, and one or an X of straps to form the grip. A pad behind the hand and forearm to dampen shock.
Notes:
Don't forget the guige strap (the long one that goes around the neck / shoulder) -- takes a lot of the weight off the arm. Treat it like an assault weapon 3-point strap, wherein you can push the shield out into the desired position (for me, with elbow bent 90 degrees), letting strap tension take up part of the strain, instead of holding up the shield purely by main force of arm. (This is my experience -- others may differ)
The German 13th century solutions suggest D-ring buckles riveted to the shield surface with a metal or leather strip (rivets at ends of strips). Straps are then run through these buckles. Gives the straps some play, and helps with wear and tear (I find that straps directly riveted to the shield wear out a tad faster, near the rivet point).
Caveats:
Don't take any of this as canonical! Osprey's stuff looks very complete and plausible to the untrained eye (including mine), but it is not the word of the Almighty carved in stone. The illustration notes sometimes say that they throw in a fair dose of speculation. Also known as Scientific Wild-Assed Guesses.
That said, they include numerous actual in-period artwork, and some artist somewhere (Hook, Embleton, MacBride, et al) spent hours squinting at the fuzzy, centuries-old, stylized pictures, photos of statues, and in consultations with the authors coming up with reasonable guesses.
And, of course, any of this is probably better than a Home Depot carriage bolt.
Cheers,
Dakao
|
|
  |
|
Elling Polden

|
| Posted: Sun 25 Nov, 2007 6:06 am Post subject: |
|
|
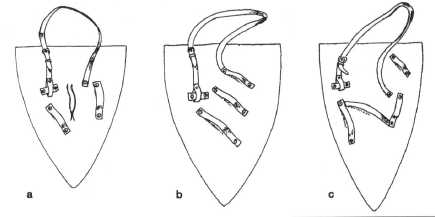
Attatching the picture in question.
The guige makes a lot of difference, Since you do not need to have the rear armstap in place at all.
Almost all the pictures of mounted knights show the left hand on the reins.
Consequently, a lot of these shields would have had straps that let you controll the shield with the left hand free.
Also note that the guiges are placed towards the center of the shield, so that it would rest on the shoulder, and the shield would follow your movement.
Another interesting strap arrangment from Edward the confesor, mid 13th c. ;

 Attachment: 9.86 KB Attachment: 9.86 KB
"this [fight] looks curious, almost like a game. See, they are looking around them before they fall, to find a dry spot to fall on, or they are falling on their shields. Can you see blood on their cloths and weapons? No. This must be trickery."
-Reidar Sendeman, from King Sverre's Saga, 1201
|
|
|
|
|
|
Nathan Gilleland
|
| Posted: Mon 02 Jun, 2008 8:15 am Post subject: |
|
|
This topic is amazing. I've been trying to make a wooden shield for years now when I stumbled across this. Right away I went out and bought 2 2x4 1/4 ash plywood and started my own kite shield.
I ended up using a large pine tree as my form.
4 straps curved it around the tree, and I let it sit for 24 hours. (I hated waiting!) 
The next day, I drew the outline of the kite and cut it out with my dad's jigsaw, and must say that, though I probably won't ever have a future in professional woodworking, I am quite pleased with the results.
Elling, thank you for the shield strapping diagrams. I notice that they seem to all be heater shaped shields in the pics. I would guess that the strapping would be viable and historically accurate (or at least plausible) for a kite-shield as well. Is this correct?
Seek Honor before Wealth,
Truth before Honor,
God Before all
|
|
|
|
|
|
Dakao Do
Location: Houston, TX Joined: 19 Feb 2007
Posts: 4
|
| Posted: Mon 02 Jun, 2008 11:57 am Post subject: |
|
|
[For some reason, I completely missed the subdiscussion on wetting / steaming / glueing plywood on the first page. Apologies to all for my inattentive question in my previous post.]
| Nathan Gilleland wrote: | | Elling, thank you for the shield strapping diagrams. I notice that they seem to all be heater shaped shields in the pics. I would guess that the strapping would be viable and historically accurate (or at least plausible) for a kite-shield as well. Is this correct? |
For a kite shield, you'd be casting back a couple centuries prior to the shorter heaters shown above. I'd vote no on using the later strap arrangements, but I'm not certain on that.
The only confirmed strapping arrangement I can give you is for a perfectly vertical arm. This can be seen in the Bayeux tapestry, among other period bits of art. I do know the vertical shield strapping arrangement can also be seen on some depictions of early heaters into the very late 1100s, FWIW.
[could someone check me on this: I thought that kite shields were primarily for cavalry, and anyone expecting to be on foot ought to use a round shield. Same vertical strapping arrangement as for the kite shield.]
At roughly the midpoint of the shield, you have a single strap running horizontally. (for the crook of the elbow)
Mounted on the shield itself and under the strap(s), running vertically for the length of the forearm and back of the hand, is a pad of leather (presumably stuffed with soft material) tacked to the shield. Thickness speculated to be anywhere from .25" to 1" (5 - 25 mm).
Towards the top of the shield, you have either one horizontal strap, a squashed X, or two horz straps vertically spaced apart 1-2" (25-50 mm). The latter two alternatives allow you to squeeze the grip and keep it under tension. Your shield fist should be at roughly the center of the kite shield's semicircular top.
When you hold your arm up in a reflexive stance, like a boxer's, the shield edge should cover most of your face / head, allowing you to quickly duck fully behind the shield or peer over the edge.
The guige strap is connected to points outside and slightly above the handgrip strap ends. Or alternatively, to the same connection points as the strap ends. If you go with the X or parallel strap grip, I'm not sure which strap ends double up with the guige strap ends.
[post becomes increasingly speculative and anecdotal beyond this point.]
I can't put much money on the strap attachment points, but your choices seem to be (as per Elling's attached illustration above from the German Medieval Armies Osprey book cited, as well as other references):
A) directly riveting the strap end to the wood
B) riveting a short (~3" / 75 mm) strip of leather to the wood at a 90-degree angle to the strap itself, which is looped around the strip and riveted to itself.
C) the metal version of B, with a metal (steel is easiest for us) ring attached to the wood (either via an eyehook or a metal strap riveted at each end, so as to pivot or swing), with the leather strap again looped through and riveted to itself
D) a metal ring is connected with a folded and riveted strip of metal to the strap end, and that ring is linked through a metal ring connected to the shield via C's method.
My impression is at least one guige strap end always used at least B.
Personal observations follow:
A is the easiest, but provides least mobility / wear and tear protection. If you use A, you will probably want to cut little squares of sheet steel and punch / drill a hole in them, to use as fat, thin washers on either side of your leather strap rivet. That way, the stress is distributed across the wood instead of creating points of high wear on your shield. Plus when you inevitably have to replace the straps, the wide washers will protect against errant grinding / drilling as you knock out your rivet. Putting washers is recommended for any rivets you put on your shield in any config anyway.
As a haphazard reenactor who prefers accuracy, but can be lazy about repairs and is comfortable with looking correct at 10-15 feet, I prefer version D on all my strap ends. I initially went with A on my grip straps to be accurate, but had to replace them somewhat often. On one occasion right after one such strap replacement, I caught a strike from the side directly on the shield rim, which ripped one of my brand new strap ends off.
Since I use 10-12 oz leather (3-5 mm thick?), I figured it wasn't really the fault of wimpy leather.
Using D has made my straps last a lot longer. <shrugs> Just my preference, and YMMV. I prefer the mid and late 15th century, so I'm not slavishly devoted to the Norman period -- it's just fun to visit.
As always, overly detailed and of dubious assistance / accuracy. I hope the reliable facts / historical evidence were clearly distinguished from my personal speculation. Since anyone closer than 50 feet can tell that I'm obviously Asian, and not of European descent, I don't think the casual observer will go on to criticize my choice of strap connections since I'm already blatantly historically inaccurate. :P At least 15th cen armor lets me cover up.
Cheers,
Dakao
|
|
|
|
|
Gavin Kisebach

|
| Posted: Mon 02 Jun, 2008 3:14 pm Post subject: |
|
|
| Quote: | | someone check me on this: I thought that kite shields were primarily for cavalry, and anyone expecting to be on foot ought to use a round shield. |
As the wise admin once said, "Context, context." What era, what area?
|
|
|
|
|
|
Kelly Powell
Location: lawrence, kansas Joined: 27 Feb 2008
Posts: 123
|
| Posted: Tue 03 Jun, 2008 4:16 am Post subject: |
|
|
|
Cav has to dismount and take buildings and stuff....and sometimes the terrain is just no damne good for horseys
|
|
|
|
|
Elling Polden
|
| Posted: Tue 03 Jun, 2008 8:09 am Post subject: |
|
|
Kites and heaters are used on foot as well; As far as I can gather, the notion that they are for cavalry use is just a result of the fact that almost all depictions of warriors from the 12th and 13th century show cavalry.
When infanfry ARE shown, they use the same shields as the knights.
In its conseption, the kite was a byzantine infantry shield. And, beeing civilized people, the Byzantines actually wrote down the measurements for their kites; 60x90 cm. (2x3 feet)
It appears later kites are longer, though.
"this [fight] looks curious, almost like a game. See, they are looking around them before they fall, to find a dry spot to fall on, or they are falling on their shields. Can you see blood on their cloths and weapons? No. This must be trickery."
-Reidar Sendeman, from King Sverre's Saga, 1201
|
|
|
|
|
Matthew D G

|
| Posted: Sat 28 Jun, 2008 8:12 am Post subject: |
|
|
Hello everyone, I've got a few questions
What kind of trim was used during the later medieval time, like during the crusades? I know rawhide was used for Viking shields but what was used after that?
Elling Polden said something about using canvas to make the shield tougher. Would you use only 1 layer of the canvas or would 2 or 3 layers be better?
How do you make a rivet or is it something you can buy at a hardware store?
"I thought what I'd do was, I'd pretend to be one of those deaf-mutes."
|
|
|
|
|
|
Kelly Powell
Location: lawrence, kansas Joined: 27 Feb 2008
Posts: 123
|
| Posted: Mon 30 Jun, 2008 1:32 am Post subject: |
|
|
|
I'm not a big fan of kites.....But I do know alot of people fight them too static.....you got to angle it out a little and be more aggressive with it.......hiding behind it pretty much guarantees a hocking stroke to the shield leg.....sca experience only
|
|
|
|
|
|
Johan S. Moen
Location: Kristiansand, Norway Joined: 26 Jan 2004
Posts: 259
|
| Posted: Mon 30 Jun, 2008 3:07 am Post subject: |
|
|
| Matthew D G wrote: |
Elling Polden said something about using canvas to make the shield tougher. Would you use only 1 layer of the canvas or would 2 or 3 layers be better?
|
I used 5 layers total on mine; 3 on the front, 2 on the back. Holds up pretty well, though the outermost layer does get scuff-marks easily. That's only a concern for a modern reenactment context though, as a shield was not exactly designed to last forever. I'd definately go for more than one layer though.
Next shield I make will either have 3 layers of canvas plus a good coat of gesso on the front, or be covered in rawhide and gesso. The gesso should at least make the paint-job look prettier, as the fiber structure of the linen shows through the paint even after being glued and sanded(I spent some 1-1,5 hour sanding each front layer...).
Johan Schubert Moen
|
|
|
|
|
|
Lafayette C Curtis
|
| Posted: Sat 05 Jul, 2008 6:17 am Post subject: |
|
|
| Johan S. Moen wrote: | | I used 5 layers total on mine; 3 on the front, 2 on the back. Holds up pretty well, though the outermost layer does get scuff-marks easily. That's only a concern for a modern reenactment context though, as a shield was not exactly designed to last forever. I'd definately go for more than one layer though. |
Wouldn't scuff-marks actually make the whole thing look more authentic--in the sense that it looks as if it has seen some actual use?
|
|
|
|
|
Matthew D G
|
| Posted: Mon 07 Jul, 2008 11:52 am Post subject: |
|
|
Thanks for the help with the canvas! I'll be using five layers on my heater/kite style shield, 3 on front 2 on back. Sadly I don't have a camera to take any pics with  . .
I'm still in the dark here about rivets so any help would be fantastic!
|
|
|
|
|
|
Johan S. Moen
Location: Kristiansand, Norway Joined: 26 Jan 2004
Posts: 259
|
| Posted: Mon 07 Jul, 2008 1:17 pm Post subject: |
|
|
| Lafayette C Curtis wrote: | | Johan S. Moen wrote: | | I used 5 layers total on mine; 3 on the front, 2 on the back. Holds up pretty well, though the outermost layer does get scuff-marks easily. That's only a concern for a modern reenactment context though, as a shield was not exactly designed to last forever. I'd definately go for more than one layer though. |
Wouldn't scuff-marks actually make the whole thing look more authentic--in the sense that it looks as if it has seen some actual use? |
Well, maybe. Although I do believe that a shield used in battle would have more than just a few scuff marks. Shields are disposable after all. Though, those of us doing reenactment prefer shields and other equipment that lasts...well, not eternally, but certainly as long as possible 
Johan Schubert Moen
|
|
|
|
|
Matthew D G
|
| Posted: Mon 18 Aug, 2008 9:26 am Post subject: |
|
|
Hello again!
Has anyone ever made a scottish targe? I've been looking to make one for the last few weeks but I'm a little stuck on how to make the handgrip.
Any pics, drawings, and suggestions would be very helpful
"I thought what I'd do was, I'd pretend to be one of those deaf-mutes."
|
|
|
|
|
|
James H.
|
| Posted: Fri 05 Sep, 2008 4:54 pm Post subject: |
|
|
I hope I am not resurrecting a dead horse here but I would like to make sure I have gathered the necessary information from this thread to make a functional and reasonably actuate historically heater shield.
My grocery list would be as follows: 3 boards of 3-4mm. Plywood (Ash or Birch if I can find it at Lowes) , Lots of wood glue thinned with water and a wide brush to evenly spread it (maybe a dowel?) , I have an old oil drum that I will use for curving the wood, 4 crank style belt straps, three pieces of 2x4 for bracing to prevent cracking and impressions left by the belts. The is a saddle and leather shop down the way from me and a tannery as well so I will get leather sheets from there. I will remember to be mindful of the direction of the grain of the wood before gluing and cutting. Am I right so far?
Now for questions: Is rawhide better for the edgings or is steel strips? Would tacks be best to hold the leather and edging on or rivets? And would canvas hold up as well on the front of the shield or would leather be better. And lastly, what is milk paint?
And lastly what would be the measurements for a heater shield? I am six feet tall, I believe my arms are 28in long with about 19 in from elbow to middle finger: at lest, from as good as I can measure it. Or does sizes pretty much come standard.
After the main part is done I will tackle the arm straps.
Thanks,
James H.
Attachment: 12.33 KB
|
|
|
|
|
|
Felix Wang
|
| Posted: Fri 05 Sep, 2008 5:38 pm Post subject: |
|
|
James H:
Answers to your questions depend on what the purpose of the shield is. As far as a shield rim is concerned, metal is impressive, but poorly documented; rawhide is easier to manage and historically reasonable. I have done rawhide, but not metal. A rim can be fastened with tacks; metal strips could be held by tacks or rivets; a rawhide rim could also be sewn on (this is historically likely, as the Gokstad shields had numerous small holes about the edge where a rim would be). This last method is easy to do - clamp the rawhide strips on the edge, let them dry, and then take a drill to the wood and through the rim. Then run waxed linen thread through the holes.
Canvas is fine for the front, historically speaking, or rawhide or leather could be used.
Milk paint is based on casein, a protein found in cows milk. It can be found on the Web.
Size of the shield depends on what you want it for. Historically, they tended to shrink; so earlier heaters might range up to 36 or 40 inches, later ones (most likely for horsemen) might be as little as 24 inches tall.
|
|
|
|
|
|
|
You cannot post new topics in this forum
You cannot reply to topics in this forum
You cannot edit your posts in this forum
You cannot delete your posts in this forum
You cannot vote in polls in this forum
You cannot attach files in this forum
You can download files in this forum
|
All contents © Copyright 2003-2024 myArmoury.com — All rights reserved
Discussion forums powered by phpBB © The phpBB Group
Switch to the Basic Low-bandwidth Version of the forum
|

