| Author |
Message |
|
Adam Simmonds
Location: Henley On Thames Joined: 10 Jun 2006
Posts: 169
|
 Posted: Sat 13 Jan, 2007 12:28 pm Post subject: Posted: Sat 13 Jan, 2007 12:28 pm Post subject: |
 |
|
hi there,
in Peter Johnson's informative picture (thanks Patrick) he states: "Use only vegetable tanned leather! not chromium tanned!"
But - why would this matter when the leather in question is only wrapped around the outside of the wooden core and so won't be coming in contact with the blade?
Is this stipulation for using "only vegetable tanned leather" solely a desire for historical authenticity or are there also more practical reasons for using said leather?
cheers, Adam
|
|
  |
 |
Chad Arnow
myArmoury Team


|
| Posted: Sat 13 Jan, 2007 1:09 pm Post subject: |
|
|
| Adam Simmonds wrote: | hi there,
in Peter Johnson's informative picture (thanks Patrick) he states: "Use only vegetable tanned leather! not chromium tanned!"
But - why would this matter when the leather in question is only wrapped around the outside of the wooden core and so won't be coming in contact with the blade?
Is this stipulation for using "only vegetable tanned leather" solely a desire for historical authenticity or are there also more practical reasons for using said leather?
cheers, Adam |
Even if it doesn't contact the blade it will likely contact the guard at the top of the scabbard.

ChadA
http://chadarnow.com/
|
|
  |
|
M. Eversberg II

|
| Posted: Sat 13 Jan, 2007 4:09 pm Post subject: |
|
|
| Grayson C. wrote: | | how would I go about hollowing out the wood? |
The guide I have reccomends using a CNC Mill, however those are rather on the pricer side.
If anyone is interested I could email you the guide -- it's for 14th century scabbards.
M.
|
|
    |
|
Jared Smith

|
| Posted: Sat 13 Jan, 2007 4:51 pm Post subject: |
|
|
The vegtable tanned leather (1.5 to 2 ounce weight calf leather preferred) has several useful characteristics not typical of the couch leather.
If you wet it (recommend 75% isopropal alcohol) you can get it to shrink a couple of percent. This makes it conform tightly to the core of the scabbard. It is also somewhat rigid after it dries, and takes a set. It will not tend to rotate around the core since it is set in its canoe like cross section form.
While it is damp, you can do a wide range of things. Prepare to spend a few hours seeing it through to completion of stiching and forming tasks though.. . It is much tougher and harder to stictch once it dries.
You can antique distress it (wad it up inside a canvass bag and bash it with a hammer.) Form it while wet and stiching around risers (glued cord underneath), and press it over embossed forms (can be made from similarly thin layers of the same leather glued to the core underneath the cover. It is also the right type of leather for incising thin line designs on while wetted. Despite this "abuse" it will accept leather dyes. You can use several hues of brown-reds if if going for the antique route.
Absence of evidence is not necessarily evidence of absence!
|
|
|
|
|
|
Hans Englund
|
| Posted: Sat 14 Apr, 2007 12:35 pm Post subject: |
|
|
I´m going to sew the leather around my scabbard but I think I need some pointers.
1. Which is the best way to measure the amount of leather needed? How is the pattern supposed to look like?
2. How do I start at the bottom? I am going to glue it on and stitch it together but it is a bit hard with the beginning. It makes a pointy end if I fold it and twist it 90 degrees. Is there a way of avoiding this? Hope you know what I mean.
I have some leather working experience but I really want to make this look perfect. I am not going to use a metal endpiece.
|
|
|
|
|
Jason G. Smith

|
| Posted: Sat 14 Apr, 2007 6:45 pm Post subject: |
|
|
|
Hey! Anyone have a high-res version of Peter Johnsson's primer? It's kinda hard to read as-is, and blown-up it ain't much better! Thanks.
|
|
|
|
|
Greyson Brown

|
| Posted: Sat 14 Apr, 2007 8:13 pm Post subject: |
|
|
| Hans Englund wrote: | | 1. Which is the best way to measure the amount of leather needed? How is the pattern supposed to look like? |
Length is pretty easy; just measure the length of the scabbard and add a little for the triangular flap at the mouth. You may also want to add about 1/4 inch, just to have a little extra, but the leather will also streatch a bit, so that would probably just end up being cut off.
For the diameter, the easiest way is to get a cloth measuring tape, and measure around the body of the scabbard core every few inches. You can also do the same thing, if you don't have a cloth tape, by wrapping a piece of cord around the core once, and then measuring that to see how much you will need. I find that the leather also tends to stretch in this direction, so you don't want to add any to this measurement. You may even need to trim a bit as you stitch, but don't get too carried away, as the leather will shrink back a bit as it dries, if you trim too much, you can get gaps.
| Quote: |
2. How do I start at the bottom? I am going to glue it on and stitch it together but it is a bit hard with the beginning. It makes a pointy end if I fold it and twist it 90 degrees. Is there a way of avoiding this? Hope you know what I mean. |
If I understand your question, it is a problem that I ran into at times. What I like to do is to cut the leather so that the bottom end is square, and also leave a little excess hanging off of the bottom (1/2 is on the long side of good). You should not need to calculate any excess into the length of the leather (except perhaps the previously mentioned 1/4 inch), as it will stretch enough to make up for this amount. By cutting the end square, you now have two corners that make good references for starting your stitch, and the excess allows you to pull the material just that much tighter before it reaches the body of the scabbard. Once you are finished stitching and are compressing the leather, you can revisit this spot and press down the excess so that it wraps around the bottom rather nicely.
| Quote: | | I am not going to use a metal endpiece. |
I would strongly recomend that you rethink that choice, as a scabbard without a chape (the metal endpiece) looks rather unfinished to my eye, and the chape will also help hide any fits you might have with starting the stitch. It also provides just a bit of protection to the end of the scabbard, which is the part most likely to whack or get whacked by something. That's mostly opinion, though.
| Jason G. Smith wrote: | | Hey! Anyone have a high-res version of Peter Johnsson's primer? It's kinda hard to read as-is, and blown-up it ain't much better! Thanks. |
That picture was originally posted by Patrick Kelly at 1275x1755 pixels. If that is what you have, then I'm not sure how to help you. Otherwise, it is posted and linked to several places within these forums. You can either do a search for posts about scabbards, or you can click on favourites at the top of the page, and check the scabbard related links there.*
*If you have set up your own favourites, these pages may or may not be listed in the favourites, but if you log out, they are listed there.
-Grey
"So long as I can keep the path of honor I am well content."
-Sir Arthur Conan Doyle, The White Company
|
|
|
|
|
Jason G. Smith
|
| Posted: Sun 15 Apr, 2007 7:56 am Post subject: |
|
|
|
The image I have (which I got from this thread) is 581x800 pixels. Nowhere near the res you mentioned. I'll look it up, though. And yeah, I do have my own faves...
|
|
|
|
|
M. Eversberg II
|
| Posted: Mon 08 Mar, 2010 7:05 am Post subject: |
|
|
Instead of making a new thread, I'm going to bump this old one. I've gotten a few requests here and there for the above mentioned PDF, but it requires a CNC machine. Most people don't have this. So, in the interest of passing along more information, I will link the following tutorial:
http://yeoldegaffers.com/project_scabbard.asp
This should be more useful to most people.
M.
This space for rent or lease.
|
|
|
|
|
Nathan Beal

|
| Posted: Mon 08 Mar, 2010 9:35 pm Post subject: |
|
|
| Grayson C. wrote: | | How would you carve the wood to perfectly fit the sword? It seems to me that there is no room for error and just the slightest tenth of a millimeter would make your scabbard loose. Personally, I want it so it will just barely hold on when tipped upside down and have absolutely no nottle when shaken. |
Simple answer is you don't, if the wood swells a little due to the atmosphere your blade will get stuck in and/or crack the scabbard.
What you may wish to do is line the scabbard with sheepskin (either just at the throat or the whole length), this increases the friction without relying on wood/metal contact.
HTH
N
Beware of dragons, for you are crunchy and good with ketchup.
|
|
|
|
|
|
Hadrian Coffin
Industry Professional
Location: Oxford, England Joined: 03 Apr 2008
Posts: 404
|
| Posted: Mon 08 Mar, 2010 10:33 pm Post subject: |
|
|
Hello,
I just thought I'd toss out a few tips...
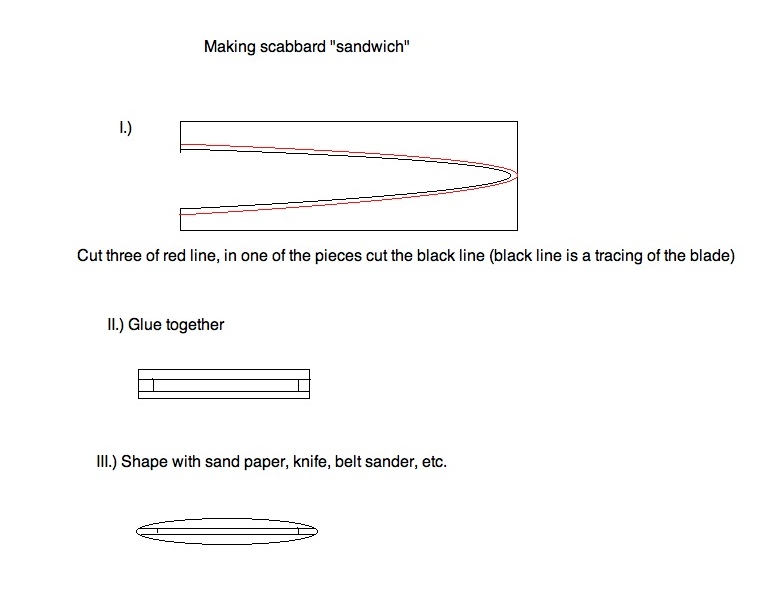
I. For "carving out the hollow for the blade": I used to use balsa wood, and carve out the hollow with a plane, stopping to check as I went. However I quickly found a far easier way, after purchasing an albion campaign line scabbard. Use three pieces of very thin wood, trace the blade shape onto one and cut it out, then cut the shape of the scabbard onto two other pieces. It is like making a sandwich. Finally carve the edges so it isn't "blocky".
II. For making the leather pattern: Simple, wrap masking tape around the core, cut down the middle, peel it off, stick to backside of leather.
III. For swelling/shrinking problems: I had this problem when shipping scabbards (especially between hot, cold, and humid states). The solution I found was to use a stabilized wood (such as plywood) and a glue that will not change in differing climates. The solution isn't exactly period, but it works.
Hope this helps!
Cheers,
Hadrian
 Attachment: 62.77 KB Attachment: 62.77 KB
Historia magistra vitae est
|
|
|
|
|
Julien M

|
| Posted: Tue 09 Mar, 2010 2:39 am Post subject: |
|
|
| Hadrian Coffin wrote: |
II. For making the leather pattern: Simple, wrap masking tape around the core, cut down the middle, peel it off, stick to backside of leather.
) |
Hey Hadrian, I like that...clever!
Thanks for sharing.
J
|
|
|
|
|
Jean Thibodeau

|
| Posted: Tue 09 Mar, 2010 7:40 am Post subject: |
|
|
One might even carve out a channel for a sword with a centre ridge and make the " box " even thinner before gluing the part together and end up with almost the same crossection that fully carving out the inside would have produces.
You can easily give up your freedom. You have to fight hard to get it back!
|
|
|
|
|
|
Austin D.G. Hill
|
|
|
|
|
Daniel Wallace

Location: Pennsylvania USA Joined: 07 Aug 2011
Posts: 580
|
| Posted: Wed 14 Sep, 2011 3:21 pm Post subject: |
|
|
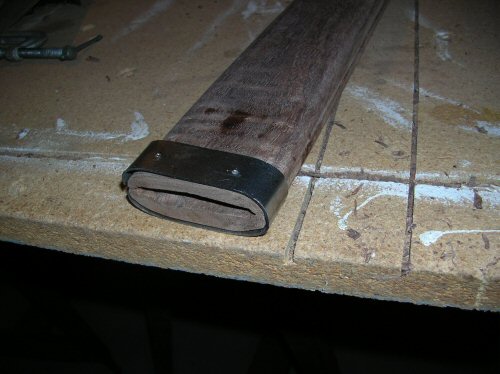
all the sheaths i've been making are wood without leather and i;ve always found that hollowing out the core fits tighter than bonding 3 pieces of wood together. it's actually pretty easy to do once you get the hand of pushing a wood chisel through the wood.
i basically start from where the bevel would be on the blade and setting the chisel at an angel start to dig into it. and also i would use a wood that is not very porous. (maple - cherry - walunt ) nothing like red oak (it will will feel tougher than the steel when trying to carve it) because your chisel will want to follow the grain patter on the wood.
if your going to cover the sheath with leather poplar is a good wood to start with, it's soft to cut, and considered a hard wood. once you have the 'negative' on the blades geometry layed on the on the cores it's a good idea to carve the walls of the sheath away from the blade a little. i've had experience when glueing the two halfs together with tightbond brand glue that if it oozed out into the core when you place your blade in the sheath it will tarnish the steel, so i always use a minimal amount of glue when putting the halfs together. and couple coats of poly will help seal the 2 pieces together too. as long as you carve out a little at a time the wood will hold the steel on the faces of the blade to have a tight fit.
sand the inner core very smooth - if you use something like maple (which is basically a hard as iron) it has the potential to make scuff marks on the blade. if you wanted to - you could carve out the core enough to add a liner in the sheath - but i've never had good experience with them. cracking and warpage - i've never had trouble with that either possibly because of how much sealer i put on my wood cores.
this is the best pic i have of my a&a sheath i made last year that you can see the bevels in the carving.
Attachment: 94.58 KB
|
|
|
|
|
|
Joss d'Azincourt
Location: AZINCOURT Joined: 31 Jan 2011
Posts: 1
|
| Posted: Mon 27 Feb, 2012 1:36 pm Post subject: |
|
|
I've read this topic with great interest !! It's an old topic but i'd like to know if the process presented by Mister Johnson is correct for end of 14th century ?
Many thanks !!! 
Joss d'Azincourt
|
|
|
|
|
|
George Hill
Location: Atlanta Ga Joined: 16 May 2005
Posts: 614
|
| Posted: Sun 08 Jan, 2017 11:52 pm Post subject: |
|
|
How are Chapes attached to scabbards? I imagine you fellows are using glue, but I haven't found any references on this question of scabbard construction.
I've been reading and searching the guides, but if this issue is addressed I've managed to miss it. I know many use superglue or wood glue to get the leather onto the core, but none of the guides address chape attachment, and what glues are appropriate.
To abandon your shield is the basest of crimes. - --Tacitus on Germania
|
|
|
|
|
Leo Todeschini
Industry Professional

|
| Posted: Mon 09 Jan, 2017 12:37 am Post subject: |
|
|
George Hill wrote | Quote: | | How are Chapes attached to scabbards? I imagine you fellows are using glue, but I haven't found any references on this question of scabbard construction. |
Generally they had a couple of nail holes near the top that had small pins inserted through to pin it to the core; it works but is not very secure. I actually don't know if they used glue, but they of course struggled to get glues to stick to metal, but a resin based 'adhesive' would mechanically fix the chape in place such as a slightly softened rosin or similar. Rosin mixed with a hint of beeswax works well and is period.
Regards
Tod
www.todsworkshop.com
www.todcutler.com
www.instagram.com/todsworkshop
https://www.facebook.com/TodsWorkshop
www.youtube.com/user/todsstuff1
|
|
|
|
|
Brian K.
Industry Professional

Location: Salt Lake City, Utah Joined: 01 Jan 2008
Posts: 727
|
| Posted: Mon 09 Jan, 2017 10:30 am Post subject: |
|
|
A properly sized scabbard end will actually provide a great 'friction' fit and if desired only a tiny bit of adhesive is needed to last a long time.
Brian Kunz
www.dbkcustomswords.com
|
|
|
|
|
|
Mark Moore
|
| Posted: Mon 09 Jan, 2017 10:45 am Post subject: |
|
|
I've often wondered.....Would it be feasible to veeery carefully measure a scabbard core, then veeeery carefully cut and stitch your leather INSIDE-OUT, then slip it on the core? Kinda like putting on a...uhh...condom?  Yes? No? Thoughts?...McM Yes? No? Thoughts?...McM
''Life is like a box of chocolates...'' --- F. Gump
|
|
|
|
|
|
|

