| Author |
Message |
M. Adair Orr

|
 Posted: Mon 02 Nov, 2020 9:00 am Post subject: 16th Century side-ring hilt - DIY project Posted: Mon 02 Nov, 2020 9:00 am Post subject: 16th Century side-ring hilt - DIY project |
 |
|
I've begun another project sword. This one is using the blade from a Windlass German Bastard Sword, an unknown old pommel and cross guard.
I ground three fullers in the blade and have begun dressing them with riffler files.
I filled some ugly details that were on the quillons with some weld beads and blended them in.
I turned some finals on a lathe, forged them to shape, then spliced them into the side rings for some added detail. I don't really have a historical precedent for this specific detail, but aesthetically I felt it needed something.
I plan on welding in a projecting tongue on the quillon block to give it some substance, you might be able to see the sharpie outline in one of the photos. This will give me some space for a bit more detailed file work.
I'm just improvising with this piece, making use of some pieces I had in the shop. I wish this was modelled after a specific historical piece.
-Adair
 Attachment: 298.42 KB Attachment: 298.42 KB
[ Download ]
 Attachment: 326.92 KB Attachment: 326.92 KB
[ Download ]
 Attachment: 316.69 KB Attachment: 316.69 KB
[ Download ]
|
|
  |
 |
M. Adair Orr

|
 Posted: Mon 02 Nov, 2020 10:08 am Post subject: Posted: Mon 02 Nov, 2020 10:08 am Post subject: |
 |
|
Crazy,
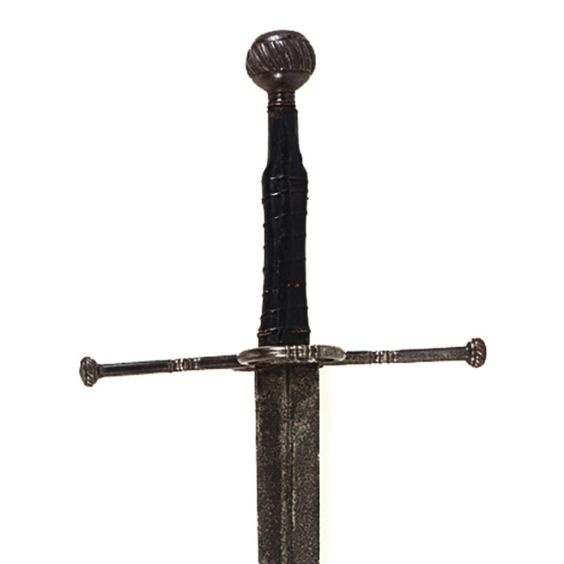
I was randomly searching pinterest this morning and found the exact hilt that the fittings I used must have tried to duplicate. It appears to be sword that sold at Sotheby's in 2007. I wish I'd have had this image before the weekend project.
http://www.sothebys.com/en/auctions/ecatalogu...t.980.html
 Attachment: 12.85 KB Attachment: 12.85 KB

|
|
  |
 |
|
Jeff Cierniak
Location: NE United States Joined: 17 Sep 2020
Posts: 79
|
 Posted: Mon 02 Nov, 2020 12:54 pm Post subject: Posted: Mon 02 Nov, 2020 12:54 pm Post subject: |
 |
|
I think it looks great. A bastard of a bastard sword at this point, eh?
Are you planning on finishing the grip more? I think a cord wrapped grip would really complete it, personally.
|
|
   |
 |
M. Adair Orr

|
 Posted: Mon 02 Nov, 2020 1:56 pm Post subject: Posted: Mon 02 Nov, 2020 1:56 pm Post subject: |
 |
|
Hi Jeff,
This is definitely an early stage, there is lots of work to be done including the chord wrap. The double bastard indeed. Thanks!
-A.
|
|
  |
 |
M. Adair Orr

|
 Posted: Sun 15 Nov, 2020 5:07 pm Post subject: Posted: Sun 15 Nov, 2020 5:07 pm Post subject: |
 |
|
Tonight I welded in an extension to the quillon block. I also built up some weld beads at the base of the side rings to make a tapered transition.
 Attachment: 262.96 KB Attachment: 262.96 KB
[ Download ]
 Attachment: 243.31 KB Attachment: 243.31 KB
[ Download ]
|
|
  |
 |
|
Jeff Cierniak
Location: NE United States Joined: 17 Sep 2020
Posts: 79
|
 Posted: Sun 15 Nov, 2020 5:55 pm Post subject: Posted: Sun 15 Nov, 2020 5:55 pm Post subject: |
 |
|
|
Looking good! I think that tapered transition will be a good call in the final product.
|
|
   |
 |
M. Adair Orr

|
 Posted: Tue 01 Jun, 2021 6:29 am Post subject: Posted: Tue 01 Jun, 2021 6:29 am Post subject: |
 |
|
I found time to pick up this project over the holiday weekend. I finished the guard with my finest files and a bit of emery paper. I then drove the guard on for final fitting and center punched around the tang. For patina I started with reverse electrolysis for a couple hours until the surface texture was fairly uniform. From there I used a vinegar and salt solution to advance the rust. I'm still exploring how much texture I want for the finish. I've been very curious how the welding on this project might become apparent when I began to deliberately corrode the piece. So far nothing is jumping out at me through the oxide.
 Attachment: 320.19 KB Attachment: 320.19 KB
[ Download ]
 Attachment: 487.7 KB Attachment: 487.7 KB
[ Download ]
 Attachment: 310.71 KB Attachment: 310.71 KB
[ Download ]
|
|
  |
 |
M. Adair Orr

|
 Posted: Thu 03 Jun, 2021 10:02 am Post subject: Posted: Thu 03 Jun, 2021 10:02 am Post subject: |
 |
|
To continue from the last post:
I continued to spray the sword lightly for a couple days. Every time the moisture evaporated I would hit it again. Below are the results after removing the loose oxide with steel wool.
My welds did react differently than the parent material in some instances. They don't show up in these photos but with some scrutiny the eye can pick them up. In the future I'll have to gas weld with matching filler material if I want to avoid this.
I think I went overboard with the reverse electrolysis. The process tended to pit in random areas even though I had anodes spread evenly along the work. No matter, it's all an enjoyable experiment. On the next project I'll have a bit more command of the techniques and be able to anticipate the results.
I'll wrap this grip and add it to the collection. I do like the aesthetic of visible tool marks, scratches and pitting on a satin grey surface.
 Attachment: 285.87 KB Attachment: 285.87 KB
[ Download ]
 Attachment: 314.5 KB Attachment: 314.5 KB
[ Download ]
 Attachment: 388.21 KB Attachment: 388.21 KB
[ Download ]
 Attachment: 403.27 KB Attachment: 403.27 KB
[ Download ]
 Attachment: 420.29 KB Attachment: 420.29 KB
[ Download ]
|
|
  |
 |
|
|

