| Author |
Message |
Leo Todeschini
Industry Professional

|
 Posted: Mon 08 Jun, 2015 12:42 pm Post subject: Seax of Beagnoth - WIP Posted: Mon 08 Jun, 2015 12:42 pm Post subject: Seax of Beagnoth - WIP |
 |
|
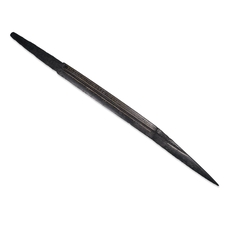
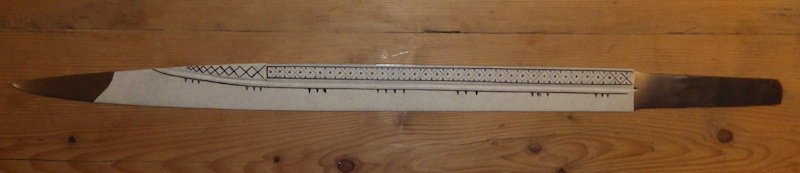
Possibly the most iconic seax is the Seax of Beagnoth in the British Museum and one I have wanted to reproduce for many years and I now have the opportunity thanks to an MA Alumni.
This is a classic 10thC Langseax with a 55cm/22" blade of the broken back type and is long and beautifully elegant. What really makes it stand out is the very elaborate Futhorc alphabet inlaid in wire on one side and the name Beagnoth on the other. There is considerable further wire inlay in geometric patterns on both sides of the blade as well as the spine.
The origin of the blade is most probably Kent as the only two renderings of the name in manuscripts are from Kent and the alphabet used, also best fits that from Southern England.
Thanks to Ryan Renfro who arranged a visit to the BM in December last year, both myself and Owen Bush were able to measure, handle and photograph the seax first hand and see the 'other' face that is almost never on display. We were also able to get a very close examination of the wire inlay. The inlay is executed in silver, brass and copper in what appears to be a fairly random manner, so that even parts of the same letter could have two different combinations of twisted wire. Although this appears random, it was deliberately done and was not, in our opinion, after use repairs. We have opted to try to replicate the inlay as faithfully as possible and this will include the apparently random materials choice.
We were also able to measure the section of the blade, which is an apple seed grind from edge to the fuller and again back toward the spine, so that the thickest section of the blade is right by the fuller, not at the edge as you may expect.
What is also interesting is that there is a partial break near the 'broken' part of the back that has caused the tip of the blade to rotate around. This means that the very distinctive and elegant form of the blade is in fact not what it would have looked like in life. We have opted to shape the blade more in line with how it would have originally been.
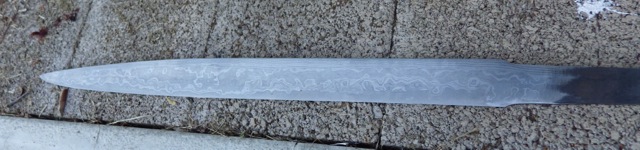
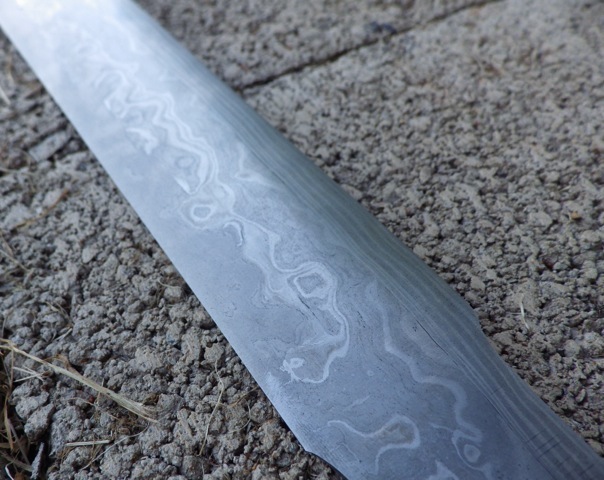
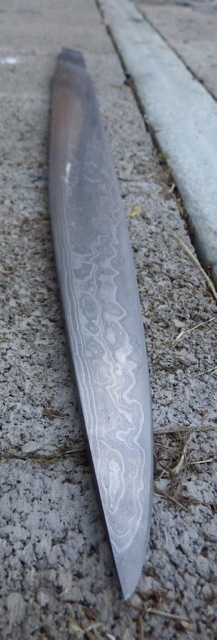
Completely unrelated to this visit my client contacted me to see if I was interested in making as faithful a reproduction as possible, a chance at which I jumped, and of course for me there would only be one person to contact for the blade, my old friend Owen. I discussed the project with Owen and my client and we settled on making the blade from bloomery steel that Owen smelted himself from a variety of ores. The blade construction and make up is Bloomery iron and bloomery steel, from 3 separate smelts. The steel is multiply folded magnetite bloom, circa 25,000 layers, and is a high carbon steel. Edge and body is a sandwich of high carbon bloomery steel (25,000 layer) with a mix of bloomery iron from a hematite smelt and bloomery iron from a siderite/magnetite smelt on the outside of the sandwich. The back edge is laid on its side and is again a mix of the iron and steel layers. Materials are derived from Wealden siderite from Kent, Swedish magnetite and hematite which is in fact American. The blade was then Oil hardened in high temperature oil, making for a tough and moderately hard blade, but not as remotely hard as modern steels.
We don't know the method of construction of the original piece, but Owen has followed an established method for knives of this period.
This construction method gives a distinctive look that shows through especially post etch, but this will be removed during the inlay process and can be returned by an etch after if required or the blade can be left plain; though general use will cause the pattern to show once more as the blade ages.
I have just received the blade and thought it would be good to share the process with you all, but believe me it will be drawn out. I have a deal of work ahead of this in the queue, but As the inlay will play merry hell with my fingers, I suspect I will dip in and out of this project over the next few months and then of course we have to decide on the handle and scabbard.....but that will come in time.
In the meantime here are some pictures of the blade as I have received it and the next step will of course be to cut the fuller in and then onto the inlay.
Tod
 Attachment: 7.24 KB Attachment: 7.24 KB
Attachment: 42.16 KB

Attachment: 50.85 KB
Attachment: 106.86 KB
Attachment: 57.77 KB
Attachment: 38.92 KB

Attachment: 111.93 KB
www.todsworkshop.com
www.todcutler.com
www.instagram.com/todsworkshop
https://www.facebook.com/TodsWorkshop
www.youtube.com/user/todsstuff1
|
|
   |
 |
Jerry Monaghan

|
| Posted: Mon 08 Jun, 2015 2:21 pm Post subject: |
|
|
Hi Tod
Looking forward to other up dates over the next few months love the blade Owen sounds like an other master piece.
Good luck in the coming months
Regards
Jerry Monaghan
|
|
|
|
|
|
Shawn Hatcher
|
| Posted: Mon 08 Jun, 2015 2:31 pm Post subject: |
|
|
Beautiful and ambitious project! Thank you for sharing. Looking forward to seeing more. 
www.hatcherknives.com
|
|
|
|
|
|
Robert Muse
|
| Posted: Mon 08 Jun, 2015 2:48 pm Post subject: Seax |
|
|
|
Well, I never expected to see this made in such detail. It would be the pride of anyone's collection.
|
|
|
|
|
|
Kevin Colwell
Industry Professional
|
| Posted: Tue 09 Jun, 2015 5:25 pm Post subject: |
|
|
Tod, I am looking forward to following this. You and Owen together, it should be very interesting. That bloomery material is beautiful! I am very interested in the inlay, and especially in the chisel/graver that you use to cut the lines. I am just now trying to add inlay to my own skill set, and it is challenging.
thanks for the detailed description to start the project. Take care,
Kevin
If there is a lower class, I am in it
If there is a criminal element, I am of it
If there is a soul in prison, I can not be free!
E V Debs
|
|
|
|
|
|
Jeremy V. Krause
|
| Posted: Mon 29 Jun, 2015 12:50 pm Post subject: |
|
|
I want to thank Tod and Owen for agreeing to take on this ambitious project for me.
Over the years my love of the seax has grown to equal my devotion to the sword. I am super eager to see this project develop and I know that the end result will be something special.
I will be completing a formal review for myArmoury when I receive the finished piece.
|
|
|
|
|
G Ezell
Industry Professional

|
| Posted: Mon 29 Jun, 2015 3:21 pm Post subject: |
|
|
Beautiful steel, it would be a shame not to have its character visible, though I'd think it would be best to keep it subtle... I am looking forward to this.
" I have found that it is very often the case that if you state some absolute rule of history, there will be an example, however extremely unusual, to break it."
Gabriel Lebec
https://www.facebook.com/relicforge
|
|
|
|
|
Sean Flynt

|
|
|
|
|
|
Patrick De Block
|
| Posted: Tue 03 Nov, 2015 10:59 am Post subject: |
|
|
'As the inlay will play merry hell with my fingers'
'but that will come in time.'
Isn't it time yet and how are your fingers?
Just very curious.
|
|
|
|
|
Leo Todeschini
Industry Professional
|
|
|
|
|
|
Jeremy V. Krause
|
| Posted: Tue 03 Nov, 2015 2:08 pm Post subject: |
|
|
| Leo Todeschini wrote: | Patrick wrote | Quote: | | Isn't it time yet and how are your fingers? |
Unfortunately, all manner of junk and some nice projects has kept me away from this so far, but it is sitting on my bench winking at me and its time will come.
Tod |
It's calling your name Tod. . . . .
|
|
|
|
|
|
Carl W.
|
| Posted: Tue 03 Nov, 2015 3:42 pm Post subject: |
|
|
| Leo Todeschini wrote: | | ... it is sitting on my bench winking at me and its time will come. |
| Jeremy V. Krause wrote: | | It's calling your name Tod. .. :) |
Jeremy, from my experience with Tod patience may really pay off. Thanks to you both & Owen for making a good try at this & sharing!
|
|
|
|
|
Leo Todeschini
Industry Professional
|
| Posted: Fri 04 Dec, 2015 4:53 pm Post subject: |
|
|
Well, it winked, I blinked and took up the next phase.
Not much to show really at this stage, but the real work starts next.
Originally the blade came to me etched up and looking lovely, but it still needed the fuller, so I cleaned it back for clarity, marked up the fuller and ground it in. Losing the etch doesn't matter at all, as the wire inlay is a messy process and it has to be reground and polished again after this.
My next step will be to run some wire inlay tests, to get a feel for the twist and the depth and will talk more about this in time, but plain wire inlay is not too tricky, but a twist is more so as the depth is important. That won't be until shortly before Christmas though.
Handling this blade again, reminds me of quite what a monster it is.
Tod
Attachment: 31.11 KB

Attachment: 43.82 KB

Attachment: 43.96 KB

www.todsworkshop.com
www.todcutler.com
www.instagram.com/todsworkshop
https://www.facebook.com/TodsWorkshop
www.youtube.com/user/todsstuff1
|
|
|
|
|
Leo Todeschini
Industry Professional
|
| Posted: Mon 21 Dec, 2015 9:05 am Post subject: |
|
|
The next step has begun now and that is to mark up the blade to get it ready for the inlay. I have covered the blade with masking tape and have drawn on one face and the spine where the inlay will go. The runes side will be harder and thats the next part to tackle.
What is already becoming evident is the slightly erratic nature of the inlay. There are 9 groups of lines on the spine, 8 of 2 lines and 1 of 3 lines and the seven groups of triangle dags under the fuller, 6 have 3 dags and 1 has 4 dags. This apparently haphazard layout will be a continuing theme...
Tod
Attachment: 47.75 KB
Attachment: 29.85 KB

www.todsworkshop.com
www.todcutler.com
www.instagram.com/todsworkshop
https://www.facebook.com/TodsWorkshop
www.youtube.com/user/todsstuff1
|
|
|
|
|
|
Tim Lison
|
| Posted: Mon 21 Dec, 2015 9:33 am Post subject: |
|
|
Oooo, that'll be a bit of work, won't it? I'm eagerly awaiting this one Tod. I think anyone who likes seaxes (and I do!) has to count this among their favorites. You and Owen have done a great job so far! That inlay will be  ! !
|
|
|
|
|
|
Patrick De Block
|
| Posted: Wed 23 Dec, 2015 4:32 am Post subject: |
|
|
|
My eyes are already blinking in anticipation.
|
|
|
|
|
|
Jeremy V. Krause
|
| Posted: Wed 23 Dec, 2015 8:11 am Post subject: |
|
|
What I look forward to is seeing the fairly half-hazzard nature of the inlay used. Some sections seem to be brass, some copper and some silver. Even along a single plane- the original shows use of different metals. It's almost as if the smith ran out of one type of metal or another and had to "make do".
I considered to have this inlay executed in a "perfected" manner- meaning using a consistent metal-inlay design, but Tod and I elected to reproduce this piece as seen on the original.
It is bound to have a really interesting presentation.
|
|
|
|
|
Leo Todeschini
Industry Professional
|
| Posted: Mon 04 Jan, 2016 2:35 am Post subject: |
|
|
Jeremy V Krause wrote | Quote: | What I look forward to is seeing the fairly half-hazzard nature of the inlay used. Some sections seem to be brass, some copper and some silver. Even along a single plane- the original shows use of different metals. It's almost as if the smith ran out of one type of metal or another and had to "make do".
I considered to have this inlay executed in a "perfected" manner- meaning using a consistent metal-inlay design, but Tod and I elected to reproduce this piece as seen on the original.
It is bound to have a really interesting presentation. |
This is an interesting area. When Owen and I handled the piece, it was a surprise for us both. I had obviously looked at the pictures, but just assumed that the inlay would be of one metal (or pair of metals) or failing that to have some apparent reason for using different metals. However it was simply not like this at all. Some areas like the longitudinal wire pairs under and above the fuller are made in shorter sections of silver and copper and copper and brass that has some reason in that they reasonably alternate. Other areas though really do seem to have no sense, so that the runes for example may have two or three different wire combinations in one rune and the next may be entirely of one combination. We were advised that this characteristic was evidence of post manufacture repairs and this is of course both possible and is a point for debate, however both Owen and I immediately dismissed this as a possibility in our opinions.
Why it was done like this I suspect will never be known, however I think there are a few options and feel free to discuss away.
1 Post manufacture repairs
2 Maker/buyer simply didn't care, so anything was slapped in the grooves
3 Some sort of ceremonial/religious/other significant reason for the wire choices
4 Maker was low on materials and went through the scrap bin using all the tiny bits up to create a blade with 'bling' at a low material cost
5 Other reasons
1 doesn't look like it was the case.
2 We all know the Vikings were pretty careful with their metal work, so 2 doesn't feel right
3 possibly
4 Some of the pieces are no more than 3mm/1/8"long ad so their use seems to me like a deliberate choice
So really not much wiser as far as I am concerned as none of the listed reasons really feel right to me, but both Jeremy and I felt that this aspect of the piece should be replicated.
So back to the making.
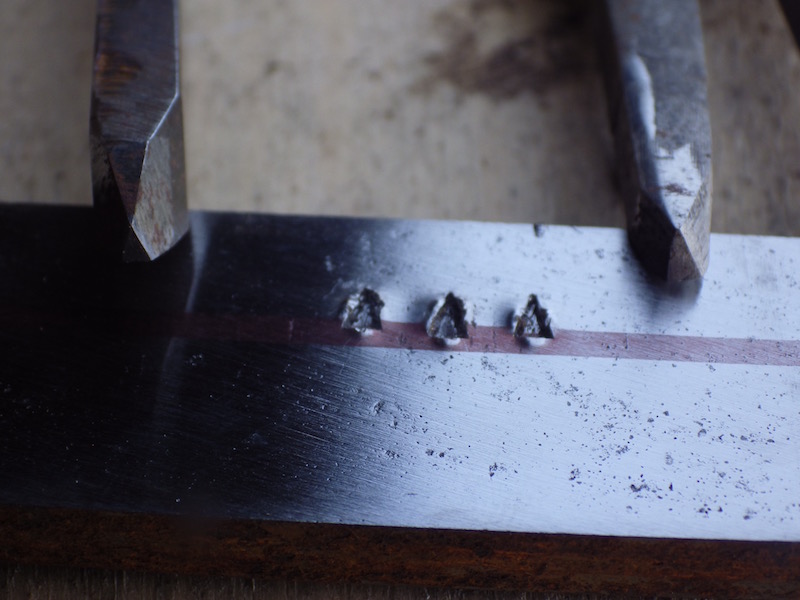
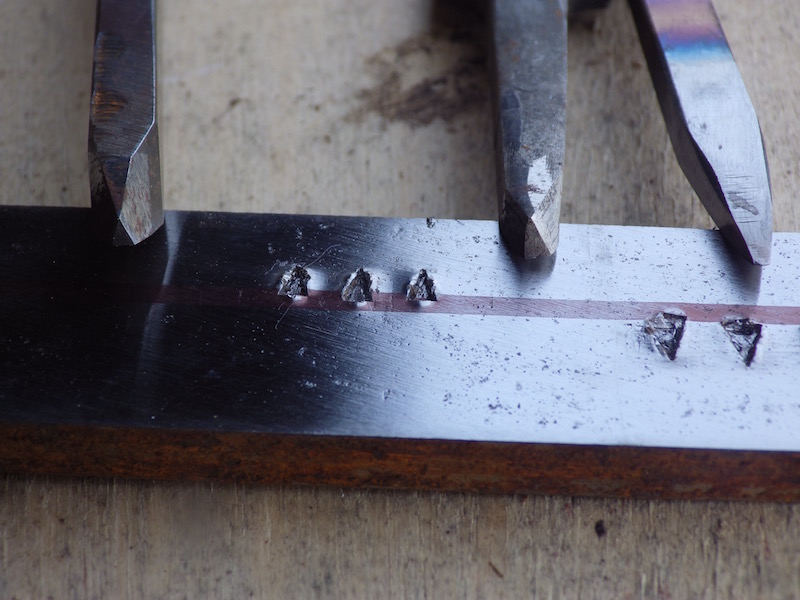
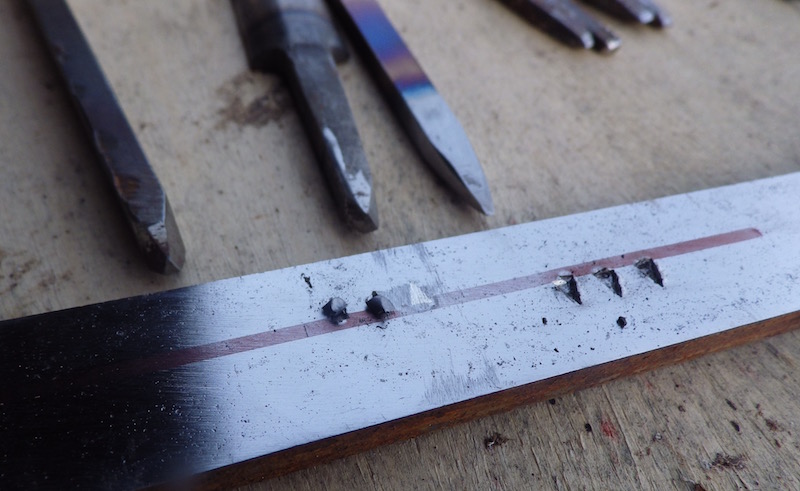
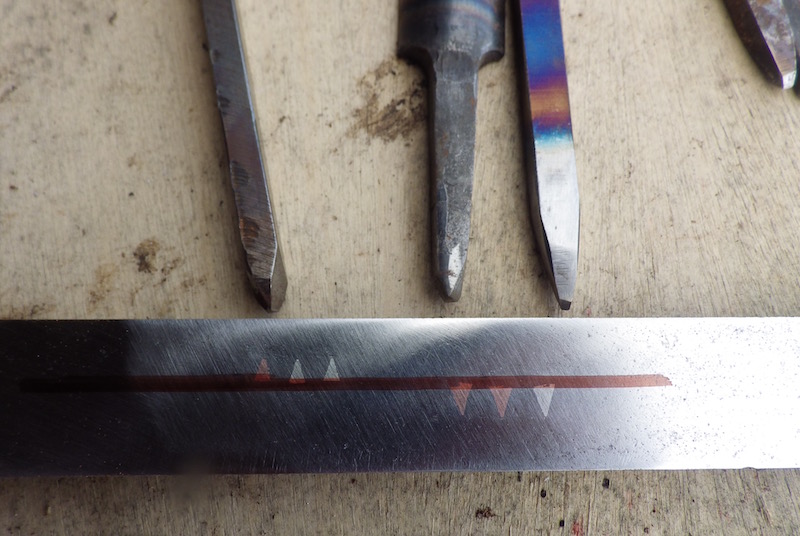
In its simplest manifestation, wire inlay is a relatively straightforward principle, but is also time consuming. A groove is chiseled into the metal by running along a drawn line with a very small chisel punching downward, this pushes the metal out sideways and a little upward, so that a lip is created at the top of the V. A small chisel is then tapped along each face of the V to create a small undercut. A round wire is annealed and placed onto the groove and tapped in with a small pin hammer. This pushes the wire into the groove and into the undercut. A rounded punch is then passed over the groove/wire and this drives the wire deeper into the V and also closes the lip partially over the wire. The process mechanically locks the wire in place, there is no soldering, welding or gluing.
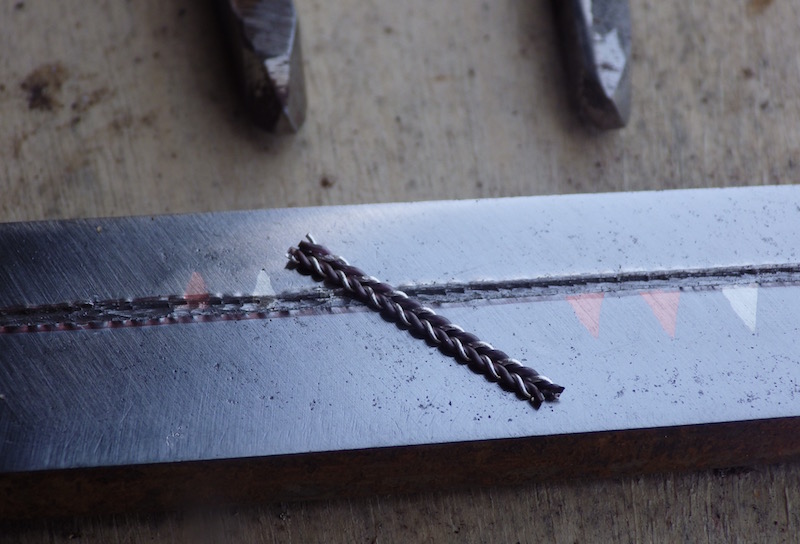
If you want a twisted wire then simply follow the same process and the hammering will perfectly squash the wire twists together so that it fills the groove with no gaps.
If you want a small plane like the triangles here, then a punch is used to punch the form directly down and then the faces undercut with a chisel and a small bead of annealed metal placed on the form and tapped down as before.
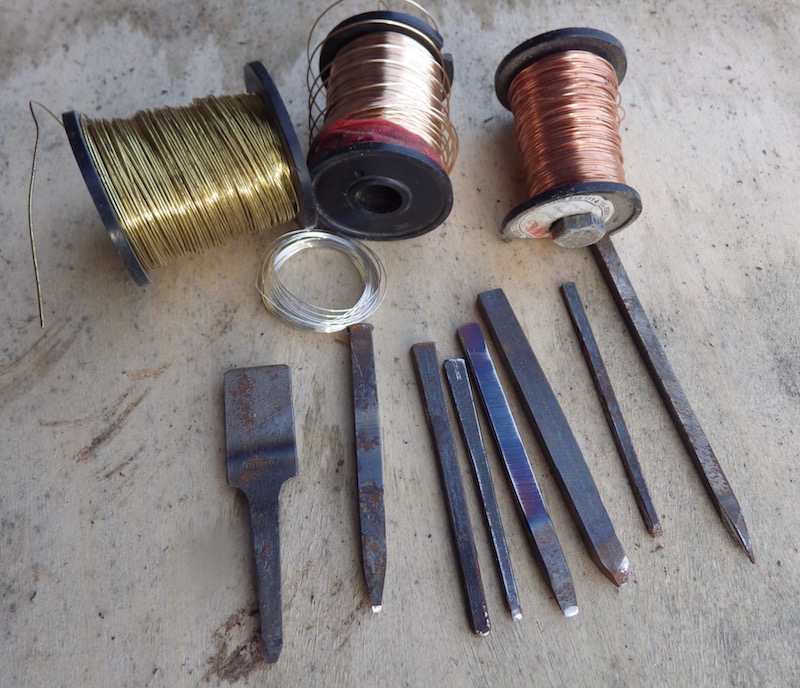
The punches are small and quick to make and so if you need a new tool for the job, then it is usually easier to make a new one than struggle on with what you have. Shape a piece of tool steel, get it red hot, quench and give it a very light temper to keep it really hard. If it breaks, reshape it and temper it a little softer next time.
Once the inlay is locked in, it will still be proud of the main surface (unless you have cut the grooves too deep) and so this must be ground off and the piece repolished.
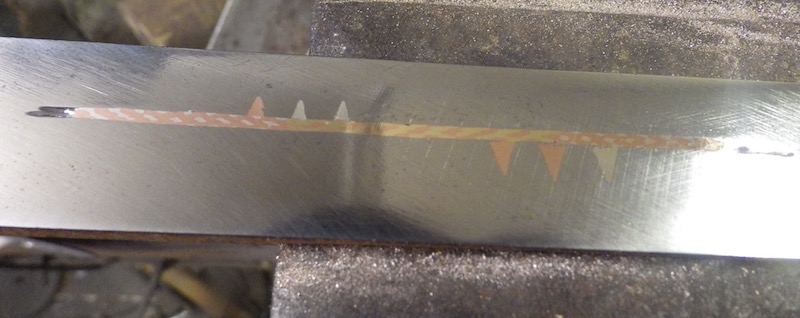
The pictures below show a mild steel test piece and the various steps for the principle inlays on this blade and also show the surface disruption caused by the punching and the undercutting. For an idea of scale, the bar is 25mm/1" wide and the wire is 0.5mm diameter. The chisel shown in these pictures was used for running the grooves in, but was in fact too wide for undercutting the Vs so I made a smaller one - its fiddly and slow work.
The eagle eyed amongst you may also spot the differences in the silver. If you look at the annealed silver beads used for the triangles, they are black (oxides) and when they are hammered in a polished they come up silver as you would expect. The annealed twisted silver/copper wires still show the silver as white/silver coloured, which when polished also come up silver. This colour difference is because the beads that I used for the triangles are Sterling silver and the wire was pure silver. When you heat Sterling the alloying metals will oxidise and leave the surface black whilst pure silver does not do this. There are a few differences between the two metals and there are plenty of reasons for using Sterling (which is 92.5% silver) but importantly it did not exist in Viking times.
Jeremy wants this piece to be right and there will be aspects of the build where we will discuss materials and may or may not compromise, but this aspect is an easy one to get right, so I will use pure silver for the triangles, not the rather handy thick wire I already had. If the piece is kept clean and oxide free a difference would never be seen, but if the piece is left to age a little then the Sterling does tend to discolour differently than pure.
I hope to start the inlay later this week or next and will update as I go.
Tod
Attachment: 187.29 KB
Attachment: 119.88 KB

Attachment: 99.39 KB
Attachment: 119.6 KB
Attachment: 103.48 KB
Attachment: 124.29 KB
Attachment: 109.49 KB
Attachment: 108.98 KB

Attachment: 71.53 KB
www.todsworkshop.com
www.todcutler.com
www.instagram.com/todsworkshop
https://www.facebook.com/TodsWorkshop
www.youtube.com/user/todsstuff1
|
|
|
|
|
|
Tim Lison
|
| Posted: Mon 04 Jan, 2016 9:50 am Post subject: |
|
|
|
Oh man! This is gonna be really great when it's done!!!! The test piece already looks so cool. It will definitely have "bling"!
|
|
|
|
|
Daniel Wallace

|
| Posted: Tue 05 Jan, 2016 7:52 am Post subject: |
|
|
your inlay line are so clean I'm jelious! I love to do inlay, just so time consuming.
I've made my own inlay tools from spring steel - which cutting into mile steel works ok. what I didn't get right was the angle of the bevels so my cuts really dig instead of shave material away. I see some old file there in your pics, I think I'm going to repurpose one of my old ones now!
|
|
|
|
|
|
|

