| Author |
Message |
Quinn W.

Location: Bellingham, WA Joined: 02 May 2009
Posts: 197
|
 Posted: Thu 16 Jan, 2014 10:52 pm Post subject: Scabbard and Other Leather Projects Posted: Thu 16 Jan, 2014 10:52 pm Post subject: Scabbard and Other Leather Projects |
 |
|
Hello all,
I've taken in so much helpful information on making my own gear but I've never really taken the time to show off any of the results. I play the role of a late 14th century leather worker at Camlann Medieval Village in Washington state and I've spent the past couple of months attempting to put together a wide enough variety of objects to give the public a good idea of the craft.
Since this is for educational purposes, it would be great if I could get some feedback on what is and isn't period appropriate so I can be aware of any shortcomings in my presentation.
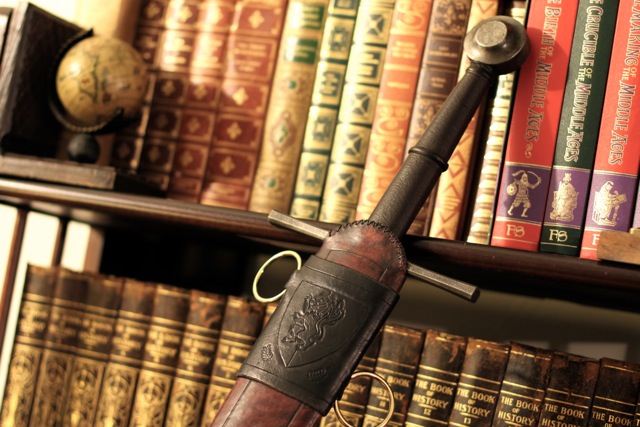
First, the scabbard.
It's for an Albion Crecy with aged furniture and dark brown grip.
I used the carved core method on some poplar ($17 for two 1/4" slats at Home Depot) and chisled it down, then hit the ouside with a belt sander. It's laced up the back with a typical X-stitch.
One really odd thing I experienced was with the fit. When I glued it together I discovered that it was much to tight - I could draw it, but it took some serious effort. Then while stitching the leather I heard a little crack and then it instantly got quite loose! Not rattling, but I couldn't hold it upside-down any more. By the time I finished stitching it seemed to find a nice middle ground and is now perfect. Is this at all normal?
Anyway, the late 14th century is a really tricky period to get info on. Too late for the laced style of suspension you see on 13th c stuff but to early for the knotted style that's so common in 15th c examples. I did manage to find a few examples of lockets, but my metalwork abilities are iffy so I tried a leather alternative. I don't know if there is a precedent for this but the design was simple and it functions in about the same way. The rings are a little too big but they're what I had on hand and I can always switch them out later.
No chape yet, but I'll either buy or make one soon enough. I used antique gel instead of my normal dye method, and the result was a little more extreme than I expected, but it's cool and interesting in its own way.
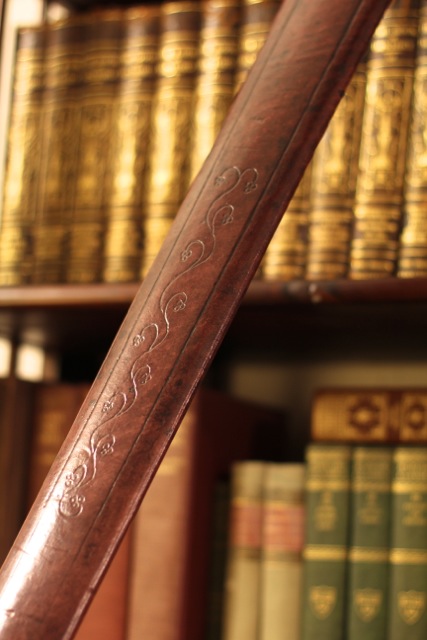
I don't see a lot of examples of tooling on period scabbards, but I couldn't help myself so there you have it 
Vine work was inspired by the some of the borders on the lutrell psalter.
Next up is the belt for it! Shouldn't take long but I may need to order some period buckles.
 Attachment: 125.99 KB Attachment: 125.99 KB

Attachment: 110.31 KB
Attachment: 72.74 KB
"Some say that the age of chivalry is past, that the spirit of romance is dead. The age of chivalry is never past, so long as there is a wrong left unredressed on earth"
|
|
   |
 |
Quinn W.
Location: Bellingham, WA Joined: 02 May 2009
Posts: 197
|
| Posted: Thu 16 Jan, 2014 11:05 pm Post subject: |
|
|
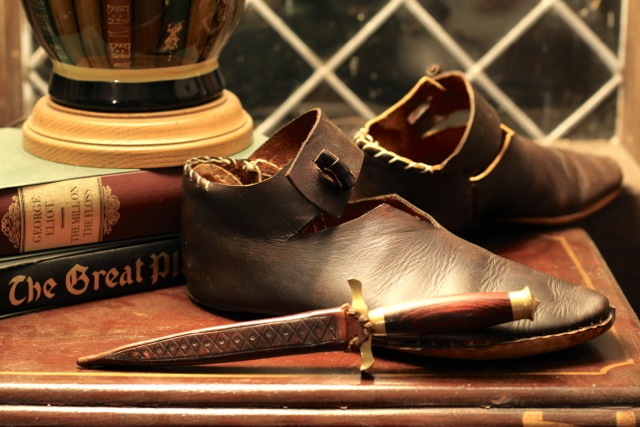
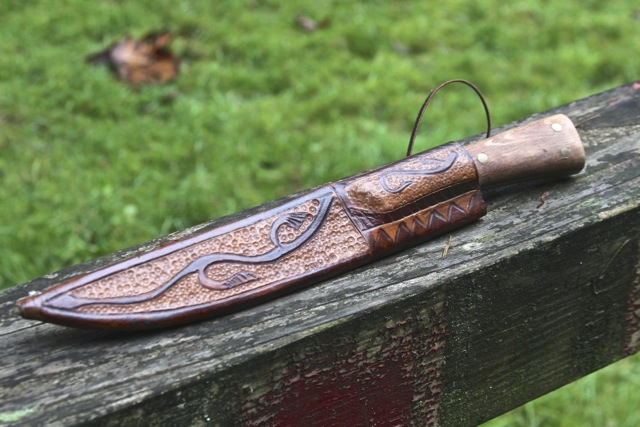
Next, two knife scabbards, a water bottle and a pair of shoes!
Shoes are a direct copy of an example from 'Shoes and Pattens' and the more intricate knife is a copy from 'Knives and Scabbards,' although I don't know if the original was dual-colored.
The other scabbard is for a cheap stainless knife I bought at a ren fair. It's not inspired by anything in particular but hopefully would fit in with more period stuff.
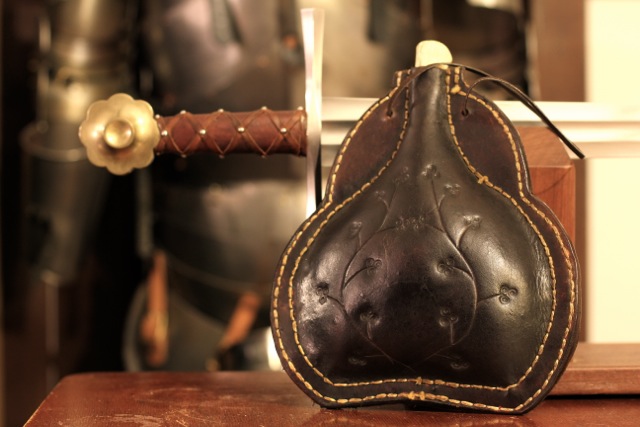
The water bottle is 3 layers of leather (Two sides and a middle lining around the edge) and sealed with beeswax on the inside. I'm less sure about this one historically. I know of a few 14th c examples but nothing from my period. Does anyone have any period examples or artwork for leather bottles like this? The instructions I also found online. The site said it was accurate but I didn't check to confirm.
The design on the front is just improvised freehand to match the scabbard.
I've had some experience with leather before but this has been my first intro into period designs and methods. Demonstrating for the public is a fun challenge as well since I can't use paper stencils or anything like that. It's a lot harder to record measurements for shoes when your character isn't literate!
I just want to thank again those who contributed their knowledge on leather and scabbards here in the forum. The DIY section was a great source of courage to stop drooling over other people's stuff and try it out for myself!
Cheers,
Quinn
Attachment: 97.52 KB
Attachment: 75.52 KB
Attachment: 96.44 KB
"Some say that the age of chivalry is past, that the spirit of romance is dead. The age of chivalry is never past, so long as there is a wrong left unredressed on earth"
|
|
|
|
|
Bjorn Hagstrom

|
| Posted: Fri 17 Jan, 2014 1:03 am Post subject: |
|
|
The only two sources I know for leather bottles (or costrels) is the Mary Rose example and images from Gastons "Livre de Chasse" (I have made repros of both) outside of your time period and of different design, though. But great work nonetheless.
I see a lot of leather bottles at markets that have that gourde-shape, and I have always wondered if it is a reenactorism or what the sources are for them. Would love if someone could chip in on that.
Edit: Indeed there is a Mary Rose bottle with that shape as well as the "horisontal tubular" shaped one. Check that out!
http://sevenstarwheel.files.wordpress.com/2011/11/mr-81a12218.jpg
The shoes looks very nice indeed!
There is nothing quite as sad as a one man conga-line...
|
|
 |
|
Bryan Heff

|
| Posted: Fri 17 Jan, 2014 3:50 am Post subject: |
|
|
|
Your Crecy scabbard is excellent. I love that ever so slightly mottled brown color you have. Looks great. I have found that when building the wood core, its a very fine line to get the tightness correct, and once fully glued together I have found it is tighter than when test fitting, which I suppose makes sense. Don't know if there is a tried and true method that gets you great results every time on fit. My "cheat" method is I line the core with wool felt. It gives just the right amount of spongy material inside to cushion and grip the blade, nice and firm and super snug without having a perfectly sized inner core. I have had good results with the lining method personally. Plus you get the added bonus of a really smooth draw.
|
|
|
|
|
J. Hargis

|
| Posted: Fri 17 Jan, 2014 6:49 pm Post subject: |
|
|
Quinn,
Looking good, thanks for the photos. Without a doubt you're on your way. Nice work, keep at it.
Jon
A poorly maintained weapon is likely to belong to an unsafe and careless fighter.
|
|
|
|
|
Quinn W.
Location: Bellingham, WA Joined: 02 May 2009
Posts: 197
|
| Posted: Fri 17 Jan, 2014 7:14 pm Post subject: |
|
|
Thanks Bjorn, I wasn't sure about the bottle but it seemed like a worthwhile project even if I can't use it for my 14th c kit. It was my first time sewing through three layers of thick leather so it was a learning eperience if nothing else. Nice to know there's at least some basis for it, though.
Bryan, I'm probably going to make a scabbard for my Chevalier next, so I may give the lining trick a shot. Sounds fancy! Although I know it's tough to find historic info on that sort of thing since linings probably tend not to last as well.
"Some say that the age of chivalry is past, that the spirit of romance is dead. The age of chivalry is never past, so long as there is a wrong left unredressed on earth"
|
|
|
|
|
Matthew Bunker

Location: Somerset UK Joined: 02 Apr 2009
Posts: 483
|
| Posted: Sat 18 Jan, 2014 7:03 am Post subject: |
|
|
Something you might want to look into, to add depth to the character, is the fact that to be doing that sort of fine work you would have been a guild member. If you weren't then, as a leatherworker, the Guild of Cordwainers would have paid you a visit.
As a member of the Guild of Cordwainers, you would have made shoes, scabbards, sheaths etc but wouldn't have made belts (including sword belts) as that was reserved for members of the Guild of Girdlers. You wouldn't be allowed to make gloves either.
You'd only have bought your leather from members of the Guild of Leather sellers and they in turn would only have been able to buy their tanned skins from members of the Guild of Curriers.
Very important stuff in the high medieval period, the Guild system.
"If a Greek can do it, two Englishman certainly can !"
|
|
|
|
|
Quinn W.
Location: Bellingham, WA Joined: 02 May 2009
Posts: 197
|
| Posted: Sat 18 Jan, 2014 1:49 pm Post subject: |
|
|
That's really interesting! I'll have to tell people my belt was outsourced, then. So would the guild system have been pretty universal? Would it also apply to smaller villages or is that more for cities and proper towns? Or perhaps being a craftsman sort of necessitates living in a place large enough to support a guild system. That's an angle I haven't spent as much time considering so thanks for the heads up!
"Some say that the age of chivalry is past, that the spirit of romance is dead. The age of chivalry is never past, so long as there is a wrong left unredressed on earth"
|
|
|
|
|
Dean F. Marino

Location: Midland MI USA Joined: 24 Aug 2011
Posts: 229
|
| Posted: Sat 18 Jan, 2014 1:51 pm Post subject: |
|
|
I have two FREE PDF tutorials available... one on Making a Scabbard Core with a Router, one on Wrapping a scabbard core. You CLEARLY don't need the second one  (in fact, I wish an expert of your level would WRITE a far better tutorial than mine ). (in fact, I wish an expert of your level would WRITE a far better tutorial than mine ).
Making a poplar core....
http://findlithui.deanandsandy.dyndns.org:808...ter1.2.pdf
In edhil, hai edhil. In edain, hai edain.
|
|
|
|
|
Johan Gemvik

|
| Posted: Sat 18 Jan, 2014 5:02 pm Post subject: |
|
|
The sword scabbard and the knife sheaths are just excellent!
"The Dwarf sees farther than the Giant when he has the giant's shoulder to mount on" -Coleridge
|
|
|
|
|
Harry Marinakis

|
| Posted: Sat 18 Jan, 2014 11:40 pm Post subject: |
|
|
|
So when can you get me into your work queue for a scabbard for my Albion Landgraf?
|
|
|
|
|
Matthew Bunker
Location: Somerset UK Joined: 02 Apr 2009
Posts: 483
|
| Posted: Sun 19 Jan, 2014 1:23 am Post subject: |
|
|
| Quinn W. wrote: | | Or perhaps being a craftsman sort of necessitates living in a place large enough to support a guild system. ! |
Exactly. Firstly, in order to learn the skills, you'd need to have been taken into the guild as a young apprentice, otherwise you'd spend most of your time just working in the fields in order to feed yourself. You wouldn't have had the luxury of free time, nor would you have had access to the means of learning those skills, or the tools that you'd need in order to execute the work.
Secondly, as you say, you need to be living somewhere that would generate enough trade to allow you to make money. Demand for high end leather goods would be extremely limited unless you were living in a larger town.
"If a Greek can do it, two Englishman certainly can !"
|
|
|
|
|
Quinn W.
Location: Bellingham, WA Joined: 02 May 2009
Posts: 197
|
| Posted: Mon 20 Jan, 2014 1:40 pm Post subject: |
|
|
That makes sense, Matthew. So guilds wouldn't be common in smaller villages... but then again neither would skilled craftsmen, so it's a moot point really. I'll have to make sure my character is consistent so thanks again for bringing that up!
| Harry Marinakis wrote: | | So when can you get me into your work queue for a scabbard for my Albion Landgraf? |
Well I spend most of my time making stuff either for myself or bartering with the other re-enactors I work with (that's how I got most of my soft kit). I haven't really considered expanding operations beyond that but you know, never say never...
| Dean F. Marino wrote: |
I have two FREE PDF tutorials available... one on Making a Scabbard Core with a Router, one on Wrapping a scabbard core. You CLEARLY don't need the second one Happy (in fact, I wish an expert of your level would WRITE a far better tutorial than mine Happy). |
I enjoyed doing things the old fashioned way but if I ever start making these in larger quantities that sounds like it would be way more efficient. As for wrapping, well you kind of got me there! The reason I didn't show a back view is because my stitch is pretty meandering. It's clean, just not straight. For the sake of education I'll swallow my pride and give you guys a back view when I have the time to get some pictures together.
To be honest, while I hadn't looked at your wrapping guide before I started this one I don't have much to add. I used the ye olde gaffer guide which is incredibly vague when it gets to the wrapping part but since I had experience with leather I felt I could more or less wing it.
I might try writing something down the road but until then I guess I could just add what comments I have to yours:
(CAUTION, WALL OF TEXT AHEAD!)
I would add myself to the list of people who swear by veg tan for this sort of work. While I'm sure upholstery grade leather is functional for this sort of thing it is not period and just looks very obviously modern in my eyes. It doesn't shape as well, doesn't dye as well, is harder to apply finishes to, and like you mentioned it can't be tooled. If it's what you've got by all means use it, but if you have a choice it's a no-brainer in my opinion. Between the wood and the leather I spent about $50 so it's really not a big investment for what you get at the end of the day.
The tools I use are:
A punch awl. The awl you featured in your guide is actually a scratch awl. It works for punching holes but that's not what it's designed for and I think you'll find a proper hole punch awl will be easier on your wrists. Plus you can get them with a diamond cross section which is more historically correct and also allows the hole to close back in around your thread over time.
A multi-hole punch. It's a little slower than the stitching wheel but the wholes can go a little deeper (or all the way through) which makes it easier to punch through when you're going over it with your awl. A little harder to to curves but that's less important here. Both tools work well, though so it's really just preference.
Waxed thread and leather needles, more or less the same as the ones you used in your PDF.
The main reason I didn't add risers is because I pre-cut my leather to shape beforehand, and ended up being a little too accurate... so I didn't give myself any extra room for the risers. Next time I'll give myself some breathing space.
One thing I did differently is that I didn't use glue. Even without it there is no way my wrap is going to fall off or anything, so I do not believe it is necessary for strength. Additionally, if I ever wanted to re-wrap it for any reason all I need to do is cut the stitches and I'm back to a pristine core. The only thing I would say the glue is helpful for would be to keep the center line in place. Like I mentioned, my back stitch is a little crooked toward the tip and I bet a few little dabs of glue would have been enough to keep it where it was supposed to be until I finished stitching. That being said, I also neglected to draw a center line on the core or leather and I bet that would have solved the problem by itself. So I would say a light amount of glue could be helpful for alignment (but still optional) and not at all necessary for grip or strength.
While I didn't do risers this time, based on my previous leatherworking experience I don't think glue would be needed there either except maybe right around the throat. This is also assuming you're using damp veg-tan leather which stretches nicely and also holds its shape once it dries, minus a little shrinkage which in this case only causes it to grip more. Upholstery leather does not hold a shape so in this case glue would be needed for definition on the risers. The faster it veg-tan dries the more ridged it becomes and the more it shrinks, ie the more tightly it holds to the wood. So use a hairdryer or put it near a heater if you're nervous.
In terms of cutting and measuring, your guide sounds great, especially when you get right down toward the point which I also struggled with a bit, although once I add a chape it won't really matter. I was very unscientific about it in general as I generally prefer to go by feel, which I'd like to think is
the period approach as well. It worked out for me but I realize not everybody operates that way. Again, in hindsight a centerline would have been really useful but mostly just to straighten out my back stitch.
When I do demos I use beeswax to finish my products. When I'm not, I find fiebing's leather balms with atom wax is a convincing substitute but is much easier to apply. Conversely for a less flashy, more functional look I avoid wax and instead use boiled and strained goose grease as an authentic finish during demos (I just strain out the drippings from the annual Christmas goose, although note that your product will smell like goose for about a week). Otherwise neatsfoot oil and mink oil give a nice mild finish without the smell. They also keep the leather supple and add a mild level of water resistance.
Hope that helps! I'll see if I can get those pictures up soon and I'm happy to answer what questions I can.
"Some say that the age of chivalry is past, that the spirit of romance is dead. The age of chivalry is never past, so long as there is a wrong left unredressed on earth"
|
|
|
|
|
|
|
You cannot post new topics in this forum
You cannot reply to topics in this forum
You cannot edit your posts in this forum
You cannot delete your posts in this forum
You cannot vote in polls in this forum
You cannot attach files in this forum
You can download files in this forum
|
All contents © Copyright 2003-2026 myArmoury.com — All rights reserved
Discussion forums powered by phpBB © The phpBB Group
Switch to the Basic Low-bandwidth Version of the forum
|

